Good night) I can’t sleep, I was sitting making a diagram for connecting additional buttons and closers.
The standard electrical circuit of the ESP (electric windows) of the VAZ 2110 looks like this
I made it into what I needed using PAINTa))
Designations on the diagram: 1) “Black box” (where the relays and fuses are) 2) Ignition switch 3) ESP button of the front right door 4) ESP button of the right rear door 5) ESP gearmotor of the front right door 6) ESP gearmotor rear right door 7) ESP gearmotor of the front left door ESP gearmotor of the driver's door 9) ESP button of the left rear door 10) ESP button of the driver's door 11) Relay for turning on the buttons from the ignition 12) Button for blocking the buttons in the passenger doors 13) Locking relay buttons in passenger doors
Something like this. .I hope experienced electricians will appreciate my work, and if they find a mistake, they will tell me... I don’t pretend that the diagram is 100% correct, I will assemble it according to it, if everything goes well, then naturally the result will be here)
And another question: should the buttons on the tunnel also be run through the blocking relay, i.e. so that only the buttons in the driver's door work or not...
PS in the diagram the buttons in the driver's door and on the tunnel are not blocked.
If it’s not difficult, please rate me in the comments, and if anything is not clear, questions are welcome)))
Selecting window regulators for installation on a VAZ-2110
If you want to install electric windows on your car, you will first need to choose the most reliable device that will serve for many years without causing any problems. On the modern market you can find the following options:
- traditional cable structures, which are relatively easy to install, but differ from others by not having a very long service life, wear out quickly;
- strip devices that are not very convenient to use;
- rack and pinion window lifters, which are deservedly recognized as the most suitable and reliable in operation.
When choosing devices suitable for your car, pay attention to factors such as:
- the speed of raising and lowering the glass, which largely depends on the gear motor installed on the car;
- the ability to use the device in the cold season;
- noise level during product operation.
Taking into account all these factors, you will be able to choose window lifters that will not only work flawlessly, but also will not create any problems in specific operating conditions.
How to install and connect power windows on a VAZ-2110
The most preferred devices are rack type, so we will describe the installation process as an example. The connection diagram for the window regulator on a VAZ-2110 car is as follows:
- remove the negative terminal from the car battery to stop the supply of voltage to the on-board power supply network;
- we take the wires that come standard with rack-and-pinion window lifts and make a kind of harness out of them that makes connection easy;
- remove the car mounting block, which will require unscrewing the self-tapping screw that secures the special latch;
- turn the block over and carefully install block Ш1 of the pre-prepared wiring harness into the corresponding connector;
- dismantle the door trim;
- we pull the wires to the electric window drive. To do this, you will need to carefully pass them through the holes in the door itself and the body pillar on the desired side.
After this, buttons or keys are installed that will be used to control the power windows. Depending on your desire, they can be attached either to the door trim of a VAZ-2110 car, or to an existing control panel. In the first case, you will need to use an additional wire, which will allow you to equip the key backlight.
Important points
So, you can install an ESP on a VAZ 2109 yourself. In order to assemble a simple electrical circuit, no special electrical skills are required. Knowledge from a school physics course is quite enough. But at the stage of choosing window lifters you should be especially careful. It is strongly recommended to abandon both rack and pinion devices, even if their price seems incredibly attractive. Only lever window lifters should be installed, since they are the only guarantee that the glass will not freeze to the door on a frosty winter day.
The first car you bought for yourself only seems perfect for a while. Considering that for most drivers such a car becomes unpretentious, chances are high that you will not be the first owner of such a car. Well, if the previous owners took care of it properly, then such a car will not become a headache for you. If you are really lucky, you will get some “bells and whistles” as if by default.
However, they are not always needed. It is unlikely that anyone will seriously invest in old Lada models 2107, 2106 or 2109. The same applies to, for example, alloy wheels, leather interior and other excesses. However, some improvements are worth the effort. For example, it’s much more pleasant to insert a flash drive into the radio rather than fiddling with disks or cassettes. And certainly this category includes the installation of window regulators.
Installation process of electric windows
In addition, it is necessary to install the power windows themselves. The procedure is performed in the following sequence:
- temporarily remove the glass seal located on the inside of the door;
- remove the glass, and then dismantle the window regulator fastening mechanism;
- we install devices that will operate from an electric drive;
- connect the negative terminal to the battery and check the operation of the new window regulator;
- We install the glass in place and trim the door.
Our instructions in pictures will help you understand the installation procedure in more detail.
Some features of power windows on the VAZ 2110
Not much time has passed since they began installing electric windows on the VAZ 2110. However, during this short period, many cases of ESP breakdowns and developments in repairing them have already accumulated.
You can, of course, replace the used device with a new one. But you can go another way, especially since the design of the window regulator allows you to restore its functionality independently. By the way, this can be done without much difficulty. The main thing is that the installation/dismantling and repair instructions are strictly followed. But before you get started, it is recommended to understand the types of these devices.
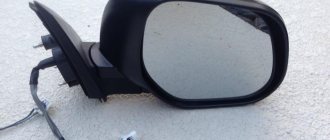
How to disassemble a side mirror
Sometimes a complete replacement of the side view mirror of a VAZ-2114 is required. It is quite possible that everything can be done by installing a separate element on the left or right side.
Let's see how we can disassemble the structure as carefully as possible. First you need to press the plastic case from the inside. The holders are carefully snapped off using a flat-head screwdriver. This method is not very reliable - there is a considerable chance that the mirror element or other parts will break.
The second option carries even greater risks - here you need to quickly hit the glass on the surface (but it is better if it is soft). This is a quick option for dismantling and replacing the element. The blow should be light and fast. To replace the plastic housing or main fastener, remove the adjusting rods and pin. The assembly is done exactly the opposite.
Types of window regulators and the main causes of their breakdowns
Today the following types of window lifters are in use on VAZ:
- rack type (experts consider them the most reliable of all known designs);
- cable;
- plank.
Depending on which company produced the product in question, it can be installed in the car door as standard, or, if it does not fit in size or other technical characteristics, it can be altered without unnecessary problems.
Since both domestic and imported gear motors can be installed on the lift, the described devices, depending on the type and origin of the electric motor, may differ:
- by the speed at which the glass is raised or lowered;
- according to the noise level recorded during operation of the window lifter;
- if possible, its normal operation in winter conditions.
The parts in question can fail for a number of reasons, which can be summarized into two main groups: mechanical and electrical failures. The list of possible reasons looks like this.
- The whole design doesn't work. The cable has broken or become jammed. Lifting mechanism malfunction.
- The electric motor failed due to moisture getting into it. Such a malfunction occurs quite often, since the gearmotor has a leaky housing into which water leaks, which is why rust forms inside the device over time. As a result, spreading corrosion destroys the entire mechanism.
- The power window relay has failed. The performance of this component can be determined by replacing the problematic relay for testing with a guaranteed working one.
- The corresponding fuse has blown. If after installing a new element the device starts to work, then this is the reason. If the new fuse blows again, you need to look for the short circuit.
- Short circuit in the circuit. Its location is determined by which fuse burns when turned on. The cause of this malfunction can be either burnt out wire insulation or a failed gear motor or mechanism switch.
- Breakage of the switch. Determined after replacing the problematic one with a new, known-good switch.
- Break in the common circuit. This can happen due to a mechanical break in the electrical wire, disconnection of the block or poor contact in it.
Return to contents
Let's get started
Before you start connecting the window lifter to the VAZ-2106 or VAZ-2107, and even the VAZ-2109, keep one nuance in mind. Actually, you should have encountered this even when purchasing a window regulator. The fact is that on these models there is no “window window” and the glass is lowered across its entire width. Because of this, the most common models of window lifters are not suitable: there is simply not enough space. So the connection diagram for the window regulator on the VAZ-2106 and two other models is slightly different from the standard one and requires different equipment. Fortunately, sellers are well aware of this and usually offer a suitable solution.
First of all, read the instructions. It is written very clearly and understandably how exactly to install the electric motor and what to attach it to. According to the holes, the fastening bar coincides with the three bolts that we unscrewed during dismantling, so there will be no difficulties. After installing the window lifter mechanism, connect it to the brackets on the glass. Now, again in accordance with the instructions, lay the wiring to the battery. There is a special technological tunnel in the door for this, so run the wire inside it. This will protect it from chafing and protect it from atmospheric moisture. Which by no means eliminates the need for proper, intact insulation! The wires are connected using four-pin connectors, but if you have any problems with this, you can use the old fashioned method: strip, connect and wrap with electrical tape. But this is still not recommended.
After that, we begin to find a place for the button. As practice shows, it is not very convenient to install it on the door of 2106 or 2107; the optimal solution is to install it on the dashboard. There is space there and it is relatively easy to run wires there. Having made a hole (or if you have free ones, simply remove the plug), insert the seal and the toggle switch itself, and connect the wiring. Actually, all that remains is to put the door back together and this is where the connection of the window lifter on the VAZ-2107, VAZ-2106, VAZ-2109 ends. Unless you can, before putting the casing in place, connect the negative terminal and check the functionality of the assembled system.
Installation procedure for glass lifting devices
Installation of the lifting device is quite simple. It starts with disconnecting the battery. After this, use a curved screwdriver to unscrew 3 screws, unfasten the door trim latches and remove the door pocket. Using a thin screwdriver, pry off the handle (latch) of the window lifter - the tip of the tool is inserted into the recess between the latch and the socket.
The handle itself is removed. At the next stage, the car door opening handle is dismantled. To do this, use a screwdriver to pry the handle cover and remove it. Now use a screwdriver to remove the 2 fastening screws that were hidden by the cover plate. After this, the handle can be removed without much difficulty. Using a screwdriver, you can also remove the power window button, which serves to lock the door.
After removing 6 pistons, the trim covering the car mirror adjustment mechanism is also removed. As a result, it remains easy to dismantle the door trim. Armed with a 10mm wrench, unscrew the 2 bolts that hold the auto glass clips. Next, 2 nuts securing the lifting mechanism, nuts of the upper and lower fastenings, and 3 nuts securing the lifting mechanism are unscrewed in sequence.
Upon completion of the described stage, it is time to remove the lower guide pin of the lifting device from the door panel. To facilitate and simplify such an operation, the upper pin of the guide must be bent using a screwdriver. Now the entire lifting mechanism can be safely removed through the resulting opening in the door frame.
In order to quickly, efficiently and without problems install a new electric window regulator in the door, you must first make sure that it is in the fully folded position. Otherwise, the entire operation will not be possible.
However, as already mentioned at the beginning, replacing an inoperative device with a new one is most often not particularly necessary. If the contractor can accurately determine the reason why the window regulator refuses to function normally, it can be repaired quite easily.
Adjusting door locks
Before adjusting the lock, it is recommended to outline the outline of the lock on the body pillar.
1. If the door closes too tightly, loosen the fastener bolts, move it outward and tighten the bolts. If the door closes poorly, move the lock inward. In this case, there should be no protrusion or retraction of the door relative to the body.
2. If the door goes down when closing, lift the lock. If the door rises when closing (sagging in the open position), lower the latch.
3. If the door is difficult to unlock with the internal handle, then the position of the internal handle of the lock drive is adjusted. To do this, loosen the screws securing the handle bracket and move the handle together with the bracket to the desired position. Then tighten the screws.
Connection diagram, restoration of functionality
To successfully repair a power window, you need to know the structure of the lifting mechanism and the principle of its operation. The window connection diagram looks like this.
- Mounting block.
- Ignition switch device.
- Power window switch for front right door.
- Power window switch for rear right door.
- ESPD gearmotor for the front right door.
- ESPD gearmotor for the rear right door.
- ESPD gearmotor for the rear left door.
- ESPD gearmotor for the front left door.
- Power window switch for left rear door.
- Power window switch for left front door.
- Power window on/off relay.
Drive unit
Drive shaft, CV joint (grenade), Outer CV joint, Inner CV joint, Right CV joint, Left CV joint, CV boot, Tripoid, CV joint nut, Retaining ring, Cardan, Crosspiece, Suspension bearing, Cardan bearing, Elastic coupling, Axle, Front axle, Rear axle, Axle reducer, Gearbox bearing, Gearbox oil seal, Differential, All-wheel drive sensor, Haldex coupling, Differential bearing, Differential oil seal, Planetary gears, Axle bearing, Axle shaft, Axle shaft bearing, Axle oil seal, Axle shank, Shank bearing, Axle bearing, Transfer case, Transfer case, Transfer case oil seal, Transfer case bearing, Transfer case chain
Diagram of electric windows VAZ 2110, VAZ 2111, VAZ 2112, Lada Ten
Electric windows are used to raise and lower door windows and are installed on some cars. These VAZ 2110 cars have a plug in the door trim instead of a window lifter handle, and there are corresponding illuminated switches on the floor tunnel lining.
In the window lift mechanism, instead of a gear reducer, only a drum is installed, into the hole of which the output shaft of the VAZ 2111 gear motor is inserted.
The gearmotor consists of a worm gearbox and a DC electric motor with excitation from permanent magnets. The direction of rotation of the shaft depends on the direction of the current in the armature winding. To protect against overloads, a built-in thermobimetallic fuse is used. The faulty gear motor is replaced.
Voltage is supplied to the switches only when the ignition is on through a relay of type 904.3747-10 located at the rear of the VAZ 2112 mounting block.
Wiring diagram for power windows
1 – mounting block 2 – ignition switch 3 – power window switch of the right front door 4 – power window switch of the right rear door 5 – power window motor of the right front door 6 – power window motor of the right rear door 7 – power window motor of the left rear door 8 – power window motor of the left front door 9 – power window switch of the left rear door 10 – power window switch of the left front door 11 – power window relay A – to power sources B – to instrument lighting switch C – conventional numbering of plugs in power window blocks
Diagnostics of electrical equipment of the Lada 2110 car. Instructions for troubleshooting the lighting system. Repair of the generator and starter of the Lada 2111. Diagram of the Lada 2112 car. Power window lifter. Electrical circuit diagrams for a VAZ 2111, VAZ 2112, VAZ 2110 car.
- Units and electrical circuits of VAZ 2110, VAZ 2111, VAZ 2112,
- Repair of electrical equipment VAZ 2110, VAZ 2111, VAZ 2112,
- Diagram of electric windows VAZ 2110, VAZ 2111, VAZ 2112
© Club of domestic cars Lada. Do-it-yourself repair and tuning of VAZ (Lada) with photos. The portal will help you do the work on modifying and repairing your VAZ car yourself.
Not much time has passed since they began installing electric windows on the VAZ 2110. However, during this short period, many cases of ESP breakdowns and developments in repairing them have already accumulated.
You can, of course, replace the used device with a new one. But you can go another way, especially since the design of the window regulator allows you to restore its functionality independently. By the way, this can be done without much difficulty. The main thing is that the installation/dismantling and repair instructions are strictly followed. But before you get started, it is recommended to understand the types of these devices.
Timeless classic
GAZ Gazelle Logbook Electric windows
Electrical circuits operate on the principle of automating those processes that occur when opening and closing a window manually. This gives every reason to believe that by studying a mechanical window regulator in detail, you can make significant progress in understanding the principles of operation of power windows.
What is important to understand so that the functioning of the front or rear window lifter mechanism on a car does not cause difficulties, and any malfunction that arises can be eliminated independently and without much effort? Of course, it is worth knowing what components the mechanical system consists of and what characteristics each functional unit has
Another detail that is included in the functional diagram of the car is a cable that is pulled onto a roller, or rather, a groove cut out at its end. The cable has a rough surface and is well tensioned, and therefore allows all the elements shown in the diagram to move synchronously. In addition, the circuit includes a metal guide that prevents the glass from warping.
The scheme works in such a way that the glass moves in both directions strictly parallel to the window opening. The handle rotates, and, according to the diagram, the force is transferred to the cable. The cable is stretched and begins to pull the glass in one direction. The glass begins to move relative to the guide as long as the handle is rotated. As soon as the handle is released, the cable is released and the glass stops.
Types of window regulators and the main causes of their breakdowns
Today the following types of window lifters are in use on VAZ:
- rack type (experts consider them the most reliable of all known designs);
- cable;
- plank.
Depending on which company produced the product in question, it can be installed in the car door as standard, or, if it does not fit in size or other technical characteristics, it can be altered without unnecessary problems.
Since both domestic and imported gear motors can be installed on the lift, the described devices, depending on the type and origin of the electric motor, may differ:
- by the speed at which the glass is raised or lowered;
- according to the noise level recorded during operation of the window lifter;
- if possible, its normal operation in winter conditions.
Which window lifters to buy: rack, cable or articulated-lever
On the market you can find various models, which are divided into 3 main groups, depending on the design of the window lifting mechanisms:
In general, their functional load is relatively the same. However, systems that use a cable are the most cost-effective and repairable option, but at the same time suffer from slowness and the risk of breakage and stretching of the cable if the glass freezes. Rack and pinion windows handle moving the glass from one extreme position to another in about 4 seconds; require regular lubrication; also sentimental about glass freezing. The most expensive and “advanced” choice seems to be a hinge-lever system: it works as quickly and quietly as possible; has good traction properties even when glass freezes; true. Video tutorial on installing electric windows "Granat" on a VAZ 2109
Installation procedure for glass lifting devices
Installation of the lifting device is quite simple. It starts with disconnecting the battery. After this, use a curved screwdriver to unscrew 3 screws, unfasten the door trim latches and remove the door pocket. Using a thin screwdriver, pry off the handle (latch) of the window lifter - the tip of the tool is inserted into the recess between the latch and the socket.
The handle itself is removed. At the next stage, the car door opening handle is dismantled. To do this, use a screwdriver to pry the handle cover and remove it. Now use a screwdriver to remove the 2 fastening screws that were hidden by the cover plate. After this, the handle can be removed without much difficulty. Using a screwdriver, you can also remove the power window button, which serves to lock the door.
After removing 6 pistons, the trim covering the car mirror adjustment mechanism is also removed. As a result, it remains easy to dismantle the door trim. Armed with a 10mm wrench, unscrew the 2 bolts that hold the auto glass clips. Next, 2 nuts securing the lifting mechanism, nuts of the upper and lower fastenings, and 3 nuts securing the lifting mechanism are unscrewed in sequence.
Upon completion of the described stage, it is time to remove the lower guide pin of the lifting device from the door panel. To facilitate and simplify such an operation, the upper pin of the guide must be bent using a screwdriver. Now the entire lifting mechanism can be safely removed through the resulting opening in the door frame.
In order to quickly, efficiently and without problems install a new electric window regulator in the door, you must first make sure that it is in the fully folded position. Otherwise, the entire operation will not be possible.
However, as already mentioned at the beginning, replacing an inoperative device with a new one is most often not particularly necessary. If the contractor can accurately determine the reason why the window regulator refuses to function normally, it can be repaired quite easily.