If in summer heated exterior mirrors are not needed, then with the onset of frost, the presence of this function becomes simply necessary. And here it’s not even a matter of comfort, but the safety of the driver and other road users. Frozen mirrors do not provide sufficient visibility, which can be dangerous. Unfortunately, not all vehicles are equipped with heating as standard. Therefore, you often have to make something yourself. Let's see how to make heated mirrors with your own hands.
General information
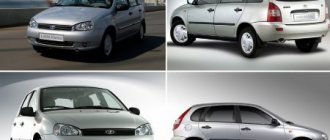
Modern cars are mostly equipped with a heating system. But vehicles, such as the VAZ, for the most part lack this advantage. However, this does not mean that the situation cannot be corrected. Agree, home craftsmen already redo a lot of things in classic VAZ models. For example, the chassis, engine and much more are being modified. Compared to this, installing a heated mirror system seems like baby talk.
All you need is free time, desire and theoretical knowledge, which you will get from this article. In general, there are two ways to implement the plan. One of them is the installation of heating elements, the second - light bulbs. We will look at each of them, and you can decide which one you like best.
Using heat lamps
The essence of this method, as you probably already guessed, is that several lamps are installed in the housing, which are insulated and warm up the mirror. For these purposes, a pair of 12-volt lamps and some wire will do. Of course, in this case the lamps are not used for illumination, do not forget about this. Their heat will be quite enough to free the mirror from ice in a couple of minutes.
Naturally, the first step is to dismantle the mirror. To give it better thermal insulation properties, the body can be additionally insulated. It’s up to you to decide which material to use, since their choice is quite large. It can be paronite, textolite, varnished fabric and much more. In addition, the material will act as insulation in case the plus of the lamp comes into contact with the mirror body. But since in most cases the side mirror housing is made of plastic, you have nothing to fear. In principle, a thin layer of foil can be glued on top of the same PCB. It will be used as a heat reflector. Do-it-yourself mirror heating for VAZ-2101 and VAZ-2107 is not much different.
Heated mirrors and wiring.
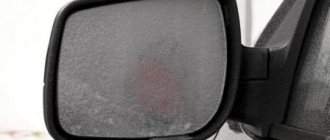
I recently replaced one of the heated side mirrors, and at the same time the wiring to it. At the same time, he complained that the second mirror heats up much worse. He named the same liquid wires as the reason.
To check, I armed myself with a tester with a thermocouple and a screwdriver to pick out the mirrors. The weather whispered with gusts of wind: “Go home - you’ll catch a cold!”, but I didn’t listen and almost didn’t catch a cold)
First measurement of an old mirror. 28 degrees + old wiring
The second measurement is a new mirror and greasy wiring. It reached 38 degrees. Sometimes 39 slipped through.
The old mirror was then opened to replace the mirror element with the mirror from the new kit. Thus, on the right and left we have new identical elements.
The purpose of the test was initially to check the importance/unimportance of bold wiring. Therefore, we don’t open the door, we solder to those shitty wires that go into the mirror body.
The replacement took no more than ten minutes. The weather did not change. Freeze...
The third measurement, new mirror, old liquid wiring reached 35 degrees.
The conclusions are not tricky. Don't bother with fat wires)
Active stage of work execution
Often you have to face the fact that there is not enough space to place the appropriate socket under the lamp. In this case, there are only two options. One of them is to take a smaller light bulb, which is not recommended, the second is to use a heat-resistant clamp, which takes up virtually no space. Don't forget to solder the wires and carefully insulate this area. In any case, the most important thing is to prevent the lamp from touching the back of the mirror. This can lead to both damage to the latter and destruction of the heating element during movement.
Next, you should connect the heated mirrors to the vehicle's electrical network, for which you will need a pair of wires with a dense and flexible sheath. At this stage it is extremely important to ensure free adjustment of the mirror. To do this, you need to lay the wires correctly. They should not be stretched, nor should they bend in some areas.
Heated side mirrors - logbook Lada Kalina Sedan kalina 2006 on DRIVE2
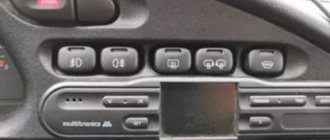
I'm tired of driving blindly in fog, rain, snow, when the side mirrors get covered or covered. I decided to do the heating myself. I went to an auto store, bought heating elements, went to a radio electronics store, bought wires, a button, a relay, found a connection diagram for Drive2 and started making it. I started with the button, put it in the place where the air conditioner should be)) I took the backlight from the heated rear window button, guided by this diagram
I ran the wiring and placed the relay in an empty regular place, next to the rear window heating relay. In the diagram everything is clear, only it is mixed up in one place, the right one is the button for heating the mirrors, the one that I installed myself. Pulling the wiring is not difficult, for those who even understand a little)) For me, the most difficult thing was separating the mirror itself from the plastic. For those who don’t want to bother with this, you can buy mirrors already heated and, after stretching the wiring yourself, simply install the mirrors. Well, I first removed the right mirror, brought it home, put it in hot water so that the plastic would become at least a little softer, and when I managed to bend it slightly from the mirror, I quietly peeled off the double-sided tape with a knife
and then first I removed the top layer of tape with a knife, then with gasoline, there was no other solvent at hand, I removed the rest of the tape. I cleaned everything and glued the heating element,
Then I encountered another difficulty. the element contacts did not fit into the holes for them. I had to get out extra
Afterwards I glued everything back with double-sided tape, everything turned out well. I put the mirror in place, covered it with snow, turned on the heating and I didn’t even expect that it would heat up so quickly, the snow melted off and all the droplets evaporated. Now you don't have to worry about ice and snow in the morning.
www.drive2.ru
Do-it-yourself heated side mirrors: features
It would be useful to talk about the effectiveness of the method. You probably guessed that this indicator directly depends on the performance of the lamp. For example, a 12-volt product with a power of 21 watts will heat the mirror in 2-4 minutes. However, if you did not pay due attention to the foil sticker, then this result can worsen significantly. In addition, it is not recommended to leave the heating on for a long time. The temperature in the case will gradually increase, which may damage the plastic or mirror.
About safety rules
We have already figured out a little about how to use the first method to heat mirrors with your own hands. “Kalina” or “seven” - you must not forget about safety rules.
Firstly, the connection must be made only through a special fuse, and secondly, the cracks and holes in the side mirror housing must be completely sealed. This is necessary in order to prevent moisture from entering and the possibility of a short circuit.
In addition, always remember not to leave the wires exposed, as this may cause a short circuit in the housing, etc. It is advisable to place the switch in a place convenient for you so that you do not need to be distracted from the road. In principle, following these simple rules is not so difficult.
Installing heated mirrors - logbook Lada Kalina Universal 2010 on DRIVE2
My long-time dream was to install heated mirrors. I looked with white envy at those who drive in the rain with completely dry burdocks and excellent visibility... And so I found an online store at the plant that supplies VAZ with burdocks www.solina-avto.ru and ordered heated mirrors and wiring for him. With delivery it came out to be something like 600-700 rubles.
These are my relatives
It took me quite a long time to install it, because I realized that I couldn’t do it in an hour. In addition, I had to figure out exactly HOW I should install them. There are 2 options - on a separate button or on the heated rear window. At first I decided to put it on a separate button, as shown in the batyram, but already during the installation process I decided to simplify the task in order not to create a bunch of buttons, since these heaters usually turn on both and I don’t need independent activation anyway... The installation process took 3 days, since the weather interfered (I installed it outside, since there is no space in the garage), I did not have the necessary tools at hand.
The sequence is like this (the same for each door, so the photo is only for the right one):
1. Carefully removed the mirror itself. Here I had 3 screwdrivers to help me and I needed my father’s help to bend the mirror, and I used two screwdrivers to remove the latches.
2. Removable burdock cladding
3. Disassemble the door trim
4. We lay wires from burdock into the door
5. Connect the wires to the mirror element and put it in place. 6. Next, to check the connection with the mirror, I took the battery from the UPS and connected the wires to it, and when I was sure that the heating was working, I continued the connection. 7. Solder one of the heating wires to the black ground wire (we do not fasten it to a screw, since the contact with the body through the door hinge mechanism will not be stable).
Next came the most difficult part, since I still didn’t know how to do it.
— bring the positive wire into the cabin...
8. Thank God that there are a lot of responsive people on our forum and they advised me to do this - drill a hole in the center and push the wire through it into the corrugation. That's exactly what I did.
9. Assembling the door
10. Repeat steps 1-9 for the second mug
11. Since I chose to connect to the heated rear window, then we solder the wires from the mirrors through the 10A fuse to the wire connected to pin 5 of relay K10.
Green Insulated Fuse
12. Enjoy the result)))
www.drive2.ru
Using heating elements for heating
As noted above, today many modern vehicles are sold with mirrors that have a heating function. You can buy such mirrors in specialized stores. But if you do not want to spend money, then you can use an alternative method. To do this, you will need to visit a car store and find a special heating element there. It costs a penny, so buy 2 pieces at once.
Here you will need a little more skill compared to the first method. In this case, it is necessary to remove the mirrors from the car. After this, it is worth separating the mirror element from the plastic. This can be done using heat. The easiest way is to use a household hair dryer. Under constant heat, using a knife, you can separate the mirror surface from the body. In the future, it needs to be thoroughly degreased, since the heating element will be glued.
In principle, you will get a very effective heating of mirrors with your own hands. "Gazelle", unlike a passenger car, requires the installation of heating elements that are more powerful and larger, remember this.
Installation of heated mirrors on Kalina
| Kalina's mirrors are significantly larger than those on a Priora or a VAZ of the tenth family, but this does not make it any easier when they become covered with frost in winter. To avoid such an unpleasant situation, it is recommended to install heated mirrors on Kalina. |
To implement heating, you can:
- consider special heated elements that will have to be installed in the mirrors yourself (for example, installing heating elements in the mirrors of a VAZ).
- buy ready-made heated mirrors (price 700 rubles), which will be installed instead of the standard ones.
Let's take a closer look at the second method:
Replacing a mirror on Kalina
To remove the mirror on Kalina you will need a couple of screwdrivers. First you need to unhook 8 clips. Then, carefully bending the mirror, gradually unfasten its clamps in a circle, without breaking off the 4 guides.
Connecting heated mirrors on Kalina
Remove door trims. Having snapped off the rear plastic trim on the mirrors, we lay two wires from the side mirror housing into the corrugation between the doors and the car body. To avoid the hassle of pulling wires through the block, you can simply drill holes in it. We connect the first wire to the body in the cabin (the ground on the door is not reliable). A +12V is connected using any of the following diagrams: Connecting heated mirrors to a separate button :
Connecting heated mirrors together with heated rear window : We solder wires from the mirrors through the 10A fuse to the wire connected to pin 5 of relay K10.
All that remains is to check the heating of Kalina’s mirrors, if everything works, then assemble in the reverse order. This is where plastic clips can come in handy, as they quickly break off in cold weather.
By the way, since the door trim has been removed, then install sound insulation.
Photo source:
Keywords:
Similar materials
xn—-8sbabr6ahc3e.xn--p1ai
Installation of heating system
The dimensions of the mirror and the heating element must match. The latter may be smaller by only a few millimeters. If there is no electric mirror drive, then you will need to make a couple of holes in the housing to drain the wires and connect them to the power supply.
Please note that it is important to properly glue the heating element to the mirror. As for the contacts, it is better to use a soldering iron. In this case, you will receive a reliable connection, which must then be insulated. The final step is to glue the mirror surface back to the frame. To do this, the plastic must be degreased. “Moment” is suitable as glue.
A few important details
So we described how to make high-quality heated mirrors with your own hands in several ways. "Grant", modernized in this way, connects to the network in one way, "Gazelle" - in another, and so on. It is for this reason that there is no point in describing how to correctly route the wiring from the mirror to the on-board electronics of the car. Here you are free to choose your preferred route.
At the very end, you need to bring everything to the power button, which it is advisable to place in a convenient place. Of course, do not forget that everything must be well insulated. It is not recommended to use wires that are too thin, as they can be damaged already at the installation stage.
Electric mirrors + heating - logbook Lada Kalina Universal 2011 on DRIVE2
I bought a set of electrically adjustable and heated mirrors on the market there. I'm getting ready for winter, so to speak. 1500 RUR per piece + control unit 750 RUR. One of these days I will disassemble the car there and install it. There is a lot of work to be done. In theory, electric mirrors are not needed. Set it up once and that’s it (if one person drives). All you need is heating. Well, we are not looking for cheap ways.
You will need to purchase wires, terminals, etc. and deal with the car's wiring.
I installed everything. Almost spent the whole day fiddling around. I'm getting tired of threading wires through the door. You will need: - 5 colors of wire, 5 meters each (this is more convenient) - a button for heating. - 4-pin relay, - 10 medium female terminals. - indicator screwdriver with wire, - heat shrink, electrical tape - wire cutters for removing insulation
I wanted to touch on a couple of points. 1. Plug for adjusting mirrors - well, there are no such things in nature (no one knows about their existence). I followed suit. way.
You can pull the pins out of an old computer wire
They fit well, but I couldn’t figure out how to secure them. You can fill it with silicone as an option.
An electronics store found me a plug like this, it fits almost like a original.
You wrap 2 plugs with electrical tape and everything fits in smoothly.
2. The ill-fated socket is where the door connects to the body. It seems to me that it is very problematic to find such pins, because... on viburnum the wiring is of a different type (supposedly new). And their installation is just an ass. I drilled and then sweated to thread the wires there. Moreover, you need to pull 5 wires through this socket (on both doors) so take care of this right away. And not like me, first 3 and then 2 more poked there.
Connection diagram. I did not use one button to heat the rear window and mirrors because... I don't think this is necessary. I made it on a separate one.
The best mirror connection diagram I've found.
Wiring diagram for a button for heating mirrors. took it from www.drive2.ru/l/206000/
Let it be for now. then more cheerful tweeters and podiums
this is what the beard looks like now
www.drive2.ru
Types of heating
The need for this function became clear quite a long time ago. Just a few decades ago, some cars were equipped with simple devices designed to defrost viewing structures.
Installation involved installing incandescent lamps inside, which heated the part from the inside and the ice melted. In modern devices, the heating method has changed, but the function remains the same.
The existing types of defrosters should be considered separately:
- Wire - how heated mirrors on a wire base works is explained by its very name. Tungsten filaments are used as a heating element, placed on an insulating and heat-resistant base. When an electric current passes through them, they heat up, which leads to melting of the ice.
- Printed conductors – heated car mirrors using printed conductors are the most modern. You can buy boards at the car market or at a spare parts store. They are not made independently.
- A film heater is a film-based product with heating elements included in it.
- Lamp heater - this type of heating element is a low-power (10 watt) incandescent lamp. This technology is best suited for making heated mirrors with your own hands and is often used by owners of outdated models of domestic cars.
Checking the presence of standard heating
The presence of a heated rear view mirror cannot always be detected at first glance. The fact is that there is often no separate button to turn it on, and many car owners wonder how the heated exterior mirrors are turned on. The function is activated automatically when the rear window heating is turned on. To check if the mirror heater is present:
- Start the engine;
- Turn on the rear window heating;
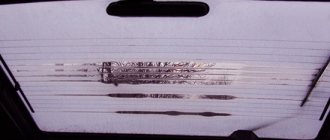
- Spray the mirrors with water or blow on them;
- Touch it with your hand.
When the heating is running, the water drops dry within 1-2 minutes; when you breathe, the mirror does not fog up, and it is warm to the touch. In the cold season, you can verify the presence of heating by simply observing how long it takes for the mirror to thaw after being parked overnight. If a heating element is located underneath, the defrosting process takes only a few minutes.
Malfunction of button and wiring
After checking and confirming the serviceability of the fuses, you need to move on to the button. This element may also fail. The manifestation of a defect is accompanied by the absence of light from the LED. That is, the light bulb will not turn on and needs to be replaced. In this situation, the voltage at the output contacts of the button is checked.
Sometimes the question arises where the mirror heating button is located. The required element can be located on the microclimate control unit. Often the button for turning on the heated mirrors is combined with the heated rear window, then when turned on, two systems will work simultaneously. Situations of separation of devices are not excluded, when the required button is located on the driver's door.
If the problem is not in the button, you should start wiring. Further testing will require dismantling.
How to remove a mirror:
- The adjustment needs to be lowered down, which is accompanied by the appearance of a small gap, which allows you to pry up the structure and easily remove it.
- Next, disconnect the connector of the contacts connected to the heating. Just pull them, no special effort is required.
Examination:
- Using a multimeter, determine the voltage. When the button is turned on, the indicator should be 12–14V.
- Testing with a light bulb also involves connecting wires to the terminal. If you turn on the button, the light will light up.
If the wiring is faulty, the tester will not show results and the light will not light up. It is recommended to check the wires for damage, insulation problems, and short circuits. Another weak point is the contacts, which sometimes break off and come off. To eliminate the defect, they are soldered.
Heating system problems, troubleshooting
If all possible malfunctions have been ruled out, you need to pay attention to the heating circuit itself - the filaments, because they are sometimes damaged. Here it is easy to determine when and why the heated mirrors do not work.
Examination:
- When connecting the tester, the resistance value is determined. Optimal parameters range from 10–30 ohms. The presence of a defect is indicated by missing or inflated indicators.
- Checking with a light bulb involves disconnecting the circuit and connecting the wires in series. The complete absence of glow may indicate a malfunction - the heating system has burned out.
Another typical failure involves breaking off contacts and connections on copper pads that should secure the power wires. In this case, the filaments themselves must be in good condition.
When thinking about how to check the heating of mirrors, determine the resistance of the filaments, the tester should give a result of 100 Ohms.
Then, to eliminate the defect, it will be enough to solder the contact fastenings. If the problem is a broken thread, no values will be displayed as the track progresses. This means you need to find a break and solder it.
Instructions for installing ready-made components
Installing commercial heated mirrors is a relatively simple operation. To carry it out, it is necessary to remove the part from the car and disassemble it. Glued products are heated with a hair dryer or by soaking in boiling water, after which the reflective overlay is easily removed. » alt=»»> Products fastened with bolts are disassembled using the appropriate tool. Do-it-yourself installation of heated rear-view mirrors purchased in a store is permissible only on clean and dry surfaces.
Before starting the procedure, it is necessary to evaluate the dimensions of the heating element and housing. If printed circuit boards are used, it is possible to remove the stiffeners. The film is cut to size while retaining the heating strips.
The boards are glued to the inside of the case with glue, the films are fixed directly to the reverse side. In both cases, wires are soldered to the contacts of the thermoelement, which go to the power source.
The connection diagram for heated exterior mirrors may vary on different cars. Usually the wires are brought out and connected to the line that supplies the heated rear window. It is possible to install separate wiring using a relay and a fuse. In some models, auto wiring for the devices in question is provided with src=»https://znanieavto.ru/wp-content/uploads/2018/02/skhema-podklyucheniya-obogreva.jpg» class=»aligncenter» width=»500″ height ="600″[/img]
How do you turn on the heated mirrors on a Prior?
Fuses and relays in Lada Priora, electrical diagrams
Lada Priora is another car in the line of new VAZ cars, which is gaining popularity among segments of the population. External similarities with the 10th model attract the attention of young people; the relatively low price is also a reason for purchase for most car enthusiasts. Along with the growth in popularity, the owners of this model are gaining experience in repair and maintenance, which is becoming more and more every year. If your Priora has electrical problems, do not rush to get upset; first, check the fuses and relays in your Lada Priora. These are the ones that will be discussed in this article.
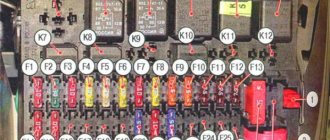
Fuse box in the passenger compartment of VAZ-2170, -2171, -2172
The fuse box in Priora is located at the bottom of the dashboard, on the left side of the steering wheel. To get to it, you need to open the cover, which is held on by three latches. Rotate each locking knob 90 degrees and pull the lid down and it will snap open.
Fuses in the interior mounting block
F1 (25 A) - radiator cooling fan. If your fan does not work, check its motor by applying 12 V directly to it from the battery. If the engine is working properly, then most likely the problem is in the wiring or connectors. Check the serviceability of relay K1.
The fan in the Priora usually turns on at a temperature of 105-110 degrees. Do not allow the engine to overheat, watch the arrow of the temperature sensor.
If the fan runs constantly and does not turn off, check the coolant temperature sensor located on the thermostat. If you remove the connector from the working sensor, the fan should turn on. Check the wiring to this temperature sensor, as well as the contacts of relay K1, move this relay, clean the contacts. If this is the case, replace it with a new relay.
F2 (25 A) - heated rear window. Check together with fuse F11 and relay K2. If the rear window does not fog up, the heating element threads may have broken. Inspect all the threads and if you find a break, seal it with special glue or varnish, which can be bought at car dealerships for 200-300 rubles. Check the connection contacts at the terminals to the heating elements at the edges of the glass, as well as the switch on the dashboard and the wiring from it to the rear window.
F3 (10 A) - high beam, right headlight. F4 (10 A) - high beam, left headlight. If the headlights do not shine on high beam, check the K7 relay and the headlight bulbs. The steering column switch, wiring or connectors may also be faulty.
F5 (10 A) - sound signal.
If the signal does not work when you press the steering wheel button, check relay K8. The signal itself is located under the radiator grille; you can get to it by removing the plastic casing from above. Check it by connecting the voltage to 12 V. If it doesn’t work, try turning the adjusting screw, or replace it with a new one.
F6 (7.5 A) - low beam, left headlight. F7 (7.5 A) - low beam, right headlight. When replacing lamps, be careful; there are separate lamps for the low and high beams, so they can be easily confused. It is better not to install lamps in high-power headlights; the reflectors may melt and the desired effect will not be achieved. Most low beam headlight problems that cannot be corrected by conventional means can be related to the light control module (LCM). The low beam relay is only available in cars equipped with a light sensor, it is located in the place of relay K1; on most cars this relay is not in the mounting block; the low beam circuit goes through the MUS block. It happens that the tracks in the block burn out; if there are problems, it is better to replace it with a new one. If the windshield wipers turn on spontaneously when the low beam is not working correctly, the problem is most likely in the windshield wiper control unit, located in the center of the dashboard, the topmost block, next to the radio, is best reached from the glove compartment, or by hand through the removed console covers at the feet.
F8 (10 A) - alarm signal. If the alarm does not work, also check relay K9.
How to make heated mirrors with your own hands
It’s not difficult to make heated mirrors with your own hands. Most often, incandescent lamps or a wire-based heating element system are used for this. The cost of materials is minimal, but the work will take time.
What you will need
To make heated mirrors with your own hands, you will need a set of tools and materials. The list of consumables depends on what type of device the car owner wants to see.
| Lamp | Wire |
| lamp 10 watt | the basis |
| foil | tungsten filaments |
| heat resistant material | Double-sided tape |
| cartridge | wires |
| wires | soldering iron |
| soldering iron | sealant |
| sealant | |
| disassembly tools |
Cost of materials
Do-it-yourself heated rear-view mirrors require extremely low financial costs. So, an incandescent lamp costs about 20 rubles, a cartridge - 30 rubles, wires - 25 rubles / meter, sealant - 100 rubles, adhesive tape 40 rubles. Tungsten filaments can be removed for free from an old kettle, and a soldering iron and screwdriver for disassembling a mirror can be borrowed from friends.
Procedure
As in the case when ready-made components for heating are used, installation of the heater begins with disassembling, washing and drying the mirror. After this, the inside of the housing is lined with a heat-resistant coating and aluminum foil.
The cartridge is mounted in such a way that after installation it does not touch the structural elements.
A lamp is inserted into the socket, the wires are soldered to the contacts and insulated with sealant. Also, using sealant, insulate the holes through which the wiring comes out. » alt=»»> Heating filaments are glued to the base, after which it is covered on both sides with heat-resistant material. The resulting structure is glued to the inner surface of the mirror, soldered to the contacts of the wires, which are brought out through specially made holes. All open heating elements are insulated with sealant.
An important question is how to turn on homemade heated mirrors. The best option is to have a separate button for this.
Connection to the rear window defrost system is not recommended, since the design should not operate for a long time. Both the lamp and the filaments become hot enough to cause overheating and damage to the housing during prolonged use.
How to connect heated mirrors on a Priora
Installation of side mirrors of the new SE model on Lada Priora
Currently, Lada Priora is equipped with electric drive and heated exterior mirrors. One of the popular modifications is the installation of side mirrors of the new SE model (with heating, electric drive and turn signal indicators). We'll tell you how to replace old-style mirrors with new ones with your own hands.
Required
: Electrically controlled external mirrors with turn indicator (article: 2170-8201050-75 and 2170-8201051-75, price about 3,500 rubles), turn signal caps SE.
Installation
Remove the standard side mirrors (pry off the mirror triangle with a screwdriver and remove the three mounting screws). Install the new mirror in the reverse order.
We stretch the turn signal wires to the mirrors:
- Remove the door trim.
- Remove the turn signal from the fender and disconnect the block. We install plugs instead.
- Pull the wires out of the fender and into the interior. To do this, unscrew the sill trims in the cabin, peel back the carpet and felt and pull the black wire in the engine panel. We determine which of the two +12 V wires using a multimeter or a test lamp. We insulate the second wire.
- Route the wire from the passenger compartment to the car door through the corrugation.
Lada Granta White Ice › Logbook › Heated mirrors, installation.
Winter came to our city SUDDENLY
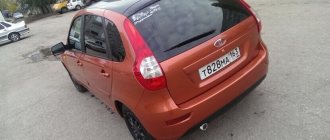
))), however, as in all of Russia, the consequences are traffic jams on the main highways of the country, uncleared roads, congestion, ice, a lot of accidents, people all over the country without heat... It’s terrible in general. And on top of everything else, the mirrors on the car freeze and there is zero visibility. So I, like our entire vast Motherland, did not prepare properly in advance. But I had some free time at work and, gathering my willpower, I solved the problem with fogging/freezing mirrors on the scale of one Lada Granta. So, ladies and gentlemen, step-by-step instructions (with pictures) for installing heated mirror elements on an A.M. Granta White Ice
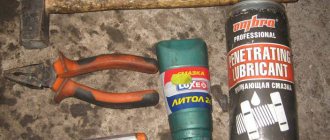
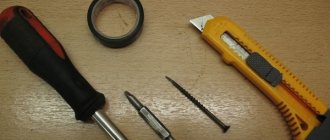
Tools, components and prices (option from Britbandit).
The fuse box in Priora is located at the bottom of the dashboard, on the left side of the steering wheel. To get to it, you need to open the cover, which is held on by three latches. Rotate each locking knob 90 degrees and pull the lid down and it will snap open.
Fuses in the interior mounting block
F1 (25 A) - radiator cooling fan. If your fan does not work, check its motor by applying 12 V directly to it from the battery. If the engine is working properly, then most likely the problem is in the wiring or connectors. Check the serviceability of relay K1.
The fan in the Priora usually turns on at a temperature of 105-110 degrees. Do not allow the engine to overheat, watch the arrow of the temperature sensor.
If the fan runs constantly and does not turn off, check the coolant temperature sensor located on the thermostat. If you remove the connector from the working sensor, the fan should turn on. Check the wiring to this temperature sensor, as well as the contacts of relay K1, move this relay, clean the contacts. If this is the case, replace it with a new relay.
READ How to install free avg antivirus on your computer
F2 (25 A) - heated rear window. Check together with fuse F11 and relay K2. If the rear window does not fog up, the heating element threads may have broken. Inspect all the threads and if you find a break, seal it with special glue or varnish, which can be bought at car dealerships for 200-300 rubles. Check the connection contacts at the terminals to the heating elements at the edges of the glass, as well as the switch on the dashboard and the wiring from it to the rear window.
F3 (10 A) - high beam, right headlight. F4 (10 A) - high beam, left headlight. If the headlights do not shine on high beam, check the K7 relay and the headlight bulbs. The steering column switch, wiring or connectors may also be faulty.
F5 (10 A) - sound signal.
If the signal does not work when you press the steering wheel button, check relay K8. The signal itself is located under the radiator grille; you can get to it by removing the plastic casing from above. Check it by connecting the voltage to 12 V. If it doesn’t work, try turning the adjusting screw, or replace it with a new one.
F6 (7.5 A) - low beam, left headlight. F7 (7.5 A) - low beam, right headlight. When replacing lamps, be careful; there are separate lamps for the low and high beams, so they can be easily confused. It is better not to install lamps in high-power headlights; the reflectors may melt and the desired effect will not be achieved. Most low beam headlight problems that cannot be corrected by conventional means can be related to the light control module (LCM). The low beam relay is only available in cars equipped with a light sensor, it is located in the place of relay K1; on most cars this relay is not in the mounting block; the low beam circuit goes through the MUS block. It happens that the tracks in the block burn out; if there are problems, it is better to replace it with a new one. If the windshield wipers turn on spontaneously when the low beam is not working correctly, the problem is most likely in the windshield wiper control unit, located in the center of the dashboard, the topmost block, next to the radio, is best reached from the glove compartment, or by hand through the removed console covers at the feet.
F8 (10 A) - alarm signal. If the alarm does not work, also check relay K9.
Connection
Old style mirrors (without direction indicators) have two connectors (3 and 2 wires):
The mirrors of the new SE model have 1 block of 6 wires:
We cut off the wires from the SE mirror block and solder it according to the diagram:
The process of installing and connecting mirrors of the new SE model is also shown in the video:
Found an error? Select it and press Ctrl+Enter..
Mirrors on the Priora SE and the old model, what is the difference?
1) The presence of turn signals on the mirrors. SE has them, old ones don't.
2) Visibility, it is greater on the SE mirrors.
3) Mirror mounting triangle. On the SE mirrors it fits better without any gaps.
4) Protection from rain. SE mirror housings provide less protection from rain and snow.
5) The external differences of the mirrors can be seen in the following photos:
At the moment, the price of SE mirrors on Lada Priora is about 3,300 rubles.
Connecting rear view mirrors Priora (SE)
Old style mirrors have 2 connectors with wires:
Block No. 1: mirror control:
| Mirror block | car block |
| Red | Red-blue |
| Blue | Blue-black |
| Green | Green-black |
| Mirror block | car block |
| Gray (+) | Blue-red (left mirror), Black-red (right mirror) |
| Black (-) | Black (for heating) |
SE mirrors have 3 connectors with wires (an additional plus (6th wire) is for the turn signal). Connecting new mirrors is carried out in the same way, all colors are the same, except for one - +12V mirror heating, brown is used instead of Gray.
Block No. 1: mirror control:
- red connects to red-blue.
- blue with blue-black.
- green with green-black.
- Instead of gray there is brown, we combine it with blue-red (black-red).
- black with black (used for heating and for turn signals).
Block No. 3: direction indicators:
For those who haven’t figured it out, here’s a diagram for connecting the SE side mirrors on a Lada Priora:
The main thing is not to confuse the red-blue and blue-red wires. They are almost the same, so before connecting it is better to check them with a tester (multimeter or + 12V light bulb), connecting the minus of the tester to the body, and the (+) to the wire. If the lamp lights up after turning on the heated mirrors, then this is the correct wire that needs to be connected to the brown mirror wire.
Connecting the SE mirror turn signals: You can take the plus for the turn signals from the direction indicators in the car's wing.
- Left wing - blue-black and black wires.
- Right wing - blue and black.
By the way, for the VAZ 2172 the VAZ 2112 Coupe also borrows some body elements, for example, a spoiler. source
Priora mirror heating button
Here's the process. Here, on the right side of the connector, you can see the necessary gray wire, which is connected in a terminal to a thick blue wire (this must be cut off and connected to a new button): 1. We look at the diagram of the instrument panel harness and see that there is “4” on the block. on contact No. 2, 2 wires are connected (gray and blue) ... 2. +12 V is supplied to them through the relay. The relay is turned on by a button on the instrument panel. 3. When we get to contact “2” on block “4” of the instrument panel harness, removing the cover of the mounting block and looking just above the mounting block and to the right, we see:
Malfunctions of standard heating
Possible malfunctions and repairs of standard mirror heating are in the table below:
| Possible malfunction | How to repair heating |
| Heating element burnt out | Disassemble the mirror and replace the part |
| The integrity of the wiring is broken | Check the wiring with a multitester, clean, connect and insulate the wires at the damage site |
| The power button combined with the rear window heating is faulty | Check if the rear window heating works. If not, replace the button |
| Heating relay is faulty | “Ring” and replace the faulty relay |
| Fuse burned out | Replace fuse, check wiring for short circuit |
» alt=»»> It’s not difficult to make heated mirrors with your own hands today. Heating components are sold in stores, so all the work comes down to assembling a simple structure and connecting it to the car's electrical network. An assembled and well-functioning device will significantly increase driving comfort in winter and make life easier for owners of any type of car.
Causes of heating malfunction, first stages of diagnosis
To understand the causes and troubleshoot the heated rear mirror system, you need to prepare a tool. To work, you may need a multimeter, a car light bulb, a soldering iron, a screwdriver, a fuse, electrical tape - it all depends on the type of problem.
It is easier to identify a defect by studying the main components of the heating circuit:
- button – provides launch;
- wiring – designed to transmit voltage;
- fuse – necessary for power transmission;
- heating - a system of threads that are located on the back side.
Each of the elements can fail, which will affect the performance of the device.
The inspection should start with the fuse, which is usually located in a special block, a shield on the right side under the torpedo. Determining the location of the part is necessary for checking with a tester. To find out exactly which fuse is responsible for heating the mirrors, you need to study the manual. Otherwise, you will have to check all the fuses on the panel.
Fuse testing:
- Having selected the resistance mode, you need to touch the tester probes to the terminals of the device. A good indicator is 0 OM; if the measurement result differs significantly from the norm, burnout is determined.
- Checking the light allows you to assess the integrity of the filament. If damaged, deformation will occur, which is easy to notice. If the casing is not transparent, you cannot do without a multimeter.
If a defect is detected, the device will need to be replaced. If the cause of the problem is the fuse, the rear window often does not warm up either, since one unit is used.
It is noteworthy that new foreign cars may not have a fuse, which simplifies the diagnostic process. Then you need to start assessing the performance of other components.