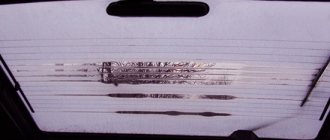
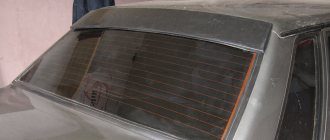
Providing the driver with visibility on the road is the key to safe driving. Viewing the traffic situation in the rearview mirror is only possible if the rear window is free. Passengers sitting in the rear must be seated so as not to obstruct visibility. Another obstacle that interferes with visibility is fogging and ice freezing in winter. For the VAZ 2107, the problem was solved by the developers at the car design stage.
The description of the rear window heating circuit is as follows. On its surface, on the right and left, two busbars run vertically; wires are connected to them, through which a voltage of 12 V is supplied. The busbars are connected to each other by conductive horizontal strips 2-3 mm wide, which are the main working tool.
By passing an electric current, they create a positive temperature on the surface of the glass, freeing it from freezing or fogging. Like any electrical appliance, it is controlled by a fuse designed for the intended voltage and current.
What is included in the electrical circuit?
Domestic yellow “six”
Regardless of whether the ignition circuit in your VAZ 2106 is contact or contactless (BSZ), the electrical circuit of the vehicle includes the following components:
- battery with negative contact on the car body;
- starter device with output “50”;
- generator is one of the main elements of the VAZ 2106 electrical circuit;
- mounting block with fuses protecting power supply circuits;
- ignition switch;
- regulator relay.
It should be noted that the electrical circuit of the VAZ 2106 car with or without BSZ was initially designed taking into account the single-wire type of connection of electrical equipment components. In essence, this means that the negative contacts of electrical equipment are brought to ground, that is, the vehicle body. As for the wired connection, it is provided exclusively by positive wiring.
Rear window heating repair
To troubleshoot the heated rear window, you should start by determining the cause of its failure. If the individual threads of the heating element do not heat up, the threads have broken somewhere.
Note: to check the operation of the heating filaments (elements), you can use a regular tester, measure the resistance at the ends of each strip with an ohmmeter, or switch the multimeter to the “ringing” mode and determine where the break occurred.
Repair in this situation consists of restoring the electrical circuit. To do this, you can try to restore the heating circuit using a special conductive glue, or solder the disconnection point. At the gluing site, the glass will heat up more due to the greater resistance in this section of the circuit, which can lead to the glass breaking.
We recommend not doing these “things” for the sake of saving, but simply replacing the rear window with a heating element. Believe me, you will spend much more time and money, worry about soldering, and in the end, you will still come to the conclusion - buy new glass.
Option 2 - not a single heating thread (strip) heats up
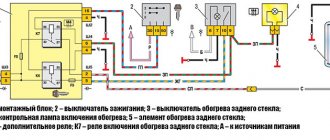
Connection diagram for heated rear window of VAZ 2106
- faulty button (switch), relay, rear window heating fuse
- wires are damaged
- tips are oxidized or poorly connected
- The contact from the glass heating element has become disconnected.
Replace faulty switch, relay, fuse, wires with new ones. Clean and crimp the terminals. If the terminal is unsoldered from the heating element, replace the glass with the heating element.
Method number 2
This method involves the use of non-ferrous metal shavings as a conductive element. Also, to repair the thread, we will need a transparent varnish (it is advisable to use a thick one, like for nails).
Mix the shavings with a brush and apply to a strip previously sealed with tape, as in the previous case. After an hour, the varnish will completely dry. The method is quite old. It is not always possible to connect damaged contacts as needed. Therefore, if it is possible to buy conductive glue, it is better to use the first method. It will be much faster, easier and more reliable. The cost of a 10-gram tube with this composition is 78 rubles. This volume is more than enough to repair several damaged heating threads.
(K) Electrical | Thread starter: Carantoc
Guys, please give me a wiring diagram for the ESP, foglights and heated rear window! Very necessary..
Zhenya (Ingegun) https://vkontakte.ru/photo-10692_139553255 these are fog lights. Connect the rear window heating in the same way. I need to think about ESP, I haven’t encountered this yet
Artyom (Margarethe) Hello everyone! Need advice from a COMPETENT ELECTRICIAN. I have the following problem: I turn on the low beam (everything is fine), turn on the high beam (LEVER TO THE VERY BOTTOM.) The left side of the headlight lights up as it should, but the right inner one does not light up + the outer xenon starts blinking. My actions: 1 I decided that the right xenon unit was screwed! (I installed a regular H4 lamp, although a 24-volt one was at hand, the main idea is the same:) in general, when the high beam was turned on, it began to dim (this was a consequence of the xenon blinking, i.e. low voltage) 2 separately connected the plus and minus to the direct one H1 and turned on the high beam, I realized that both the plus and minus that fit this lamp normally do not supply electricity at all! What the. 3 I installed a new relay to check, the same song. 4 under the hood and near the optics, I checked all the ground wires + the fuses are intact (I changed them to a new one because when I turn on the high beam, it shorts somewhere and the old one is a little overheated) AND WHEN I PULL THE LEVER TO MYSELF TO BLINK, THE RIGHT SIDE OF THE XE NON DOES NOT BLINK, ALTHOUGH AND THE FAR DOES NOT BURN.
Zhenya (Ingegun) Artyom, is it the same when the ignition is on or does everything work fine?
Zhenya (Ingegun) I’ll be honest) I’m not a very competent electrician. but I’ll try to help in any way I can)
Zhenya (Ingegun) Artyom. I'm leaving home now. I'll try to figure out what could be the matter. If I figure it out, I'll post it tomorrow
Artyom (Margarethe) Thanks Zhenya:) it makes no difference with or without ignition. I'm a fool myself when it comes to electrics :) but purely logically, I think I've tried everything! )))
Damn Zhenya (Ingegun). the head explodes. everything would have been resolved somehow if it weren’t for this point “AND WHEN I PULL THE LEVER TO MYSELF TO BLINK, THE RIGHT SIDE XENON DOESN’T BLINK, ALTHOUGH THE FAR ONE DOESN’T BURN. “fuck and why did I skip classes when they were talking about the VAZ 2106 ((in general, the most that aroused suspicion in me was that you don’t have a Mask somewhere. If the light dims, there’s definitely no Mask. Look under the instrument panel. Oh yes. That’s the topic I was in a VAZ 2108. Only there the ignition also played a role. I found a way out. Under the instrument panel, the father and mother were oxidized. Namely 3 wires. There are a lot of them. I cleaned it and everything is fine. If everything worked fine for you and you didn’t go anywhere, then Most likely the ground wire has fallen off somewhere or has oxidized. Look under the instrument panel. Unfortunately, there are no more ideas.
Toha (Kamana) Or look at the same mother folders directly under the hood in the places where the connections go, it was just disconnected!!
Mikhail (Gaddi) Contact, contact and contact again. Look at the black wires that go inside the headlights to the body of the car. If there are signs of oxide, tear them off, clean them and fasten them properly and you will be happy!
Artyom (Margarethe) THANK YOU! ) Once I fix the problem, I’ll be sure to post.
Zhenya (Ingegun) let’s wait) be sure to write about it) we’ll know what to advise for the future)
Victor (Huata) Zhenya [zhǝnʁ] Gomenyuk thank you very much for the diagram! The fog lights have been hanging on the bumper for a year now and still can’t connect them
Artyom (Margarethe) Zhenya, and everyone else, you can laugh at me))) Remember #3, so here’s the answer: today, after all, I stopped by the electrician. In short, the light bulb burned out X))) but most likely it was like this: the mass really disappeared, but in the process of all the experiments on the electrics, the H1 lamp of which I called +/- (#3.2) burned out, and at the same time I eliminated the loss of mass! I’m writing and laughing X))) now I wish I could go back and laugh at myself, as I call with an optimistic face like a burnt lamp +/-)))))))
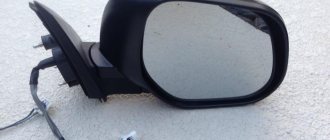
Blowing side windows for torpedo 2103-06
Has anyone tried to embed the side air duct deflectors into the original 2103-06 torpedo? Or maybe you saw something similar in someone’s on-board vehicle or in photographs?
Of course, large rectangular deflectors from 2104/05/07 are unlikely to work, but if you try some small ones from a foreign car.
Only connecting rods go into battle
Has anyone tried to embed the side air duct deflectors into the original 2103-06 torpedo?
The only thing cooler than black bekha is Lada
Our photography team
Electroplating Group
Only connecting rods go into battle
Emissions, but it still won’t reach the side windows)))
Only connecting rods go into battle
I once thought about something like this. I wanted to implement it like in the old bekhs.
But the Lada doors are very thin, and the glass is very close to the inner panel (or whatever it is called). So there is nowhere to put such deflectors.
Only connecting rods go into battle
Andriy1352, Don't torment the car. With proper cooling, everything in the Lada sweats normally. And if it’s in the rear with a heater, then there are no problems at all.
To prevent sweating a lot, let’s say in the snow, I constantly left the car at night and drained and still drain the machmala from the mats and tap them.
Has the idea been implemented and died out at the concept stage? I think how to choose the deflectors.
Haven't taken up exercise yet. But I understand one thing: if it works, then the deflectors do not need to be selected, but manufactured on a 3D printer as required.
The deflectors do not need to be selected, but produced on a 3D printer as required.
Has the idea been implemented and died out at the concept stage? I think how to choose the deflectors.
Haven't taken up exercise yet. But I understand one thing: if it works, then the deflectors do not need to be selected, but manufactured on a 3D printer as required.
I really need my mother to program it) I’m still thinking about what to get into. I want two on the sides - a dashboard and a glove compartment and a windshield vent.
The deflectors do not need to be selected, but produced on a 3D printer as required.
I was still thinking about going to the epicenter and seeing what kind of ventilation grilles there are)
Andriy1352 , Don't torment the car. With proper cooling, everything in the Lada sweats normally. And if it’s in the rear with a heater, then there are no problems at all. To prevent sweating a lot, let’s say in the snow, I constantly left the car at night and drained and still drain the machmala from the mats and tap them.
How can I compare? The only thing that needs to be done right away is to service the stove, clean the honeycombs and seal the radiator seat, because I climbed there the last time on the 10th, when I replaced the radiator (as expected, without a garage))
Source
Features of the electrical network
In a VAZ 2106 car, the following are constantly energized, regardless of the position of the key in the ignition switch:
- Electrical circuit of sound signals (horn);
- Brake light bulbs;
- Alarm;
- Cigarette lighter;
- Plug socket for a portable lamp;
- Illumination lamps built into the ends of the front doors.
For reference: The factory instructions inform you that this was done specifically for emergency situations. For example, to prevent a possible accident, when the safety of people and vehicles depends on the speed of response to a threat.
Design of the rear window heating system
The system that helps clear the rear window of ice, snow or fog is not very complicated in design. The electrical circuit in general terms can be depicted as follows:
- C - generator.
- E230 - OZS system switch.
- J519 - on-board electrical network control unit.
- Z1 - heating element of the OZS system.
Although there may be some differences in different car models, nevertheless, if we consider it in detail, then in principle it includes the following main elements.
- Mounting block.
- Ignition switch.
- Heating switch ZS.
- Indicator lamp signaling the activation of the OZS.
- Heating element of the OZS system.
K6 - additional relay. K7 - OZS switching relay. A - connection to power systems.
In addition, the system has fuses, terminals and wires that connect all elements into a single whole.
When the ignition key is turned, the OZS is turned on by pressing a button, to which power is supplied through an additional relay K6. At the same time, the rear window heating relay K7 is activated, the heating element is connected and at the same time the control light comes on.
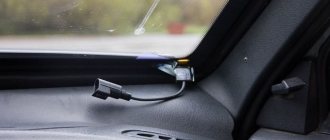
The design of the heating element on the rear window may also vary. In the standard version, it is a mesh of thin metal nickel threads, which are connected by two conductive busbars located on opposite sides. On one side, a 12V current is supplied to the bus, and on the other, the bus is shorted to ground. Such devices are attached to the glass using special glue.
On some car models, the heating element is applied to the glass using spraying, for example, aluminum. A thin film with good light transmission is attached on top of this coating using glue that conducts current.
Video - How to get rid of internal glass frost
Solving the problem of quickly removing windshield icing worries almost every driver in the winter. This is especially true for those whose car is parked. If you leave a heated car outdoors in the evening, you will find ice (frost) on the windows in the morning. The intensity of icing will depend not only on atmospheric conditions, but also on the condition of the vehicle. If there is high humidity in the cabin for any reason, icing at subzero temperatures cannot be avoided in any case. And in order to defrost the windshield using the standard heating system, you will have to spend a lot of time burning precious fuel.
Quick defrost options
There are many ways to quickly defrost a windshield. However, not all of them are effective and safe. Many people believe that the simplest method of removing ice from the windshield is to remove the frost with a scraper or pour hot water on it. Let us immediately note that these procedures lead to the appearance of microcracks on the surface of the glazing. This may subsequently cause the glass to break.
- Industrial alcohol
. According to the experience of experienced craftsmen, you can quickly defrost a windshield using technical 90% alcohol and a regular plastic sprayer. After processing, the ice on the windshield almost immediately turns into a jelly-like state. Having removed this “mush” with a brush or rag in a few minutes, you can immediately hit the road after the engine has warmed up. - Chemicals
. To quickly defrost glass, you can also use various chemical compositions, which today are presented in a large assortment in any household chemicals store. However, not all of these drugs are effective, so you should be more careful when choosing them.
- Salty water
. If you don’t have any special defrosting liquids on hand at this moment, you can use the old proven remedy - salt water. Mix 2-3 tablespoons of salt in one liter of warm water and pour the solution into a regular spray bottle. Spray generously onto the icy surface, and then remove the remaining ice with a rag. In this case, you need to avoid getting the salt solution on the seals and plastic. - Saline swabs
. If you don't have a spray bottle, you can make swabs by wrapping a "mush" of salt in a rag and then blotting the ice onto the glass. After defrosting the glass, do not forget to wipe the glass with a clean cloth. - Salt and glycerin
. You can remove frost from the inside of glass using a glycerin solution. To prepare it you will need two parts glycerin, one part table salt and a regular spray bottle.
You can make such protection yourself or buy a complete set in a store. The film will prevent frost from forming, and you will not have to defrost the glass in the morning. If there is no film, as a last resort, try to cover the windshield with any other material. In this case, do not forget to first equalize the air temperature in the cabin with the environment. If you do this, then in any frost there will be minimal icing.
The windows in the car freeze from the inside, what should I do? Many Russian car enthusiasts have probably encountered this problem. Our climate is famous for its low temperatures in winter, so every driver is faced with the problem of frozen windows.
In addition to the negative aesthetic side, this can lead to unpleasant consequences in the form of accidents. Because poor visibility makes it more difficult for the driver to see the danger. And starting every morning by cleaning or warming all frozen windows is simply unrealistic. That is why many car enthusiasts are interested in a very winter question - when the windows in the car freeze from the inside, what to do? After all, everyone understands why glass freezes on the outside.
(K) Electrical | Thread starter: Carantoc
Guys, please give me a wiring diagram for the ESP, foglights and heated rear window! Very necessary..
Zhenya (Ingegun) https://vkontakte.ru/photo-10692_139553255 these are fog lights. Connect the rear window heating in the same way. I need to think about ESP, I haven’t encountered this yet
Artyom (Margarethe) Hello everyone! Need advice from a COMPETENT ELECTRICIAN. I have the following problem: I turn on the low beam (everything is fine), turn on the high beam (LEVER TO THE VERY BOTTOM.) The left side of the headlight lights up as it should, but the right inner one does not light up + the outer xenon starts blinking. My actions: 1 I decided that the right xenon unit was screwed! (I installed a regular H4 lamp, although a 24-volt one was at hand, the main idea is the same:) in general, when the high beam was turned on, it began to dim (this was a consequence of the xenon blinking, i.e. low voltage) 2 separately connected the plus and minus to the direct one H1 and turned on the high beam, I realized that both the plus and minus that fit this lamp normally do not supply electricity at all! What the. 3 I installed a new relay to check, the same song. 4 under the hood and near the optics, I checked all the ground wires + the fuses are intact (I changed them to a new one because when I turn on the high beam, it shorts somewhere and the old one is a little overheated) AND WHEN I PULL THE LEVER TO MYSELF TO BLINK, THE RIGHT SIDE OF THE XE NON DOES NOT BLINK, ALTHOUGH AND THE FAR DOES NOT BURN.
Zhenya (Ingegun) Artyom, is it the same when the ignition is on or does everything work fine?
Zhenya (Ingegun) I’ll be honest) I’m not a very competent electrician. but I’ll try to help in any way I can)
Zhenya (Ingegun) Artyom. I'm leaving home now. I'll try to figure out what could be the matter. If I figure it out, I'll post it tomorrow
Artyom (Margarethe) Thanks Zhenya:) it makes no difference with or without ignition. I'm a fool myself when it comes to electrics :) but purely logically, I think I've tried everything! )))
Damn Zhenya (Ingegun). the head explodes. everything would have been resolved somehow if it weren’t for this point “AND WHEN I PULL THE LEVER TO MYSELF TO BLINK, THE RIGHT SIDE XENON DOESN’T BLINK, ALTHOUGH THE FAR ONE DOESN’T BURN. “fuck and why did I skip classes when they were talking about the VAZ 2106 ((in general, the most that aroused suspicion in me was that you don’t have a Mask somewhere. If the light dims, there’s definitely no Mask. Look under the instrument panel. Oh yes. That’s the topic I was in a VAZ 2108. Only there the ignition also played a role. I found a way out. Under the instrument panel, the father and mother were oxidized. Namely 3 wires. There are a lot of them. I cleaned it and everything is fine. If everything worked fine for you and you didn’t go anywhere, then Most likely the ground wire has fallen off somewhere or has oxidized. Look under the instrument panel. Unfortunately, there are no more ideas.
Toha (Kamana) Or look at the same mother folders directly under the hood in the places where the connections go, it was just disconnected!!
Mikhail (Gaddi) Contact, contact and contact again. Look at the black wires that go inside the headlights to the body of the car. If there are signs of oxide, tear them off, clean them and fasten them properly and you will be happy!
Artyom (Margarethe) THANK YOU! ) Once I fix the problem, I’ll be sure to post.
Zhenya (Ingegun) let’s wait) be sure to write about it) we’ll know what to advise for the future)
Victor (Huata) Zhenya [zhǝnʁ] Gomenyuk thank you very much for the diagram! The fog lights have been hanging on the bumper for a year now and still can’t connect them
Artyom (Margarethe) Zhenya, and everyone else, you can laugh at me))) Remember #3, so here’s the answer: today, after all, I stopped by the electrician. In short, the light bulb burned out X))) but most likely it was like this: the mass really disappeared, but in the process of all the experiments on the electrics, the H1 lamp of which I called +/- (#3.2) burned out, and at the same time I eliminated the loss of mass! I’m writing and laughing X))) now I wish I could go back and laugh at myself, as I call with an optimistic face like a burnt lamp +/-)))))))
Where is
Over the entire production period of the car of the model in question, quite a lot of different modifications were produced. But it is worth noting: on most VAZ 2106 cars, sensors are installed in special sockets on the cylinder blocks.
The latest models of the VAZ 2106 car were equipped with specially designed thermostats. A temperature sensor monitoring the state of antifreeze was located in them. But such designs are relatively rare.
In the latter case, the sensor is located next to the pipe - it is through it that hot antifreeze enters the radiator. Thanks to this arrangement, it is possible to obtain the most accurate data. The sensor itself, due to the simplicity of its design, fails relatively rarely. Problems arise during long-term use. Gradually the thermistor changes its resistance. As a result, the electronic control unit receives incorrect data.
Main signs of sensor malfunction:
- the presence of a large amount of oxides on the surface of the case - if there is a green coating (brass oxide), the cause of the breakdown lies precisely in it;
- a significant increase in gasoline consumption - incorrect data transmitted to the electronic control unit often leads to an increase in the amount of fuel supplied when there is no need for it;
- problems with the engine - it is difficult to start it when cold, the engine suddenly stalls, and idles unstable.
There is no point in repairing the temperature sensor on a VAZ 2106. If a breakdown occurs, it should simply be replaced with a new one. Its cost is from 200 rubles.
Installation
Installation of the rear door glass is performed in the reverse order, following the previously marked mark on the cable.
| Type | lateral |
| Brand | VAZ |
| Model | 2106 |
| Eurocode | 4500FCLS4RD |
| Width | 543 mm |
| Height | 429 mm |
| Installation cost | 1500 rub. |
| Installation/replacement time | 1 hour |
| Cost of tinting | 1000 rubles |
| Tinting time | 40-60 minutes |
| Price | 428 rub. |
| Color | Transparent |
| Car body | Sedan - 4 doors. |
| Side window position | Rear door |
| Anti-glare coating | No |
| Openable | No |
| Encapsulation | No |
| Privacy Glass | No |
Call us at +7 and we will help you select glass for your car
| Name | Eurocode | Manufacturer | price, rub. |
| Glass - front window on a VAZ 2106 |
Range
Huge selection of auto glass from well-known manufacturers.
The cost of a call is from 800 rubles. Installation time - 3 hours.
Installation centers in different districts of Moscow.
A guarantee is provided for all types of work.
In the VAZ Six, as in other cars, comfort and safety are ensured by car windows. As the vehicle is used, they are exposed to negative environmental factors, which leads to gradual damage to the surface. Ultimately, one glass or another has to be replaced. This procedure is simple and can be done by every Zhiguli owner.
Rear window heating repair
To troubleshoot the heated rear window, you should start by determining the cause of its failure. If the individual threads of the heating element do not heat up, the threads have broken somewhere.
Note: to check the operation of the heating filaments (elements), you can use a regular tester, measure the resistance at the ends of each strip with an ohmmeter, or switch the multimeter to the “ringing” mode and determine where the break occurred.
Repair in this situation consists of restoring the electrical circuit. To do this, you can try to restore the heating circuit using a special conductive glue, or solder the disconnection point. At the gluing site, the glass will heat up more due to the greater resistance in this section of the circuit, which can lead to the glass breaking.
We recommend not doing these “things” for the sake of saving, but simply replacing the rear window with a heating element. Believe me, you will spend much more time and money, worry about soldering, and in the end, you will still come to the conclusion - buy new glass.
Option 2 - not a single heating thread (strip) heats up
Connection diagram for heated rear window of VAZ 2106
- faulty button (switch), relay, rear window heating fuse
- wires are damaged
- tips are oxidized or poorly connected
- The contact from the glass heating element has become disconnected.
Replace faulty switch, relay, fuse, wires with new ones. Clean and crimp the terminals. If the terminal is unsoldered from the heating element, replace the glass with the heating element.
/yycoridive.md
connection diagram for rear window heater VAZ 2107
We are looking for faults in the heated rear window of the VAZ and. This is the scheme. rear heater. Electrical diagram of a VAZ-2107 car 1. rear window. connections to. Rear heater diagram. glass vaz 2107. Diagram. connection diagram. . heated rear window 28 Scheme. connection diagram. VAZ 2107; Scheme. ELECTRICAL EQUIPMENT SCHEMES VAZ 2105 Scheme. Rear window heating element and. The connection diagram for the rear window heater of a VAZ 2107 car is very simple, if you have. . VAZ rear window.. and repair of the rear window heater. VAZ 2101-2107; . rear window, repair and maintenance manual for VAZ 2107. rear heater. VAZ car. Electrical equipment diagram. rear window heating relay;. . that the rear window is heated. in violation of connection contacts. Carburetor VAZ 2107:. Rear window heating system on a Lada Priora VAZ 2170 - diagram. rear window. Connection diagram for VAZ 2106 rear heater. rear window. VAZ 2107. VAZ 2108. VAZ 2109. VAZ 2110. VAZ 2114.. that the heated rear window of the VAZ does not work. Feb 01, 2008 ·. rear window. connection diagram in the topic. rear heater diagram. . heated rear window. car VAZ 2107. wiring for connection. Connection diagram for VAZ 2106 rear heater. rear window of VAZ 2106. Electrical diagram of a VAZ car. connection to the rear window on a VAZ. . Connection diagram for VAZ 2110 rear heater. rear window. activation of the rear window washer relay. heater glass. VAZ.2107.scheme. How to connect the heated rear window.. what to connect. rear heater. We repair the rear window defroster on a car. Most modern cars. Scheme k1 of the rear window washer time relay 24. VAZ 2104 connection diagram. VAZ 2107. . relay and connector “10” for connecting the rear heater. rear window (for a VAZ. Heated rear window of a VAZ:. Wiring connection diagram. Electrical diagram of a VAZ 2107. Diagram. Fuse block of a VAZ 2107.. rear window.. heater contacts and. rear window heating relay VAZ. VAZ 2101-2107?. rear heater. Electrical wiring of VAZ 2114. Connection diagram. relay for connecting the heater winding. VAZ 2106 diagram gives. Connection diagram for VAZ 2106 this. turning on the rear heater. Electrical connection diagram. rear window of VAZ 2107.. diagram for the heater. VAZ central locking diagram and. Tuning VAZ 2101 -2107; Repair of the rear heater. Therefore, first of all, let's open the hood of the VAZ 2107 and the rear window heater and... No. 9 in models VAZ-2105 and -2107/ and the rear window heater of the VAZ car.
- © 2022 GitHub, Inc.
- Terms
- Privacy
- Security
- Status
- Help
- Contact GitHub
- Pricing
- API
- Training
- Blog
- About
You can't perform that action at this time.
You signed in with another tab or window. Reload to refresh your session. You signed out in another tab or window. Reload to refresh your session.
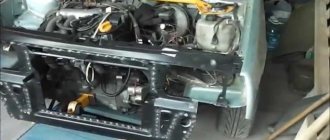
How to replace the fuse block on a VAZ 2106
VAZ 2106 fuse box - change
Usually, changing fuses on a VAZ 2106 is carried out at the most sudden moment. After all, they can fail at any moment. For this purpose, the driver is always required to have a set of new fuses with him, so that if they fail, they can be quickly replaced. But it also happens that repairing the fuses alone does not solve the problem.
Then only changing the fuse block in the VAZ 2106 helps.
The old mounting block becomes unusable and thus, only changing the fuse block for the VAZ 2106 is the only correct solution.
It should not be said that after changing the fuse box on a VAZ 2106, the driver will not be distracted for a long time by eliminating problems associated with electronic components.
A thorough inspection of the block and its diagram
On a VAZ 2106, changing the fuse box, which is also called the black box, is carried out after a painstaking check of it and the relay. As is clear, any mounting block consists of a circuit that the driver can find on the cover from the inside. For example, the circuit diagram of the mounting block on a VAZ 2106 car consists of fuses running from left to right:
VAZ 2106 fuse box diagram
- number 1 – responsible for lamps, sound signals, cigarette lighter and front door alarm lights, as well as a clock (the power of this type of fuse is 16 A);
- numbers 2 with a power of 8 A - is responsible for the operation of the windshield wiper and relay, as well as the operation of the windshield electric motor and heater;
- 3 – responsible for the left high-beam headlights and the turn-on warning lamp;
- fuse 4 is responsible for the right high-beam headlights;
- fuse 5 – monitors the operation of the left low-beam headlights;
- fuse 6 – is responsible for the operation of the right low-beam headlights;
- numbers 7 – controls the left front side light and the right rear side light, as well as the license plate lamp;
- numbers 8 are responsible for the right front side marker light and the left rear side light, as well as the engine compartment lamp and warning lamp;
- numbers 9 - responsible for the oil pressure indicator, cooling water temperature, brake light, turn signals, battery warning light, tachometer, reverse lamp, trunk lamp;
- numbers 10 – responsible for the voltage regulator and the generator excitation winding;
- fuses 11-13 – which are spare;
- fuse 14 – regulates the rear window heating element;
- numbers 15 are responsible for the electric motor of the engine cooling system fan;
- numbers 16 are responsible for the emergency signal indicators.
Replacing fuses and block VAZ 2106
Changing the fuse block of the VAZ 2106 is carried out after you arm yourself with a mounting block of blade fuses from the GAZ 3110, which is perfectly suitable. Apart from this, you need to prepare a wire with a cross-section of about 2 square meters. mm, which will serve to create jumpers. Changing blade fuses for a VAZ 2106 begins with the following steps:
- the block is unscrewed and pulled down as far as the wires allow;
- jumpers are prepared at home (only 5 of them need to be made);
- changing VAZ 2106 fuses to blade fuses involves making homemade jumpers according to the diagram;
Fuses
The main electrical equipment of the VAZ 2106 car is protected by fuses.
They are arranged in blocks:
- Basic;
- Additional;
And they are located on the left side of the driver's seat under the instrument panel.
The diagram shows numbers and arrows:
- lock drive lever on the hood of the car;
- main fuse box;
- additional fuse block.
For reference: the VAZ 2106 generator and the wiring to it, as well as the charging wire for the battery, starter, ignition coil, power supply for the headlight high beam relay are not equipped with fuses.
The main fuse block on the VAZ 2106 is responsible for the safety of all electrical systems. And depending on the technical features of their operation, the rated resistance of the fuses depends.
For reference: if the current in one of the protected circuits exceeds the permissible value, the fuse thread will melt and open the circuit. As a result, the electrical wiring on the VAZ 2106, as well as connected instruments and devices, will not be damaged.
The additional fuse box protects:
- circuit to the cooling fan motor;
- chain of direction indicators and hazard warning lights.