DIY technology for replacing antifreeze on injection VAZ 2109
The replacement concept involves draining the used compound through special holes and filling the system with new antifreeze. The designers provide two drain holes in the cooling system of VAZ engines:
- on the left side of the main radiator;
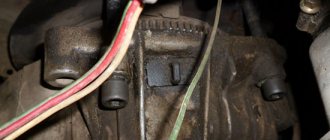
- on the front wall of the cylinder block.
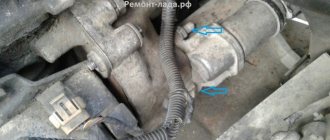
Replacing antifreeze on VAZ 2109 engines is not possible without first dismantling the ignition module located on the front surface of the cylinder block:
- remove the negative terminal from the battery;
- disconnect the wires from the spark plugs;
- remove the ignition module power supply block;
- unscrew the bolts securing the module relative to the cylinder block and clutch housing;
- loosen the upper left bolt of the front engine mount;
- remove the module bracket from under the bolt;
- remove the module with wires from the engine compartment.
Draining of used antifreeze is carried out according to the following method:
- open the heater tap;
- connect the expansion tank to the atmosphere by unscrewing the cap (under such conditions, rapid flow of liquid from the system is ensured);
- place the container and unscrew the cap in the lower left corner of the engine radiator, wait for the liquid to drain;
- Unscrew the drain nut on the cylinder block and drain the coolant from the “jacket”.
For your information. If the drained liquid is dirty and rich in various inclusions, the system should be flushed with plain water:
- clog the drain holes;
- pour water through the expansion tank and close it;
- start the engine for 3-4 minutes;
- shut down and drain.
The operation is repeated until the waste water is clean.
Having removed all the liquid from the system, you should:
- install all drain fittings back;
- install the ignition module in reverse order;
- connect the vehicle's ground to the battery;
- pour new antifreeze through the expansion tank (see filling technology below);
- start the engine for 1-2 minutes;
- add coolant and close the expansion tank;
- warm up the engine until the cooling fan operates and turn off;
- if necessary, add coolant to the virtual average mark (between MIN and MAX).
Sequencing
First, we’ll tell you how to replace this part yourself. You will need to prepare the car - sequentially disassemble it from the engine compartment so that you have access to the radiator. Dismantle it and the old part. Next you need to do:
- Sand the new part (it is covered with shipping primer) and re-paint it with automotive primer. Do this only in advance, since later it will be impossible to do this work from the engine compartment.
- Use a chisel and hammer to remove the old grate.
- Clean the welding points, putty and coat with primer. Take measurements and weld the new frame. Place the weld points where they were.
- Paint the outside of the structure. It is advisable to additionally cover it with anti-gravel.
- Reassemble the car in reverse order.
Article on the topic: Which Dyson cordless vacuum cleaner to choose
Replacing the TV is extremely important, since if it is weak, it may sag and break. The cost of this work at a service station is quite high, so car enthusiasts often try to make the replacement themselves.
Replacement
To carry out repair work, you need to prepare tools, materials, power tools:
- complete set of keys;
- locksmith - chisel, hammer;
- electric welding machine;
- electrodes dia. 2 mm;
- drill;
- drill dia. 5-6 mm;
- a grinder with a grinding wheel, have a metal disc in stock;
- primer;
- paint;
- solvent;
- aerosol can with anti-gravel composition in black Body 950;
- cotton gloves;
- canvas mittens;
- rags;
- fire extinguisher – you need to check the expiration date;
- plastic containers for 6-7 liters, they can be made from 10 liter canisters;
- safety glasses;
- tassels;
- moisture-resistant sandpaper.
Preparing the machine
Replacing the lower cross member of the VAZ 2109 radiator frame
Place the vehicle on a level surface:
- Open the hood.
- Open the expansion tank cap.
- Place a container under the cooling radiator and open the drain plug.
- Drain the antifreeze.
- Place the second prepared container under the engine and drain the antifreeze from it.
- After this, install and tighten the plugs.
- Disconnect both terminals from the battery.
- Remove the battery.
- Place wheel chocks under the rear wheels.
- Raise the front of the car with a jack.
- Install standard supports.
- Align the front part of the body level. You can apply a level.
- Remove the front decorative grille.
- Unscrew the headlight mounts from the engine compartment and disconnect the terminals.
- Take them out and put them on a rack in the garage.
- Unscrew the upper radiator mounting. First remove the electrical wiring terminals from the fan and remove the wires as far as possible from the intended work area. If possible, wrap the wires with tarpaulin.
- Tilt the radiator towards the engine and unscrew the clamps securing the pipes.
- Remove the pipes. Move them away from the front end.
- Remove the radiator and fan assembly.
- Remove the radiator inserts from the lower channel.
Preparing the frame
VAZ 2109 radiator frame panel
When carrying out work by one car enthusiast, it is necessary to prepare the purchased parts:
Clean frame parts from transport primer
Pay special attention to welding points and bends. Boil the joints by welding
Clean with a grinder. If necessary, straighten. Apply a solvent with a brush to degrease the metal. It is necessary to prime the internal parts first, since after they are installed from the engine they become inaccessible. After checking these parts on site, mark them. Connect them together with clamps. Carry out welding work to connect them
Start welding parts from the top and gradually move to the bottom. Clean welded joints. Strip the front of the frame down to metal. Cover with primer, then paint with one coat of paint. The sealant is applied.
While the parts are drying, you need to cut off the old frame.
Removing the old frame
- Using an electric drill, drill out the spot welds at the fastening points. The outer part of the frame is welded to the side members (see Replacing the front side member on a VAZ on your own).
- Now use a chisel to cut off the remaining weld seams.
Replacing TV VAZ 2109
VAZ 21099
How to replace the front spar on a Nine
Replacing the front side members 2108-09 must be done on a slipway; in a regular car service without special equipment, it is very difficult to perform such work, and in some cases it is simply impossible. Before starting body repairs, it is necessary to partially disassemble the car, remove from the car:
- front optics and bumper;
- hood;
- radiator grille;
- expansion tank;
- radiator;
- front wing (on the side where the submarine changes);
If the car's hardware is sufficiently rusty that you have to additionally change (repair) other body elements, you may have to remove the gearbox and engine. The body repair itself is performed in the following order:
- the old spar is cut off (usually using a grinder or a gas cutter) so that the new part “falls” into place better, a beveled cut is made;
- the new submarine is cleaned of transportation soil;
- At the seat, rust, dust and dirt are removed from the metal; a grinder is used for this. A good result can be achieved by using a sandblasting machine; to remove traces of corrosion, a rust converter is needed;
- The new spar is butt welded, first tackling it in several places. Before final welding, the geometry of the body is checked; if the work is not done on a stand, the correct installation of the part is verified using control points:
- after welding work, the metal surface is cleaned again, degreased, the weld seam is treated with mastic, and primer is applied;
- After the primer has completely dried, the replaced body part is painted in the color of the body, and the car is assembled.
Article on the topic: How long can salted salmon be stored in the refrigerator?
As a rule, one body element on a car is rarely changed; along with the submarine, a new “TV”, upper radiator frame, and panels (mud flaps) of the front wings have to be installed. And the front spar on the nine is not always completely changed; most often it is cut off along the “glass”.
Replacing a VAZ 2109 TV
It’s easy to replace the “TV” radiator frame on a VAZ! Especially if you have a grinder and a welder on hand. This is not a lesson, I'm not teaching anyone, I'm just showing how I do it.
Hello everyone, my name is Danil, you are watching the main garage channel and today we are changing the TV on nine, the car has been dismantled, now we have access. Wings have been removed from all sides of the TV and will attack us enough to hang it to this place now.
You need to unscrew the cushion under the jack the engine and it starts to cut off so much.
The TV looks like this, that is, it consists of two halves. Let's cook, set, grab some steam.
- Let's estimate the headlights and bumper and then we'll completely scald it, so we'll knit it in these places, that is, as usual, I leave this place where the points are cut out like that with a grinder, here it's caught here by the spar in this.
- The place is exactly the same on the other side, so well.
- And from below there is also a rib.
- The top half of the TV has been removed.
- Now we will take on the bottom of these.
- In places where you need to crawl up, in theory you need to drill here, drilling is in no way subject to sleep at these points and therefore we will.
- In parts they managed to remove it in half and there it was.
Pay attention to how some masters do welding here on this machine. Inserts under the crab reinforcement and here it is
Together, in this we see whether there was such a sandwich, that is, who made it, cut out the metal, and so this strip itself did not remove, that is, these are the strips that remain.
They remain and just some people are right on the wheels on this accident from above, that is, it does not need to be removed immediately. Drill this one out to remove the strip, you need to set this point then bend it, that’s how I’ll do it now, in this place it’s removed.
It is drilled and taps out, it’s all very good.
It takes a long time and that’s why some masters do it this way to save time, that is, even here it is itself.
3 on one for death therefore pay attention to. This is important if you do it like a master, but it’s better not to do it yourself little by little. In a hurry, you cut it into pieces. In order to remove the TV, I basically crumbled it all, that is, it’s all in one piece here.
Now I'll delete all these stripes. And we will put up the TV.
So all the unnecessary elements have been removed; all the stripes are not needed; now we are preparing new parts of the TV; welding; a hole is inserted along the perimeter of the mating elements from top to bottom by 2 also.
We clean the paint around the holes.
I'll get the weld stuck now. We set it up, we fasten everything with screws, we install the headlights, we look at the gaps and then we say that the top part of the TV is pre-set, the places that we will weld on the second part are cleaned, it all rests on.
- Self-tapping screws.
- Now we want to use self-tapping screws.
- Strengthen it a little, not from the TV, but this place we want to weld a square profile pipe from this point and we will go there.
- We say we will weld it to this wall and then at the top, then here the second part will be in front, we will weld it with points, that is, we will slightly strengthen the TV in that place and then the second one.
- Half of the top is new.
So cut out and grab the amplifier in place in the form of a square. 60 by 60 50 by 50 50 by 50 by year on.
We'll see how he doesn't grab the glasses.
The holes are drilled here.
There's a bigger pillow here and on this side here we'll boil it from to these. Round holes, that is, this one.
The square will not fit the bottom of the TV. To turn around like this, since Richie is here, it means he’s a little heavier. The valve and this pillow presses down and...
Thus, turning the TV around like this, it bursts in places like a square, it won’t allow you to turn not behind the TV in this place, now we’ll throw on the other half and see how it will be, then we’ll fix everything with screws, weld the screws, unscrew the holes for them, weld them, and also estimate the headlights in place .
- We looked at the gaps, everything seems to be fine, but we remove the headlights, remove the front part of this TV, weld the inside, weld the amplifier, apply dota to the front part and finally boil everything and assemble it all.
- The structure, welded together, is now a monolith. In addition, they decided to put a guy at the bottom like this that ties the ship together; it definitely won’t be superfluous.
- Maybe it will help increase rigidity, although I doubt this is the case in general.
- And it turned out that the muzzle is still in place now.
- We will collect.
- Everything is cooked everywhere.
- That's all, like and subscribe to the channel bye everyone
Increasing the rigidity of the VAZ body
Increasing body rigidity is of no small importance in tuning.
When cornering and sharp turns, it greatly affects the car's handling. The main characteristic of the body is torsional rigidity. If the rigidity is small, then during various maneuvers, the steering response becomes “smeared”, the body is deformed and twisted, and the suspension begins to work incorrectly. Constant deformation leads to metal fatigue, welding points are slowly destroyed, moisture and other aggressive substances enter them, which inevitably leads to corrosion. When designing a body, designers take into account many factors, such as weight, stiffness, passive safety and others, and look for a compromise between them. In recent years, computer modeling has come to their aid, but it is still difficult to work out all the factors, so tuning experts correct some errors and design flaws. The torsional rigidity of the body is measured in Newton•meters per degree (Nm/deg), the higher the value, the stiffer the body. The type of body also affects rigidity: two-volume hatchbacks are stiffer than three-volume sedans. The number of doors and the location of the power unit also affect the rigidity of the body. Here are some test results at the AvtoVAZ stand: Vehicle Body type Stiffness, Nm/deg
VAZ 1111 Oka 3-door hatchback 7000 VAZ 21043 Station wagon 6300 VAZ 2105 Sedan 7300 VAZ 2106 Sedan 6500 VAZ 2107 Sedan 7200 VAZ 21083 3-door hatchback 8200 VAZ 21093 5-door new hatchback 6800 VAZ 21099 Sedan 5500 VAZ 2115 Sedan 5500 VAZ 2110 Sedan 8000 VAZ 21102 Sedan 8400 VAZ 2111 Station wagon 7400 VAZ 2112 5-door hatchback 8100 VAZ 21106 Sedan 12200 VAZ 21213 Niva 3-door hatchback 8900 VAZ 2131 Niva 5 door hatchback 7400 VAZ 2123 Chevrolet Niva 5-door hatchback 12000 VAZ 2120 Nadezhda 4-door minivan 10000
Vehicle Year of measurement Body type Stiffness, Nm/deg
Daewoo Lanos 1997 3-door hatchback 10500 Fiat Tempra 1994 Sedan 6700 Ford Fiesta 1995 3-door hatchback 6500 Opel Corsa 1999 3-door hatchback 8000 Opel Astra 1998 5-door hatchback 11700 Toyota Corolla 19 95 3-door hatchback 10500
Modern foreign cars, such as Volvo S60, Alfa Romeo 147, Citroen C5, have a hardness of about 20,000 Nm/deg. So how do they increase the torsional rigidity of the body? The easiest way is to install spacers and guy wires.
Many people claim that it is of no use, but this is not true. Many tests have been conducted that prove otherwise. With this device, changing lanes and cornering are more confident and at higher speeds. The degree of deformation is also reduced, which has a beneficial effect on the durability of the body. front struts for body rigidity For cars with a rigid front suspension, it is recommended to install “softer” struts, but with the standard one you can install reinforced ones. It is better to install parts from well-known manufacturers, such as AVTOPRODUCT, TEKHNOMASTER, and not “nameless” ones that are made in the garage or basement, and select them for a specific car, with a specific engine, otherwise problems may arise during installation, such as touching the pipes, reservoir with brake fluid, or better yet, take a receipt so that you can change it later in case of a discrepancy.
Creates reinforcement for the rear of the body. The VAZ 2111-12 needs such a spacer more than the 2108-09, where the rear seat plays an element of body rigidity, since in the 12th the seats fold out, the rigidity of the body in this place is low. rear strut for body rigidity Reduces the movement of the upper mounting points of the struts, increases overall body rigidity and handling. Has a positive effect on the durability of the body. There is an even more rigid structure, placed behind the back of the rear seat - this is a rear body reinforcement.
As stated, rigidity increases by 20-25%, handling and road stability improves. The car's response when cornering increases. rear strut for body rigidity.
Reduces play of the steering rack housing in the mounting clamps, significantly improves vehicle handling. Used to increase the rigidity of the front panel, reduces the amplitude of movement of the steering rack housing: in the longitudinal direction by 2 times, in the transverse direction by 5 times
Increases the rigidity of the body as a whole. There are subframes with additional engine support, which improves the engine mount. Some subframes are quite difficult to install, sometimes you have to digest some parts of the front end.
A procedure such as increasing weld seams is also used; at the factory, body parts are welded using spot welding, which makes the body less rigid. Additional metal plates and reinforcements are welded into weak spots of the body.
A more complex stage of strengthening the body is the installation of a tubular safety cage. They are professional for competitions and “civilian”, the latter are simpler and cheaper. They are divided into welded
and
collapsible
, the first are welded into the load-bearing structure of the body, and in the second case, only the fasteners are welded, and the pipes are already screwed to them.
The main disadvantage of frames is the weight, the average frame weighs about 40 kg. It will also take longer to undergo technical inspection. roll cage In addition, visibility deteriorates, and boarding/disembarking passengers becomes more difficult, but it’s up to you to decide whether to have it or not.
For example, in European countries, almost every second tuning car has a roll cage.
But the safety cage can also cause serious harm. In racing conditions, it protects the living space and strengthens the body; in everyday life, it can become dangerous, since the use of inelastic seat belts in an accident can lead to severe overloads and injuries, including rupture of internal organs .
there is a crack in the mudguard on a VAZ 2109, they say it is dangerous, help!
Thread starter Warri802, 14.1.2009, 19:38
Log in to reply to this topic
Users-2
56 messages
- Offline
- Card
- PM
Message added 4.2.2009, 18:54
Users-2
2,217 messages
15
- Offline
- Card
- PM
Message added 4.2.2009, 19:59
Users-2
13 messages
- Offline
- Card
- PM
Message added 11/23/2010, 08:54 pm
Thumbnails of attached images
Users-2
975 messages
3
- Offline
- Card
- PM
Message added 11/23/2010, 9:11 pm
Users-2
13 messages
- Offline
- Card
- PM
Message added 11/23/2010, 9:27 pm
Users-2
2,217 messages
15
- Offline
- Card
- PM
Message added 11/23/2010, 10:33 pm
Users-2
975 messages
3
- Offline
- Card
- PM
Message added 11/23/2010, 11:32 pm
Users-2
29 messages
- Offline
- Card
- PM
Message added November 28, 2010, 2:07 am
#29 jake746
Users-2
21 messages
- Offline
- Card
- PM
Message added 12/7/2010, 4:16 pm
Do you want to say that you presented a car with a welded license plate for inspection to the traffic police and you did not have any problems? If so, then you are very lucky.
The search for factory welding points is carried out during the examination, where you will be sent after welding the numbered parts. Documents for the car are confiscated and a certificate of safe storage is issued. Based on the results of the examination, either a refusal to initiate a criminal case on changing the factory markings, or the progress of this case. Everything takes just a couple of months. Bullshit, of course, not problems :-)))))
Post edited by jake746
— 7.12.2010, 16:17
#30 Strannik_98rus
Users-2
29 messages
- Offline
- Card
- PM
Message added 12/8/2010, 0:53
Do you want to say that you presented a car with a welded license plate for inspection to the traffic police and you did not have any problems? If so, then you are very lucky.
The search for factory welding points is carried out during the examination, where you will be sent after welding the numbered parts. Documents for the car are confiscated and a certificate of safe storage is issued. Based on the results of the examination, either a refusal to initiate a criminal case on changing the factory markings, or the progress of this case. Everything takes just a couple of months. Bullshit, of course, not problems :-)))))
I just want to say what I wrote. quote; ". On my car, the whole burdock is overcooked from the muzzle to the rack.” , there is no talk about overcooked cups. I know about the experts, that’s what they told me. what and how. The point here is that the motor shield and the cup were not separated. And as I already wrote, if there is at least one factory welding point between the cup (registered) and the shield, then they (the experts) do not see the crime. But in order not to be unfounded, I will show a photo. There are still many patches missing.
And here you can see all the beauty. It is easy to see parts of the repair inserts and patches being welded to the cup. ONLY THE WHEEL SIDE, NOT THE ENGINE COMPARTMENT
And in general - a car of two bodies.
Post edited by Strannik_98rus
— 8.12.2010, 0:58
#31 jake746
Users-2
21 messages
- Offline
- Card
- PM
Message added 12/8/2010, 6:09
The point here is that the motor shield and the cup were not separated. And as I already wrote, if there is at least one factory welding point between the cup (registered) and the shield, then they (the experts) do not see the crime.
This will be the subject of the examination, whether the cup was separated from the engine compartment or not. Odd man! Do you really think that during the initial examination they will take your word for it, that they didn’t remove the cup and cooked it like that? Don’t you consider the referral for examination itself to be a problem? And then you are required to make an entry in the PTS and in the vehicle registration certificate - the right front suspension support - traces of repair work and the number of the resolution to refuse to initiate a criminal case. After this, there really won’t be any problems - come on, I don’t want to. And people leave the factory location only in order to avoid getting into much more serious problems associated with the permanent ban on the operation of the vehicle.
How to make a flower from a ribbon master class
December 13, 2016 admin
DIY ribbon flowers step by step instructions with photos
How to make a flower from a ribbon – Stylish and fashionable clothing store
Hairstyles on IriXpiX: flowers made of satin ribbons decoration
DIY ribbon flower for beginners
Ribbon roses
How to Make a Flower Bow from Ribbon Ribbon Bow Tutorial Natalidoma – AgaClip – Make Your Video Clips
Ribbon flowers. Discussion on LiveInternet - Russian Online Diary Service
Make a topiary with your own hands step by step photo
flowers from ribbons step by step photo Photo archive
Making flowers with ribbons yourself
HOW TO EASILY MAKE A FLOWER FROM RIBBON MASTER CLASS FLOWERS FROM ORGANSA – AgaClip – Make Your Video Clips
flowers from the ribbon Women's site Girls. Beauty and health, love and sex. Work and career. Sport. Pregnancy and children
Evde Kumastan Gul Yap?m? Kendin Yap
DIY satin ribbon bows for September 1
Ribbon Flowers Decor Shop
Master class Kanzashi.Ribbon flowers.Hair clip.Rose Kanzashi.Flat flower Rose Kanzashi – AgaClip – Make Your Video Clips
How to make roses from ribbons for beginners
How to make ribbons from beads Beading
Schemes for making flowers from ribbons
DIY Kanzashi flowers made from satin ribbons – AgaClip – Make Your Video Clips
Leave a comment
Design features of rotary oil pumps
As a rule, a rotary-type oil pump consists of a small number of parts, including:
- suction and discharge cavities;
- external and internal rotors;
- drive shaft.
Oil pump operation
with rotors is based on the interaction of two rotors. In unregulated designs, the oil that is drawn in is transferred into the system by rotor blades. If the pressure becomes excessive, the pressure relief valve opens and excess oil is released.
What makes them adjustable is the presence of a movable stator. It has a special adjustment spring, by tightening or twisting it you can change the volume of the chamber with the rotors, due to which the overall pressure in the system also changes. Thanks to the stator, it is possible to achieve stable pressure in the lubrication system, regardless of how intensely the crankshaft rotates.
Advantages of variable oil pumps
Today, adjustable oil pumps are considered much more acceptable than unregulated ones, because they have a number of significant advantages, including:
- about a third less power taken from the engine;
- less oil wear due to reduced frequency and speed;
- the oil foams less.
That is, an adjustable oil pump allows for smoother oil circulation and a longer interval between oil changes, which makes it a more preferable equipment.
Monolithic ceiling of the second floor video
December 13, 2016 admin
Construction Videos how to... instructional videos - Page 3
Leningrad region. Priozerskoe highway, village Yukki
Insulation of attic floors. How to insulate a wooden attic with your own hands: video
Profiled sheet for floors Overlap using a corrugated sheet watch video
Video: covering the first floor with beams, a house made of sibit, Video diary covering the first floor video online - Wellness
Pouring a monolithic floor: stages
Polystroy - Monolithic ceiling
VIDEOS — Search results for 'overlap' — video.bibib.kz
Monolithic ceiling of the ground floor » Page 2 » Construction of my house. Arrangement of a country estate.
Beginning of construction, covering the first floor, day 4 – AgaClip – Make Your Video Clips
How to make an overlap between floors: three main options
Thickness of a monolithic floor slab - Reinforced concrete structures and more
Do-it-yourself country house, pouring monolithic floors
Construction
How to build a combined house with your own hands correctly
Insulation of interfloor ceilings Do-it-yourself apartment renovation
Monolithic construction in Smolensk / Buy, find out the price on the Classifieds24 website
Do-it-yourself monolithic ceiling photo
CHELYABINSK: Prefabricated monolithic floors - price 0.00 rubles, Building materials of the Chelyabinsk region, 74-chelyabinsk.ru
Leave a comment
How to replace an oil pump
Before you begin removing the oil pump and replacing it, it is necessary to carry out preparatory work. First, make sure you have easy access to the following tools:
- set of wrenches;
- socket heads;
- universal joints;
- extension.
We remove the old pump:
- If you own a fuel-injected car, you must first remove the crankshaft position sensor from the engine. You won't have to do this with a carburetor engine.
- After this, you should completely drain the engine oil that is in the engine.
- When you have drained all the oil, you need to remove the crankshaft timing pulley.
- Now remove the oil pan, unscrew the bolts that secure the oil pan, and remove it.
- Remove the oil pump bolts using an extension.
- Move the pump using a screwdriver - to do this, insert it between the bearing and the pump.
- After all this, carefully remove the pump from the crankshaft.
Once you have removed the old oil pump, you can begin installing the new one. This must be done in the correct sequence:
- Before installing the new pump, rotate the drive gear so that it is completely aligned with the flats on the crankshaft.
- Now you need to thoroughly lubricate the working edge of the crankshaft front oil seal; use engine oil for this.
- When you have completed all the previous operations, you can install the oil pump on the crankshaft. Carefully tuck the lip of the oil seal in, and then tighten the bolts that secure the oil pump.
After this, you need to carry out the final stage of installation - collect all the parts that you removed before (including covers and gaskets) and install them in the correct order.
Sequencing
First, we’ll tell you how to replace this part yourself. You will need to prepare the car - sequentially disassemble it from the engine compartment so that you have access to the radiator. Dismantle it and the old part. Next you need to do:
- Sand the new part (it is covered with shipping primer) and re-paint it with automotive primer. Do this only in advance, since later it will be impossible to do this work from the engine compartment.
- Use a chisel and hammer to remove the old grate.
- Clean the welding points, putty and coat with primer. Take measurements and weld the new frame. Place the weld points where they were.
- Paint the outside of the structure. It is advisable to additionally cover it with anti-gravel.
- Reassemble the car in reverse order.
Article on the topic: Which TV is better ice or 4k
Replacing the TV is extremely important, as if it is weak, it may sag and break. The cost of this work at a service station is quite high, so car enthusiasts often try to make the replacement themselves.
Postcard template for February 23
December 13, 2022 admin
Postcard template for February 23 » Allday - all the best in the world of graphics and design!
DIY postcard stencils for February 23
Gallery.ru / February 23 – humorous postcard (PSD) – TEMPLATES FOR PHOTOSHOP – download (1) – solncewo
Congratulations » Department of Education of the Molchanovsky District Administration
Happy Defender of the Fatherland! — Union of Free Trade Unions
Background for postcards for February 23 (33 pictures)
Make a postcard for February 23rd. Postcard template included Tatyana Saxon's blog
Download postcard frame for February 23
Templates for presentation February 23 – Templates for presentations – File catalog – Everything for the Schoolchild
DIY postcard stencils for February 23
DIY postcard stencils for February 23
Postcard design for February 23
February 23 /templates/-article on the website “ADVERTISING SERVICES CENTER”
Postcard template for February 23 » ALLDAY - people's website about design
Lika Golden VK
February 23 frame
PSD source of the poster-card for February 23rd! » 3drus – 3D graphics, 2D graphics, web design, 3d Max, Maya, Blender, ZBrush, Adobe P
Holiday February 23rd Defenders of the Fatherland Day - For kindergarten teachers - Maam.ru
Leave a comment
Easter basket bunnies
December 13, 2016 admin
Easter basket with bunnies. Patchwork Sewing Postila
Basket of rabbits for Easter. Pattern BLOG HOUSEWIFE
DIY Easter basket with bunnies. Master class with step-by-step photos / Masterclasses Blogs
Easter with animals.
Easter Basket With Eggs And A Bunny On A Green Meadow With Flowers Stock Photo, Picture And Royalty Free Image.
Easter. Easter basket. Master Class. razpetelka.ru
Life is full of red and black crosses. — Easter basket with bunnies. Patchwork
Easter Rabbits with a basket of eggs - Photo, image, buy posters, order posters, paintings on canvas. — Russia — Posterok.com
We sew Easter baskets - sewing
Easter bunnies. Discussion on LiveInternet - Russian Online Diary Service
Basket HARE COUNTRY EASTER Orange Gifts
Easter. Easter basket. Master Class. razpetelka.ru
Baskets, boxes “Bunnies and Bunnies”. Discussion on LiveInternet - Russian Online Diary Service
Sunny bunnies Happy Easter
Stickers Easter basket 48292 production and printing to order in Minsk
Basket with bunnies / DIY / basket with flowers with your own hands / Pinme.ru / Pinme
Easter wallpaper. Discussion on LiveInternet - Russian Online Diary Service
Easter ideas and inspiration. Continuation.
rabbit basket with bow. square
Easter. Hares with a basket of eggs — Stock photo Natalia Preobrazhenskaya (natalinka) (#2023425) Stockfresh
Leave a comment
What is this?
Re-welding the bottom means updating the floor of the car using welding equipment and a number of tools. The bottom of the car is the most vulnerable place. It takes on mechanical damage, the negative effects of active chemicals, and dirt. Most often you have to deal with the corrosion process.
Overcooking the bottom of a VAZ-2112 may be required in the following cases:
- The bottom is covered with rust.
- There are holes.
- There are big cracks.
- The bottom has become thinner.
In these cases, auto technicians recommend overcooking. This work is labor-intensive and expensive. To repair a car, you need to do a number of these steps:
- Find a service station that restores VAZ-2112 cars.
- Contact the administrator and ask him about the terms of cooperation and approximate prices for services.
- Agree on a time to come to the master or call a specialist.
- Provide your vehicle to the mechanic.
- After a professional inspection, negotiate the exact cost of the work and the time frame for its completion.
- Give consent for repairs.
- Accept the job.
- Pay the specialist the previously agreed amount of money.
- Receive a warranty card for the work done.
The wizard performs a number of such actions:
- Inspects the bottom of the car.
- Makes a decision about the need to digest it.
- Cuts out the damaged part.
- A patch is welded to this place.
- Treats the area with an anti-corrosion compound, sealant and mastic to increase resistance to external negative influences.
- Provides the restored car to its owner.
For work, the specialist uses a semi-automatic welding machine, gas welding.
Order of Operations
Important! Before you start replacing the VAZ 2109 clutch cable or the entire basket, make sure that the pedal has sufficient travel in the normal range. It should be from 2 to 3 cm. To carry out repair work, you need to place the car on an inspection hole, put it on the handbrake, disconnect the negative terminal to de-energize the on-board network, remove the engine mudguard
Now you can start disassembling:
To carry out repair work, you need to place the car on an inspection hole, put it on the handbrake, disconnect the negative terminal to de-energize the on-board network, and remove the engine mudguard. Now you can start disassembling:
Install a jack that will temporarily replace the front pair of wheels. You need to unscrew the nuts on them, remove the chassis and put them aside. To remove the contact part of the ball joint from the hub, you need to unscrew the bolts. Instead of the 2 upper conventional bolts, you need to install cylinder head fasteners.
Now you can remove the starter; it is attached to three nuts that need to be unscrewed.
At this stage it is necessary to install a jack under the engine. After this, the side motor support is detached.
After this, you can disconnect the rear engine mount and unscrew the gearshift linkage.
The protective cover must be removed from the clutch.
The box is secured with several bolts; first you need to unscrew the front one. Now the transmission is accessible, the rear nut is unscrewed first.
The gearbox bolts are located on the left wing side, they need to be unscrewed until they stop and the gearbox should be removed
It is important to ensure that the end of the assembly rests on the lever extension. This will create a gap that will allow you to remove the clutch.
Disassembly is complete. At this point, the guide for the clutch remains. It must be thoroughly lubricated. After this, the release bearing can be put on the guide.
Attention! If you are sure that a new unit is needed, you can begin the assembly process. But you can disassemble the clutch and troubleshoot parts. Perhaps you just need to replace the VAZ 2109 clutch disc or cable.
If the complete kit is installed, the process begins with the installation of the VAZ 2109 clutch disc. First, the driver is installed, then the driven one. Now you can install the gearbox and secure it to the guides with the two bottom bolts. After this, you need to start moving the crankshaft, tightening the basket. It is important to fix it evenly. Note! There is always a small wear on the petals of the basket, depending on how long the car has been in use. It follows the shape of the part of the bearing that is in contact with the part. If the output is small, work can continue. But, if the petals break or bend easily, you need to change the entire basket completely.
Subsequent operations are performed in the reverse order of the above steps. Important! There is no need to rush while completing the work. All operations are performed consistently and calmly. Make sure that after assembly there are no “extra” spare parts left.
The main reasons for the destruction of the front spar
As noted above, the submarine bends from impact and rusts over time. The following also have a destructive effect on this body element:
- constant engine vibrations, especially if the engine or gearbox mounts are loose;
- driving a car on bad roads;
- extreme driving.
Since the side members are practically the skeleton of the body, a large load falls on them. All vibrations and shocks are transmitted to these elements; as a result, the body parts cannot withstand, become deformed, and cracks appear on them.
Strengthening and modernization
Strengthening or tuning the body of a VAZ 2109 according to the instructions should be carried out only if the owner is well versed in the design features of the car, has an appropriate understanding of the device, and knows the technical data on weight and other parameters. Otherwise, it is better to entrust the modernization work to professionals at the service station. True, the price of their services in these matters is too high, but you will be satisfied with the result.
So, tuning a VAZ 2109 car is, first of all, upgrading its body. The process always begins with this, and only after that the power unit and other components of the machine are brought to the desired state.
Purpose of the spar
The spar is a load-bearing body element, which is a beam, serves as the basis for fastening the components and components of the car, and also plays the role of a shock absorber, softening the impact, absorbing deformation. The “nine” is equipped with paired front and rear spars; these body elements experience significant load.
If a car can move without problems with a dented fender and a rusty door, then the car should not be driven with a deformed front spar (PL).
If this part is damaged, quite serious problems may arise:
- tires will quickly begin to be eaten away;
- the car is poorly controlled;
- the body loses strength and collapses.
If the condition of the spar is not the most critical, it can be welded, the geometry can be corrected on a special stand (slipway); in case of severe deformation or if there are cracks, the body element should be replaced. But it should immediately be noted that it is very difficult to do such work with your own hands - here it is important to accurately install the part, you must use welding. If the body element is installed incorrectly, the geometry of the body will be disrupted and the work will have to be redone.
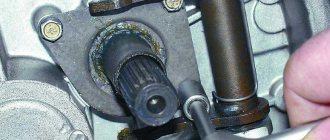
The VAZ 2109 speedometer drive is a common cause of its breakdown
The VAZ 2109 has a mechanical drive. Its driven and drive gears are mounted on the (secondary) shaft of the gearbox. From them, the torque is supplied through a flexible shaft to the car’s speedometer, which is located on the instrument panel.
It is the break of this shaft that most often becomes the reason that the speedometer stops working, and this already leads to difficulties with cornering (changing gears correctly can be quite difficult) and unpleasant meetings with traffic police officers (the likelihood of a fine for speeding is high). As a rule, the shaft breaks near the entrance to the checkpoint. You can check for a break like this:
- the shaft (flexible) is disconnected from the speedometer on the instrument panel;
- start the engine and drive 20–30 meters, while carefully monitoring the end of the shaft.
In cases where the tip is stationary (does not rotate), it must be pulled out by opening the hood and freeing the shaft from the fastening with the union nut. In cases where only its shell is pulled out, the shaft is completely torn off. The remaining tip can be removed from the drive only with pliers and nothing else. If the shaft comes out together with the shell, this means that the edges have been “eaten off” at its tip. It is not broken, but due to this defect it cannot transmit torque. However, in both the first case and the second, the flexible shaft will have to be replaced with a new one.
Why do thresholds wear out?
Thresholds are load-bearing elements that provide the body with additional rigidity. Due to the fact that these parts are located in the lower part of the body, they are constantly exposed to negative factors:
All this significantly reduces the service life of the thresholds. In addition, the mediocre quality of painting and anti-corrosion treatment of body elements from the factory leads to the fact that almost every owner of a “Nine” is faced with the need to replace the thresholds on their car.
Signs of the need to replace thresholds on a VAZ 2109
The appearance of even small areas of corrosion on the thresholds is the first sign that you need to pay attention to these body elements
At first glance, such areas may seem harmless, but if you examine them in more detail and clean them, it may turn out that under the layer of paint there is a serious source of corrosion or completely rotten metal.
It is important not to miss the moment when replacing the threshold is still possible. It often happens that the threshold rots around the perimeter and there is simply no need to weld a new part
In this case, more serious and labor-intensive body work will be required.
Threshold repair options
Repair of the body elements in question can be performed in two ways:
- welding patches;
- complete replacement of parts.
The first option requires less effort and financial investment. However, this is where its advantages end. If you follow the recommendations of specialists, then repairing the load-bearing part of the body with patches is not the best option. This is due to the fragility of such repairs.
If you do not have the opportunity to completely replace the thresholds or the body element in question has minimal damage, you can partially replace the damaged area. To do this, you need to cut out the rotten place, clean the metal as best as possible from corrosion and weld a patch of body metal of the required thickness or use a repair insert.
After this, the threshold is carefully protected from corrosion in order to maintain its integrity for as long as possible.
The cost of replacing the front side member of a VAZ-2108-09 in a car service center
Since replacing a submarine is not an easy job even for an average car service center, not all craftsmen undertake it, especially since not everyone is eager to begin restoring the body of a used Nine. Mostly, small auto repair shops carry out minor and medium body repairs, while large auto repair centers do not want to deal with domestic cars at all. Prices for body work from auto repair companies and private owners are most often approximate; often the final cost of the repairman is announced closer to the end of the repair. The fact is that “pitfalls” may unexpectedly appear, and as a result of their identification, the work is delayed and becomes more complex.
Some car service centers indicate two values in the price list at once - the upper and lower limits; in large cities or the capital, they charge from 3,500 to 9,000 rubles for replacing the front side member; usually, work from private repairmen in garages costs less. Often, along with the submarine, it is necessary to change the wing splash guard, sills, and repair the bottom; some auto repair shops note in their prices that the cost of repairs in the price list is indicated without painting.
Tuning and repair of VAZ 2110
Not long ago I encountered a problem: the engine on the radiator side began to become covered with something oily. It was impossible to determine where the leak was coming from. Therefore, I washed the engine using chemicals intended for washing engines and Karchers. After driving for a couple of days, I drove the car into a pit, took off the engine protection, since you can’t really look under the hood. And I saw streaks in the crankcase area, namely in the area of the oil pan gasket. So I established that the gasket had become unusable. In this article I will tell you how to replace the oil pan gasket of a VAZ 2110. I want to say right away that such a repair will require an overpass or a pit.
- Remove the engine protection.
- Drain the oil. If you recently had an oil change and don’t want to spend money again (this happened to me too, I change the oil every 10 thousand, and after the change and before problems with the gasket I drove 7 thousand km), then drain it into a clean container. I took a six-liter bottle from under the water.
- Now you need to unscrew all the bolts securing the pallet - there are 16 of them. Be careful not to lose the shaped washers under the bolts.
- Remove the old gasket.
6. Install a new one, having first thoroughly coated the places where it fits with sealant. 7. Place the VAZ 2110 oil pan in place. 8. Reinstall the 16 bolts. It is better to tighten it from the center to the edges of the pallet, this way the gasket will fit better. 9. Fill in the oil drained before repair. Or if you decide to change the oil in one fell swoop, then follow the instructions described here. 10. Install engine protection. That's the whole process of replacing the oil pan gasket. As you can see, there is nothing complicated. You can do this VAZ 2110 repair yourself and not overpay. __________________________________________________________________________
Source
VAZ 2114 reinforced
It's no secret that every car enthusiast wants to make his car better.
Someone is chasing tuning that will make the car more beautiful, while others want to improve the driving performance of their VAZ 2114, make it more reliable, and not have to replace worn out spare parts so often. Let's talk about exactly this. The first thing you can do is strengthen the body with a shock absorber strut.