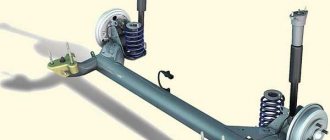
The front suspension of a passenger car is one of the most loaded devices. It is she who takes all the blows, she “eats up” small unevenness in the road surface, and she also keeps the car from tipping over on sharp turns. One of the most critical elements of the suspension is the front beam, which, despite the massive structure, can also fail. Can I repair it myself? Yes. Let's figure out how this is done.
- Description and fastening of the beam
Main faults of the beam
- Sequence of work
Replacing the front beam on a VAZ 2107
During intensive use, the body of the VAZ “Seven” is subject to significant loads and the negative impact of adverse environmental factors.
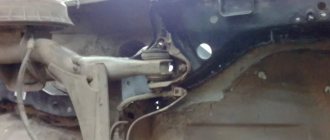
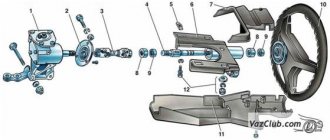
In the metal from which the parts of the supporting structure of the VAZ 2107 car are made, fatigue stresses gradually accumulate. As a result, cracks form in the front beam body, which can lead to complete destruction of the element. The best solution to the problem is to replace the part. This unit is a three-dimensional structure made of steel sheet using stamping and welding technology. This element connects the front side members of the VAZ 2107 and serves as a support for the engine. In addition, the axles of the lower arms are attached to both ends of the part. Replacing this design is quite complex and requires specific skills.
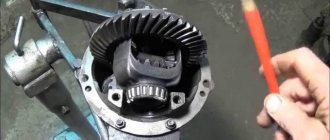
Self-locking differential
The most common way to increase the cross-country ability of a car is to install a self-locking differential. The main advantage of this device is that it prevents wheel locking “forever”
This is important because preventing lockup from engaging when not required helps protect the axle shafts from critical loads.
There are the following types of differential locks:
- Disc - implemented through the use of friction clutches. These clutches come into action as soon as the wheels begin to rotate at an uneven speed. The disadvantage of this mechanism is that it requires the use of expensive gear oil, and also requires quite frequent adjustment work to set up the unit. This is far from the best mechanism for a VAZ 2107 car.
- Viscous coupling blocking - the operation of such a device is based on the use of sticky discs immersed in a special liquid. It hardens when heated, allowing the gears to engage—that is, the differential locks. The liquid heats up when the angular speed of the wheels on the axle changes (when the speed of rotation of the wheels becomes different). The disadvantage of this mechanism is that they require complete sealing of the assembly, and work effectively only during short-term slipping.
- Screw locking or worm locking is the best option for automatic locking for the VAZ 2107. The mechanism is implemented using worm screws, which rotate when the car drives in a straight line, and when the angular speed of the wheels changes, they shift into grooves, thereby locking the differential. As soon as the car gets out of the mud captivity, the blocked mechanism resumes its normal operation by moving the worm screws to their places.
- Planetary - the operating principle is similar to a worm circuit, only instead of gears, balls are used. Due to the balls, the wheels are blocked, and they come into operation when the traction force between the engines and the axle changes. Compared to a self-locking worm gearbox, a planetary gearbox costs about 2 times less.
In addition to automatic differential locking, there is also a forced one, which is activated if necessary.
DISASSEMBLY OF THE UNIT
The front beam of a VAZ 2107 car is removed using metalwork tools and lifting devices. To perform this operation you will need:
- Wrenches and sockets in a set with a wrench and an extension.
- Automotive or hydraulic jack of appropriate size and load capacity.
- Manual hoist and design for its fastening.
- Portable lamp for illuminating the work area.
Instead of a lifting mechanism, a special device can be used to allow the engine to be suspended with support from body parts. It is most convenient to carry out the work in an equipped garage box on a lift or above an inspection pit.
The wizard's sequence of actions is as follows:
- The front part of the car is hung out, the front wheels are removed from it, and the body is placed on strong supports.
- We dismantle the steel sheet of engine protection and mudguards.
- It is advisable to remove the hood to avoid accidental damage. The power unit hooks onto an eye fixed to the body and is lifted with a hoist or using a special device.
- If there are no lifting mechanisms, the support can be placed directly under the engine crankcase, be sure to place a piece of board under it. This will avoid deformation of the part.
- We disassemble the front suspension on both sides of the car. We dismantle the springs and lower arms along with the axles.
- Unscrew the bolts securing the rubber-to-metal engine mounts.
- We unscrew the nuts on the spar studs that hold the structure in place and free it.
Now you can directly remove the beam from the fasteners and move it to the side. A specialist is recommended to inspect the engine mounts; if they are significantly deformed, they should be replaced with new parts.
Is it time to replace the rear axle bearing or...?
An original article from the “do-it-yourself car repair” section, which describes a method for eliminating play in the axle bearing in the rear axle beam on VAZ 2101, VAZ 2106, VAZ 2107, Zhiguli, Classic cars.
Quite often, owners of VAZ 2101, 2106, 2107 cars are faced with such a problem as a knocking sound in the rear axle beam, which is typical for establishing the diagnosis “it’s time to change the axle bearing”; in some cases, the “sentence” can be worse (more expensive), like “complete replacement” rear axle shaft." But both the first and second diagnosis may turn out to be erroneous. In some cases, the culprit for the appearance of a knock turns out to be play in the axle bearing in the rear axle beam. And an accurate diagnosis can be made only after removing the axle shaft.
I would like to note right away that you can remove or change the axle shaft yourself, as well as eliminate the bearing play in the seat. But replacing the bearing itself requires special tools and certain skills.
Axle shaft removal process:
1. The car must be driven onto an inspection hole or overpass. Since you will have to “release” the handbrake, if this is not done, then removing the brake drum will be quite difficult.
2. Secure the front wheels of the vehicle using wheel chocks.
3. Loosen the wheel bolts and jack up the car.
4. Remove the wheel, loosen the parking brake cables and then remove the brake drum.
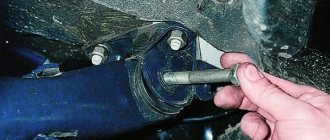
5. Next, use a socket wrench set to “17” to unscrew the four nuts securing the axle shaft. Use tweezers to remove the engraver from the studs.
6. Take out the axle shaft. We take it out, if our diagnosis (deterioration of the bearing seat) is correct, then the axle shaft should come out without problems. If the axle shaft cannot be pulled out easily and there is no special tool for pressing it out, you can use a removed car wheel. It should be secured with two wheel bolts and with a sharp movement, pull out the axle shaft.
1. Inspect the axle shaft, oil seal, bearing seat in the bridge beam.
2. Use your fingers to check the bearing for radial or axial play; if there is play, the axle shaft assembly should be replaced. Since, let me remind you, the operation of replacing the bearing itself and the locking ring requires a special tool
3. The axle shaft seal should be replaced in any case, since it is difficult to determine the degree of its wear “by eye” (if the seal is deformed, torn, or the axle shaft itself and the brake shield are in oil, then the question “maybe not touch the oil seal?” definitely disappears!) .
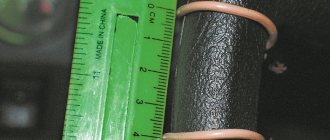
4. If the bearing seat in the beam looks something like in photo No. 1 (the entire or almost the entire diameter is shiny, which indicates “movement” of the bearing), then it’s time to get the material and tools, as in photo No. 2.
Material – square strip of foil 35mm by 35mm, about 0.02mm thick, made of brass (preferably).
We make cuts and bend the strip in half (see photo No. 3).
5. We lay out our product in the beam, as shown in photo No. 4, tucking the notched edge between the beam and the brake shield.
6. All that remains is to carefully place the axle shaft in place. In order for the bearing to sit completely in place, it is necessary to make several blows with a hammer (plus an extension) to the end of the axle shaft. That's all!
Problem solved cheaply and cheerfully!
INSTALLING THE POWER ELEMENT AND ADJUSTMENTS
The front suspension beam of the VAZ 2107 is mounted in the reverse order of its removal and in compliance with the rules and safety measures. A qualified replacement of this power element involves the use of new fasteners. During the work, it is necessary to defecate the suspension units, especially the ball joints and silent blocks. Replacing faulty elements will avoid repeated repairs in the near future.
Repair and restoration work of this kind on a VAZ 2107 car is usually carried out by the owners themselves. This is usually done in order to save money, but precise adjustment of wheel alignment angles is quite difficult to perform without special equipment. To do this, contact a specialized service station. Replacing load-bearing body elements inevitably leads to changes in settings.
Installing a new beam on a VAZ 2107 car will eliminate the problem of yaw while driving. The car becomes more controllable and does not deviate from the chosen trajectory. The new beam increases the torsional rigidity of the body, which has a positive effect on its overall condition.
Strengthening stabilizing traction
Some owners of the “classic” VAZ, who love to improve their car in every possible way, have even gotten to the stabilizing unit. There is an opinion that the car behaves better on the road if you install a double stabilizer on the VAZ 2101-07. This modernization improves the car's handling, since rigidity does not allow it to sway and deviate from the trajectory.
To realize the strengthening of the stabilizer, you need to buy the following parts:
- stabilizer rod;
- set of rubber bushings;
- 4 brackets designed for attachment to the lever.
The new rod must be immediately trimmed by 80 mm on each side. Then remove the “original” rod along with the brackets. Further steps - according to the instructions:
- Remove the outer bushings from the “original” rod and clean the ends.
- Place 2 middle bushings on the new rod so that they coincide with the brackets on the old one. Pull the outer rubber bands onto the ends of the rod.
- Pull additional rubber bands on the old stabilizer that match the outer ones on the new one.
- Place the rods together and twist them with brackets placed on additional bushings on both sides.
- Install a reinforced stabilizer on the car.
A similar design can be made by welding from bushings from a Niva and stabilizer struts from a VAZ 2110. This will cost a little more, and the appearance will not be very aesthetically pleasing.
Installing rear suspension from BMW E21 on VAZ 2107
INSTALLING THE BEAM
Now we are installing the rear independent suspension from the BMW E21, instead of the classic axle. Everything is done for the sake of collapse. The idea stuck in my head a long time ago when I saw Junkie (Kopeyka of the Drop Mode club). Then I decided to do something similar on my car. In August last year, a beam with levers and a gearbox was purchased. There is actually not much information, most of it was looked at from photographs on the Internet.
Let's start: The silent blocks were taken from a Chevrolet Lanos, and custom mounts were made for them.
Next we made a place where the beam will be attached. They cut this thing off.
Happened
It is clear that it would be impossible to attach a beam here and this place was reinforced
Next, I will try to explain how the beam was adjusted. Dad helped in this matter, for which I thank him very much.
We screwed the silent blocks to the beam.
We placed the wheel in the arch approximately in the position in which I will ride. Positioned so that the wheel is in the center of the arch
Back view
We marked a point at the place where the beam was attached, through the rubber block.
The quality is not very good, but the essence is clear
We pulled a rope from this point and started measuring from the torque rod mounting bolts (from the old suspension).
Thus we found the 2nd point. And they have already begun to measure the beam left and right in this plane. We measured the distance between the centers of the silent blocks mounted on the beam and measured the end points from the side members.
Well, another photo of the installed suspension.
What was purchased: -Cardan from E21 4-mortar (it is longer).
-Rear struts from Mk1 Kayaba Premium.
What you need to buy: -Drums (there were none) -Pillows -Small things
STRUTS AND AIR BAGS
Kayab racks from 1 golf were purchased. These stands are short and have proven themselves well among my friends.
Next, BLACKTECH 11025C cushions were purchased (shock absorber diameter 39mm). Thrust rings and sealing washers were machined (more on this a little later).
To put the pillow on the stand, you need to sharpen these places (shown in the photo) to match the diameter of the hole in the pillow.
Was
You also need to carve a thrust ring into which the pillow will rest.
It became (with a thrust ring). This place is sealed by rubber rings that are installed inside the pillow piston. Next, you need to seal the cushion with the rack rod; for this, a washer like this is sharpened. There is a cone inside the cushion, so it is also present on the washer.
Cone
With ring
The lower part that rests on the strut rod
Bottom of the washer
General form
Next, put on a pillow and put on this “fungus” on top.
It’s hard to see in the photo, but there is a protrusion on it, the small ring seals the “cavity” on the pillow (it’s clearly visible in the photo), but the big one seals the sides just in case)
Well, after everything was assembled and tested, no leaks were found.
Stand with pillow assembly
CUPS, BEAM MOUNTING, GEARBOX MOUNTING
Things are moving slowly. Most of the work is done. Now, in order. I'll start with the cups. At first they wanted to take a pipe with a diameter of 140 mm as a basis, but there wasn’t one at hand, but they had 2 old fire extinguishers of the required diameter at hand, cut off the excess to make a pipe, ground it down to a diameter of 136 mm (their wall is about 6 mm, so it’s not scary).
Similar fire extinguisher
Next, we turned out the top cover, made a platform in case we had to install springs, and put the whole thing together into a single whole.
Photo of what happened
We cut off the seven-inch fastenings of the rear springs, those in the photo
And we tried to install our custom cups, but realized that they would be hampered by the rear seat mount and spacer, well, no matter, we sawed off the excess and installed them in place
Then the “interesting” part began: we needed to adjust the cups and the lower mount of the stand so that the stand was in the center of our homemade cup. I had to redo the lower mount of the strut (which is located on the lever), for this we made similar mounts that were on this suspension and welded them side by side, reinforcing them with a plate, there will be a long bolt that will pass through these 2 mounts, so it will be reliable. New fasteners were made so that the stand would fit into the holes where the spring previously rested.
Well, then they began to adjust the cup so that the stand was in the center, as soon as they found the desired position, they grabbed it and scalded it.
Photo of what happened
The spacer was welded directly to the cup (you can see it in the photo). the gearbox mount was made
. A curved plate was simply taken and a hole was drilled.
We also strengthened the fastening of the beam, simply took the reaction rod, sawed it and welded it to the beam.
and strengthened the standard beam fastening on top. They reinforced it with a 3mm washer, which was also boiled.
It seems that everything remains to make the cardan, make the eccentric bolts and replace the consumables.
PREPARATION OF THE CARDAN
Today we will talk about the cardan. Back in June I bought a cardan from an E21 4x mortar, and only today I picked up the finished cardan crossed with a VAZ one. The cardan was crossed for me at the end of August, all that remained was to balance it. On the same day I find a suitable cardan for an inexpensive price, buy a flange and take it to the master. There they again cut off the excess and cross the 2 cardans. Today I finally picked up the finished, reworked version. The cardan was made on the basis of the BMW one, because it is thinner than the VAZ one, this is so that you can drive in the lowest position.
ADJUSTING THE CHAMBER
A familiar turner made plates with sides and eccentric bolts (bolts with an offset center) for adjusting the camber. Unfortunately, I couldn’t take any photos, so I’ll borrow an example from the Internet that I used to make it.
Plates with sides
The plates are arranged in this way: Those plates that are on the edge of the beam will be responsible for the derailment.
We arrange them this way
Plates that are closer to the center of the beam will be responsible for camber.
We arrange them this way. Only in the photo the hole is at the bottom, I placed it in the middle.
Initially, the installation of this suspension was intended for one thing - to create camber at the rear. I'll show you a photo of what I ended up with.
By the way, I bought myself some wheels, I’ll tell you what kind of wheels they are later, parameters: Diameter 13 Width front 7 rear 8
INSTALLING THE CARDAN
There were no particular problems with installing the cardan; it was necessary to: 1. Make a plate to secure the suspension one. The VAZ tunnel is wider than the BMW one and the fastening of the BMW suspension had to be “extended” 2. Select bolts to connect the cardan to the gearbox. They came from UAZ.
Next, we drilled 2 holes in the new suspension mount and body and inserted bolts from the interior. And that’s it, the car can already drive.
What causes damage to the body of the “nine”
ATTENTION! A completely simple way to reduce fuel consumption has been found! Don't believe me? An auto mechanic with 15 years of experience also didn’t believe it until he tried it. And now he saves 35,000 rubles a year on gasoline! Read more". There is an opinion that Soviet cars are equipped with an “indestructible” body
It is impossible to say this one hundred percent, but it is also wrong to refute such a statement. Indeed, the body of the VAZ 2109, the diagram of which is presented in the article, is made to perfection, but over time, any quality will come to an end
There is an opinion that Soviet cars are equipped with an “indestructible” body. It is impossible to say this one hundred percent, but it is also wrong to refute such a statement. Indeed, the body of the VAZ 2109, the diagram of which is presented in the article, is made to perfection, but over time, any quality will come to an end.
VAZ 2109 body geometry
Almost all car bodies older than 5-7 years need repair. And there is nothing surprising about this. The living conditions of recent years, the huge amount of harmful substances, the general deterioration of the environment - all this cannot have a positive effect. Difficult, almost extreme, modern operating conditions also cause a lot of harm.
As a result, the state of the metal surface becomes deplorable, the internal combustion engine and parts are sent for disassembly, and instead of a worn-out but close-to-the-heart car, a new car takes its place. All this can be avoided if you know the features of the body layout, understand the intricacies and carry out preventive maintenance in a timely manner.
Replace the lower silent blocks
This procedure is much more difficult. All actions will have to be performed directly on the machine. We carry out the procedure in the following order:
- Unscrew all the nuts securing the lever axis;
- A puller is screwed onto either side and the silent block is squeezed out of the socket. The same should be done on the other side;
- We press on replacement parts;
- Screw on the nuts, but do not tighten them too much;
- We put the wheel on and lower the car from the jack. Tighten the nuts as much as possible.
To get the job done quickly, you cannot do without a puller. If it is not at hand, you will have to remove the lever along with the rest of the suspension parts. On the removed lever, the silent blocks are simply knocked out with a hammer. Conclusion
. Suspension repair is familiar to every Zhiguli owner. This structural element on a car is not very reliable. Therefore, replacing silent blocks on a VAZ 2107 is required relatively regularly. Fortunately, the work does not cause any special problems even for beginners
If you have the necessary tools, repairs can be done quickly
It is important, when choosing replacement parts, to pay attention to the material from which they are made.
Oil leak
The traditional defect - oil leakage - does not bypass the rear axle. Loosening of the bolts securing the gearbox to the beam, wear or damage to the seals of the drive gear and axle shafts are possible places where oil may leak.
The easiest way to deal with a leak that occurs at the connection between the beam and the gearbox. The bolts need to be tightened. For those who are going to perform the operation correctly, i.e. using a torque wrench, we remind you: the gearbox mounting bolts are tightened to a torque of 23.5 Nm.
If oil drops appear in the area of the axle flange, the oil seal will have to be replaced. Knowing how to dismantle the axle shaft (described above), replacing the oil seal is not difficult, since the oil seal is located in the beam flange.
A failed oil seal is not the only reason for an oil leak. It also contributes to the destruction of the axle bearing. It happens something like this: the TAd-17I oil decreases when the rear axle is running. Rushing towards the axle shaft flange and finding a loophole through the failed oil seal, the oil penetrates the bearing and washes out the lubricant contained in it. This mixture of TAd-17I and lubricant enters the brake drum, along the way it oils the surface of the pads and only then flows out.
Usually, after replacing the oil seal, few people check the condition of the axle bearing and the presence of lubricant in it. Very little time passes and the axle shaft and bearing assembly have to be replaced.
To prevent this from happening, when replacing the oil seal, take the advice of a Minsk car enthusiast who, apparently, having suffered once, developed his own technique:
- With the axle shaft removed, remove the inner (from the gearbox side) bearing protective washer;
- rinse the bearing in gasoline and add Litol-24 lubricant to one third of the free volume;
- install the axle shaft in its place.
It has been verified through experience that Litol is reliably stored in the space between the oil seal and the outer protective washer, thereby providing the bearing with very good operating conditions.
Oil leakage through the oil seal of the drive gear of the gearbox is unpleasant because you have to contact a service station. We said above that the drive gear bearing requires very precise adjustment, and in the absence of a special torque wrench and skill, only specialists can perform such adjustment. There are often cases when more expensive parts have to be replaced because of a cheap oil seal.
Preparatory work
Before removing the beam, it is necessary to remove the shock absorbers and suspension springs. For this operation, in addition to standard keys and heads, you will need a pry bar, a jack and spring ties.
The order of operation is as follows:
- Drive the car into the pit, put the handbrake on, and install wheel chocks under the rear wheels.
- Loosen the upper nuts of the front shock absorbers located in the engine compartment (to prevent the shock absorber rod from turning, it should be held with an open-end wrench).
- Unscrew the top nuts and remove them along with the washers and springs (the location of the elements must be remembered, this will be useful during assembly).
- Unscrew the nuts securing the shock absorbers to the lower arms.
- Pull out the shock absorbers.
- Loosen the front wheel mounting bolts.
- Raise the car on a jack, place the front part of the car on supports, remove the front wheels (special supports or ordinary bricks are located under the side members at the point where they connect to the body).
Further actions are performed sequentially for the right and left levers:
Reinstalling the parts is done in the reverse order. Before installing the springs, they should be compressed with ties.