The use of reaction rods in the car suspension improves the stability and controllability of the car when driving, especially on uneven roads.
While driving, the rear axle experiences heavy loads with different directional vectors. Without reaction rods or with damaged rods, a car begins to behave dangerously under heavy loads on the suspension. It is the reaction rods that prevent the car from swaying and prevent it from tipping over during a sharp maneuver. Their condition critically affects driving safety. Therefore, you should periodically monitor the condition of the jet rods and carry out timely repairs or replacement of these parts.
The agony of choosing VAZ jet rods
Currently, there are not many large manufacturers left that produce jet thrust for the VAZ 2107 and other classics. Their products differ in both price and reliability. Let's look at the most popular products.
Track
The product is very popular among owners of the “Seven”. These rods are distinguished by their high reliability and high price, which starts from 2100 rubles per set.
Trek thrusters are distinguished by high reliability and high price
The main difference between Trek is the heads for the bushings. Firstly, they are large, and secondly, they are attached to the rods by welding. The silent blocks on Tracks are also made of especially dense rubber, which significantly extends their service life.
Cedar
The overwhelming majority of “Sevens” that had previously rolled off the assembly line had jet thrusters installed specifically from “Kedr”, since this company has always been and remains the official supplier of AvtoVAZ.
Kedr rods have an affordable price and mediocre quality
The quality of Kedr is somewhat inferior to Trek. This is especially true for bushings and silent blocks. All this wears out quite quickly, and therefore they will have to be changed more often. But there is also a good side - a reasonable price. A set of “Cedar” rods can be purchased for 1,700 rubles.
Belmag
Despite the simplicity and reliability of Belmag rods, they have one significant drawback: they are not so easy to find on sale. Every year they are found less and less often on the shelves of auto parts stores. But if the car owner still manages to find them, then he can be congratulated, since he got a reliable product at a reasonable price. The cost of Belmag rods starts from 1800 rubles per set.
Today it is not so easy to find Belmag rods on sale
This, in essence, is the entire list of large manufacturers of good rods for the VAZ 2107. Of course, now there are a lot of smaller companies on the market that are quite aggressively promoting their products. But none of these companies gained much popularity among the owners of classics, and therefore it is inappropriate to mention them here.
So what should a driver choose from all of the above?
The answer is simple: the only criterion for choosing jet rods is the thickness of the car owner’s wallet. If a person is not short on funds, the best option would be to purchase Trek rods. Yes, they are expensive, but installing them will allow you to forget about problems with the suspension for a long time. If you don’t have enough money, it makes sense to look for products on the shelves. Well, if this idea is not crowned with success, there remains a third option - “Cedar” rods, which are sold everywhere.
Here we should say a few words about fakes. Knowing that car owners most often choose products from the three above-mentioned companies, unscrupulous manufacturers are now literally flooding the shelves with counterfeits. Moreover, in some cases, the fakes are made so skillfully that only a specialist can identify them. In such a situation, an ordinary driver can only focus on the price and remember: good things are expensive. And if there is a set of Trek rods on the counter for only a thousand rubles, then this is a serious reason to think about it. And don't rush into buying.
Auto repair school - Do-it-yourself car repair
Aug 2, 2016 VAZ 2101, VAZ 2102, VAZ 2105, VAZ 2106, VAZ 2107, Zhiguli, Classic by admin
If on your kopeck, six or seven , when starting from a stop or driving on an uneven road, a knocking sound appeared in the area of the rear axle and along with it the rear axle of the car lost stability, then it’s time to check the condition and, if necessary, replace the bushings of the rear rods (reactive rods ) . Of course, you can take an easier route. And replace jet thrust . But this path, although easy, is not cheap. You can compare the price of a repair kit (metal and rubber bushings) for reaction rods and the price for a complete set of reaction rods. I think you will notice the difference. And why pay more if it's not necessary? If the reaction rods are normal (not broken, not bent, the lugs are not broken), then you can simply replace the rubber bushings. Yes, and if you figure it out, it won’t be difficult for you to do this. All that is required from you is the desire to do the work yourself and prepare the tools and accessories that are necessary for the work.
First of all, about spare parts. You can immediately buy a set of rubber and metal bushings . A standard set of rubber bushings for cars VAZ-2101, VAZ-21011, VAZ-2102, VAZ-2103, VAZ-2104, VAZ-2105, VAZ-2106, VAZ-2107 consists of 10 pieces, four large and six small. But I can advise you to buy a set of rubber bushings for the VAZ-2121 (Niva) , in this set all the bushings are equally large. Pressing them in is not much more difficult, but they can withstand the load better than standard ones. We also make sure to buy a set (10 pieces) of metal bushings (the old ones are often very worn out) - four large and six small. What do the rubber and metal bushings look like (pay attention to the color of the metal bushings, that’s the color we buy) look at photos No. 2. Of course, it’s better to buy new fasteners (bolts and nuts) too (especially if no one has worked on jet rods for a long time ), but here at your discretion or at the discretion of your wallet. Plus, you should buy a set of rubber bushings for the rear shock absorbers .
As for the tool... Here you will need to have, at a minimum: two 19mm spanners, a hammer, a metal rod (useful for knocking out bolts when removing rods). But you will have to think about the devices for pressing out and pressing in the bushings in advance (since work without them will be much more complicated). You can either make them yourself (take a bolt of the appropriate diameter, screw on the nut and grind it to the size of the outer diameter of the metal sleeve) or buy (or order a turner) a ready-made tool (see photo No. 3 for what it looks like). Also, having a vice will make the work much easier.
Further point by point (for example, we are considering the removal and repair of a short jet rod . To remove a long rod , you will also have to unscrew the lower fastener of the rear shock absorber):
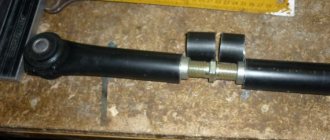
1. Unscrew the nuts and remove (or knock out) the mounting bolts (photo No. 1). Let's relieve the traction.
2. If at one end of the rod the metal bushing can fall out on its own (photo No. 4), then at the other end the bushing will have to be knocked out using our pre-prepared device. (Photo No. 5). And, for example, we use a screwdriver to pry out the rubber bushing (photo No. 6).
3. Use a knife to clean the inside of the traction eye (photo No. 7).
4. Using a vice, press the rubber bushing into the rod , having first lubricated it and the rod eye with soapy water (photo No. 8). Precisely with a soap solution and in no case using oil, since the bushings are NOT made from oil-gasoline resistant rubber. And by lubricating them with oil, you will shorten their service life.
5. After this, using a “special tool” we press in the metal sleeve , also lubricating it with soapy water, see photos No. 9 and No. 10. In the absence of a “special tool”, a metal bushing, just like a rubber bushing , can be pressed into a vice.
That's all! We carry out the same procedure with other rear links . When installing jet rods on a car , it is better to lubricate the mounting bolts, for example, with nigrol. Otherwise, the next repair of jet rods will turn into an exam in the skill of using an angle grinder!))
UPD 01/05/2016
Please love and favor - SEVI-Extreme torque rod bushings for VAZ-2101, VAZ-2102, VAZ-2104, VAZ-2105, VAZ-2106, VAZ-2107 cars manufactured by SEVI . I won’t be afraid to speak loudly and say that these bushings are the best of all possible options for jet rod bushings for the Classic . I can say this with confidence, because as soon as these bushings appeared on the car market, I bought them and immediately installed them on my own dime. You can call this a pioneer experiment. In the photos below you can see in what packaging they were sold at first (initially the bushings were called SEVI-Spike ) and in what box these bushings can be found today. Plus, a photo of the kit. And to say that I was surprised by the result of the experiment would not be correct. That's right - I was shocked! Yes, I had to tinker with pressing the bushings, but the result was simply amazing. The comfort that appeared in the rear axle of the car is difficult to describe in words. The rear of the car has become more solid and stable. The amount of noise transmitted from the car suspension to the body has been significantly reduced. Plus, you can add to this the high wear resistance of these bushings - for example, on my car they worked steadily for almost 30,000 km . And none of the bushings failed. I can’t say exactly how long they lasted, since the car was sold.
After the tests, in my own car, it was the clients’ turn. Not everyone, however, agreed to install rubber-metal bushings for SEVI-Extreme jet rods. Since the price of a set of these bushings upset even the most fanatical car enthusiast, who doted on his iron friend and never spared money on its maintenance and repair. To make it clearer: the price of a set of these super bushings was (and is) equal to the price of a complete set of Chinese-made reaction rods. Or -60% of the cost of factory jet rods (rods) produced in Balakovo . Something to think about...
But, despite the price issue, I have already managed to install these bushings on about a dozen cars. All car owners are happy and do not regret the money they spent.
That's why I recommend it to you! nothing complicated about installing SEVI-Extreme jet rod bushings . Everything is the same as when working with standard bushings. But, there are some small features: the tie rod eyes of your car must be in good condition - not broken or destroyed by rust. Before pressing in the bushings, the eyes of the rods (rods) should be thoroughly cleaned. And only after that you can begin the installation. A bench vise is a must! We treat the eyelet and bushing with a soapy solution. And slowly we begin to press it in.
This is how it was:
Here it is:
There is nothing complicated, as I said. The main thing is that the eyes are cleaned and do not fall apart from rust in your hands. And the result should please you. I would be glad if you share your impressions or your opinion about SEVI-Extreme bushings in the comments .
When using an article or photographs, an active direct hyperlink to the website www.avtorem.info is required!
Did you like the article? Share it on your page!
About the modernization of VAZ jet thrusts
Sometimes drivers decide to independently increase the reliability of the VAZ 2107 suspension and extend its service life. To this end, they are modernizing jet thrust.
Typically, modernization of rods means two operations. Here they are:
- installation of dual jet rods;
- installation of reinforced jet thrusts.
Now a little more about each of the above operations.
Double rods VAZ 2107
Most often, drivers install dual rods on the VAZ 2107. The reason is obvious: for this procedure you don't have to do anything with the pulls. You simply purchase not one, but two sets of rods that are installed in a regular place near the rear axle of the “seven”. Plus, you purchase not ordinary, but elongated mounting bolts, on which this entire structure rests.
Installing double rods on the VAZ 2107 increases the overall reliability of the suspension
The obvious advantage of such modernization is the increase in the reliability of the suspension: even if one of the tie rods breaks while driving, the car is unlikely to lose control and the driver will always have a chance to notice the problem in time and stop (a break in the tie rod is almost always accompanied by a strong knock on the bottom of the car, which cannot be heard this is simply impossible). This design also has a drawback: the suspension becomes stiffer. If earlier it “eaten up” small unevenness in the road without any problems, now the driver will feel even small pebbles and holes while driving.
Reinforced traction for VAZ 2107
If the car is used in extreme conditions and drives mainly on dirt roads or on roads with very poor asphalt, the car owner can install enhanced torque rods on it. As a rule, drivers make such rods themselves. But recently, large manufacturers have begun to offer reinforced rods of their own production. For example, you can find Trek-Sport rods on sale, which are distinguished by the large size of silent blocks and an adjustable transverse rod. A pair of nuts on the crossbar allows you to slightly change its length. Which in turn affects the car’s handling and the overall stiffness of its suspension.
The reinforced rods have nuts that allow you to change the length of the rod and adjust the stiffness of the suspension
Of course, the driver will have to pay for increased reliability: the cost of a set of Track-Sport rods starts from 2,600 rubles.
Seven rear suspension design
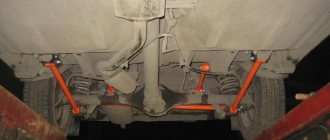
The rear suspension design of the VAZ 2107 is quite simple, which is required by the presence of a rear axle. It is due to the presence of the rear axle that the rear wheels are rigidly connected to each other. The rear axle beam is suspended from the body using reaction rods, of which there are only 5 in the design - four longitudinal rods and one transverse rod.
The main purpose of the longitudinal rods is to prevent and prevent the beam from moving in two directions - forward and backward. Transverse traction is needed in order to prevent the beam from moving when lateral loads occur. You need to know all the suspension parts in order to identify faults and make correct repairs.
This is interesting! To combine the rods with the body part and the beam, special hinges are used, which are made of rubber material and are called silent blocks.
We continue to study the structure of the rear suspension of the seven, and it is worth highlighting another important element - the springs. The lower part of the springs is in contact with the bowl on the bridge beam. To soften contact and prevent squeaks, a thick rubber gasket is placed between the spring and the bowl. The upper part of the springs also rests against the body bowls through an insulating gasket.
Vehicle vibrations are damped using a pair of telescopic shock absorbers. The load that is formed when the vehicle moves on uneven roads is reduced due to the presence of seven three rubber compression seals in the rear suspension design. Two seals are located in the spring structure, and the third is located on the bottom above the rear axle housing. For ease of understanding of all of the above, below is a diagram of the rear suspension of the seven.
- springs;
- telescopic shock absorbers;
- rod or transverse rod;
- axle beam connecting the wheels;
- longitudinal upper rods or rods;
- longitudinal lower rods.
How to check the condition of the rear suspension elements of a VAZ 2107
The opinion that the seven’s suspension has increased strength and wear resistance is not at all a reason for not monitoring its condition. The suspension condition of a car that is operated in off-road conditions or on poorly paved roads (there are still a large number of them left in the post-Soviet countries) especially needs to be checked.
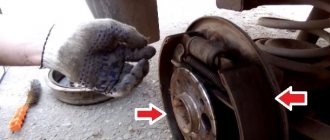
The easiest and most effective way to check the condition of the rear suspension of the seven is a visual inspection. To do this, the car needs to be driven onto an overpass or placed over an inspection hole. Particular attention should be paid to such suspension elements as:
Checking the condition of the jet rods on the VAZ 2107
Before we talk about checking jet thrusts, let’s ask ourselves: why is there a need for such a check at all? The fact is that when driving, jet rods are subjected to both lateral and torsional loads. Torsional loads occur when wheels hit large potholes or run over large rocks and other obstacles. This type of load is especially harmful for rods, or more precisely, for silent blocks in rods. It is the silent blocks that are the weak point of the jet thrust (there is simply nothing to break in the thrust itself: it is a metal rod with two eyes at the ends). In addition, the rubber parts of silent blocks are periodically exposed to reagents that are sprinkled on roads during icy conditions. As a result, cracks appear in the rubber and its service life is rapidly reduced.
The rubber part of the silent block on the rod has become completely unusable
If you believe the operating instructions, the new jet thrusts on the VAZ 2107 can travel at least 100 thousand km. But taking into account the conditions listed above, the actual service life of rods rarely exceeds 80 thousand km.
From the same instructions it follows that the state of the jet rods must be checked every 20 thousand km. However, car service technicians strongly recommend checking the rods every 10–15 thousand km in order to avoid extremely unpleasant surprises. To check the condition of the silent blocks in the rods, you will need an inspection hole and a mounting blade.
Test sequence
- The car is placed on an inspection hole (or, alternatively, on an overpass).
- The mounting blade is inserted behind the rod eye.
The mounting blade is installed behind the rod eye
- Now you need to rest your spatula against the torque rod bracket and try to move the rod to the side along with the silent block. If this is successful, the silent block in the rod is worn out and needs to be replaced.
- A similar procedure must be done with all other silent blocks on the rods. If they move to the sides by even a few millimeters, they need to be changed urgently.
During the inspection, the silent block shifted to the left by several millimeters. This is a clear sign of wear and tear
- In addition, the rods and lugs themselves should be inspected for wear, cracks, and scoring. If any of the above are found on the rods, you will have to replace not only the silent blocks, but also the damaged rods.
Jet thrust malfunctions and possible consequences
If the load causes the axle to sway or shift, the impact will be taken by the jet thrust. The appearance of defects in parts leads to a deterioration in the overall behavior of transport. Damaged parts need to be replaced as quickly as possible.
The following factors often cause breakdowns:
- Exposure to chemicals from road compounds in winter;
- Impact of torsional loads. Occurs more often when colliding with obstacles. Only reducing the speed before these elements reduces the risks;
- Static loads. This factor is only reduced by the absence of overloads; it is impossible to completely get rid of it when operating rods on a VAZ 2107.
It is important to detect deformation, chips and cracks in a timely manner, for which periodic inspection of the entire system is organized. Welding seams and silent blocks are weak points that receive the most attention during inspections.
Silent blocks of any type are rubber, so they wear out faster than metal parts. Due to their wear, backlashes appear, becoming an obstacle to the stabilizing function. Welded joints, when they break, also lead to unpleasant consequences. It is recommended to remove them as quickly as possible.
With broken parts, driving is worse. Added to this is the unstable behavior of the body when defects appear in the jet rods.
Changing thrusts according to your mind
Before changing the jet rods on a VAZ 2107, find a suitable place. The work must be done in a pit or overpass. As a last resort, find a flat area, lift and secure the desired part of the car.
For work, prepare:
- required set of keys;
- metal brush;
- WD-40.
The algorithm for replacing jet rods is as follows:
1. Clean the joints of the reaction rods using a special brush. After treatment, be sure to spray the bolted joint with WD-40 and allow time to soak.
Note! The process of replacing rods is identical, so there is no point in describing how each rod changes separately.
2. It happens that you won’t be able to unscrew it the first time. Re-treat with Vedashka and wait a little more time.
For greater efficiency, you can take a wrench with a large “shoulder” and unscrew the nut (of course, if you work while lying under the car, then this option is unlikely to work). 3. As soon as the nut is level with the edge of the bolt, apply several blows with a hammer to dislodge the bolt from its “home” place, since it usually sticks strongly in the sleeve.
4. Using a wrench, unscrew the nut completely and remove the bolt; if it does not give in, use a drift.
5. If the rod was torn out alive, then you will have to remove the remains of the fastening. This can be done using a small mounting spatula.
6. Now move on to the second part of the fastening. Here you still have to unscrew the lower part of the shock absorber, pull out the spacer sleeve and move it to the side, this is done in order to gain access to the torque rod bolt
8. The nuts may be too tight—this is normal. This is explained by the fact that a self-locking nut is used for fastening. Its peculiarity is the presence of a nylon “side” along the edge, which makes the connection more dense.
9. Further - more difficult. The design feature is such that the bolt is installed on the gearbox side. As a result, hitting the bolt is not very convenient - to do this you need to unscrew everything unnecessary on the left side (remove the brake disc, remove the axle shaft, and so on).
Of course, doing such work is a serious investment of time and effort, so there is no point in doing such work. Try cleaning the connection with a brush, treating it with WD-40 and then try to unscrew photo 2.
If nothing works out again, then you can’t do without an angle grinder. Cut off the bolt head in the space between the silent block and the bracket. Perform a similar manipulation on the other side.
10. Using a mounting spatula, remove the rod from the bracket.
Please note that if the jet rod is cracked or broken, you should not weld it or try to restore it in any other way - this is dangerous.
It is better to install a new rod and no longer worry about possible failure of the unit.
Replacing bushings and silent blocks on VAZ 2107 rods
Silent blocks with bushings are disposable parts that need to be replaced immediately. In a garage, restoring parts becomes impossible. To replace you will need to acquire the following things:
- The beard is 10 mm in diameter.
- Hammer.
- Press-fitting device. It may also be needed when the rear axle is being repaired.
Sequencing
Follow the above instructions when removing the traction. Parts must be pre-treated with WD-40. A wire brush helps remove dirt and dust. Further actions are performed according to the specified algorithm:
- After removing the rod, the bushing should be removed without problems;
But this behavior is typical for parts without serious rust, with severe wear. Otherwise, you will have to use a hammer to knock the structure out of its place. The beard is inserted inside first.
- They get rid of the silent block if the rubber part is damaged too much. Use a screwdriver or a mounting shovel to pry up parts that prevent everything from being freed;
- Using a sharp knife or sandpaper, carefully clean the surface of the eyelet inside. Remains of rubber and rust should then disappear completely;
- A new bushing is placed in the eye and pressing is carried out using new equipment;
- The beard helps to cope with this part of the work. The main thing is to act carefully to avoid damage.
Thrust installation is carried out according to this algorithm
1. Install the linkage into the front bracket first. Before inserting the bolt into the prepared place, be sure to lubricate it with nigrol.
2. Insert the torque rod into the rear bracket. Don't be surprised if the holes don't line up.
If the rod was broken, then under the influence of loads the bridge would constantly move. This, in turn, caused the mount to move.
To align the holes, you need to take a mounting blade, rest it on the bracket and unscrew the bridge until the holes align. As soon as the openings are at the same level, insert the bolt and tighten the nut.
With simple manipulations, you can replace the jet thrust yourself and save some money on visiting a service station.
The main thing is not to miss the moment when the rod or bushing fails. Good luck on the roads and of course no breakdowns.
Full size
What links are included in the rear suspension?
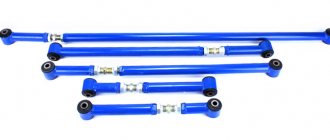
The Chevy Niva bridge is held in place using five parts. To prevent longitudinal and transverse displacement, four longitudinal rods (two each: front and rear) and one transverse rod are used. At the ends of the products there are eyes into which silent blocks are inserted to prevent knocking in the suspension. One end of the rod is attached to the bridge, the other to the car body.
The parts have the same diameter and differ only in length. The longest is the transverse thrust. The length of the elements ensures vertical mobility of the rear axle. Thanks to this, the silent blocks do not twist, even if the suspension moves by the full stroke of the shock absorber.
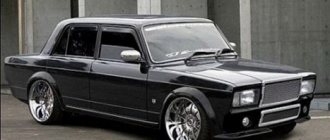
VAZ-2107, jet thrust: purpose, repair, replacement
VAZ-2107 is the latest model from the classics. This car was created on the basis of the Soviet “five”. The latter, in turn, originates from 2106, and that one - from the “troika” and “kopek”. What's all this for? Despite various modifications, many elements of these machines were similar (if not identical). All VAZ classic models have the same suspension scheme. At the front is an independent axle with coil springs, at the rear is a dependent axle with a Panhard rod. It is also called reactive. It is this element that we will talk about today.
Rear suspension of the VAZ-2107 - design and methods for checking serviceability
The design of the rear suspension of the 7 is practically no different from the suspensions of other classic models of the VAZ family. The dependent suspension modification is somewhat outdated and is associated with the presence of a rigid connection between the rear wheels. Of course, a rigid connection has a great advantage - high reliability, as well as ease of maintenance, but there are also some disadvantages. To find out about them, let’s take a closer look at the rear suspension design of the VAZ 2107.
Purpose
It is worth noting that this traction was used by automakers long before the appearance of the classics. Thus, the element was used on cars with dependent leaf spring suspension. The design of the rod has not changed for years. On the “seven” this element is a long metal pipe installed under the bottom near the rear axle.
The part is attached to the body using rubber-metal bushings. Why is jet thrust needed on a VAZ-2107? This element is designed to prevent lateral rocking of the car. Since the Zhiguli had a dependent suspension at the rear, this car leaned heavily when cornering. To stabilize its body and increase safety, the machine is equipped with jet thrust. The VAZ-2107 is equipped with an element made of elastic steel grades. This material can withstand high loads for a long time and works well in compression and tensile strength.
FakeHeader
Comments 7
Hello. Two years have passed. I just came across your story. Now I was tightening the upper silent blocks, the rubber bands on the outside stupidly came out from under the washers. And I didn’t make it to 60. I’m sitting here scratching my turnips. True, my graphics are blurry. But the lower ones were also lubricated, they were tightened for 80 minutes and did not come out.
Hello! Thank you for remembering) The range is 60-90 N*m because our rubber products are produced according to specifications. It’s not clear to anyone what specifications a particular manufacturer has. You shouldn’t pinch the rubber bands—that’s a fact. My silent blocks drove for 3000, then I swapped them as is with levers onto a friend’s car, tightened them by eye - and it’s still running.
Malfunctions
In fact, the rod itself is not subject to wear. The main malfunctions concern the places where it is connected to the eye. Usually the rod breaks in the area of the welds and bushings. This happens for several reasons:
- Firstly, this section is the weakest in the structure and does not withstand the load well. Since the suspension is constantly subject to shock and vibration, over time the bushings wear out and can cause abnormal noise.
- Secondly, the thrust is located under the bottom. It's no secret that this place is constantly exposed to salts, dirt and other reagents. As a result, corrosion appears on the surface of the rod and in the places where it is attached. Over time, it corrodes the metal so much that its strength is not enough to dampen vibrations and the rod simply breaks.
To prevent such problems from taking the owner by surprise, it is necessary to periodically monitor the condition of this element. If there are cracks and other deformations, it is necessary to replace the jet rods on the VAZ-2107.
Signs
What may indicate the need to replace this element? If you do not take into account external inspection, a traction fault can be determined by the nature of the car’s behavior. Over time, the bushings become loose and the rod no longer performs its function.
The car rolls more when cornering, and dull knocks are also heard in the cabin. This indicates failed silent blocks. Well, if the rod is rusty and broken, part of it will simply drag along the ground. It is hardly possible not to notice such a malfunction. But how can you get home if your traction breaks on the way? You can hang part of it on some element under the bottom (for example, a muffler) using a wire and carefully move to the parking area and repair.
Malfunctions of the front suspension of the VAZ 2101
The service life of front suspension elements directly depends on the conditions and intensity of vehicle operation, as well as on the quality of the parts used. Since this or that malfunction manifests itself in different ways, it is worth dwelling on each of them in more detail.
Noises and knocks while driving
Extraneous sounds in the operation of the suspension can occur for a number of reasons:
- failure of shock absorbers. In this case, it is necessary to replace the damaged shock absorbers;
- wear of silent blocks. “Broken” hinges need to be replaced;
- development of the transverse stabilizer in the rubber cushions. Inspection and replacement of worn-out products is required;
- The shock absorber rod mount has come loose or the rubber cushions have become unusable. It is necessary to check the fasteners and, if necessary, replace rubber products;
- ball joint malfunctions. When a working appears, the failed supports must be replaced;
- increased clearance in wheel bearings. It is necessary to adjust the gap, and if the bearings are worn out, parts need to be replaced;
- wheel imbalance. It is necessary to check and, if necessary, balance the wheels;
- wheel rim damage. The disk needs to be restored or replaced;
- spring breakage or sag. The front suspension springs need to be replaced;
- damage to the bumpers. Rebound buffers that have become unusable require replacement;
- loosening of the upper or lower arms. In this case, it is necessary to check and tighten the nuts and bolts.
Video: causes of knocking in the front suspension
The car is pulled to the side
If the vehicle pulls to the side, then there can be no question of any safety of movement. There may be several reasons for this behavior:
- different tire pressures. The correct pressure must be checked and set;
- The front wheels are at the wrong angle. A visit to a car service center is required to adjust the wheel alignment;
- Excessive play in the wheel bearing. If there is a large gap, adjustment should be made;
- The front suspension arms or axle are deformed. Replacement of damaged parts is required;
- the springs have uneven subsidence. The front springs need to be replaced;
- The brake mechanism is not fully released. The brake mechanism should be checked and the malfunction eliminated;
- Tire tread has a big difference in wear. Worn tires need to be replaced;
- wheel imbalance. Eliminated in the same way as with knocking in the suspension.
Suspension breakdowns
Sometimes in the operation of the suspension characteristic impacts of metal on metal occur, which is called breakdown. This indicates that one or another part of the suspension does not fulfill its function. The reasons for this phenomenon may be the following:
- sag of front springs. Elastic elements need to be replaced;
- The shock absorbers have become unusable. If damping devices break or fail, they should be replaced;
- deformation of levers. Levers with changed geometry must be replaced with serviceable ones.
There can actually be many more faults in the front suspension. For example, the appearance of squeaks when driving over uneven surfaces may indicate the failure of silent blocks, oil smudges on shock absorbers indicate damage to the product and indicate the need to replace it, etc.
Jet thrust VAZ-2107 - price
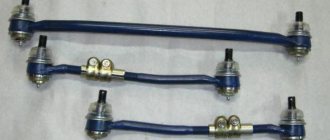
Note that these elements are interchangeable with other VAZ models of the classic family. On average, the price of a set of VAZ-2107 jet rods ranges from one to two thousand rubles. Among quality products, reviews note traction from. What is the price for these jet rods for the VAZ-2107? The cost of the set is 1400 rubles. This price includes:
- Transverse thrust.
- Longitudinal left and right.
- Longitudinal short.
Additionally, the kit includes torque bushings. How to replace this element? We'll talk about this below.
Diagnostics of rubber-metal joints
To check the condition of silent blocks, you need to use a pit or overpass. Without such amenities, it will be problematic to drive the seven, so there should be a pit in every garage. therefore, it can be repaired by hand without any problems. But you need to determine whether the VAZ-2107 silent blocks need to be replaced; the price of one is approximately 50 rubles. For a set of 8 silent blocks you will pay 400 rubles.
Carefully inspect the suspension on the lever, evaluate the appearance of the rubber-metal hinge. If the rubber has obvious damage - it has begun to become cracked, or there are any cuts at all, then all elements must be replaced. When carrying out repairs, try to do as much work as possible. Therefore, you not only change all eight silent blocks, but also, after assessing the condition of the balls, replace them if necessary. It is also worth looking at the condition and tightening the nut if necessary.
Tools
So, to replace it, we need to prepare a standard set of tools (heads, wrenches), a hammer, a mounting blade, as well as universal grease VD-40. In the absence of one, you can use any analogue from, “Mannol” and “Laurel”.
These products cope no worse with soured bolts. We will also need a metal brush. We will use it to clean the head of the bolts from accumulated dirt.
Let's get started
Having thoroughly cleaned the joints with a brush, treat them generously with universal lubricant. You need to wait until it completely penetrates inside. Next, select the head of the required size (19) and unscrew the nut that holds the rod on the free side. If it is tight, you can re-spray the threaded joint with lubricant. When the end of the bolt is level with the nut, take a hammer in your hands. It is necessary to strike the bolt several times and remove the latter out. After that we move on to the second side. To remove it, you need to unscrew the lower shock absorber mount.
Next, remove the spacer sleeve of the elastic element. This way we will get access to the second bolt of the VAZ-2107 jet thrust. If the nuts are difficult to unscrew, and even lubricant does not help, you can cut off the bolt with a grinder. Please note: do not knock out this element with a hammer, since it is close to the gearbox. At the next stage, you need to get the remains of the rod itself out.
The result of the work
The result of the replacement will be working traction, no knocking in the suspension, and driver safety. The main thing to remember is that you need to promptly notice cracks in the rod and replace it without waiting for a breakdown.
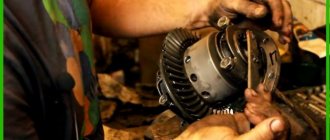
We have a VAZ 2105 car, manufactured in 2010, with a mileage of 58 thousand km under repair; it is necessary to replace the reaction rods (rods) on the rear axle suspension. We will show you how to do this procedure yourself; the instructions are also applicable for VAZ 2107, VAZ 2106.
We lift the car. We press the bridge with a hydraulic strut so that the shock absorber is untied and the spring does not fall out. If you will be working on the ground, you can use an additional jack. Nuts 19, unscrew the lower mount of the rear shock absorber:
And another bolt next to it:
Now let's move on to the fastenings of the rods themselves:
We take out the old rod and take a new one, we have rods from the KEDR company, order number MK-01-2919100, new fastening bolts were also purchased for them in advance, their order number is 21010-2919000-86. Before installation, lubricate all fasteners with copper grease so that during further repairs they can be unscrewed without any problems. Install in reverse order.
Then unscrew the top short reaction rod:
Then the front bar:
There are washers on both sides at the front, remove them and replace them with new ones. Using a mounting tool, unscrew the bridge a little to insert the bolt:
Installation
If a grinder was used, it is important to remove all remnants of fasteners with a mounting spatula. How do you then replace the VAZ-2107 jet rods? After this, the new element is installed in the previous mounting locations. But installation may be difficult. Since the old rod could no longer cope with its task, the bridge could “move” a few degrees to the side.
To ensure that the new link is properly secured, rest the mounting blade against the bracket and unscrew the bridge until the holes line up. Next, tighten all the bolts and nuts. The same procedure is performed on the second side. For tightening, use the same wrench and a 19mm hex head.