I’ll say right away that this procedure on the Niva, and on any other “classic” model, is quite unpleasant. First of all, due to the fact that due to the constant dirt and water that gets on the fastenings, the bolts and nuts become sour and then unscrewing them becomes very problematic. In my personal example, it was still difficult to unscrew the rods, having previously lubricated them with water. Below is a list of the necessary tools that will be needed when performing this Niva repair:
- Key to 19
- 19mm heads with knobs (preferably 2 to make it easier to hold the bolts)
- Ratchet (if the connection is not very rusty)
- Nail or puncture
- Hammer
Immediately before starting work, spray WD-40 or other lubricant on all fastening joints and wait 10 minutes for the chemical to take effect.
Replacing the transverse rod of Niva VAZ 2121
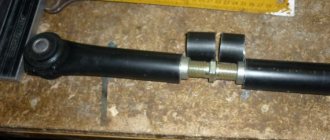
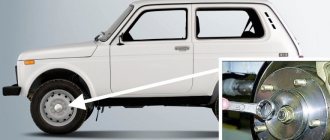
I will show you using the left side as an example, since there are certain nuances there. To unscrew the nut, you need to hold the bolt on the back side, and you can only reach there with the head, approximately as shown in the photo below:
On the reverse side, we use a wrench with a long lever to move the threads out of place. If the nut is then unscrewed normally, you can use a ratchet to do everything as quickly and conveniently as possible:
After this, to knock out the bolt, you can use a wooden block or the handle of a hammer, knocking on the back side:
And then you can do the same with the second side of the transverse rod, after which you can remove it and replace it with a new one if necessary.
The price of a set of new rods for the Niva VAZ 2121 is 1,100 rubles.
Lada 4×4 3D › Logbook › Adjustable rear suspension links
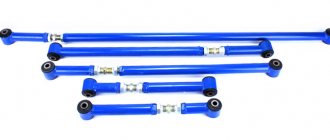
Back in the day I got the front control arm brace, I also got a set of adjustable rods in yellow polyurethane. To my great regret, this product is made of Zhiguli rods.
There were no Nivovskiy ones in the store at that moment, and even these ones seemed to meet the requirements. The reactive Panhard rod is a little short, but the length of the adjustment mechanism is plenty enough for a 3-5cm lift.
I replaced the cross rod on the same day. The replacement was extremely necessary and important. Not only because the new rod could be used to move the bridge into the required position, but also because the old rod was no longer in the best condition.
The next day after work, I stopped by the office. On the ramp I removed the remaining rods.
The long longitudinal rods came off easily and without force, and I also treated them with Deshka a day ago.
But I had to tinker with the short rods. These rods are attached to the body using a long M12 bolt, the bolt passes through the silent block and the insert in the spar and is secured with a 19 nut with a nylon ring.
It turned out to be easy to unscrew the nut and remove the bolt from the spar. But not everything was so smooth. The bolts were bent in several directions. And therefore they did not come out of the silent block bushing.
It was possible to knock the bolt out of the rubber band and it was not difficult, but removing the soured bushing from the bolt was much more difficult.
Fortunately I was not alone. Taking the torch, my colleague began to heat the sleeve. Then we put a long 19mm head on the bolt, it rested on the washer and with a hammer we moved the sleeve down a little. Due to the fact that the bolt got quite hot, it was difficult to hold it, but the old rod helped us out a lot.
After we knocked down the bushing a little, the question arose - how to knock down the bushing completely, the length of the head is not enough. And then the familiar Handle from High Jack came into play. She coped with the task like no one else and easily freed the bolt from the sleeve.
Having freed both bolts from their shackles, we had a new question. Why all this?
It was not possible to install the bolts into the new rods. And we sent a messenger to Rus'. Unfortunately, the store did not have Niv bolts, but only Zhiguli bolts. For those who are sure that there are no differences in the rear suspension of the Niva and the Lada, this is not the most important information. The dimensions of the standard Niva rod mounting bolt are m12x160x1.25. The Zhiguli bolt has dimensions of m12x150x1.25. It seems like some kind of centimeter, but it plays an important role. Having installed the short bolts, I was only able to screw the nut onto it halfway. It was not very quiet to drive like that and the next day I acquired the necessary bolts in 49.
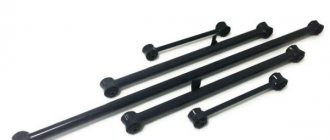
Before installing the rods, I compared them to the stock ones and sized them.
Installing the rods is not difficult, but installing short rods should begin with attaching a long bolt. The counter part of the rod is attached to the bridge; the position of the bridge can be adjusted and the holes can be aligned using a simple Phillips screwdriver.
This is how it all looks after installation.
Source
Replacing longitudinal rods on a VAZ 2121 Niva car
With longitudinal reaction rods, everything happens exactly the same by analogy, and the same tool is needed. The only thing that can be noted is that you will need to unscrew the lower shock absorber mounts when removing the long cross rods. This is necessary in order to remove the long rod mounting bolt.
Also everything is done, we put two keys on both sides and unscrew the fastening nuts:
Then we knock out the bolt through a wooden block, the photo below clearly shows it, only without the block:
We carry out all work on replacing jet rods one by one, replacing first two long ones, for example, and then changing short ones, or vice versa.
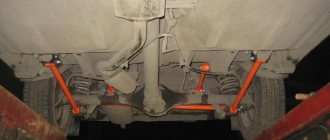
Tie rods are important parts of the Chevrolet Niva suspension. They limit the movement of the rear axle, preventing it from moving forward or backward.
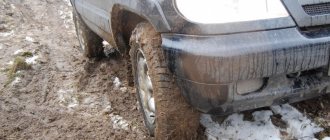
When driving off-road, the rods are subject to a high load. This may cause their deformation, wear of the silent blocks or breakage of the fastening.
As a result, the position of the rear axle is disrupted, the car begins to pull to the sides and tire wear accelerates. Therefore, you need to monitor the condition of the torque rods and silent blocks of the rear suspension.
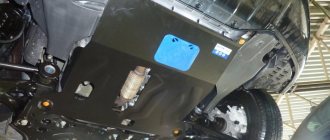
Replacing the Chevrolet Niva suspension shock absorber
The need to remove and install the shock absorber arises when a leak of a specialized solution is detected or a noticeable loss of effectiveness in damping vibrations of the car body. The necessary tools will include keys “No. 19”.
Work progress:
- Place the machine above the inspection hole or lift it with a specialized lift. If you prefer a lift, then place a support under the rear axle beam and lower the car so that the suspension receives the appropriate load.
Unscrew the shock absorber hinge mounting bolt at the bottom and pull it out.
Unscrew the fasteners at the top of the shock absorber hinge, remove it and remove the shock absorber.
- Install the new element in return mode.
Types of breakdowns and their causes
The parts are made of high-strength alloy steel, so they are practically not subject to deformation.
The jet rod can only bend as a result of hitting large stones or tree stumps off-road.
More often, car owners have to deal with other problems:
- Cracks in the welds between the rod base and the eyes. If a breakdown is not detected in time, the part may fall apart while moving.
- Corrosion of rods. A rusted base loses strength and is easily deformed or broken.
- Wear and damage to rubber bushings of silent blocks. Over time, rubber dries out and cracks. This process is enhanced by physical activity. As a result, play appears in the connection of the rod with the bridge and the body. This worsens the car's directional stability and can lead to the lugs coming off.
Important: the appearance of a knock in the rear suspension may indicate wear of the torque rod silent blocks. If the malfunction is not corrected in time, the lugs will quickly come off under the influence of increased shock loads.
Mileage 97 thousand. km. Major repairs - universal joint, torque rods, trapezoid, ball joints. How much money?
Well, brothers Chevy drivers. It’s time to repair my beloved Shevik again, because after recent driving, an unpleasant sound appeared in the rear of the car in the area of the cardan - sometimes a grinding sound, sometimes as if something was whistling (as my wife says, the cricket was whistling again). On the last fishing trip, it pulled off the track and when its bottom hit a pothole, my soul immediately began to ache. Apparently, this blow was the last, and after it unpleasant sounds appeared.
It’s clear that driving like this is absolutely uncomfortable, it feels like something is going to break. Plus, the lock has become very difficult to turn on; sometimes you have to drive back and forth to turn it on. Previously, it turned on without problems, but it can be difficult to turn off, sometimes it gets stuck.
In general, bad sounds appeared and I immediately turned my feet (wheels) to very good guys, from whom I now constantly get repairs. They changed my shock absorbers and brakes.
Without stopping at the service center, I drove a couple of meters, and the master listened to this whistle. He says “the crosspiece has flown.” Okay, we drove into the pit, looked and, as usually happens, the trouble began to increase))
It turned out that the rear cardan was being replaced (both of its crosspieces were completely loose with no hope of recovery), the front cardan was also wobbly, but only closer to the “face” of the car. To eliminate this problem, it was also necessary to buy a front crosspiece.
I took a couple of photos of the “worn out” rear card:
Unfortunately, there is nothing to stitch in, only replacement:
Next I ask the question - why did the cardan crack? The master shows - do you see the jet thrusts? They “sat down”, because of them there was play in the cardan and it “staggered”. And he recommended that if you want the new cardan to last as long as possible, install new jet rods. This is what the “tired” old ones looked like:
We wrote down the shopping front on a piece of paper and went to the store. The store has a decent selection, the cost of cardans is 2200 for a regular VAZ one and 3900 for a branded one, which will last longer. And then I was simply stunned - my wife said: “We take the best.” I really didn’t expect it)) So, here are the photos of the purchases:
Driveshaft Belkard
So, we took the rear cardan (it comes assembled with crosspieces on both sides) for 3,900 rubles. Produced by Belkard, here is a photo:
Reinforced jet thrust SITEK
Jet thrusts were for 700 rubles a set and for 1600. Cheaper - regular, 1600 - reinforced, especially for increased loads. They took them. Photo:
Let's open the box :))
K/V cross assembly - 1 piece
The front cardan is still breathing, but one of the two crosspieces has grunted - 700 rubles.
This is what it looks like in real life:
Oh yes, when purchasing, make sure you include the retaining rings:
Steering linkage set
At the same time, the guys took a look at the front end and had to take one set - TRACK, produced in the Chelyabinsk region, Miass.
Plus, the guys saw that the front brake hose was all cracked - it was also replaced, on the left it was worn out, on the right it was normal, apparently the owner had changed it before me. Like this:
During the work, while the front left trapezoid was being installed, it turned out that the upper ball joints were also “covered.” It is noteworthy that on my Chevy Niva there were balls from the regular Niva 2121, they were on spacers. As the masters said, they had never seen anything like this before; it was done in order to “lift up” the face of the car. The spacers for the ball joint were specially machined. In terms of money - another plus of 700 rubles for a set of 2 tops.
Total came out: 7400 rubles + 700 balls.
Over 97,000 km, everything got stuck there, and the jet thrusts had to be cut out with gas. They made Shevik for me from 11 pm to 8 pm. They charged 4,900 rubles for the work (this amount also includes wheel alignment after installing the steering rods).
In total, the repair cost me 13,000 rubles and a day without a car))
After the replacement, the car immediately felt fresher, and as soon as I got behind the wheel, I immediately felt the changes. There is some density on the highway, the car runs confidently, it doesn’t wobble like before. Apparently, there was previously a play in the cardan, which caused the other components of the car to break down.
The repair was not cheap for me, but now my Shevik is again ready for adventure, dirt and off-road. And I don’t mind the money for this, it’s drive, adrenaline, fun and interesting. And of course, the machine needs to be repaired as soon as you sense something wrong in its operation.
Good luck to everyone on the roads and less breakdowns))
Which ones are better?
There are parts from several manufacturers on the market, among which the following options can be distinguished:
- Cross and Detal-Resurs are two budget brands that produce suspension parts for the Niva. Price - from 1600 rub. per set.
- Sitek - budget spare parts with rubber or polyurethane silent blocks. They are distinguished by their small wall thickness and low weight. Suitable for those whose route mainly runs on asphalt. Price - 2200 rub.
- Niva Urban - inexpensive high-quality spare parts for Niva Chevrolet. The manufacturer produces rods for the entire VAZ family. Price - 2600 rub.
- UG is another budget rod from a little-known company. Like Sitek, they are not intended for active off-road running. Price 3000 rub.
- SC is a more expensive model, characterized by a rectangular cross-section. Judging by the mass, the manufacturer did not spare the metal. The quality of the seam does not cause any complaints from car owners. Price - 3400 rub.
- Niva Extreme - reliable, durable suspension parts that are preferred by fans of extreme racing. The only drawback is the price, which is almost 5,000 rubles.
Note: the high price of Niva Extreme parts is due to their non-standard design. These are enhanced traction.
How to make a Panhard rod adjustable with your own hands?
If you do not know how to adjust the Panhard rod in a garage, we advise you to follow the algorithm presented below. So, first of all, it should be said that even sagging springs lead to a displacement of the bridge from its designated point. Fans of “lowered” cars and those who, on the contrary, prefer to install high spacers under the car’s springs, which would provide the vehicle with the ability to transport cargo, need conversion of standard traction to jet traction like no other.
To begin converting the crossbar, we need to stock up on:
- 2 tie rods from a VAZ 2108. Make sure that the bushings are faceted and a wrench fits them. One side should have a right-hand thread, and the other should have a left-hand thread;
- bending the steering rod, which has the form of a double-sided bolt with threads of different directions;
- 2 nuts, with right and left pitch.
If all the necessary spare parts are available, you can begin directly converting your car into a super-controlled vehicle.
Reinforced rods
The appearance of cracks between the rod base and the lugs will shorten the service life of the parts. This problem can even cause an accident - the car suddenly pulls to the side when the traction breaks.
To avoid unpleasant surprises, special reinforced parts are installed in the rear suspension. They are made of alloy or cold-rolled steel and differ from conventional ones in the diamond-shaped section of the base and powerful welding seams that hold the lugs.
Reinforced rods differ from standard ones in the following characteristics:
- Reduced weight of parts.
- Improved paint coating that prevents corrosion of elements.
- High strength welded seams.
- Increased resistance to torsion, compression and tension.
Installation of reinforced rods is recommended for full use of the Chevrolet Niva off-road. They don't offer much benefit for city or highway driving. Under gentle operating conditions, the strength of standard rods is quite sufficient, so there is no point in overpaying for reinforced parts.
Basic faults
Chevrolet Niva suspension parts are designed for different service life.
The levers, beam and anti-roll bar do not need to be changed even after 100-200 thousand kilometers.
But rubber-metal hinges, boots and bushings gradually lose their properties even while parked.
VAZ-2123 owners have to deal with the following malfunctions:
- Wear of silent blocks, ball joints.
- Damage or cracking of anthers.
- Reduced performance of shock absorbers.
- Breakage of jet rods.
In addition to replacing faulty parts, it is necessary to regularly check and adjust the angles of the front wheels.
Otherwise, the car's handling deteriorates, and the tires begin to wear out rapidly. Wheel alignment is checked every 10-15 thousand kilometers and after very strong impacts when falling into road potholes.
Why is there a need for replacement?
The thrust rods themselves are made of high-strength material to withstand high loads that occur during movement and long-term operation of the vehicle. But using only one metal in the manufacture of rods is impossible. At the mounting points, special eyes are made into which silent blocks are installed. They are installed in the rods directly at the factory and secured by welding. Therefore, they are the weak point of the system. If errors were made during manufacturing and microcracks appeared, this could eventually lead to destruction of the product. Therefore, it is important to correct the malfunction in a timely manner and periodically diagnose the car.
The design also includes rubber bands that protect against dust. If the seals are damaged, the rubber bands bear increased load. They begin to deform and tear. Over time, this can cause the rod to come off.
But it is impossible to constructively do without oil seals. Therefore, the rod must rotate slightly to compensate for the movement of the suspension.
Diagnosis of silent block faults
Replacement of parts on a Chevrolet Niva is carried out for the right and left levers according to the same instructions.
Raise the car using a jack. Remove the wheel. Place a support under the lower arm. Using a jack, raise the lower arm or, conversely, lower the car slightly to increase the load on the suspension. It is best to use a second jack to fully compress the spring. This way you will achieve this effect faster. Install the tie down spring and then lower the second jack to relieve stress on the anti-roll bar. Release the lever from the stabilizer clamp. Remove the shock absorber mounting bolt from the eye, having first unscrewed it. Remove the three nuts that secure the ball joint to the arm. Remove the second jack and remove the spring. Unscrew the lower arm axle nut and use a spacer to knock out the axle. Remove the lever
Pay attention to the location of the front suspension axle shims. Try to remember their number so that there are no problems when reassembling
Remove the nuts from the upper arm axis. Remove them along with the washers. Using a puller, press the old parts out of the lever lugs. If this cannot be done with a tool, then you need to use a blowtorch or gas torch. Clean the seat. Install new silent blocks and press them with the same tool. Before this, it is advisable to coat the lever and bushing with graphite lubricant, Litol or Movil.
Now you need to install the lever in place, making sure to place the shims correctly. Before you install this part, you can change the silent blocks on the upper arm. This operation is carried out according to simpler instructions:
- Tie the front hub together with the caliper to the body so as not to break the brake hose during the work.
- Remove the upper arm by unscrewing the bolts securing the axle and arm to the ball joint.
The rest of the work follows the same principles as when installing parts on the lower arm. First, the worn bushing is removed with a puller, and then a new one is installed in its place. Don't forget to clean the seat of the upper assembly and treat it with lubricant. After installing this part of the suspension, carry out final assembly.
The final tightening of the silent blocks should only be carried out with the machine standing on the ground. The Niva manufacturer recommends tightening the lower axle nut with a force of 100-170 N. After replacing the components on both sides, it is recommended to have a wheel alignment performed at a service station. This will help increase the life of the suspension and tires.
It is impossible to accurately indicate the service life of silent blocks, because everything depends on the quality of the rubber insert and the operating conditions of the vehicle. But everyone understands that sooner or later they will have to be replaced. There are several methods of self-diagnosis. All these methods can be implemented comprehensively in order to make an accurate verdict regarding repairs.
Any driver will immediately feel changes for the worse. But similar symptoms also appear when the ball joints are faulty, so you will have to use the method of elimination.
For convenience, you should hang the wheel. Giving it variable forces at the top and bottom points, you need to rock the hub in a vertical plane. The presence of play is very easy to determine
It is important to make sure that the source of this play is the silent block and not the ball joint. It is necessary to visually inspect the entire lever mounting assembly
Small cracks are allowed on the elastic bands, but there should not be large breaks. A rupture of the rubber rim, which is visible from under the bushing, is not yet a cause for concern, but a sign of imminent failure of the silent block. The axis of rotation of the lever and the axis of the silent block must coincide. If they are at an angle to each other, then this indicates that the rubber has begun to deteriorate, and under load the inner bushing has shifted relative to the outer one.
Installation of reinforced rods
To increase the life of the suspension, to be more confident in the condition of the car, you have to use higher quality, but also more expensive parts. Reinforced thrust rods of the Niva Chevrolet are made of more durable materials. In addition, the place of welding seams is processed more carefully to prevent the occurrence of cracks. Some reinforced rods are specially made not round, but diamond-shaped. According to experts, such angles of rigidity allow them to withstand stronger loads.
In general, there are several criteria that distinguish enhanced jet thrusts:
- lower weight
- high quality production. The special shape allows protection against twisting and compression, which gives an advantage when driving off-road.
- factory production
- Technological painting. The use of powder coating helps prevent corrosion due to higher adhesion to the metal. This also protects against the occurrence of microcracks.
Advantages and disadvantages of the Niva Chevrolet suspension
A comprehensive assessment of the suspension takes into account the study of the design, its effect on handling and cross-country ability. You also need to take several factors into account.
Pros of car suspension
- excellent cross-country ability – thanks to high ergonomics and adaptive design;
- maintainability - you can replace worn parts yourself according to the instructions;
- Availability of spare parts - always available in any store.
In terms of costs, repairing the front or rear suspension of a Chevrolet Niva is cheaper than foreign cars - the price of spare parts is 2-3 times lower. The parts have a shorter lifespan, but even with scheduled maintenance, it is more profitable to maintain a domestic SUV.
Disadvantages of the Chevrolet Niva suspension
- vibrations - mainly due to the rear dependent suspension or due to “oak” rubber bands when replacing them is missed;
- low quality of spare parts - if you buy cheaper analogues instead of original ones;
- increased fuel consumption - mainly due to the heavy rear gearbox.
Some people note other shortcomings, such as play in the front hub due to a worn tapered bearing, ball joints or silent blocks. But the cause of these malfunctions is poor vehicle maintenance and missed scheduled maintenance.
Signs that the rods require replacement
Typically, a problem with torque rods manifests itself in the form of vibrations when starting off or changing gears. If these symptoms occur, it is necessary to carry out an external inspection of the rods for malfunctions. To do this, the car is placed on a pit or viewing platform and the welding points and the condition of the rubber bands are examined. It is also necessary to check the backlash of the reaction rods. If there are problems, replacement is required.
As a rule, the entire set is changed completely, since the load on them is distributed evenly and if there are problems with one, it may soon be necessary to replace the other rod.
Remedy
Increased noise from the rear wheels
— The wheel fastening is loose
Tighten the wheel nuts
— Wear or destruction of the axle ball bearing
Inspect the axle shaft and replace the bearing
Constant increased noise when the rear axle is operating
— The rear axle beam is deformed, the axle bearings are damaged
Straighten the beam and check its dimensions, replace the axle bearings
— The axle shafts are deformed and have unacceptable runout
Replace the axle shafts with new ones
— Incorrect adjustment, damage or wear of gears or gear bearings
Determine the gearbox malfunction, repair or replace the gearbox
— Worn or incorrectly adjusted differential bearings
Remove the gearbox, repair and adjust
Noise when accelerating and braking the car
— Incorrect adjustment of the main gear gear engagement
Adjust the engagement
— Damage to the axle bearings
Replace bearings
— Insufficient amount of oil
Restore the oil level and check for leaks in the seals or rear axle beam
— Incorrect side clearance in the meshing of the final drive gears
Adjust the gap
— Increased clearance in the drive gear bearings due to loosening of the flange nut or wear of the bearings
Adjust the clearance, replace bearings if necessary
Noise when cornering
— Damage to axle bearings
Replace bearings
Knock when starting to move the car
— Wear of the hole for the pinion axle in the differential box
Replace the differential box and, if necessary, the pinion axle
— The rear suspension rod mounting bolts are loose
Tighten the bolts
Oil leak
— Worn or damaged drive gear oil seal
Replace the oil seal
— Wear of the axle shaft seal, leading to oiling of the brake shields, drums and pads
Check the runout of the axle shaft and beam deflection. Repair or replace damaged parts
— Loosening of the bolts securing the rear axle gear housing, damage to the sealing gaskets
Tighten the bolts, replace the gaskets