Hello, dear friends! Today I propose to talk to you about the elevator kit for the Niva. This could be a Chevrolet Niva, that is, series 2123, or the more “our” Niva Urban, 2131 or 4x4, and representatives of the 2121 series, that is, 21213, 21214. It all depends on what kind of car you have at your disposal.
Russia, Ukraine, Belarus and a number of other countries are the greatest admirers of Niva cars. They are affordable and provide many benefits.
Some people prefer to do everything themselves. I can’t say that modifying the front and rear suspension of a Niv car will be an easy job in a minute. No, you will have to spend a lot of effort, time and patience on this.
You can find out how much such a service costs at a service station. The price for a professional lift is steep, so not every owner of a not-so-expensive crossover like the Niva is willing to spend that kind of money, having the opportunity to do everything themselves. And if you put a power bumper and an expeditionary trunk on top, it will turn out great. At least now on a round-the-world trip on Niva.
Lift options
How and where you will make a lift for your crossover, decide for yourself. I will try to tell you about all the nuances of this procedure so that you understand what to expect and what to prepare for.
Let's start with the existing elevator options. Suspension modification professionals distinguish two types of such procedures:
I will say right away that a body lift lifts the entire body by using stands, modifying the hose and other parts. In theory, such tuning is very simple, but in the case of the Niva it is not used. And why all? Yes, because the Niva 2121 and other representatives of the series do not have a frame. If there was a frame, then there would be no questions.
From this we conclude that for our Niva the optimal solution would be suspension lifting. It provides the following benefits:
- increases crossover cross-country ability;
- lifts the entire machine;
- allows you to install larger wheels without having to trim the arches;
- provides the car with a more attractive appearance;
- makes the Niva an ideal car for fishing, hunting and driving on the most difficult sections of roads and off-roads.
If you raise the car by about 45 mm, achieve a lift of 50 mm, or even take the height to a bold 60 mm, you can easily insert wheels with a diameter of up to 29 inches into the factory arches. Do not forget that installing large wheels affects fuel consumption.
Video 2
Regardless of whether you have chosen a budget or professional elevator, after final assembly it is necessary to conduct test runs. If there are flaws in the installation, or the dimensions are incorrect, it is better to check it away from public roads.
Attention! Independent manual modification of the suspension is making changes to the design of the car. When using Niva on public roads, you may be checked by a traffic police officer
This is followed by penalties - up to and including deprivation of registration. It is advisable to formalize all completed work in the “NAMI-PTIA-FUND”. Once you receive the certificate of conformity, you will save yourself from troubles during further operation.
Materials and tools
I don’t argue that in Samara, Nizhny Novgorod, Moscow or cities like Yekaterinburg and St. Petersburg there are many companies ready to do any amount of work on your car and suspension in particular for your money.
If you decide to do everything yourself, I have nothing against it. I only advise you to use only factory-made, high-quality kits for the Niva elevator.
Kits from Izh Techno have earned good reviews; you can also find excellent options in the store on Sedova Street in St. Petersburg. This store is called Niva 4x4. The T 34 lift kit also showed excellent performance. Each of them is excellent for the Niva, which is why it is widely used by car owners when modifying the front and rear suspension.
There is an option to assemble the kit yourself. But this will require accurate drawings and even more time and effort. I don’t see the point in this, since it is better to take a ready-made set after looking at a review of different sets.
To work you will need to take:
- front and always rear new springs;
- spacers made of rubber for springs with a metal cup;
- spacers for the Nivov ball joint (upper);
- shock absorbers;
- brackets for rear shock absorber springs;
- cup washers;
- set of tools;
- jack;
- durable boards;
- ties for working with springs.
Sizes are selected individually, based on what kind of car you have and what results you are aiming for. You can buy something without any problems. Although some elements will have to be ordered or done yourself. That's why buying a ready-made lift kit seems preferable to me.
Get ready to go. Photo and video instructions will help you.
Strengthening drives on Niva with your own hands
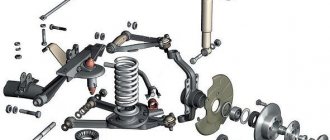
A vehicle suspension, or suspension system, is the parts, components and mechanisms that are an integral link between the car body and the road.
To improve the Niva's cross-country ability, it is important to strengthen the main suspension mechanisms. Based on the objectives, to improve the efficiency of the SUV, it is necessary to install spacers between the suspension elements, which will significantly affect the vehicle’s ground clearance, upgrade the springs and shock absorbers, and strengthen the front and rear axles of the vehicle
Work on modernizing drives must begin with strengthening the rear axle of the vehicle
You can change the configuration of the Niva's rear axle on your own or buy a finished product that has increased strength, which is very important in off-road conditions
Most extreme sports enthusiasts strengthen the bridge with their own hands. To strengthen it, the bridge is removed from the car and, using a grinder, all elements are cut off from it, except for the breather and the lower linkage fastenings. It is necessary to purchase a rectangular profile 50*50 or 60*60 to strengthen the bridge. Using a grinder, you need to cut out one wall of the profile, then it is adjusted in place so that the profile fits as tightly as possible to the product.
Experts recommend welding the bridge in assembled form with axle shafts, gearbox and filled with oil. This is done so that the bridge does not move during welding work. It is necessary to cook with short seams at a distance of about ten centimeters. Then the missed spots are brewed in two passes. After strengthening the bridge with the help of profile pipes, an angle for attaching shock absorbers and cups for springs is welded to the beam. It is also possible, instead of the standard fasteners for the lower links, to weld ears from a corner of steel about four millimeters thick with a continuous welding area.
Particular attention must be paid to the rear axle rods, which most often break at the connection points under significant loads. To do this, a strip of metal of about three millimeters is spot welded along the entire length, and high-quality polyurethane products are installed instead of conventional silent blocks
We've sorted out the rear axle, now let's look at how to strengthen the front suspension on the Niva. It is necessary to begin strengthening the suspension by installing special spacers, which helps raise the lower spring areas. To ensure that their angle of inclination does not change, the installation of spacers must be carried out directly on the platforms themselves, and not under the springs.
Elevator assembly
The installation procedure is divided into installing a front and, accordingly, rear car suspension lift.
There is nothing particularly complicated here. Especially for those who have already had to work with the suspension, change something, repair and dismantle it.
Let's look at the processes separately.
Front suspension
Let's start with the front of the Niva. Then I’ll tell you separately how work is done on the rear suspension of the crossover.
- It all starts with removing the wheels and releasing the silent blocks. The activities are elementary, so we won’t pay much attention to them;
- Securely secure your Niva. To do this, place a jack under the ball joint. The machine rises until the spring is fully compressed;
- Next, the ties are installed on the fastenings and the fastening elements that you will see on the Niva’s shock absorbers are dismantled;
Methods for lifting suspension on Nivas
There are several main ways to increase ground clearance on a Niva by lifting the suspension:
- Installing spacers for suspension springs.
- Installing spacers between the upper arms and ball joints (front suspension).
- Spacers between the lower cups of the front springs and the lower arms.
- Replacing the suspension springs with longer and stiffer ones.
The required amount of work is quite simple, and kits for modifying the suspension are produced by many companies. The typical installation process for a suspension lift kit is as follows:
- Spacers are installed between the spring cups of the rear shock absorbers and the body.
- The lower mount of the rear shock absorber is moved upward (the shock absorber is connected to the suspension through a special extension).
- The upper rods of the rear axle are replaced with extended or adjustable ones.
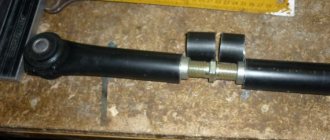
- The extension spacer is attached between the Panhard rod and its standard mounting point. A more expensive, but also more correct way is to replace the entire Panhard rod with a tuning rod with the ability to adjust the length.
- The brake force regulator rod (“sorcerer”) is replaced with an extended one.
- Spacers are also installed under the front suspension springs.
- Spacers are also required to be installed under the upper ball joints. Otherwise, a significant increase in the angle at which the ball pin is inclined to the plane of its installation can lead to the fact that it will rest against the body of the ball joint, which can cause its destruction in the extreme positions of the suspension.
- Threaded extensions are screwed onto the rods of the front shock absorbers, or the shock absorbers are replaced with longer ones.
What is important to consider when lifting the suspension?
First of all, we must not forget that any intervention in the suspension design (and especially such a drastic one) noticeably changes the wheel alignment angles, and adjusting the wheel alignment angles after lifting the suspension is a mandatory procedure. However, the standard range of adjustments for a lifted suspension may not be enough, which will entail additional modifications.
The Niva front suspension lift should be carried out with caution. The design of this multi-link suspension requires maintaining the parallelism of the upper and lower suspension arms throughout its entire travel, which can be disrupted when installing different-sized spacers during an incompetent lifting
In this case, the performance characteristics of the suspension will be deteriorated due to the deviation of the wheel planes from the vertical, as well as abnormal changes in the toe angles of the wheels during body roll.
You need to be very careful when choosing ball joints, since the maximum design angles of inclination of the pins in them may be insufficient.
Simultaneously with the lifting, it is advisable to replace the CV joints if they have a sufficiently high mileage, since an increase in the angles of inclination of the drive shafts will lead to the fact that the balls in them will go beyond the previously worn out zone with a noticeable crunch. The wear on the internal hinges will be especially noticeable.
Since the upper arms of the front suspension will go down during lifting, they may rest against the rubber bumpers during full rebound travel, which will require trimming them.
Replacing springs and shock absorbers is always preferable to using spacers - this will make the suspension more energy-intensive and increase its operating strokes, which is very important for off-road vehicles. Increasing the suspension travel will increase the quality requirements for the silent blocks of the levers and will noticeably affect their service life. In this case, a common solution is to replace the rubber silent blocks with caprolon or polyurethane bushings.
You can often find recommendations for increasing the possible suspension travel by removing the front anti-roll bar and Panhard rod of the rear axle. The price to pay for a slight increase in the chuck stroke will be the practical impossibility of more or less dynamic driving on asphalt roads due to significant roll in corners and the car's emerging tendency to lateral swing.
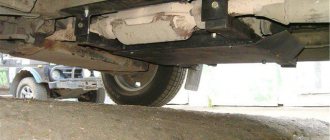
You should pay attention to whether the brake hoses will be stretched during the full rebound stroke, which will entail the need to replace them with longer ones. See how to properly lift the rear suspension of a Niva:
Considering the above, you should carefully weigh your strengths and carefully approach the work if you plan to do it on your own. The key to success will be the correct choice of parts of the required quality and a reasonable amount of modifications, especially if the vehicle is not intended to be used exclusively off-road in the future.
What will you need for the job?
In order to slightly increase the ground clearance, it is advisable to use a factory lift - a kit for Niva-2121, sold both in company stores and in car markets. Using the included instructions, you can carry out the desired tuning in just 1 day. However, there is one significant drawback: the suspension lift is produced exactly as much as the manufacturer considers necessary.
At the same time, if there is an urgent need to tailor the car to specific needs or the specifics of the road, you can make a lift kit for the Niva on your own.
You just need to prepare the following set of tools:
- rear and front springs (the best parts on a Chevrolet Niva are 31.5 cm long and 1.57 cm thick, but these parameters can easily be changed according to the owner’s requirements);
- rubber spacers for springs with special metal cups;
- shock absorbers;
- spacers for the upper ball joint (not sold in stores, so they can only be made to order);
- brackets for rear shock absorbers;
- washers for the Niva-21214 cup of an enlarged type with an internal diameter of 1 cm and an external diameter of 3 cm;
- jack;
- boards;
- spring ties.
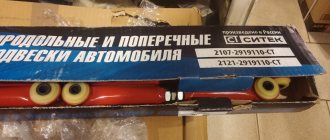
Suspension lifting Niva VAZ 2121 21213 21214 2131
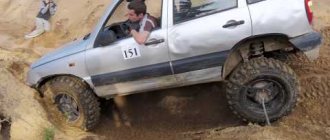
When a person buys a Chevrolet Niva, he rarely thinks about an extreme trip. Most often, a car is bought for a picnic with the whole family. That is, the car moves from one point to another.
Although the Chevrolet Niva is an SUV, it is noticeably inferior to its European and Asian competitors in cross-country ability in hard-to-reach places. It is because of this problem that fans of hunting, fishing and simply extreme driving choose to lift their car instead of watching videos while sitting at home.
Lifting is a type of tuning that increases the vehicle's ground clearance. They often do it with their own hands, in garages.
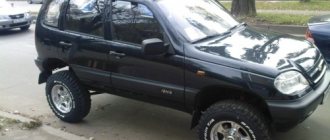
Chevrolet Niva
Proper modification will turn the Niva into a fairly solid car that will show excellent results off-road and in difficult terrain. We mentioned the word “lifting”, but did not say what it is.
Lifting is a set of changes made to the design of the car. They allow you to install larger diameter wheels on your car. Most often, cars with all-wheel drive are chosen to create such projects.
What does lifting give?
There is a rumor among inexperienced drivers that lifting increases ground clearance. Remember, this is not true. It should be understood that the ground clearance will be increased by large diameter wheels, and lifting will mainly allow them to be installed on the car.
In other words, this is a modernization of ground clearance and a significant increase in cross-country ability. This kind of car tuning can be done with your own hands without much difficulty.
To do this, you need to find time, a garage stocked with everything you need, and allocate a budget for the purchase of spare parts.
Ultimately, the ground clearance increases, and the car can easily overcome bumps and all kinds of holes. The first step is to install and upgrade the suspension lift and install larger wheels. Let's consider the advantages of Niva with lifting:
- More “hard” appearance of the car;
- Improving the cross-country ability parameter;
- Possibility of installing wheels with mud tires and larger wheels;
- Increased clearance;
- Increased protection of important mechanisms from physical damage and wear.
Subtleties of lifting
In this type of car suspension tuning, such as lifting, you always need to maintain common sense and be able to stop in time
It is important to know that during modification the bend angle of the drives changes, which automatically leads to a reduction in their service life
It is necessary to increase the ground clearance only with minimal load on the chassis, otherwise serious problems may arise.
Tuning the suspension of such a car is very popular among hunters and fishermen. The cross-country ability of this vehicle has already proven itself at a high level, and the suspension upgrades made increase them even more. This makes it even more popular and functional.
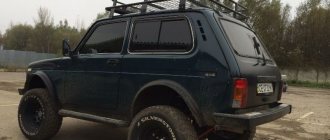
Modified all-terrain vehicle
You should only use a lift for a Chevrolet Niva if you spend time off-road, because a lifted car reduces the life of the suspension, transmission and the life of chassis parts.
But be prepared that parts will wear out faster during such extreme driving.
The outer CV joints are too little susceptible to this, it will be worse for them if the wheel becomes larger in offset, width and weight, and then they can “crunch”. Although even then the hub bearing has a hard time, especially if it had play before.
Although we have avoided this problem, since we install steering knuckles with 2 ball bearings (from the rear axle shaft), they do not need to be adjusted; they are tightened all the way, although it is much better with a torque wrench. The unit comes out maintenance-free, the hub is unloaded, rolling is easier and the dynamics of the car are much better. Steering knuckles are naturally of domestic production and with a guarantee.
When installing wide wheels after a lift, you will need to keep in mind the ball ones (when the weak ones “fly”), the pendulum will also be able to fly, and the installation of the latest gas shock absorbers results in a stiffening of the upper bracket of the lane. shock absorber (otherwise it tears, especially when the front end is heavier), the mounting of the rear shock absorbers can also be strengthened. It is preferable when lifting, replace the suspension with p/urethane instead of rubber.
Economical Niva suspension lift of 1.5-2 centimeters. In such a situation, we resort to replacing the rubber spacers for the springs with tuning ones (of greater thickness), installing washers, spacers for the upper ball joints and adjusting the spring bumpers (at the visitor’s request). In this implementation, the Niva gets wheels (correct) in size R15 215/75.
How is the installation carried out?
Conventionally, the installation can be divided into 2 stages: installation of the rear and front suspension. It all starts with a fairly ordinary procedure - removing the wheels and releasing the silent blocks. Now, in order for the Niva-21214 to be securely fastened, a jack should be installed under its ball joint and the car should be raised until the spring is completely compressed. It is not possible to lift the Niva-2121 with your own hands. Only reliable fixation using technology. The next step is installing the ties and unscrewing the fasteners installed on the shock absorber.
All that remains to be done in the future is to unscrew the ball joints and remove the stabilizer. During operation, it is very important not to damage the brake hoses located in the immediate vicinity. Those bolts that are located at the wheel must be replaced with their extended equivalents.
Pre-prepared spacers for springs must be installed with special attention in relation to each other.
A stabilizer is installed on the lower and upper ball joint. Now the front suspension lift can be considered fully improved and ready for work. It remains to do a similar, albeit slightly more complex, lifting for the rear suspension.
For these purposes, you will need another tool - a semi-automatic welding machine. With its help, additional parts will be installed on top of the standard cups, which will definitely have to be welded. Such a lift of the rear suspension can lead to its movement forward, which is strictly unacceptable. To prevent such a development of events, all rods need to be slightly lengthened.
It would be a good idea to lengthen the size of the brake adjuster rocker arm and move the lower cup slightly. Particularly vulnerable at this moment is the driveshaft crosspiece, which is more than easy to touch in the heat of work. And it is the new size of the cups and filigree work that will protect it from premature failure.
The final battle is the attachment of shock absorbers and a mandatory visit to the service station. Now the rear and front springs of the Niva are reinforced. Any, even the most harmless tuning needs vigilant monitoring by a professional. And even more so, an improved Chevy Niva with your own hands.
In what cases is Niva lifting done?
Increasing clearance is a labor-intensive procedure. It requires special skills and tools. Therefore, lifting is usually performed at a service station. However, if you have the skills, you can install the lift kit yourself
In this case, it is necessary to pay attention to the following points:
- Lifting requires an integrated approach. Simultaneously with the increase in ground clearance, it is necessary to change the shock absorbers and thrust rods. Otherwise, the suspension lift will make the car unusable.
- On the right side of the rear of the body there is a gas tank with ventilation pipes. This must be taken into account if, in addition to lifting, you decide to enlarge the wheel arches.
- If there is a significant change in ground clearance, you should install an extended brake hose and adjust the bump stops. You will also have to reconfigure the pressure regulator in the rear brake circuit.
For tuning at home, it is better to use ready-made factory-made lift kits.
Installation of wheels with a large outer radius. In this case, the craftsmen are faced with a limitation - tires that are too large do not fit into the wheel arches. You have to widen them or move the wheel outside the car, installing extended hubs.
Installation of larger springs. This method is more expensive, but allows you to achieve a greater lifting height of the body.
Installation of wheel reducers on the rear axle. These parts allow the hubs to be lowered and increase the distance from the axle to the ground.
Downward displacement of the front beam. To do this, you will have to weld special fasteners onto the side members and install extended arms.
Installation of extended springs and spacers under ball joints. A simple and inexpensive way to greatly increase ground clearance.
After this, we install the ties on the spring, tighten it and unscrew the shock absorber mount. Next, remove the lower and upper ball joints and remove the stabilizer. Release the lever and remove the spring. How is the suspension lift done? The Niva remains stationary for now, and at this time we turn the wheel hub to the side and place it on a stand
It is important not to damage the brake hoses.
The Niva lift can be carried out either independently or in a car repair shop. In special stores you can purchase a kit for Niva, which was produced at the factory. However, it is worth remembering that this is still an intervention in the car. Therefore, you need to carry out this process yourself only if you have knowledge and experience. If you are in doubt, it is best to turn to professionals.
Rear elements
Rear suspension lifting operations are carried out in a pit using semi-automatic welding.
- You need to install more cups under the rear springs. They are attached on top of the standard ones with bolts.
- The rear shock absorbers, assembled with brackets, are put in place and welded. As a result, the rear axle moves forward and to the side, so it is necessary to lengthen all the rods, including the transverse one.
- Cut off the lower cup and move it back 1.5-2 cm so that the cardan cross does not break out. The cups are welded. This is necessary in order to rotate the gearbox shank upward to protect the rear crosspiece during operation. At the same time, the sorcerer’s rocker arm will have to be lengthened by about 3 cm.
- Weld pins under the shock absorbers under the clamp of the metal brake pipe. Complete the assembly by attaching the shock absorbers.
- The final finishing of the bridge is carried out at the wheel alignment stand.
Return to contents
Self-replacement of VAZ 2107 ball joints (upper and lower)
Today, I bring to your attention step-by-step instructions for replacing ball joints on a VAZ 2107, with a detailed description of the process supported by informative photos. The replacement of ball joints by specialists has been worked out to the point of automation and has changed only slightly over the years thanks to new tools and capabilities.
The VAZ 2107 ball joint is replaced using an inspection pit or a lift in my case. When starting any repair work, take care of your own safety. If you are going to work in an inspection hole, install wheel chocks, tighten the handbrake and engage second gear. Working on a jack alone without the safety measures described above is strictly prohibited.
So, if you are ready, I suggest you start.
A few words about the instrument. You will need:
- Metal brush.
- Liquid WD-40.
- Key for 22 and 7.
- Puller for ball joints.
- Ball joint lubricant.
- Medical syringe (without needle).
- Adjustable wrench.
Replacing the ball joint of a VAZ 2107 with your own hands.
1. The first step, of course, is to remove the wheel.
2. Next, using a metal brush, clean the ball joint mounts.
3. Treat all connections that will be removed (as shown in the photo) using WD-40 or similar thread penetrating fluid.
4. Take a 22mm wrench and unscrew the nuts of the upper and lower ball joints by about one and a half to two turns.
Self-replacement of VAZ 2107 ball joints (upper and lower)
Self-replacement of VAZ 2107 ball joints (upper and lower)
5. Now install the special ball joint remover.
6. As a rule, in one step, it is possible to pull out two ball joints at once: the upper one shoots off first, and then the lower one. If for some reason the ball does not give in and remains in place, then using a steel drift and hammer, you can help it come out. The blows must be applied to the protrusion, which is on the steering knuckle.
Self-replacement of the VAZ 2107 ball joint
7. When the ball joints of the VAZ 2107 have been pressed out, unscrew the fastening nut of the upper ball joint and remove the ball joint from the knuckle.
8. If the finger rotates, clamp the lever using a pry bar.
9. Unscrew the fastening of the ball joint to the upper arm.
10. Now you can remove the ball joint.
11. Next, you need to carefully clean the seat of the ball joint on the lever, while carefully looking at the lever to see if there is any damage or cracks on it.
12. Remove the sealing washer from the old ball joint and install it on the new ball joint.
13. Before installing the ball joint, it must be thoroughly lubricated; for this use ShRB-4, Litol-24 lubricant.
14. Install the boot with the washer.
15. Now you can tighten the ball to the lever. Install the ball into the fist and tighten the nut.
16. Unscrew the lower ball nut, almost always the pin starts to rotate, to avoid this, install the mounting between the knuckle and the brake shield, then make a lateral tension in the connection between the pin and the knuckle.
17. If it doesn’t help, install an adjustable wrench in the gap between the lower arm and the fist and use it to keep your finger from turning.
18.The nut is unscrewed, you can raise your fist upward. In the cut between the upper part of the fist and the lower arm, set the key to 22, this will make further work more convenient.
Self-replacement of VAZ 2107 ball joints (upper and lower)
19. Unscrew the VAZ 2107 ball joint from the lever.
20. Again, carefully inspect the lever and seat, then clean the latter from rust and dirt.
21. Take the new ball joint and check for grease in the lower part. To do this, use a 7 key and unscrew the plug with it.
22. If there is no grease, fill the ball with grease using a medical syringe without a needle.
23. Place the ball joint in place at the bottom of the lever and screw it to the knuckle.
That's all! The new ball joints were successfully installed, therefore we can conclude that the independent replacement of the ball joints was a success! All the best to you, keep at it and you will certainly succeed!
Why do you need spacers for springs?
Over time, the standard set tends to sag, thereby losing rigidity, elasticity and functionality. To correct the situation, a replacement will be required, but not in all cases. So, if the product had the property of sagging, but without deformation, then you can do without replacement. For this purpose, there are special spacers that, in addition to restoring functionality, increase the vehicle's ground clearance.
This is what spacers look like
Spacers are available in various designs:
- Spacers between the spring support and the body element cup. Often this type is applicable for MacPherson-type suspensions, when when turning the strut rotates with a shock absorber.
- Interturn spacers are the simplest in design and installation. Can be installed on both rear and front springs. They do not have the ability to change ground clearance, but noticeably change the elasticity of the product.
- Spacers between the spring and the body bowl are the most common option, as they combine two functional features: increasing ground clearance and adding suspension stiffness. Standard and reinforced spacers are available. Standard spacers are designed to slightly increase ground clearance, while reinforced ones differ from the first ones in the height of the structure. The difference in height is 30 mm, which indicates a significant increase in ground clearance. Reinforced types of spacers for rear springs are especially popular.
Purpose
Chevrolet Niva comes from the factory with springs, both front and rear. The main purpose of these devices is to absorb all the shocks of the suspension that occur when the wheels hit potholes and bumps. They are located in the gap between the wheel and the frame of the car, due to which shocks from the road are smoothed out.
For their manufacture, special high-strength steel is used. The number of turns of the device affects not only the quality of shock absorption, but also the distance of the body from the suspension.
Many Chevrolet Niva owners upgrade the rear springs by installing spacers or reinforced parts.
Auto parts for foreign cars, auto repair
Contents 2 Checking the product. Signs of a malfunction The ball joint on the Niva consists almost entirely of metal.
Replacing the lower ball joint of the Chevrolet Niva front suspension
But if the integrity of the rubber boot is damaged, water can get inside along with dust. This is possible even with small cracks. As a result, extraneous noises and squeaks appear while driving.
These are one of the first signs of rapid wear of the ball joint, by which you can determine the need for replacement. New ball joints on a Chevrolet Niva are installed quite simply; the procedure can be done in any garage using standard equipment.
The only problem may be the need for a special tool - a removable key for ball joints. The puller may differ in appearance, but the principle of its operation is the same in all cases.
I don’t know, maybe I just went to the wrong stores, the old classic Nivas have anthers, but they don’t fit the Shniv ones. After surfing the Internet for another hour, I decided to completely replace the ball joints. First, we jack up the car, put jack stands, and unscrew the wheel.
Then we release the bolts that secure the ball joint. If the flame does not come out, which is most likely the case for you, then you need to hit it with a hammer several times, just do not overdo it. While pressing the upper lever down, apply several sharp blows with a hammer to the side surface of the steering knuckle boss until the pin comes out.
Press the support pin out of the steering knuckle boss. Unscrew the three nuts of the bolts securing the support to the lever, remove the bolts and move the steering knuckle to the side, removing the wheel hub from the splines of the shank of the front wheel drive outer joint. Such a breakdown threatens a serious accident. Therefore, you need to monitor the condition of the suspension and change the ball joints in time; their design does not provide for the possibility of repair.
Signs of malfunction: Knock in the front suspension when overcoming speed bumps, bumps and holes. Front wheel play, which can be noticed while driving or after jacking up the car.
Creaking sound in the suspension when turning the steering wheel. Uneven tread wear. Therefore, the decision to replace ball joints must be made after checking their condition.
The housing of some hinges is equipped with a diagnostic hole to determine the degree of wear.