Classic Niva
For all its popularity, the Niva 2121 has a number of disadvantages. One of the most common problems with this SUV is increased vibration in the cabin. Moreover, the more the car is used, the more noticeable the vibration becomes.
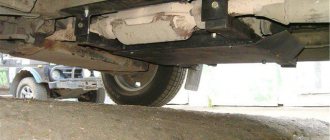
The reason for the increased vibration is a structurally incorrect solution for securing the transfer case (transfer case). The fact is that this box on the Niva is attached directly to the bottom using silent blocks. And since during operation the vibration of the transfer case is significant, all this is transmitted to the cabin.
As a result, strong vibration affects the transmission and it wears out faster. Although the metal of the bottom in the area where the transfer case is attached is reinforced, due to strong vibration, the bottom is destroyed over time due to exposure to vibration.
Often, Niva 2121 owners, in order to reduce vibration in the cabin, install a subframe under the transfer case. This device is made of metal. The Niva subframe absorbs any vibration impact from the transfer case.
The subframe has enough advantages:
- Receives the oscillatory movements of the transfer case.
- Protects its body from possible damage when driving off-road.
- When installed correctly, there is virtually no displacement of the axis between the transfer case and the gearbox, which has a positive effect on the durability of both transmission units, as well as cardan and intermediate shafts.
Benefits of use
A device such as a subframe has many advantages, the main one of which, as we have already noted, is the reduction of noise and vibrations in the cabin.
In addition, this device is the only protection for the lower part of the transfer case. By the way, on the conveyor the Niva is already equipped with special fastenings to the floor, which allow mounting supports on the transfer case. Thus, installing a transfer case subframe on a Niva will take the car enthusiast no more than 30 minutes. Another thing is to make this part yourself (in this case, the work can take several days).
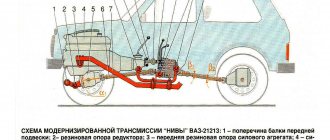
Niva transfer case. Ways to eliminate vibration
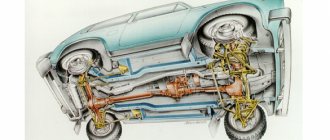
The Niva family of cars differs from VAZ passenger cars in permanent all-wheel drive - they have two drive axles. In total, the VAZ SUV has three differentials in its transmission - one for each axle and another center differential.
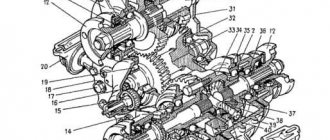
1. Oil seal; 2. Thrust ring of the front bearing of the drive shaft; 3. Front bearing cover; 4. Front drive shaft bearing; 5. Transfer case front cover; 6. High gear; 7. Gear clutch hub; 8. Gear clutch; 9. Low gear; 10. Transfer case housing; 11. Rear drive shaft bearing; 12. Drive shaft; 13. Transfer case rear cover; 14. Intermediate shaft; 15. Rear intermediate shaft bearing; 16. Rear differential housing bearing; 17. Installation ring of the rear axle drive shaft bearing; 18. Rear axle drive shaft bearing; 19. Oil seal deflector; 20. Rear axle drive shaft flange; 21. Rear axle drive shaft; 22. Bearing thrust ring; 23. Differential housing; 24. Rear axle drive gear; 25. Satellite; 26. Axle of satellites; 27. Retaining ring of the satellite axis; 28. Spring washer; 29. Driven gear; 30. Differential housing bearing retaining ring; 31. Differential locking clutch; 32. Front axle drive shaft; 33. Front axle drive housing; 34. Retaining ring of the front axle drive shaft bearing; 35. Differential bearing spring washer; 36. Front differential housing bearing; 37. Driven gear of the speedometer drive; 38. Speedometer drive housing; 39. Front intermediate shaft bearing; 40. Gearbox; 41. Elastic coupling; 42. Constant velocity joint; 43. Transfer case; 44. Shims; 45. Transfer case suspension bracket; 46. Rear engine mount bracket.
Flaws
The main disadvantage of the subframe is the reduction in the vehicle's ground clearance (by several centimeters). But still, this upgrade has virtually no effect on the cross-country ability of the SUV.
The main disadvantage of the subframe is the reduction in the vehicle's ground clearance (by several centimeters). But still, this upgrade has virtually no effect on the cross-country ability of the SUV.
Most likely, the absence of the element in question in the car’s factory configuration is explained by complex production technology (a special
However, no matter how many reasons we name, the fact remains: the transfer case subframe is installed on the Niva only through the efforts of the car owners themselves. Even at service stations, not everyone undertakes their manufacture or installation.
We install transfer case subframes on the Niva Comfort SUV: where is the protection attached?
It is mounted on the corners at the bottom of the device. As for the type of connection, it, similar to the two options listed above, is bolted. However, the holes in the body of the side parts of the device and the lower part of the corners are made according to the threaded principle. The protective sheet is part of the load-bearing structure, which forms a kind of box and gives the subframe greater strength. Accordingly, the box will be less vulnerable to various mechanical damage, which will have a positive effect on the Niva’s cross-country ability.
Additional holes
An additional window is cut under the drain plug to drain the oil. You can drill holes in any place convenient for you, without bothering with the accuracy of the markings. Car enthusiasts also make technological windows to drain the water formed between the sidewalls of the channel and the dirt that gets there. The protection is enhanced by corners that are attached to the box support and the frontal part of the entire device. This design will protect the transfer case from all kinds of impacts on stumps, ditches and other obstacles that can lead to deformation of the subframe.
Also interesting: Chevrolet Niva gearbox diagram video
What dangers can await a motorist while driving?
As practice shows, even such a device as a subframe does not guarantee 100% protection for the transfer case and other components of the car while driving off-road. Therefore, if you often operate the Niva in rural areas, where there is a danger of “picking up” a stump or some other object that is difficult to notice in uncut grass, install the special protection on the subframe that we talked about in the previous paragraph. Then the risk of transfer case deformation will be reduced to zero. If there is no such protection, both the subframe and the box itself will deteriorate.
So, we found out how to make a transfer case subframe for a Niva with our own hands. Whether you need it or not - decide for yourself.
So, we found out how to make a transfer case subframe for a Niva with our own hands. Whether you need it or not - decide for yourself.
SsangYong Korando II
This is a Korean-made all-wheel drive car. It was produced with two petrol engine options - 2.3 liters and 3.2 liters. There were models with diesel power units of 2.3 liters and 2.9 liters, created under license from Mercedes-Benz.
And the maximum configuration of the SUV includes a six-cylinder petrol engine with a volume of 3.2 liters and a power of 212 hp. s., which works in tandem with an automatic transmission. All other models could have either manual or automatic transmission. Regardless of the configuration, the Korean SUV is more powerful than the Niva.
The second generation SsangYong Korando has several body styles - convertible and station wagon. The car is designed for 5 seats, but if there are fewer passengers, the rear seats are separated by armrests. This car is slightly larger in size than the domestic Niva - 60 cm in length and 9 cm in height. And the wheelbase is 30 cm longer.
The cost of the Niva on the secondary market is much lower than that of a foreign car. SsangYong Korando ll costs from 300 thousand rubles, and a domestic SUV produced in 2009 costs from 200 thousand rubles.
Shaking problem
Many drivers who have a VAZ 2121 Niva at their disposal have encountered the fact that the cabin vibrates strongly while driving, especially off-road or at high speed. Vibrations that spread almost throughout the entire cabin cause a lot of inconvenience and constant discomfort. Technically, this was not corrected, so the people’s minds had to independently find a way out of the current situation.
After installing the transfer case subframe, the ground clearance will slightly decrease, but the car will be much more comfortable to drive.
Subframe drawings for Niva photo
The protection is mainly used for models 21214, 2121, 21213, which have vibration problems. To assemble a subframe on the field with your own hands for a transfer case, you will need metal channels, angles, bolts and a sheet of thin metal as the main materials. In addition to materials, you need to get diagrams or a drawing of the subframe. The simplest design consists of two transverse parts and two crossbars that connect them. Tools worth preparing:
- grinder;
- drill;
- measuring instruments - calipers, ruler;
- bank;
- hammer.
To protect against metal filings, you should take protective clothing made of thick fabric.
There are several design options, so the number of channels and angles may vary depending on the drawing.
To eliminate various vibrations and noise in a Niva Chevrolet car, it is possible to install a subframe. The subframe reduces the force transmitted from the transfer case to the car body. Mounting the transfer case minimizes angular vibrations in the longitudinal-vertical plane of the body. The subframe shifts the path through which vibrations and noise travel into the body.
Also interesting: Construction and repair of the VAZ 2121 Niva transfer case
Between the mounting holes, the mounting angles to the cross member and spar can be of free sizes in length and distance. It is necessary to observe the size of the height of the attachment to the subframe, and, by the way, you can use the attachment to the spar of other schemes instead of the corners. You can make two types of dispensers. Basic type and reinforced.
The type of connection of the subframe protection is bolted, and is attached at the bottom to the corners. But at the same time, the holes must be threaded in the lower flange of the corners and in the body of the sidewalls of the subframe. To impart strength, sheet protection is used; it forms the part of the structure that forms the box. In order to be able to drain oil, water and trapped dirt, it is necessary to make several holes under the drain plug and between the sidewalls of the channel in any convenient place.
Let's look at a reinforced version of installing a subframe on a Niva on our own. If the structure is flatter and stronger, it will provide greater protection; for this it is necessary to change the profile of the sidewalls of the subframe. At the level of the cutout for the transfer case, just as in the first case, with the corners of the protection fasteners, the corners are welded inside the channel onto the side panels from the outside with the shelf down.
Important to remember! Do not get confused, the subframe must be installed asymmetrically to the location of the engine and gearbox.
There are already a huge number of reviews about the manufacture of such a stretcher; if you have not yet made such a miracle for yourself, then download the diagrams and create a design!
Specifications
The basis for the SUV is a monocoque body, where the role of the suspension is assigned to an independent spring structure located on paired wishbones. The dependent rear suspension is characterized by a 5-bar spring system. There are also no innovations in the design of brakes: front – disc, rear – drum. The brake system is complemented by a vacuum booster. As for the steering mechanism, a power-assisted rack is installed here.
Car size:
- length – 3.919 meters;
- width – 1.8 meters;
- height – 1.652 meters;
- wheelbase - 2.45 meters.
Regardless of the chosen modification of the SUV, a mechanical permanent drive, a locked differential, and a two-speed transfer case appear. The model is distinguished by high ground clearance, which, in combination with all-wheel drive and compact dimensions, ensures all-terrain vehicle capability with cornering stability. At the same time, car enthusiasts appreciate this version for its ability to tow a trailer weighing up to 1,200 kilograms.
In addition, you cannot ignore the spacious luggage compartment, which allows you to transport 320 liters of cargo at a time. Folding the second row gives a modest increase - doubling the space. The engineers thought through the design in such a way that the threshold and doorway do not interfere with loading.
Despite the expectation of fans of expanding the engine range, the Chevrolet Niva was presented with only one power unit. Judging by the upcoming update, this modification will forever go down in history with only one engine - a 1.7-liter four-cylinder in-line engine with 16 timing valves. It meets the environmental standard and belongs to Euro-4.
Maximum power is 80 hp. and 127 Nm of torque. Together with it, a five-speed manual gearbox is installed, capable of accelerating the car to 140 km/h. It will not be possible to call the SUV dynamic, since it will be possible to detect the first “hundred” on the speedometer no earlier than in 19 seconds. Combined cycle consumption is 10.8 liters.
Assembly options
The first step is to measure the distance for the parts. Using the subframe drawings, we assemble the structural parts according to the measurements obtained.
Here are three build options:
- A simple version of the Niva-Comfort type frame, where you only need 5 main parts and a couple of fasteners for them. It is assembled from five square-shaped channel pieces with an additional reinforcement strip. The ends of the four parts are bent into the frame and holes are drilled into them for bolted connections. The frame parts can be welded or bolted together. A more complex design consists of almost a dozen parts and is assembled according to three drawings.
- In this homemade version, one wide channel is used as a basis, in which there will be a hole exactly for the transfer case. On the sides of the channel there are large corners, and at the ends there are shelves made from smaller corners. All parts are connected exclusively by bolted connections. This design protects the bottom of the machine well, but is more labor-intensive for manual production. The great advantage of this particular option is the installation of engine crankcase protection, which can be connected to the subframe; in addition, the protection of all parts around is improved.
And also interesting: Niva tuning: 145 photos of ideas on how to improve the VAZ 2121 with your own hands || Niva tuning dirt
VAZ trunk shelf made of plywood
If you have a layout, making shelves is easy and relaxed. It will take 1.5 - 2 hours. I performed a test assembly of the original using small self-tapping screws. The main steps and features are shown below. The photo shows the internal structure of the side right shelf and the system for mutual fastening of the shelf elements.
To ensure that items were securely placed inside the shelf, I installed an additional panel. In the photo it is temporarily secured with a clamp.
Of course, later I modified the design so that the panel would hold securely and at the same time be quickly removed without the use of tools.
I used furniture corners as blanks for making guide clamps: I straightened them, cut them into two equal parts, bent one side of the part a little, filed the edges and put them on screws.
After all the structural elements were finally adjusted, I painted all the parts of the shelf with two layers of black enamel for exterior use.
After drying all the parts, I covered them with black carpet (to match the color of the purchased shelves) using Moment glue and a construction stapler.
A set of ready-made additional elements for a shelf on one side of the trunk:
The photo below shows the manufacturing features of the main strength element to which all other parts of the shelf are attached. During final assembly, I screwed the steel strip to the sheet using self-tapping screws, furniture nuts and M5 bolts.
This is how I attached the load-bearing structure to the car body on the left and right sides.
Installing parts and protecting the bottom
Niva 21214 and most new models in this series have fastenings for installing protective body kits, so there should be no problems with installing the subframe. Factory versions, similar to the Niva Comfort frame, already have ready-made fastenings and they only need to be screwed into the right place. To install homemade products, you may have to make additional fastening points. You can, of course, screw everything directly to the cornfield frame, but this is not recommended.
You can make other protective parts for the Niva yourself. For example, engine crankcase protection in the form of a plate, which is located near the transfer case, is very easy to make even at home. It can be conveniently attached to the transfer case subframe, thus creating a whole protective kit.
If you often use your Niva for off-road driving, then you will need to assemble protective kit No. 2 of a complex design. It provides comprehensive protection for the lower part of the body and even perfectly covers the transfer case mount. Unfortunately, there is only No. 1 on sale - Niva Comfort, which is not capable of providing good protection for the underbody from external damage.
A purchased subframe is easier to install yourself, but it bends easily. If you often travel through the mountains or country roads, it is better to use a reinforced design. The same applies to a purchased reinforced plate for the engine. If you want to equip your field with a protective system, it is better to make all the parts yourself according to the drawings.
Factory design
One of the recommended devices for eliminating transfer case vibration is the so-called “Niva Comfort” kit. The Niva Comfort subframe was developed a relatively long time ago, has a quality certificate, and Niva 2121 owners often use it.
This device is a welded structure made of metal corners, with drilled fastening points, mounting plates to which the base will be mounted. Since the transfer case should not be fixed rigidly to the base, the kit includes elastic supports.
For all its advantages, this subframe for the transfer case has disadvantages. It is installed in the places where the box was previously attached, that is, to the bottom, so if there are problems with the base, installing the Niva Comfort design will be problematic.