Print this article Font size 16
The standard sound insulation provided for the VAZ 2110 leaves much to be desired. No, it cannot be called terrible, but there is always something to strive for.
If you don’t like the level of silence inside the cabin of your own ten, then you can easily solve this problem on your own by carrying out sound insulation.
Preparing for Shumka
Main difficulties
If you have already disassembled the interior of the car, you may have noticed that in the VAZ 2110 this is done quite simply. Even if you are new to this business, relying on the instruction manual, the work will be completed quickly enough. Additionally, we advise you to rely on video lessons. They can highlight a lot of useful and important things.
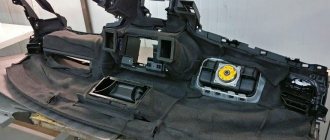
The main difficulty when disassembling the interior, without which it will not be possible to carry out full sound insulation, is dismantling the dashboard.
When disassembling the dashboard, be sure to mark all the parts, otherwise reassembling will turn into a real challenge.
The same instruction manual contains recommendations regarding dismantling the dashboard, so rely on it. Under no circumstances should you pull out all the cords, otherwise you will have problems later.
Ways to eliminate a squeaking dashboard
- Aerosol lubricants . As I already said, there are lubricating aerosols based on silicone, which is applied to the joint. If the problem is “not running” and consists of a slight creaking of the panel, then, perhaps, you can do without dismantling the panel. As a last resort, you can use WD-40, which also contains mineral oil that can eliminate the effect of friction between two parts. If the effect was not achieved, move on.
- Anti-creak and seals . If the aerosol does not help, you will have to resort to more drastic measures - glue the joints, which, by the way, are most often the cause of the squeak, with special sealants or foam rubber. To do this, the dashboard is removed (everyone will have this process in their own way), the most likely places where the panel is adjacent to the body, glass or fasteners are glued, after which the instrument panel is fixed in place.
- Noise and vibration insulation . With properly performed noise and vibration insulation, you can achieve not only good sound insulation, but also a tighter fit of the instrument panel to the body, thereby eliminating the possibility of backlash and other “crickets”. In addition, if the dashboard itself is glued, then due to the weight and increase in thickness, squeaking is hardly possible.
- Madeline . This material is perfect for permanently eliminating the creaking of the “tidy” . Madeline is a thin, rough fabric material with an adhesive base that adheres very firmly to any surface. Before gluing the madeline, you need to cut out strips of the required thickness, then degrease the surface and stick the madeline, having first removed the protective film.
- Fungi and hooks . 3M is known throughout the world for its quality car care products, as well as various materials for noise and vibration insulation. Another know-how in the field of comfort was the invention of a special technology, thanks to which it was possible to “defeat” the creaking of the instrument panel and all plastic in the cabin. The principle of operation of these “fungi and hooks” is to cover two surfaces with a special material, after which they are tightly connected to each other, while the possibility of squeaking is completely eliminated, thanks to the reliable “fungal” connection system.
Materials
So, you have disassembled the interior, so you can start gluing the surfaces.
Don’t rush to spend a lot of money buying all the materials that catch your eye. Especially in stores they like to “cook” something more expensive, despite the fact that there are a lot of cheaper analogues. You can listen to our advice, and this will allow you to save a lot from a financial point of view, but provide the car with high-quality sound insulation.
| Material | Peculiarities |
| Vibroplast | You will be laying this material over areas of bare metal. Vibroplast looks like a mixture of rubber and foil. It is highly efficient and accessible. To work you will need 6 sheets measuring 400 by 900 millimeters |
| Izolon | Choose fine-bubble material 5 millimeters thick and 1000 millimeters long. Moreover, it is better to buy isolon in construction markets rather than in car dealerships, since it costs much less there. |
| Foam rubber | This is not a superfluous material at all in the process of sound insulation, which can be turned into a full-fledged bitoplast with your own hands. Choose foam rubber with a thickness of 1 centimeter |
The amount of material you will buy directly depends on the goals and objectives you have set. If this is complete sound insulation for almost the entire car, then take 5-6 sheets of each material. If the noise is partial, then focus on the size of the areas of the car that need to be treated with sound insulators.
If disassembly is needed
Let us immediately note that if you have to replace the lining with a new one (the one you choose), then a complete disassembly may not be necessary for this.
But if noise insulation is planned due to the fact that the dashboard rattles when driving, then this cannot be avoided.
Disassembly work requires a lot of time and special scrupulousness. After all, if some fastening is spoiled or broken, then the new or tuned torpedo will not work as it should, it will creak and rattle unhappily while driving, spoiling the mood of the careless disassembler.
Where to glue
Before you start work, be sure to familiarize yourself with the purpose of this or that material that will be involved in the soundproofing procedure of your car.
- Vibroplast will serve to cover exposed metal. The main function of a vibroplast is vibration damping.
- Izolon also has properties to dampen vibrations, but it is less effective compared to vibroplast. The structure of the material with closed cells will serve excellently as a second layer after vibroplast.
- Foam rubber is another layer that can be glued after vibroplast and isolon. The last layer will effectively absorb noise.
Dashboard noise
There was foam rubber, now there is bitoplast
It is quite possible to make bitoplast from foam rubber with your own hands. There is nothing complicated in this procedure.
You will need:
- Protective gloves;
- White Spirit;
- Rubber bitumen mastic.
So, let's get to work.
- Dilute the mastic with white spirit to obtain the consistency of liquid sour cream.
- Carefully treat the foam rubber with the resulting mixture.
- Let the material dry for some time.
- Use homemade bitoplast to soundproof your car.
The material should be dried in the open air, away from people. This is due to the fact that dangerous fumes are released during the drying process.
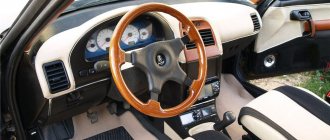
To begin with, about what and why it creaks
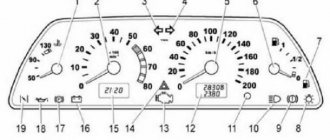
The dashboard, “tidy”, as they call it, is the instrument panel, which is located in the cabin under the windshield, directly in front of the driver and passenger seat. The purpose of the instrument panel is, as a rule, purely aesthetic; it hides a large number of wires and components located in the cabin, making it more attractive. Also on the instrument panel there are often various gadgets, a passenger airbag and the electronic instrument panel itself (speedometer, tachometer and other indicators and control lights).
In most cases, dashboards are made of elastic, but not hard materials; initially, this decision had one goal - ensuring safety in the event of an accident. However, with the advent of the Airbag, or more simply put, “airbags,” the instrument panel has become nothing more than just a beautiful shelf, the design of which is carried out by entire creative studios in order to attract the attention of a fastidious buyer. Basically, the “tidy” is made from soft foam compounds based on polyurethane foam or polyolefin, which do not withstand temperature changes and increased vibrations. The latter is very relevant for our roads, which are more like a test track or a washboard, and certainly not a public road.
Preparatory activities
Having disassembled the interior and purchased the required amount of materials, you can begin the initial stages of sound insulation.
- Carefully remove all dirt, dust, debris from the places where you plan to paste the sound insulation;
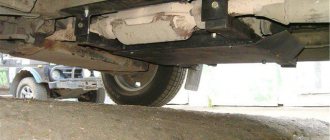
- In addition to the interior, you can install additional Shumka on the hood and trunk. To do this, the casing is removed and access to the metal is gained;
- Cleaned surfaces are treated with degreasers. White spirit is quite suitable. After processing, dry everything dry.
When working with substances such as white spirit, be sure to use a protective mask or respirator. Inhaling fumes can cause serious poisoning and more.
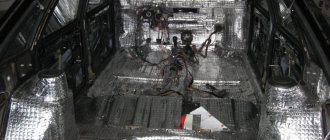
Pasting
- Work begins with gluing vibroplast. In order for the material to lie down and stick to the surface better, it should be heated. A hair dryer is best.
- After heating a sheet cut to the shape of a section of metal, apply it to the surface.
- Pay special attention to the front panel, behind which the engine is located. This is the source of the most noise. Therefore, start pasting from there.
- Also carefully treat the front and rear doors with vibroplast, removing the trim from them, and the area where the muffler passes.
- Now let's move on to isolon. Depending on what you are going to soundproof, you may need about 6 sheets. After all, you can treat with Shumka not only the bottom of the cabin, trunk, hood and doors, but also the niche for the spare wheel, wheel arches, trunk floor, and roof.
- Areas such as the roof, arches, doors, and trunk are covered with isolon without the obligatory use of vibroplast. Although if you are doing work for yourself and for the long term, a vibroplast will not hurt.
- In areas where isolon is glued to open areas of metal, and not on top of vibroplast, use polyurethane foam. It securely holds the material, plus provides additional noise-absorbing properties.
- If you are soundproofing doors, then first there is a layer of vibroplast, and then isolon. You can't do without a double layer here.
- When disassembling the doors, you will see holes in the ends of the door. They are the sources of dust and dirt that penetrates under the casing. Therefore, we recommend treating them with noise and closing them.
- Izolon should be cut to the shape of sections of the door and other surfaces. The material is glued on top of the vibroplast using masking tape.
- For the casing pistons, you will need to make slits in the insulator. Make sure the pins go all the way in, otherwise the insulation will hang loose.
Trunk insulation
Why does the dashboard squeak?
The instrument panel in cars can creak regardless of whether they are made domestically or foreign. Let's consider the main reasons for this phenomenon:
- poor-quality fastening of racks;
- non-compliance with assembly technology;
- unqualified installation;
- temperature changes;
- long-term exposure to ultraviolet radiation.
Creaking between the front panel and the windshield often occurs due to a simplified assembly procedure, as well as the use of non-natural materials.
The result is an annoying squeak of budget plastic throughout the cabin. With the arrival of frosty weather, this phenomenon often only intensifies. Warming up the interior with hot air may help for a while. Often car owners remove the dashboard themselves and then return it to its original place, but for some reason a creaking noise appears. This means that it is not in place or the fasteners at the joints are not tightened properly.
Causes of noise in the car interior
An irritating squeak appears when the surfaces of various structural elements of the car's interior come into contact. In new and expensive car models, extraneous noise occurs less frequently - higher quality materials and modern technologies are used during assembly, although over time vibrations also “loose” body elements. And in general, if the car is properly looked after and operated on roads with high-quality surfaces, then squeaks appear less frequently and are easier to eliminate.
The following factors contribute to the appearance of rattling squeaks and knocks in the cabin:
- operational wear, high mileage, poor quality repairs;
- driving on broken roads with overloads, excessive load in the interior, hard driving;
- careless car care, use of low-quality cleaning products.
In winter, under the influence of low temperatures, the plastic hardens, and the gaps between parts increase, and metal structural elements are often exposed to corrosion. This happens due to moisture condensation in the cavities and at the seams of parts, sedimentation of salts and dirt.
Internal creaking
- The creaking of car doors occurs when shaking on an uneven road - the mounting bolts gradually loosen and unscrew, which is why a grinding metallic sound appears while driving.
- Creaking also occurs when the leather or leatherette upholstery of seats and armrests, or plastic parts of the control panel rub.
- In the trunk, squeaking occurs due to weakening of metal hinges and fasteners.
- The interior has small auxiliary elements (handles, ashtrays, sun visors). Their fastenings also gradually weaken due to shaking and vibration.
External creaking
Often, an irritating sound is heard in the cabin, emitted by the external structures of the car: brakes, wipers, suspension elements.
- If, when braking, the car squeaks like an “ungreased cart,” this indicates wear on the brake pads. The characteristic sound of metal rubbing against metal appears due to the fact that, when the linings break, the metal surface of the pad rubs against the disc.
- Sometimes squeaking occurs due to improper fastening of new pads. To eliminate this unpleasant sound, service stations use special elastic plates and lead weights.
- The creaking noise that occurs when turning a car is most often produced by the ball joints of the suspension. Over time, the factory lubricant evaporates and they wear out. Sand gets into the bearings, the particles of which rub against the metal.
- Working wipers also make a characteristic sound when they “scrape” the glass. Over time, such a squeak appears in expensive cars.