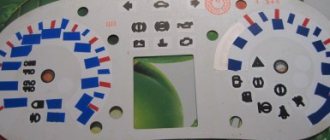
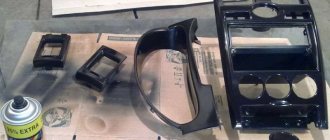
Good afternoon friends! turned to me for help to overexpose the dashboard of a VAZ 2114. I didn’t sculpt anything new, I used the topic of a person I respect, Evgegiy autolubitel2110, on overexposure of the tidy! Made it pretty quickly and actually good! what was done? Disassembling the tidy, cleaning, removing excess plastic (just a little!) Cleaning the dials from the original green color and from spraying under incandescent lamps. enlarging the hole for the arrows and creating wells for them. Changing colors is done by turning on the ignition and the dimensions at the same time, and when we select the color we need, we turn off the dimensions; the color remains in memory. no buttons or knobs! All the wires are connected in the tidy itself, there aren’t any separate ones, that is, they removed the tidy and put it back! There is a day and night mode! in the photo in the blue version just with the night mode!
thank you all for your attention! If you have any questions, please contact me, I will be glad to help!
stay tuned for further work
, soon the entire interior of the Yellow Submarine will be re-lit and the dashboard of the Gran Charoca will be re-lit!
The instrument lighting on VAZ series cars in the factory version has a green speedometer and tachometer scale and red arrows. Many are not happy with this combination, given that the panel buttons are also highlighted in green. If the car is with one driver for a long time, this color scheme begins to get quite boring, and then there is a desire to make the VAZ-2114 buttons overexposed non-standard.
After the decision is made, the question arises: how to do it yourself or seek help from a service station. Replacing the backlight on the dashboard is a simple process, so most car enthusiasts prefer to overexpose the buttons without resorting to outside help.
Why change the backlighting of individual buttons on the VAZ 2114 dashboard
On the VAZ 2114, the illumination of the buttons for controlling the dimensions, low beam, front and rear fog lights, as well as the rear window heating is green from the factory. Over time, many owners get tired of this glow and there is a desire to replace it, make it non-standard. After making a decision about such modifications, you need to decide: do this work yourself or contact the service. Since the process of replacing button backlighting is not a complicated procedure, in most cases, car owners carry out such an upgrade with their own hands.
Do-it-yourself overexposure of buttons on a VAZ 2114
Replacing the standard button backlighting on a VAZ 2114 will require the preparation of certain tools, materials, as well as some time. To work you will need the following list of necessary things:
- soldering iron with a thin tip;
- solder;
- tweezers;
- small knife or flat screwdriver;
- LED elements of the desired color.
Which LEDs and in what quantities should I buy?
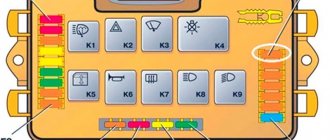
The buttons installed on the dashboard of the model in question come in old and new styles. In the first case, small light bulbs or LEDs are used as a backlight element, and in the second, boards with sealed SMD LEDs are used.
Each button is equipped with two LED elements: one is responsible for illuminating the button itself, and the second indicates the activation of a particular function. The exception is the low beam headlight button - it does not have a power indicator LED. Therefore, if you plan to replace the LEDs on all five buttons, you will need to purchase 9 backlight elements. The type of the latter can be determined only after disassembling the button. The old model requires 12 V LEDs with a diameter of 3 mm. The new sample uses elements marked 0805. When using standard LEDs, it is recommended to additionally install a resistor with a resistance of 500 Ohms to 1 kOhm along the power circuit (directly in the button), which will prevent the element from burning out.
It is better to purchase LEDs with a small margin, since there is a possibility of damage to the element during installation.
How to remove buttons
To remove the buttons on the front console, do the following:
- Remove the negative terminal from the battery.
- We take out the plug of the on-board computer or the BC itself, if it is installed. To do this, just hook it with your finger and pull it towards you.
Replacing the backlight of the front panel buttons
Since replacing LEDs on old and new button versions is somewhat different, each process should be considered separately.
Overexposure of old-style buttons
After removing the buttons from the instrument panel, perform the following sequence of actions:
- Pull the top of the button and remove the lid that is pressed.
The LEDs on all instrument panel buttons change in the same way.
Overexposure of new buttons
On modern buttons we change the LEDs this way:
- We disassemble the button, as in the previous paragraph.
- After opening we find a board with installed LEDs. We determine the polarity of the elements and solder them with a soldering iron with a thin tip.
To make it easier to replace LEDs, the board can be removed from the button. Depending on the button itself, the board can be inserted or soldered onto the legs.
Video: overexposure of VAZ 2114 buttons
Modernization of the buttons for turning on the headlights and low beam
The buttons for turning on the headlights and low beam headlights are made as a single element. The absence of an LED indicating that the headlights are on low beam causes inconvenience to many motorists. This is due to the fact that it is often unclear whether the headlights work or not. To solve this problem, they resort to modernizing the button. In addition to the tools listed above, you will need a similar button from which the necessary parts will be removed. The finalization process itself consists of the following steps:
- Remove the button from the panel.
Video: refining the low beam switch button
Panel assembly
Once you have verified that all the LEDs are working, you can assemble the panel. To do this, you need to bring all the wiring from the backlight onto the board and solder it securely. Soldering the wires must be done in a certain sequence, otherwise the LEDs will not light up. If there are long wires left, it is advisable to shorten them so that during installation they do not fall into the grooves of the latches. When all errors have been eliminated, you can put the instrument panel in place and screw it in place.
Using a similar principle, it’s time to replace the buttons for turning on the low beam, the dimensions of the power windows, etc. But you need to take into account some of the features of the buttons. The VAZ-2114 car may have strictly standard buttons and a newer modification.
In order to get to the LED in the old version of the button, it will have to be completely disassembled, and it is important not to lose the springs, which are conductors. Assembling old samples will also require a lot of time and perseverance. With the new type of buttons, everything is much simpler, since they are attached using latches, and metal plates are installed inside instead of springs.
Experience of car enthusiasts
There are buttons with both lamps and diodes, there is a choice. Resistors are soldered directly into the diode, this is AvtoVAZ know-how