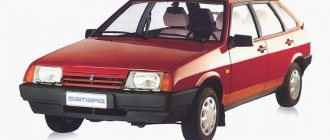
In this article we will talk about how to make sound insulation on a VAZ-2109 with your own hands. “Nine” is rightfully considered the most popular model. It was desirable in the 80s as soon as it appeared on the meager Soviet market, so either party officials or no one could own such a car. In the 90s, the market situation became simpler, queues became a thing of the past, but only those who had money bought cars. As a rule, these were bandits and businessmen (however, in those years these words were synonymous).
Features of the "nine"
Today, the “nine” has not lost its popularity - it is a pretty good alternative to old foreign cars, and it is much cheaper to maintain. Very often this car is used as a “platform” for installing music - a subwoofer, speakers. And the sound quality depends on how tightly all the casing elements are installed.
And with this, everything is bad in the VAZ-2109 - all elements made of plastic are fitted extremely poorly. Literally everything creaks and rattles - the trunk shelf, door panels and dashboard. And if you install even not very powerful speakers in the car, unpleasant extraneous sounds will constantly irritate your ears. It is unlikely that you will be able to achieve perfect sound.
“Rattle”, “Torokhtelkova skripelka”... These and other similar nicknames are given to the VAZ 2108-99 models because even in a new car, all the interior parts squeak and rattle quite a lot, especially if the car has a high dashboard (VP). My car was no exception, so after some time of use I realized that I couldn’t do this anymore. Something had to be done - and I began to look for a suitable solution to this Problem (with a capital “P”)
If you want to do it well, do it yourself
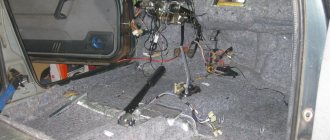
After reading the reports about Ivanovo, I decided that I would definitely go, I’ll just choose the time (it was February 1999). But then I learned about the opportunity to order a ready-made kit and install it myself. Confidence in the trip has been shaken... Moreover, the scope of electrical work has become clear:
- wires for acoustics
- installation of electric locks in rear doors
- ESP installation
- trunk light
- add. brake light (normal installation)
- replacing the old-style ball with a new one
- electrical side mirror wiring repair
- connection additional sensors (antifreeze level, washer fluid...)
- I also wanted to put the alarm system in order.
It made sense to do all this along with noise insulation (SHI). Then VadimAB appeared at the conference, I was one of the first to sign up with him. They made three cars before me, one of them was 2109. The option is tempting - you don’t have to go anywhere, the guys install the SHI, and I figure out the electrical stuff. But... I won’t say anything bad about Vadim (he is already scolded at conferences), but I came, looked at them and the work process and refused.
And I decided to do everything as usual, i.e. yourself. In general, the solution was the only one from the beginning - such a volume of electrical work cannot be done in a day. The next question is materials.
“Dynamat” was rejected immediately: it was expensive. Damping the doors for installing front acoustics was all right, but the whole car... I didn’t hear anything about “NoiseBuster” then, Standardplast (STP) remained. Someone praises him, someone scolds him - it’s difficult to sort out the opinions... I talked about SHI with Vadim-Bluesmobile, especially since he is the official dealer/installer of STP. And he said that: “... the material is “nothing”, especially the one with foil (vibroplast), but in the kit (standard) “the cat cried”, but if you cover the whole car with it, it will be “okay”.” Vadim is an authority for me, and I myself was inclined towards this option, so I decided: I will not take the standard kit for 2109, but I will order 1.5-2 X materials in Ivanovo and slowly install everything myself.
No sooner said than done, I coordinated everything by email. mail, after a week of correspondence, the final estimate was ready. I present it in full, prices as of March 26, 1999:
The total came out to about $130 for almost a double set. The issue with the shipment was resolved by itself - they had an opportunity to go to Moscow. Having received the order at Shabolovka, I paid 100 rubles. for delivery.
The names of the materials require decoding. I will give only a brief description; detailed characteristics can be found on the STP website.
Vibroplast
The main vibration-absorbing material that I used when processing metal surfaces. Very similar to a sheet of putty (reminiscent of construction putty or Guerlain) rolled out onto medium-thick foil.
Features: It is believed that when pasting with vibroplast, there is no need to heat the surfaces. I don't agree! Or rather, you can glue it, but in fact the contact patch will not be 100%, especially if the foil is wrinkled. Or you need to work in the summer in the heat, when it’s 30+ outside and the material is heated in the sun. I worked at +10C, so I warmed both surfaces with a hair dryer, applied it, heated it again and then smoothed it using brute physical force. And, by the way, I was getting warm at the same time. The guys from STP did not recommend laying sheets of vibroplast overlapping, so I used the following scheme: first laying the overlap, then cutting along the border a little with an overlap, thoroughly warming the joint and smoothing it out. The putty spread and formed one whole, and the layers of foil overlapped each other a little - no big deal. Of course, such tactics are only necessary for total pasting.
Vizomat A synthetic material reminiscent of thin linoleum, only harder, especially in the cold. Has an adhesive layer. They sent me a visomat with a thickness of 1.5 mm, although I ordered a two-millimeter one. True, in larger quantities. I glued it mainly to plastic parts.
Features: There is no point in gluing 1.5 mm onto iron, only 2 mm. The best option is M3, it is 2.5 mm and with a layer of foil. But I've only heard about this one. Requires very good heating and degreasing of surfaces. Vibroplast replicates complex terrain much worse. When applied to heat-exposed areas, it may “float”. Here’s an example: I placed a stack of 4 pieces of a visa mat under the trunk lid. So if you pull the top one, all 4 layers move back and forth! In general, the quality of the adhesive layer leaves much to be desired. Although maybe they had a temporary glitch at the plant?
An interesting detail: on the STP website there are digital indicators for vizomat, but not for vibroplast. How to compare these two materials, which one should you choose? STP specialists claim that their vibration absorption coefficients are approximately equal. But even before the work began, I tried to empirically determine the leader.
I glued identical pieces of materials one by one to the bottom of the kitchen sink on the back side. And with the vibroplast, the water jet created less noise than with the vizomat.
Bitoplast
A great thing, a must have for every chisel worker! It is foam rubber (there are different types, but I took 3 mm) impregnated with bitumen and with an adhesive layer. Ideal for gluing torpedoes and other plastic parts, much better than foam rubber, because It has an adhesive layer - cut it and glue it, it doesn’t creak, impregnation with bitumen gives the material some adhesive properties, so the neatly glued torpedo visor fits like a glove.
Materials arranged from top to bottom: Liplen Bitoplast (cut strips) Vizomat M2 Vibroplast
The section shows SPLEN 3004, Decor is glued on top. Foam without glue - the same SPLEN, but twice as thick (8 mm)
"Foam"
This is polyurethane foam, found in the form of “tourist rugs”, excellent warmth and sound insulation material. Doesn't absorb water, stretches well. I took part 8mm and 4mm with an adhesive layer (four-millimeter foam goes like SPLEN 3004) for vertical surfaces and 8mm without adhesive for the floor.
Decor
The same SPLEN, only with a layer of black leatherette for decorative finishing of the trunk and rear wheel arches, a little scary in appearance, but on the other hand, no one rides in my trunk
To process the front end of the engine compartment and the hood, I took ready-made kits; vibroplast and SPLEN 3008 were glued to the front end, and vibroplast and adhesive were glued to the hood. At the same time, the pieces on the front panel are normal, full-size, but on the hood - not quite...
The pieces of vibroplast could have been cut into larger pieces. Although with these, of course, there is an effect.
Before applying the sticker, I washed everything well and dried it.
These photos somewhat disturb the sequence of steps - the hood was processed last. Although it might make sense to stick a set of SHI on the hood first as a practice.
Tools
First of all, a hair dryer; you can’t do without it. For cutting, I used a cutter with a break-off blade and scissors, which, when cutting materials with an adhesive layer, I lightly lubricated with machine oil. The vibroplast and vizomat were leveled with an ice scraper wrapped in several layers of cloth. I tried to adapt a narrow roller for this purpose, but it immediately broke
Start
To begin with, I completely disassembled the interior, drained the antifreeze, and removed the stove. A good opportunity to sort it out properly. I didn’t throw away the standard insulation, but hung it out to dry. There was moisture under the rugs. I examined all the rubber plugs in the bottom; those that aroused suspicion were installed with mastic.
The installers do not insist on removing the stove, but I took everything out of the interior. The driver's side is the most inconvenient place; you need a lot of strong nerves to stick everything on...
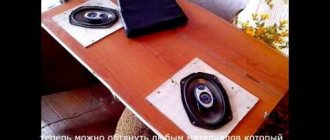
I started from the front. I wiped the iron with a rag lightly moistened with acetone and glued the vibroplast blanks. then I put on the second layer. He warmed the sheets well, tried to press them and level them as best as possible.
Then I covered everything else with vibroplast, sometimes applying a second layer. I chose the places for the double layer intuitively. Additionally, the front guard, front wheel arches, the tunnel above the resonator, part of the rear seat and the area under the driver’s and passenger’s feet were damped.
I treated the unsealed areas and joints on the bottom with Movil and mastic, and poured anticorrosive into the “humps” under the front seats. I carefully dug out all the ventilation holes in the body with a screwdriver and sprayed Movil into them.
Looks like a spaceship, doesn't it?
The rear wheel arches are not very convenient to paste over - they have a complex shape...
... but the spare wheel well is even worse.
I glued pieces of vibroplast on the roof to the size between the crossbars. At the same time, I fixed the antenna - it was installed at a service center... I ran wires from the ceiling light to illuminate the trunk, and threw in a wire for an additional brake light.
It was more difficult with the doors - a piece of “sound insulation” was already glued in the center, which swelled terribly and fell off in places. The situation was further complicated by the fact that this “SHI” has a paper layer on top... In general, I treated this patch with an iron brush as best I could and glued a piece of vibroplast on top, heating it up a lot. I sealed the remaining areas with Visomat, although I had to thoroughly wash off the anticorrosive from the inside - otherwise nothing would stick. Finally, I restored the anti-corrosion coating with Movil and mastic, and lubricated the door locks.
Inside there is a vizomat and vibroplast. You can see how the electric door locks are installed.
I glued pieces of Visomat to the outer part of the door, and then sealed the entire surface with SPLEN 3004 foam, in one piece. In the front doors, where damping is also due to the installation of acoustics, a vizomat was glued to both surfaces of the inside of the door.
In the trunk, I sealed the space under the number with Vizomat, and applied pieces of vibroplast to the inside of the rear wings (if that’s what they’re called). I also had to wash it off and then restore the anticorrosive agent - nothing sticks to it.
Foam
For the front I used the foam from the kit with an adhesive layer. I glued it end to end and sealed the seams with paper tape. On the roof I stuck sheets of 8 mm foam in the size between the crossbars. The foam without an adhesive layer was attached to double-sided tape, cut into small pieces.
The foam attaches perfectly to double-sided tape. It is used when laying carpet.
I placed the foam on the floor in one piece, slightly overlapping the front panel. I made cutouts for the clutch and gas pedals.
I used “decor” to cover the wheel arches and trunk floor. The quality of the adhesive layer in this “sandwich” is not very high, so in some places the “decor” comes off. This is especially true on complex-shaped surfaces and in hot weather. At that time, I did not know about the existence of plastic covers for the trunk, otherwise I would definitely have integrated them into my design.
I covered the rear wheel arches and the trunk floor with “decor”. I sealed the seams with black electrical tape, but over time it came off.
Good results are obtained by a combination of foam and visomat glued on top. Standardplast specialists recommend using this combination to achieve the greatest noise absorption. By the way, the standard SHI is made exactly according to this principle, so I didn’t throw it away. I used this composite structure later, at the second stage of soundproofing the car.
Plastic parts
Even if you somehow glue vibration-absorbing materials and throw pieces of foam on top, you can already observe the effect of what has been done. But when processing plastic parts, this approach is unacceptable - you can’t grab a “rattle” unceremoniously! If the goal is to eradicate all plastic squeaks, then thoroughness and consistency are needed. In addition, you need to take into account the following: when the overall noise level decreases, even those squeaks will become audible, the existence of which was previously difficult to guess. You know, sometimes the quiet jingling of the keys in the ignition bothers me...
General provisions
All plastic parts were damped with a vizomat - this eliminates the “ringing” plastic sound when tapped. The material was sometimes applied over the entire area, sometimes only in fragments. For example, you can stick several tapes 3-4 cm wide diagonally across the part, or you can stick a single piece in the center measuring 1/3 of the area. You also need to consider the increasing weight of the part and the feasibility of total coverage.
Bitoplast was glued to all surfaces that come into contact either with each other or with the car body. I mainly used strips 15-20 mm wide, glued them flush with the edge (where it won’t be visible, it should be overlapped), but I also glued some of the parts entirely. A properly processed part should not make any sounds when it shakes intensively in its place.
Processing plastic parts requires a detailed description, especially since there are not many illustrations for some stages... I'll start in order.
Trunk
Before starting SHI, I had strong squeaks in the designated area. When I removed all the plastic, I immediately saw the places where the side shelves (on which the rear shelf rests) rub against the body in the area of the pin that secures the back of the seat - the paint was worn out in these places. I glued Visomat to the inner surface of the shelves between the stiffening ribs. Bitoplast must be glued to the points of contact with the iron and with the rear pillar trim.
Pieces of visoma mat are visible between the stiffening ribs. The speaker and self-tapping screws are sealed.
Velcro is visible on the edge, and a strip of bitoplast is visible above the speaker. In general, the trunk lighting is a very convenient thing.
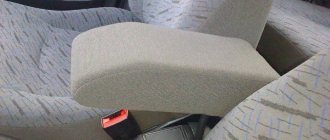
To minimize the noise from the shelf, I glued Velcro to the opening part of it, and laid the remaining contact points with bitoplast. Now the shelf hardly shakes. Although it wouldn’t hurt to put a seal from a VAZ 2104 on the back of it.
I dripped a little Moment onto the screws, but the electrical tape came off, it’s an infection...
I removed the rear seat belts and glued the inserted decorative trim with superglue.
The back of the rear seat can creak on its own; I had to lubricate the locks, lever and guide wires with lithol; place strips of bitoplast under them. That's it, there seems to be nothing more to creak.
Rack covers
There are 8 of them in total: two front, two rear and two central. I covered the front ones completely with Vizomat, the rest - with diagonal stripes. Where there is contact with metal or other plastic, I glued bitoplast, in particular near the holes for self-tapping screws. The sufficiency of processing was determined simply: the installed parts should not squelch when tapped.
Torpedo
The most important part. Consists of a visor, lining, two halves of the steering column, lining of the air ducts, “beard” and base.
The base is attached to the body at five points - two lugs on the sides, a self-tapping screw in the glove compartment and two at the bottom of the dashboard - on the left and right. Ears often break; One of mine broke too. I glued it there with superglue, it holds firmly, but I still had to strengthen the fastening, because... The weight of the torpedo increased due to the SHI.
There is an option for attaching the torpedo to the stove with self-tapping screws, and there is also an option for strengthening the ears with metal. The upper edge of the torpedo fits into the rubber of the windshield; a little lower it is pressed against the rear wall, but not against the front panel, but against the reinforcing beam (it has holes). I decided to screw the torpedo in the middle to this beam. To do this, I drilled holes on the installed dashboard in the area of the air guides to the windshield. Then I tightened the structure with three 50 mm long screws. To prevent the plastic from breaking, I placed large washers under the screws and sealed them with sealant.
If you remove the air duct cover, then right in the center of the photo you will find the attachment points of the torpedo to the beam.
I covered the part of the torpedo that is adjacent to the body with thin foam. The lower areas (the shelf under the glove compartment, the areas under the speakers and the sides) were treated from the inside with Visomat and on top of it with bitoplast. At the same time, I eliminated the gaps between the stove and the air ducts by adding foam and bitoplast.
I did not cover the air duct covers with foam from the inside, although it would have been possible for better thermal insulation. Along the entire edge I put a strip of bitoplast about 15-20mm wide on the outside and inside.;
Here and there you can see gray foam rubber - earlier attempts to carry out SHI. Even the instrument cluster did not escape treatment with bitoplast and foam
A piece of cloth is secured in places with double-sided tape - it eliminates noise from the wiring. Because bitoplast has already run out...
I didn’t stick anything on the torpedo cover (metal, with a layer of something foamy). The bitoplast on the air duct cover is quite enough - it should not make squeaks when it shakes in its place. By the way, the places where the ribs directing air to the windshield come into contact with the torpedo trim may creak. In this case, you can either stick a strip of bitoplast (you can use black rag tape), or simply lubricate the contact points with lithol. Such squeaks can especially occur when the stove is on, when all the parts heat up and expand.
The torpedo visor was covered with Vizomat and strips of bitoplast. It is very important to place iron latches on the sealant, which hook onto the lining - they constantly rattle...
The metal bracket is “specifically” filled with sealant. And it helped!
The stiffening ribs do not allow gluing a single piece onto the top part. To be sure, there is another strip on top.
If the buttons rattle in their seats, they can be strengthened with thin pieces of putty, or a little black (transparent) silicone sealant can be applied. I also glued a vizomat to the receiver's slide.
Visor assembly
I did not further strengthen the visor. However, the idea with the corner is good - worthy of repetition.
After all the operations performed, the visor holds like a glove, but it can be further strengthened. VadimAB wrote about this in the conference. This is done as follows: - remove the left heater deflector - take a 25X25 metal corner (suitable from a children's construction set) and attach one end to the left side of the visor with an M4 (M5) screw so that the other end of the corner fits exactly under the self-tapping screw for fastening the air duct cover. If you then install the deflector in place, it will cover the corner and fastening screws.
I left the halves of the steering column casing as is - this is almost the only (!) part in the car that has already been coated with factory sound insulation in the form of polyurethane strips.
Rest
The “beard” is pasted over with visomat, along the edges of a strip of bitoplast. It's time to adjust the shape of your beard above the gas pedal. The plastic ears of the torpedo, to which the top of the beard is attached, broke off. I glued one with superglue, but the other got lost. Therefore, the “beard” had to be attached with self-tapping screws to the ears of the visor using iron brackets - “nuts” for self-tapping screws. Of course, this is not correct, but even so the whole structure holds up perfectly and does not wobble.
On the right in the photo, the “beard” is trimmed in such a way that the foot in winter shoes does not cling to the plastic in the area of the gas pedal. And the stove blows better into your feet.
Such a total pasting with a visamat is optional. Trunk lighting can be placed in this part.
Deflectors
I didn’t seal the central nozzle in the stove - I use it in the summer as ventilation, and in the winter I often open it when the car warms up. Therefore, I only sealed the left half of the nozzle in the stove with foam, and fixed the corresponding half of the central deflector with superglue. In the right half, I lubricated all the attachment points of the blades with lithol. I also lubricated the side deflectors, and to prevent them from creaking and falling out of their places, I wrapped them with black rag electrical tape (only made in China - it contains more glue!)
“Processed” deflectors stay in place perfectly, do not creak and, if necessary, can be easily dismantled
And this turned out to be very successful - the heat softened the electrical tape and the deflectors were firmly fixed in place. By the way, I rate this electrical tape quite highly as a cushioning material; if someone cannot find bitoplast, then it can be replaced with electrical tape.
I covered the inside of the glove box lid with Visomat and lubricated the latch with lithol. I covered the inside with carpet using strips of double-sided tape. Now you can throw anything into the glove compartment and not expect it to rattle on all the bumps!
I also covered the floor tunnel cover with Vizomat, and glued a rectangular piece of carpet to the area in front of the gearshift lever. I threw out the air duct and plugged the nozzle with a piece of foam rubber, but not entirely. I left a gap about 15mm wide so that air could enter the tunnel. A warm tunnel in cold weather adds a little more comfort to the car...
Assembly
I laid out all the standard SI in its place, secured the wires running along the floor with tape. The cleaned carpet was spread on the floor, all the plastic trims were screwed on with self-tapping screws, and the seats were installed. Some difficulties arose when installing the floor tunnel in place due to the greater thickness of the coating. I also had to adjust the pedals a little - I trimmed the foam under the gas and clutch pedals.
I should note that the interior tolerated the increase in the thickness of the coating quite painlessly - in the end everything fell into place. Only the front seats move back and forth with greater effort and cling a little to the raised carpet.
Evaluation of results
Of course, I didn’t count on miracles and magical transformations of the “chisel” into BMW. There are many places in the car that cannot be isolated. For example, the door and glass seals are an outdated design and perfectly transmit noise, especially at high speed.
The first thing that struck me on the first trip after SHI was the “swallowing” of cracks and small potholes. The body dampens shocks and vibrations much better; the car does not completely shake from the slightest crack on the road. Probably, similar sensations should come from a “cooked body”.
In addition, the speed began to be felt much less. Previously, at a speed of 120 km/h, I began to feel that I was going faster than usual... Now, from a speed of 90 to 160, there is practically no difference, except that the wind outside the window is noisier.
The second is the salon. The dashboard DOESN'T CREAK or ROUGH, and the trunk behaves as if I have a sedan. And if something rattles from behind, then it's just things in the trunk!
The noise from the engine also decreased, but not as much as we would like. I found out the reason and eliminated it, but already at the second stage of the Shi. The transmission has become quieter, and road noise has also decreased noticeably. Although if the road has bad asphalt (with coarse gravel), then such noise penetrates through all the barriers...
The doors close much more quietly and silently, if only the lock could be redesigned... For example, the “Felicia” has exactly the same lock design, the only difference is that some of the parts are plastic. And it closes just silently! The conference included all sorts of ways to combat the castle, but this was not a solution...
The roof is now just iron, raindrops can only be heard on the rear window - it is not triplex. I didn’t feel much difference after treating the hood, but oh well, I’ll check the engine cooling time in the winter.
Since I cleaned up the stove together with SHI, it began to heat better. And in general, according to subjective perception, the cabin has somehow become more comfortable...
I did not take any noise measurements, but I think that at least three decibels were measured. I can only compare it with “Felicia”. In terms of noise level, my car is clearly closer to it, but in terms of the level of “body shudder”, I think it will even be better. But this is not the main thing - it has become much more comfortable to travel in a car. My brother (as an outside observer) claims that “... this is a completely different car.” In some ways I agree with him, maybe I’m just more skeptical about my work. But what you can’t help but notice are the tram tracks. Now crossing them at a speed of 60 km/h does not resemble an earthquake measuring 7 on the Richter scale experienced in a tram, but is perceived as a short-term inconvenience...
Minuses
I don’t even know what to say... Since I did everything myself, there were no glitches by definition. Along the way, with SHI I fixed everything that was needed and was very pleased with this fact. The only thing that can be attributed to negative aspects is the increase in the weight of the car by about 25-30 kg. And the doors have become heavier - you shouldn’t keep them open for long.
That seems to be all... Overall, I’m pleased with the result, I don’t regret the work done at all. Although there is some maximalism visible in my actions: the factory default settings really bothered me. There is simply no other way with a chisel - the instructions say: “...after assembly, process with a file.” I just spent quite a long time with all this, I won’t say how long, I won’t upset you...
Discuss sound insulation on our forum
Materials for work
Of course, even if you spend tens of thousands of rubles on purchasing soundproofing materials, as well as on the services of specialists, you will not be able to bring the car closer to even a budget modern foreign car, for example, a Hyundai Solaris. But you will still be able to significantly reduce the noise level in the cabin from the engine, gearbox, and wheels.
As a rule, the following materials are used when carrying out noise insulation work on a VAZ-2109 car:
- Vizomat.
- Vibroplast.
- Bitoplast.
- Splen.
But to choose a material, it is recommended to study the features of each of the listed ones. This is what we will do now.
Sounds from contact with road and air
The sounds generated when the car comes into contact with the road are transmitted to the cabin not only, and even not so much through the air, but through structural elements - wheel hubs, shock absorbers, levers, and the car body. Pebbles flying out from under the wheels hit the fender liners or wheel arches, and the sound comes into the cabin through body vibration. Pasting the bottom with soundproofing material somewhat changes the frequency characteristics of sounds penetrating into the cabin, but their intensity changes slightly. It is important that such sounds are very informative. If there is significant noise of this kind, you should reduce your speed and, if possible, choose a more suitable section of the road for driving.
The noise that occurs when a car interacts with air does not occur mainly on large planes of the underbody, roof and doors. It is generated in cracks, loosely fitting joints, gaps that have expanded during the long-term operation of your VAZ 2109. Adding a layer of sound insulation has little effect on the level of these noises, especially considering the need to keep the windows slightly open in the summer when there is no air conditioning as standard on the car.
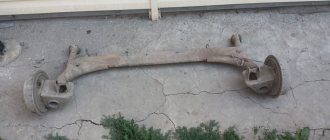
Typical for the VAZ 2109 is the noise created by the car itself outside the cabin. “Nine” is an old car. A decade and a half has passed since the release of the last series from AvtoVAZ. And like any old man, your VAZ 2109 groans and groans while driving. Something is rattling in the suspension, valves are knocking, the muffler is siphoning. Of course, you can try to isolate yourself from these grunts with soundproofing. But wouldn’t it be better to give the veteran proper care - stretch the suspension, adjust the valves, repair the muffler?
Pasting the engine shield with sound insulation does not solve most of the problems, does not muffle the sounds of the front and especially rear suspension, and does not interfere with the humming and growling of the muffler. Only the engine noise, which, when properly adjusted, usually does not irritate anyone, is somewhat reduced.
Vibroplast
This material is based on a composition of bitumen and a thin layer of foil (usually aluminum). Vibroplast is ideal for soundproofing VAZ-2109 doors, hood, trunk, and floor. Its main function is to absorb vibration, but it also performs well as a sound-proofing material.
You can find two types of vibroplast on sale - “Gold” and “Silver”. The only difference is in thickness - for “Gold” it is 2.3 mm, and for “Silver” it is 0.3 mm less. As a result, these types of vibration absorbers have different weights - 3 and 4 kg, one square meter weighs. If it is necessary to treat a large surface area, then it would be more rational to use the Silver absorber. The reason, as you can guess, is the cost - if you use Gold, you will spend a lot of money, and it has slightly better efficiency.
Vibroplast is a self-adhesive material, but if you want to do all the work efficiently, you need to warm up the surface on which you plan to apply it. In this only case you will get the most durable contact of the material with the body element.
Vizomat
This is a standard soundproofing material that has recently been used in cars such as Granta and Priora. The difference from the one discussed above is that the visomat has higher rigidity, so it covers the surface much better. Indeed, in some cases, soft materials can be pressed through (for example, in the trunk and on the floor). But rigidity is also a disadvantage of the material, since it is a little more difficult to work with.
Vizomat can be purchased on the market in the following series:
- PB with a thickness of 2 or 3.5 mm.
- MP (multilayer material with high strength).
- Q1 (material with increased elasticity).
Many car enthusiasts prefer Vizomat PB-3.5 materials. It has good characteristics (mechanical absorption coefficient 0.19), and most importantly, low cost.
Bitoplast
This material is ideal for soundproofing the hood of the VAZ-2109. It consists of foam rubber, which is impregnated with bitumen. A layer of self-adhesive is applied on top. This material allows for fairly effective noise reduction - approximately 90%. And most importantly, it has high elasticity and shrinks almost to zero.
On sale you can find material with a thickness of 5 and 10 mm. It is recommended to use it for soundproofing the VAZ-2109 panel, as well as other plastic elements. But if the surface has a large area (for example, a ceiling), then even a thick centimeter-long material will not be enough. In this case, experts recommend using an analogue of bitoplast - Accent. It has a higher density and also has a layer of aluminum foil.
Splen
It also belongs to universal soundproofing materials and is made of polyethylene foam. In addition, splen has very good thermal insulation properties. It has a closed cell structure, so it does not absorb liquid. It is convenient to work with the material, as it has a self-adhesive layer. On sale you can find two types of splen - with a thickness of 4 and 8 mm (their weight is 370 g and 600 g per square meter, respectively). Typically, splen is used to cover the partition of the engine compartment and wheel arches.
What to use?
As you can see, there are a large number of materials available for sale. And choosing the most suitable one will be difficult for those who are doing soundproofing of the VAZ-2109 with their own hands for the first time.
To carry out the work, it is best to use the following materials:
- Vibration isolation - can be done with either Vizomat or Vibroplast. It must be glued directly to a metal surface. These materials will prevent extraneous noise from entering the cabin.
- Sound absorber - Accent or Splen can play its role. It must be glued on top of vibration-proofing material. With the help of Spleen you can muffle all the noise that comes into the cabin from the outside.
- Bitoplast can be used as an anti-squeak material. It must be glued to plastic parts that rub against each other or come into contact with metal surfaces.
There is no need to stick shielding material on top of all layers, since Spleen already has a foil coating.
The level of extraneous noise forces action
VAZ 2109 sound insulation
If you leave the standard soundproofing of car interiors with the slang name “chisel” alone, then, again, the level of extraneous noise emitted by creaky plastic parts (there are a lot of them in the car) is so strong that it’s time to forget about installing expensive speaker systems. Everything creaks:
- An instrument panel that, with special care, displays almost all frequencies audible to the human ear;
- The trunk shelf does not lag behind it, creating in the rear part of the cabin something similar to a symphony, often sung by the wild inhabitants of swamps and forests.
Indeed, it seems that the interior items have come to life. Having completely lost hope and excluding the possibility of any smooth and melodic sound of music appearing in the cabin, the plastic components created their own orchestra in the “nine”.
Soundproofing VAZ 2109
Owners of such a car should not despair. Amateurs will not rule the show for long. It is enough to carry out only competent sound insulation, including treatment of various elements of the interior, and the result will not take long to arrive.
What materials and tools are needed
In order to carry out high-quality soundproofing work on the VAZ-2109 with your own hands, you will need the following set of tools:
- Construction hair dryer.
- Scissors (the sharper the better).
- Stationery knife.
- A roller or scraper will be needed to roll and level the material.
- The tape is double-sided and reinforced.
- Solvent or white spirit.
- Roulette.
The first stage of the work is a complete disassembly of the entire interior. You will need to remove the seats, door panels, ceiling, and all trim elements. There should be bare metal left. It must be cleaned so that not even a small amount of dust remains.
Preliminary preparation
Soundproofing the interior begins with complete disassembly, down to bare metal. Only in this case can a good effect be guaranteed. The trim of the doors, ceiling, and floor is removed. The seats, plastic parts, and dashboard are removed. All that remains in the cabin are the wiring, the gearbox and handbrake handles and the steering wheel.
Factory sound insulation, if any, is completely removed down to the metal. It is important to do everything carefully, without scratching the paint. The metal surface is washed and degreased. Otherwise, the insulation will have poor contact with the surface and its quality will suffer as a result.
Window lifters and external upholstery are removed from car doors, Movil, dust and dirt, remnants of factory insulation and anticorrosive are removed from metal surfaces. For degreasing, it is better to choose white spirit.
Preliminary roof preparation includes:
- dismantling the upholstery;
- removing the side covers, covering the two screws with hangers;
- removal of sun visors, plastic grilles at the rear;
- removal of the lighting fixture.
Then the upholstery falls off on its own.
How to paste over metal elements
Quite often, the factory sound insulation of the VAZ-2109 does not suit car owners. Yes, and it becomes unusable quite quickly. Once you have completely cleaned the interior, you can begin installing soundproofing materials. You need to start with the largest elements by area.
You need to perform the following manipulations:
- Vacuum the entire body, treat metal elements with solvent or acetone. If you find rust, the procedure becomes more complicated. First, all areas must be cleaned and treated with a rust converter. Then coat with primer and paint.
- Determine the area of the body from which you will begin gluing the material. After this, you can cut out a piece of Vibroplast that will correspond to the size of the area.
- Heat the material with a heat gun to about 40 degrees, remove the protective layer and apply Vibroplast to the body parts. Be sure to roll the material onto a metal surface.
- Please note that the larger the area of contact of the material with the surface, the stronger the contact will be. But you shouldn’t process the wheel arches in one piece - you need to cut out several.
- The sheets must be glued end-to-end, the gaps should be minimal. All contact lines must be taped using reinforced tape.
- When you complete the installation of the first layer, you can begin gluing the Splen or Accent. Such materials are also self-adhesive; the installation principle is the same as with Vibroplast.
What should happen?
The result should be a completely covered floor and ceiling with two layers of insulation. If you have a limited amount of material, you can only cover the space between the stiffeners. Be sure to cover the wheel arches, the partition between the passenger compartment and the engine compartment, the tunnel under the muffler pipe, and the inside of the hood.
To soundproof the luggage compartment, it is best to use Decor rather than Spleen. This is almost the same material, only on top it is covered with a tougher leatherette. Therefore, such material can serve as interior trim for the trunk. All work is done in the same way as when finishing the ceiling. First, Vibroplast is glued on, then sound insulation.
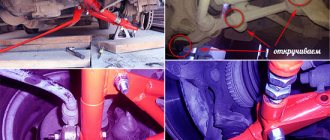
Soundproofing doors
Before soundproofing the doors, you need to completely remove the factory anti-corrosion coating. Otherwise, it will not be possible to properly glue the insulating materials. Start with the outer walls. You need to stick Vibroplast Gold on them (it has better elasticity). Try to cover as much area as possible. It is worth noting that it is inconvenient to work with, since everything is limited by the size of the technological hole.
If speakers are installed in the doors, then Vibroplast can be glued around them. This will only improve the quality of the speaker system. But you shouldn’t completely fill the holes between the door walls, since Vibroplast absorbs moisture quite well. Splen must be glued to a vibration insulation layer. Afterwards, you can install a sheet of material over the entire area of the door, after which you cut a hole for the speaker.
Bottom insulation
Soundproofing of the floor is carried out on a previously cleaned and degreased metal surface. The material is laid in pieces of a certain shape, cut according to prepared patterns. Each piece is for its own niche. The surface and material are heated to 50 degrees, after which they are rolled well with a roller, ensuring the safety of the wiring.
Particular attention should be paid to the areas bordering the stiffeners. There the insulating material is pressed especially carefully. According to some drivers, the factory floor treatment of this model against noise is quite good and there is no need to redo it
How to work with plastic
Now that the soundproofing of the VAZ-2109 floor, ceiling and doors has been completed, you can begin processing the plastic elements. After all, it was because of them that the car received the nickname “rattle”. It is necessary to process the following elements at this stage:
- In the trunk, you need to glue the side shelves from below, the entire interior trim, as well as the entire contact area between the shelf and the body with Vizomat.
- To get rid of squeaking in the back seat, you need to use Litol-24. All guides and locks must be treated with this lubricant. Afterwards, lay strips of Bitoplast in the places where the back and saddle touch.
- It is recommended to cover the racks completely with Visomat.
- The instrument panel must be laid in those places where it is in contact with body elements. As you understand, the entire panel will need to be removed. All plastic elements that come into contact with each other must also be treated with soundproofing materials.
Comprehensive sound insulation of the “nine” is a rather painstaking process, it will take 2-3 days. But if you can do it yourself, you won't need to use any expensive equipment. All work is fully justified, the comfort of driving a car is significantly increased.
Roof insulation
After removing the upholstery and other parts of the ceiling, it is necessary to inspect. By tapping on the surface, places are identified - sources of rattling, where two crossbars connect the sides of the body. There the film is sealed. The places where the roof comes into contact with the sides are also examined.
Soundproofing the roof on a VAZ 21099 car begins with surface treatment with Movil. A piece of soundproofing material is glued evenly and tightly between the crossbars. This will eliminate the noise of raindrops. Next, foam rubber is glued to the inside of the upholstery so that its borders coincide with the glued piece between the crossbars. Foam rubber should not come into contact with metal.
Then all the ceiling elements return to their places. The upholstery is checked for secure fastening. It should be remembered that poor-quality fastening or heavy weight of the insulation can cause the decorative finishing of the ceiling to sag later.