Heater (stove) and air conditioner - design, service, malfunctions, removal and installation of the heater (stove) and radiator on a VAZ 2170 2171 2172 Priora
Many people guess what a heater radiator is for the cooling system of the Priora, but everyone probably knows it. Popularly, this heater has its own name: stove radiator. This means that it is first used in cool periods, when the air passing through the heater radiator is heated and supplied to the cabin. And if so, then they remember about this same heater radiator at the worst possible moment, when it’s already winter and cold outside, and then repair work and research begins on how to change it, and where to look and fix it. In fact, “how” and “what” are also an important factor, because without certain knowledge you cannot get into the Priora system, it will be of no use except for wasted time. So, in order to make it clearer to you what and why, and to make it easier to repair your stove on the Lada Priora, we have prepared this article. Kommersant
By the way, it’s not only about the stove, but also about the air conditioning system and air conditioning, so we’ll also talk about that.
1. Design features of the stove-heater Lada Priora VAZ 2170 2171 2172 (Lada Priora)
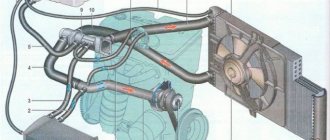
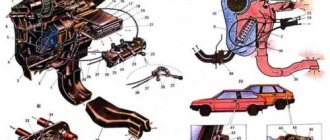
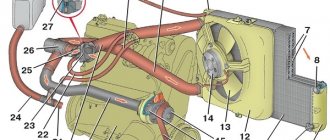
The Priora car is equipped with a stove - a heater (Fig. 1) of a liquid type, combined with the system
Main elements of the heater:
– heat exchanger of the heater (radiator), designed to heat the air entering the cabin with the heat of the water cooling the engine;
– an electronically driven fan (supercharger), providing a controlled supply of external air to the heater dampers;
– a damper for the air temperature regulator coming from the heater into the passenger compartment, the position of which determines the amount of air passing through the heat exchanger of the heater, and the amount of external air passing bypassing the heat exchanger;
– air heating distributor dampers 4, which distribute the air entering the cabin from the heater through air ducts 2, 6, 8 and 9 or for blowing the windshield.
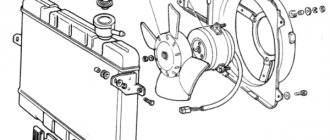
Rice. 1. Priora interior ventilation and heating system: 1 – left side ventilation nozzle; 2 – left ventilation air duct; 3 – side window heating nozzle; 4 – air heating distributor; 5 – heater; 6 – right ventilation air duct; 7 – right side ventilation nozzle; 8 – air duct for heating legs; 9 – interior heating air duct; 10 – central ventilation nozzle.
In turn, the exposed components of the Pyrora stove can be divided into components. Let's start with the dispersal block
Now let’s take a look at what the stove heater consists of, which, like in the tenth family, is installed on the engine side, in other words, it is installed and removed from the engine side.
1, 3 — housing parts of the Priora heater, 2 — air filter, 4 — gear motor, 5 — heater radiator, 6 — sensor, 7 — heater (heater) fan.
Sketch 2 The main elements of ventilation of the central part in the Lada Priora car
Replacing the heater radiator of a VAZ 21072 Priora, in an hour
Replacing the stove radiator
VAZ
Priora without
removing the brake vacuum. This is the most important point where many became.
Replacing the radiator of the fan heater or damper of a VAZ Priora without removing the brake vacuum.
Quite a quick and less easy method to get to the stove
Lada Priora car
without air conditioning
. Saved.
Replacing the heater radiator on a Lada Priora
If the stove on your Lada Priora starts blowing cold air instead of hot air, you should pay attention to the heater radiator. There are already discussions on our website about why the stove on a Priora does not work, but we still decided to publish additional material on replacing the heater radiator with our own hands.
Features of the design of the stove on the Lada Priora
Main elements of the heater:
– heater heat exchanger (radiator), designed to heat the air entering the passenger compartment with the heat of the engine cooling liquid; – an electrically driven fan (supercharger), providing a controlled supply of outside air to the heater dampers; – a damper for the air temperature regulator coming from the heater into the passenger compartment, the position of which determines the amount of air passing through the heat exchanger of the heater, and the amount of outside air passing bypassing the heat exchanger; – air heating distributor dampers 4, which distribute the air entering the cabin from the heater through air ducts 2, 6, 8 and 9 or for blowing the windshield.
If antifreeze or antifreeze is leaking from the stove, then the radiator is leaking and requires replacement.
Let us recall that in the previous article we looked at how to replace a Priora heater fan with your own hands.
Replacing the stove (heater) radiator on a Priora
– drain the antifreeze. – remove the heater. - Prepare a Phillips screwdriver.
Video. How to remove the stove on a Lada Priora
Replacing the heater on a Priora with your own hands:
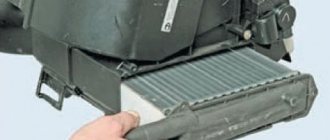
1. First of all, you need to unscrew the 3 screws that hold the heater radiator.
2. Then remove the radiator from the stove body.
Installing the stove radiator will be done in the reverse order; this requires a little sleight of hand. I spent about 50 minutes on this operation.
How to replace the radiator of a Priora stove without air conditioning
In winter, as you know, car enthusiasts turn on the stove to avoid freezing.
Its normal operation ensures a comfortable temperature inside the car, and this, in turn, is the key to safe driving. However, there are times when this unit stops supplying warm air. The reasons can be very different, for example, problems with the radiator. Many people, including owners of Lada Priora, both equipped with air conditioning and without it, encounter malfunctions of this kind. In some cases, it will only take a minute to fix the problem because you just need to replace the blown fuse. But there are situations when more serious repair work, such as replacing a radiator, cannot be avoided. However, there is nothing particularly complicated here. Everything can be done with your own hands - you just need the appropriate desire and a little time.
How to replace a Lada Priora radiator heater without air conditioning
First of all, let's look at the main elements of the VAZ-2170 heating system. They are, in particular:
The scheme is, in principle, traditional, and there are no particularly complex technical delights here. If you notice that warm air is not flowing into the cabin while the heater is on, you should inspect the entire system. If a radiator leak is detected, the latter will have to be removed either in order to be soldered, or to be replaced with a new one. Let's look at how this procedure can be done with your own hands on a Priora without air conditioning.
The first thing that is recommended to do before starting the main work is to remove the negative terminal from the battery.
Do not neglect this advice, because it is, firstly, about your safety, and secondly, it is additional insurance against a number of different unpleasant surprises with wiring and electrical equipment.
After the car is de-energized, you can remove the windshield trim. It will also be necessary to dismantle the wiper arms, since they will create additional inconvenience during operation. Together with them, we also disconnect the plastic tubes through which liquid from the windshield washer reservoir is supplied to the nozzles. Now you can proceed to removing the decorative trim of the windshield. This is not difficult to do - it is attached using 7 self-tapping screws, respectively, they should be unscrewed.
First you will need to remove the hood seal. Please note that in the middle of the pad there is a screw with which the halves are pulled together. After this, use a screwdriver or knife to carefully pry up the plugs covering the screws and unscrew them. That's it - the cover can be removed.
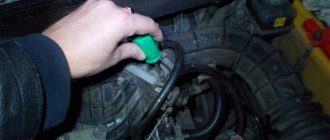
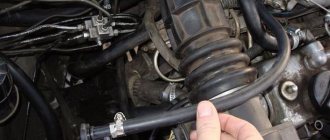
If everything went well, then you can move on. At this stage, you should remove the sound insulation from the engine compartment. To do this, unscrew the screws with which it is actually attached, and then remove the lining, left and right (the order does not matter). After this, you can move on to the pipes leading directly to the radiator. In order to remove them, you will first need to loosen the retaining clamps. Place a container to drain the coolant first.
Now you can remove all the wires that lead to the heater from the connectors. Having disconnected them, take two keys - 10 and 8 - and unscrew the 4 nuts. The wiring harness should be moved to the side so that it does not interfere, after first removing the holder. After this, we move into the car interior and take a socket wrench size 13. With its help, remove the bracket from the brake pedal, and
move it to the side. That's all - you have free access to the heater radiator. In order to remove it, you need to unscrew 3 screws using a Phillips screwdriver, after which the unit can be easily removed. All work on installing the radiator is carried out in reverse order.
As you can see, there is really nothing particularly difficult here. In order to remove the heater radiator on a Priora without air conditioning yourself, you will need some time (it all depends on your skills) and a minimum set of tools. On the other hand, you save money because you do all the work yourself, rather than turning to specialists at a car service center. Even if you have never encountered this before, figuring out how to remove the Priora radiator will not be difficult. The eyes, as you know, are afraid, while the hands do. It’s probably worth listening to folk wisdom.
VAZ online stores, discounts for site users
- Accessories
- Spare parts
- Tuning
- Body kits
- Cases
- Studio
- Carbon tuning
- Flocking
Online stores for VAZ accessories
Online stores for VAZ spare parts
xn—2111-43da1a8c.xn—p1ai
Replacing the radiator of a heating device in a Lada Priora car
Almost every motorist who owns a domestic vehicle discovers a malfunction of the car’s heating unit in the winter. After all, only with the onset of severe cold does a person begin to think about how to avoid freezing while driving a car. Naturally, everyone uses a stove for this. However, what should those for whom this very device has ceased to function properly do? After all, only the heater can ensure that the cabin maintains a normal temperature, allowing for comfortable movement. In this article we will look at only one reason why the heating device stops working, we will learn about the principles of repairing and replacing the heater radiator installed in a Lada Priora car.
If the motorist is sure that it is necessary to replace the heater core, it may take a lot of time to eliminate the faulty object, since most likely, in the process it will be necessary to replace not just a blown fuse, but to carry out more serious repair work. True, you should not immediately despair because of your ignorance; the material contains detailed instructions to help everyone understand how to replace the stove radiator in a Priora with and without air conditioning.
Cost of repairs and parts
Much of the price will depend on the make and model of your car. The more expensive it is, the more expensive the repair parts will be. The average cost of a pipe for a VAZ car will cost from $5 to $10. But the better the manufacturer, the more expensive the parts.
As for the repair procedure, you will have to pay from 600 rubles for the work. But in some service centers or stations the start can start from 1000 rubles.
Video about replacing the pipe on a VAZ 2107:
Replacing the radiator of a heating unit in a Priora that is not equipped with air conditioning
Replacing the heater radiator on a Priora without air conditioning may make sense if warm air has stopped flowing into the cabin, while the heater itself is working. If, in addition to the above problem, there is also a water leak from under the Priora stove, the motorist will have to remove the poorly functioning unit in order to solder the latter. Sometimes repairs are impractical and you have to replace the old device with a new one.
So, first of all, you need to start by removing the negative terminal from the battery. The fact is that the issue here is not only about the safety of the master himself, but also about additional insurance, which allows him to avoid several unpleasant surprises that, if handled carelessly, can arise not only with wiring, but also with electrical equipment.
Installation of a new radiator in a Lada Priora with air conditioning
Replacing the heater radiator in a Priora car with air conditioning is a fairly simple process. The latter unit appeared only in newer cars, in particular, Priors began to be equipped with a HALLA or Panasonic climate control system. Thanks to the new component, you can replace any part of a non-working stove only by dismantling the frill, getting rid of the windshield wipers, the stove itself or the vacuum brake booster.
If a motorist wants to understand how to remove the heater radiator on a Priora with air conditioning, he must start by removing the sound insulation located in the engine panel. After this, you should dismantle the power unit air filter hose and remove the seal, which is located near the radiator hoses. Then you should drain the coolant and lift the radiator up towards the mechanic.
Signs that indicate the need to replace a part
Experts believe that the main factors that indicate a faulty water pump are:
- coolant leaking from the housing in the oil seal area;
- wear of the built-in bearing, which is determined by increased noise, humming during operation, or jamming;
- insufficient circulation of the coolant used;
- excessive increase in the temperature of the power unit;
- reducing the level of coolant poured into the system;
- the presence of cracks, chips, chipping of the material of the pulley, housing or impeller of the water pump.
The water pump, as a rule, is a non-repairable component due to its design features
Therefore, experts recommend a complete replacement of this important part.
The water pump for the Lada Priora is completely replaced if it malfunctions
5.1 Disconnecting and replacing coolant hoses
1. On fittings and pipes of the usual type, hoses are secured using clamps. In this case, both standard clamps with a worm drive and disposable clamps of the twisted type can be used. When connecting the hose, the latter must be replaced with more practical standard ones.
2. Using a screwdriver, loosen the clamp and slide it up along the hose, completely freeing the fitting/inlet pipe. Carefully remove the hose from the fitting. New hoses can usually be removed without any problems, while old ones may become stuck.
3. You should try to free a hose that cannot be separated by rotating it on the fitting, then you can carefully pry off the section of the hose with a blunt instrument without applying excessive force - remember that the radiator inlet and outlet pipes are quite fragile elements. As a last resort, a strongly “stuck” hose can be cut off from the fitting with a knife: despite certain material costs associated with this method, it will still be cheaper to replace the hose than to purchase a new radiator. 4. When installing a new hose, first put the mounting clamps on it, and only then pull the hose onto the fittings/pipes of the corresponding components of the cooling tract. If twist-type clamps were initially used to secure the hoses, they should be cut off and replaced with more reliable screw or worm clamps during installation. To make it easier to fit rigid hoses onto the fittings, lightly moisten the ends of the latter with soapy water, or warm the ends of the hose in warm water - do not use any oils as a lubricant. 5. Pull the ends of the hose onto the fittings and check that it is correctly routed in the engine compartment. Place the clamps on the sections of the hose mounted on the fittings, leading them behind the end flare. Tighten the clamps securely. 6. Fill the cooling system (refer to Chapter Routine Maintenance ). 7. Start the engine, then carefully check the system for signs of coolant leaks.
Hoses connected to the heater heat exchanger
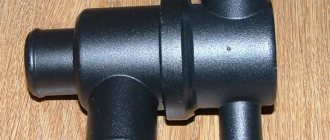
Cooling system pipe
What is a pipe? There are often several of them in a cooling system; they connect individual parts into one sleeve and are the basis for cooling.
Pipes can be divided into two types:
From the names it becomes clear that the outlet pipe is designed to drain coolant, and the inlet pipe is designed to supply it. To cool the engine, antifreeze or antifreeze is most often used, since at very low temperatures they tend not to freeze.
It is worth recalling that two pipes of different types should not be confused or swapped, since their operating temperature conditions are different.
Most often, the supply pipe fails, since the load on it is maximum, which leads to the rubber drying out, as a result it can leak or even burst.
Signs of a broken cooling system pipe
The first and most common sign of a cooling system failure under the hood or under the car is wet and slightly greasy spots of coolant. These are the first signs that a pipe has burst somewhere. Also in the cabin on the instrument panel, there is a special indicator that will show the low fluid level in the expansion tank.
If the sensor fails, the engine temperature will rise rapidly, which may result in the engine boiling. It also happens that you can smell antifreeze in the cabin; this is an indicator that the pipe may burst not under the hood, but under the front panel or in the area of the interior partition and engine.
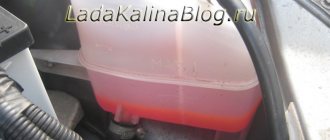
Many experienced car enthusiasts advise, from time to time, to simply check the level of antifreeze in the expansion tank. Inspect the pipes for greasy, oily stains and do not delay repairs if this is detected.
How to find a coolant leak in the system. First of all, it is worth inspecting the expansion tank for leaks. Next we move on to the radiator, since it is most often damaged. When inspecting, special attention should be paid to the joints of pipes (nozzles) and honeycombs, which are easily damaged.
Next, we inspect the pipes and hoses themselves along their entire length, since it is through them that the coolant circulates. Do not forget about the clamps at the connection points; due to engine vibration, the clamps may become loose, which means the pipe may come off the mounting point and leak.
Device and features
The cooling system of the Priora internal combustion engine has a standard set of main components:
- radiator;
- thermostat;
- electric fan;
- water pump;
- heater;
- engine jacket;
- connecting hoses;
- expansion tank.
By circulating through the large and small circuits, the coolant prevents the engine from overheating, maintaining the desired temperature. Structurally, the cooling system of the Priora is simple and no different from other internal combustion engines with an injector, with the exception of small parts.
Radiator and forced cooling fan
They mainly serve to bring the working fluid to the optimal temperature for the functioning of the engine (the operating temperature of the Priora engine with 16 valves is 90–95 degrees). The predecessor of the Priora VAZ 2110 often installed a cooler made of copper alloys, but due to cheaper prices, designers switched to aluminum analogues.
The operation of the fan depends on the engine control unit.
It receives information from the DTOZH (this is a sensor that reads temperature readings) located in the water jacket of the power unit. If the permissible temperature values are exceeded, the control unit connects an electric fan to improve cooling efficiency. A faulty fan or clogged radiator can lead to a constant increase in optimal engine temperatures, which shortens the service life and can cause costly repairs.
Thermostat
Its task is to promptly open coolant access to a large circle of the engine cooling system (engine cooling system) after the engine reaches the optimal temperature. In simple terms, the thermostat allows you to quickly warm up the engine and regulates the operation of the entire system. During warming up, the thermostat valve is in the closed position, antifreeze does not flow through the large circuit (the radiator is not activated). As it warms up, the valve opens slightly under the influence of rising temperature, and antifreeze begins to move through the radiator along a larger circuit.
A thermostat malfunction can result in overheating of the power unit (if the valve is stuck closed) or, conversely, the operating temperature rises very slowly (when the valve is stuck in the open position). Overheating is much more dangerous. Beginners can identify this malfunction if the engine heats up all the time and the fan on the Priora is constantly running.
Pump (water pump) and heater
Without the first part, the coolant circulation circuit in the system is impossible. If the water pump is faulty, at best there will be a coolant leak from the system. In the worst case, the pump may jam, which will lead to a broken timing belt and subsequent problems, the solution of which will result in expensive repairs.
The heater, or simply the stove, consists of a radiator, pipes and a fan. Can additionally cool the antifreeze in the system. An indispensable unit in winter. Provides the interior with warm air.
Connecting elements and expansion tank
It serves as a receiving compartment where gases and vapors are discharged when the coolant is heated. Also, the expansion tank is the level for the entire cooling system. One of the main elements in the tank is the valve cover through which air is forced out. There is antifreeze, it begins to boil when the engine temperature rises critically.
The design of the cooling system also includes an engine temperature sensor on the Priora and an engine jacket. The sensor constantly reads information about the current antifreeze temperature and transmits it to the ECU. The location of the power plant jacket is structurally assumed in the cylinder block housing; it serves to remove heat through the coolant.
Engine cooling system
It is impossible to say that the system consists only of some elements and nothing more; modern cars are crammed with a lot of sensors and control is carried out by an on-board computer. But there are still basic components without which the system simply will not exist.
These components include:
- radiator;
- water pump;
- thermostat;
- thermostat steam removal hoses;
- radiator steam hoses;
- expansion tank;
- radiator supply hoses;
- electric radiator fan.
Such parts can be found both in the most modern cars and in the oldest domestic ones. Therefore, when starting to search for damage, you should first inspect these elements.
Airlock
How to remove a traffic jam?
The SOD device in Priora does not imply air pockets; during operation, they are independently removed by the system without any intervention. All you have to do is run the car for a few tens of minutes and the traffic jam will go away.
There is also a way to remove the plug much faster. You need to drive your car up a hill so that the front of the car is slightly higher than the rear, open the expansion tank cap and keep the engine speed around 2000-2500 rpm. The air lock will come out.
What does damage cause?
The most common cause is engine overheating. failure will occur in a very short period of time. As a result of overheating, the cylinder block becomes deformed, cracks may appear and the piston may become deformed.
But it is much worse when the piston is completely deformed and makes a hole in the cylinder block. Such a breakdown usually leads to a complete replacement of the damaged engine with a new unit.
The process of replacing the pipe
The first thing to do before replacing the pipe is to completely drain the coolant from the system. If the liquid is clean and drained into a clean container, it can be reused. Now it’s time to remove the clamps on the missing pipe. It happens that they rust, so you should prepare all the necessary tools and WD40 in advance to facilitate the removal process.
It is worth remembering that all procedures must be carried out on a cooled engine, especially draining the coolant, otherwise you may be injured.
A similar, new pipe must already be prepared in advance. The old pipe should be removed slowly and without much effort, since the radiator necks are not strong enough and break easily. If it cannot be removed, it is recommended to twist it from side to side, but not bend it in any way.
As a last resort, you can cut it to length, this way you can remove the old pipe. Taking it off is often not a problem, but putting on a new one is much more interesting. If the new pipe does not lend itself to the procedure, then its inside should be lubricated with a solution of soapy water. But in order to soften it, you need to lower the desired part into hot water.
Under no circumstances should you use oil or related materials, as the pipe may corrode over time, and oil may also get into the cooling system.
The last step is to put the clamps on the pipe, and only then put it on the radiator neck and water jacket. Make sure that the pipe is correctly positioned and not twisted. Now we tighten the clamps on the necks and begin to fill in the coolant.
After filling, make sure once again that there are no leaks in the places of replacement and repair. It is worth remembering that when draining, there may be some coolant in the heater radiator. Now we start the engine and check the serviceability of the system. After filling in the new one, you need to turn on the stove, then add liquid to the expansion tank.
If you manage to break one of the necks, you should immediately solder it using argon welding.
Silicone pipes vs Crazy hands
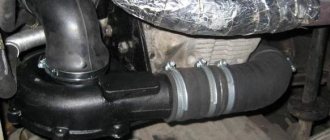
Guten tag beginner mechanics. Somehow, while surfing the DRIVE2.RU website, I came across a post from one very smart person. He outlined and showed how to decorate a regular stock pipe of a cooling system. And they seem to look like silicone. Here is the recording www.drive2.ru/l/3220061/ And somehow I, too (I won’t say that I’m a miser) wanted to try this method, to experience it myself. I want to apologize in advance that I didn’t prepare all the photos for the report (I got carried away), fortunately there is the Internet and Yandex to help. I don’t think it’s worth writing how to unscrew the old ones and install new pipes in their place. It’s clear that way. The main thing is not to rush to remove everything at once (if you are doing this for the first time), remove one, install a new one in its place, etc. Let's get started. I bought cooling system pipes for the radiator from LUZAR (St. Petersburg company)
Next, I bought heating system pipes. Stock regular
Well, for complete happiness, I bought a pipe with a subtitle, “expansion tank hose.”
Next, I purchased, with great difficulty, heat shrink (I never thought that it would be so difficult to find heat shrink of such a diameter). Moreover, on the middle pipes (going to the stove), I could only find a diameter of 30 mm and not 35 mm as the author advised, with a length of 2 meters
And I could barely find 50mm for the radiator pipes (the thickest ones) and they were red in color
Well, as described in the post, we put the pipes on something
straighten them, heat them with a hair dryer.
We get this effect
. It is very easy to treat. I placed the turned-on hair dryer on the edge of a table or any high object from which the hair dryer would not fall and simply stretched the bend with my hands. Thus allowing the heat shrink to shrink as needed.
This is what happened at the bend point
and we do this with each pipe. In the end this is what happened
Well, since I was very limited in time, I had to install everything without covering the “coolant pump hose.” I’ll say it right away and simply, the radiator pipes (thick) are changed relatively easily and without problems. But the pipes going to the stove (middle) are reluctant to come up. All bend + one turned out to be longer for some reason (it had to be cut on the spot)
Treat with the same hair dryer. I had to bend them on the spot, warm them up and wait for the heat shrink to settle.
Well, the final photo
Got my hands on a stainless steel power clamp
But as luck would have it, there was only one suitable clamp left in the store, and then only for a thick pipe. For medium pipes, I was told that they do not have clamps of this diameter. I had to put the clamps that came with the radiator pipes (thick) from LUZAR on the clamps and select the middle clamps for them. Since the inside of the clamp turned out to be smooth (which was very pleasing). And it will crimp without any additional recesses (which can lead to cracks and, accordingly, coolant leakage)
Well, all that remains is to tighten the clamps tighter, drive and tighten them again on a cooled engine (personally, after installation, nothing dripped, but after a couple of days, I had to tighten all the clamps again). So tighten it up conscientiously. Well, in conclusion, I would like to say the following. After all this hard work (tensioning, leveling and warming up), when you install the stock air filter, the radiator pipes will not be visible at all, and the heater pipes will be barely noticeable. Which makes me think. Without a zero filter, there is no point in doing this work. because no one will see this “beauty”. I don’t argue that it’s still possible as additional insulation for the pipes, but for beauty + reliability, it’s better to buy silicone pipes. Thus, leaving yourself only a headache during installation and nothing more. I don’t want to offend the author, who has done a titanic job, with my conclusion, but in my opinion, the game is not worth the candle (it takes too much time, and the result is not visible to anyone. Forceful situations arise, not only in length but also in the quality of shrinkage. And climbing under hood for smoothing out folds, let me tell you, it’s sooooo inconvenient). That’s actually the whole process in a nutshell, so to speak, write, ask, criticize, that’s your right, Auf Wiedersehen
Source