Tired of freezing in the car like “When it’s hot outside, it’s hot in the car” warm up before turning on the fan, but to do this you need to get stuck or stand for a long time...
There are several ways to solve this problem, as they say on the Internet and on the unit: 1. An alternative connection scheme to the SOD, the simplest and easiest way in my opinion, just swap the tubes and that's it (in our case you need to build, you will need about 30 -40cm tube ⌀18) 2. Installing a thermostat with 6 holes, so this will not help us (3. Replacing the thermostat insert to open 92 °, but this is yet to happen 4. Replacing the thermoelement itself or modifying it to 92 °, the process is long and tedious with boiling and checking the opening 5. Installing a Grant thermostat, but there are also 2 ways: either the factory one and then change the thermoelement at 92 ° or immediately buy a ready-made “Luzar” at 92 ° at the price of about the same more expensive modification, but also better as everyone responds
After I changed the thermostat assembly to heat the interior (the temperature stayed at 70° and the stove was also garbage), I set it to 85°. It became better to warm up, but when it reaches 90-95 °, then Tashkent is already in the car.
After examining the design of the old thermostat, the following facts and disadvantages come to mind: 1. Coolant always flows into the radiator! I don't understand, this is a waste of warm fluid entering the engine!
2. Along the way, the pump directs the coolant through the remaining slots: into the accelerator, radiator and finally to the stove, there is also an exit through the bypass, this is the so-called “SMALL CIRCLE” Yes, it deals with the following movement: > expansion tank> saxophone> pump> cylinder head + cooling jacket -> THERMOSTAT = (upper radiator pipe + radiator + lower radiator pipe for insertion on the thermostat, I have it in the closed position at 70 ° and therefore the liquid “stands”), butterfly + pipes, heater and return + their pipes, heating coolant in the pipe and the expansion tank itself! (which in itself is unnecessary), inserting the thermostat and then through the bypass to the saxophone and then into the circle)
Replacing the cooling system pipes of a VAZ 2110
Indeed, the cooling system pipes on a VAZ 2110 car cannot be called strong, reliable and durable elements. Over time, they can wear out and lose effectiveness. Therefore, the car owner can only replace them.
Rubber hoses for CO
Today we will tell you how to remove and replace these elements. You must act strictly according to the operating instructions and observe all safety precautions. This will save you and your car from unnecessary hassle.
Article: 2110-1303010/25/92, additional articles: 09-13-83bM, 2110-1303010
Order code: 158420
- Buy with this product
- show more
- Passenger cars / VAZ / VAZ-21104 drawings
- » href=»/catalog/vaz-3/legkovye_avtomobili-30/vaz_2110-10/nasos_vodyanoiy_i_truboprovody-140/#part41196″>Coupling Cooling system / Water pump and pipelines
- » href=»/catalog/vaz-3/legkovye_avtomobili-30/vaz_2110-10/nasos_vodyanoiy_i_truboprovody-140/#part41194″>Supply hoseCooling system / Water pump and pipelines
- » href=»/catalog/vaz-3/legkovye_avtomobili-30/vaz_2110-10/nasos_vodyanoiy_i_truboprovody-140/#part41192″>Exhaust hose Cooling system / Water pump and pipelines
- » href=»/catalog/vaz-3/legkovye_avtomobili-30/vaz_2110-10/nasos_vodyanoiy_i_truboprovody-140/#part41197″>Connection hoseCooling system / Water pump and pipelines
Preparation
It is necessary to remove the pipes only if the car engine has completely cooled down. Therefore, if you have just entered your garage for procedures, take your time. It's better to leave the car overnight and return to work tomorrow morning.
- Make sure the hoses are actually damaged and need to be replaced.
- Be sure to drain the coolant from the system. If you recently changed it, there is no need to dispose of the fluid. Just use a clean waste container so you can refill it later.
- The operating procedure depends on the hoses used on the vehicle.
Preparatory work
Replacement of pipes is carried out only when the engine is cold. It is advisable to leave the car in the garage overnight and start work in the morning. The preparatory stages include:
- assessment of the condition of pipes;
- draining coolant from the vehicle system. If the replacement was recently carried out, it is recommended to drain the coolant into a clean container. After checking the system, the liquid can be refilled;
- the performance of the work depends on the type of hoses used on the vehicle.
Standard pipes with union connector
In the case of such pipes, work on their dismantling is carried out as follows:
- Elements of this type are usually secured using clamps. Just check what kind of ties they are: disposable twisted or standard worm gear. If they are disposable, we strongly recommend replacing them with worm elements. They are more practical and reliable;
- Armed with a screwdriver, slightly loosen the retaining clamp and slide it along the pipe. This way you can completely free the siding;
- The tube is carefully removed from the receiver, that is, from the fitting, without unnecessary or sudden movements. Sufficiently new pipes that have not worn out can be easily removed, but old ones can “stick”;
- If the element does not want to be removed this way, turn it on the receiver, pry it with a sharp object, and pull it. You can not only put in a lot of effort, because the pipes are very fragile. If the situation is unsuccessful, cut the pipe with a knife. It is simpler, simpler, even if it requires large financial costs;
- When installing new hoses, clamps are first applied and then pulled onto the cooling system receivers;
- If you have previously used a swivel clamp, be sure to remove it. An alternative is a screw or worm-type clamp. There is not much difference in price, but the level of reliability is much higher;
- If you have difficulty attaching the elastic tube to the fitting, lightly moisten the latter with soapy water. Another option is to heat the ends of the pipes in hot water;
- Never use lubricants containing oils to facilitate installation;
- Pull the ends of the pipes onto the fitting, check the correct installation and gasket in the engine compartment;
- Now install the clamp in the desired position and fix it, thereby ensuring that the new element of the cooling system is firmly secured;
- Follow the procedure for filling the system with coolant;
- Start the powertrain and look for any signs of coolant leaks. It is quite possible that the clamp was not tight enough or the pipe itself was faulty. Although these things are worth checking before purchasing.
Procedure for replacing heater pipes
Work should be carried out when the car engine has cooled down, as the coolant will need to be drained.
Preparing tools
Before you begin work, you need to prepare the necessary tools:
- screwdriver for plus;
- ratchet;
- extension;
- heads 13.8 and 7.
Dismantling faulty pipes
First you need to remove the air pipe that goes to the throttle valve (if it’s a carburetor, then the air filter).
Remove the windshield wiper blades. To do this, you need to unscrew the two 13 nuts and pull them up.
Remove the boot. Unscrew the five fastening screws, move the top part and pull it up.
Remove the frill. Unscrew the side fastenings of the frill, shown in step 2, and the four clamping screws, then simply lift it and put it aside.
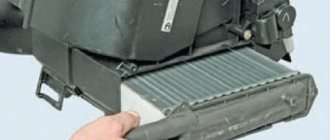
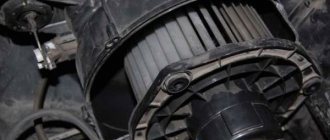
Remove the stove casing. The stove casing consists of two parts. To begin, remove the left side of the casing - unscrew two screws and remove three clips, disconnect and remove through the left side. After this, you can begin to dismantle the right part of the casing - unscrew the four screws and the ground wire, disconnect the chip with the wires and snap off the two tin brackets on top, then remove it in the same way as the first part - through the left side.
First part
Second part
Remove the damper. To remove the damper, you need to lower it in the car, this will be in a hot air stream, then unscrew the two fastening screws and remove it.
Drain the coolant. First you need to unscrew the filler plug, then open the tap on the radiator and unscrew the drain plug on the cylinder block.
Radiator valve
Cork on the block
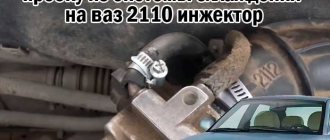
Remove the stove pipes. First, unscrew the clamps securing them and pull them - if they don’t come off, try to turn them.
After dismantling the old pipes, you can begin installing new ones.
Installation of new pipes
Experts recommend changing the clamps when replacing pipes on a VAZ 2110-2112.
- New pipes are installed, which perform drainage and supply functions.
- The remaining parts and assemblies must be put into place in reverse order.
- After installing and filling the system with coolant, it is important to check the tightness of all connections - if leaks are noticeable, then it is worth tightening them.
The process of replacing the stove pipes on a VAZ 2110-2112 with an 8- and 16-valve engine is approximately the same. Therefore, this instruction is suitable for cars with a new and old type engine.
Heater heat exchanger hoses
The remaining pipes in the cooling system of the VAZ 2110 are pipes going to the heat exchanger of the heater.
When removing them and installing new elements, it is necessary to replace the O-rings. Therefore, we recommend purchasing them in advance. The disassembly procedure itself is as follows.
- Two heater tubes are connected to the heat exchanger through one connector. Some modifications of the VAZ 2110 may require dismantling the camshaft cover.
- Remove the metal clip located above the connector.
- Push the plastic tab toward the left side of the connector to release it.
- We remove the heat exchanger connector and remove the old O-rings. It is strictly not recommended to return them.
- An alternative to these connectors is hoses with metal spring clamps.
Now all that remains is to install a new set of nozzles and complete the job. Because of this:
- Install in the reverse order of disassembly and disassembly;
- Make sure you reinstall new o-rings;
- Pour coolant into the cooling system;
- Start the engine and check for coolant leaks.
As you can see, replacing the cooling system pipes can be done manually. This will require accuracy, consistency in your actions, and the use of new high-quality parts to replace old ones.
If you cannot or do not want to solve such problems yourself, contact a good auto repair shop, where they will quickly and efficiently bring your cooling system back to normal.
Hoses in the heater system of a VAZ 2110 car
Replacing a hose from a VAZ 2110 stove.
Each car has its own heating system, which most often uses liquid. In order to connect all the elements, you will need a variety of hoses. During the operation of the machine, close attention is paid to them. If the defect is not identified and corrected in time, or the hose on the stove is not replaced, problems may arise with the vehicle engine.
Note! Pay attention to both hoses and clamps, which ensure better sealing of the connection. A loose or improperly tightened clamp can cause an unplanned engine overhaul.
Cooling system pipes for VAZ 2110, 2111, 2112 (video)
Cooling system pipes for VAZ 2110, 2111, 2112…
Hello dear readers of the blog RtiIvaz.ru. Today I want to continue the conversation about the radiator hoses of the automatic transmission cooling system of the VAZ Lada 2110 “ten”, Lada 2111 “eleventh” and Lada 2112 “twelfth”.
In the previous article about the car, we looked at the radiator hoses of the VAZ cooling system 2108, 2109, 21099, 2113, 2114, 2115. We watched videos and photos and found out what “eight” hoses are. There are “nine”, “ninety-nine”, “thirteenth” ", "fourteenth" and "fifteenth" Lada models differ from each other.
We identified the “upper” power supply, and also found out what the “lower” coolant at the outlet was – a thick rubber hose. You found out where the rubber hoses fit, today we will continue to watch the video of the Lada 2110, 2111, 2112 hoses.
Coolant hoses always look good, but they make themselves known when you don't expect it.
You've probably seen cars with open hoods on the street more than once in a steam club.
Then the coolant rises up, falling on the burning engine parts (exhaust manifold), exploding in a fountain through a burst rubber hose.
So guys, be careful if you haven't changed your mouth hoses in a while. Don't tempt fate and be unlucky, but replace all the hoses in your car beforehand.
What outlet and supply rubber radiator hoses for VAZ 2110, 2111, 2112 watch videos and photos friends...
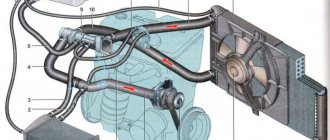
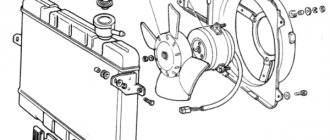
Look at the photo on the left under the rubber hose number -1, which supplies the “upper” coolant, and under number -2, the “lower” coolant outlet. Numbers -3; -4 “shorts”, one of which is the bypass from the block head to the water pump, and the other “short” is the coupling.
The pipes discussed on the left are suitable for VAZ cars of the “tenth” family with a carburetor and an injection engine.
- 2110-1303025 Radiator supply hose No. 1 (see photo)
- 2110-1303010 Radiator outlet hose, No. 2 (see photo)
- 2108 -1303092Р connection of the thermostat and water pump, as well as a “short” bypass, numbers -3; -4 (see photo)
Also look at the photo on the right, numbered -5, the “upper” coolant supply pipe and numbered -6, the “bottom” fresh fluid outlet pipe. You see the number -7, the so-called “elbow” overflow pipe for liquid cooling.
These pipes on the right are intended for Lada VAZ-2111 and Lada VAZ-2112 cars with an injection engine. Also on the VAZ-2112 with a 16-valve engine there are longer “upper inlet” and “lower outlet” pipes.
- 2112-1303025 Radiator supply hose, No. -5 (see photo)
- 2112-133010 radiator outlet pipe, number -6 (see photo)
- 2108 -1303092Р connection of the thermostat and the “short” of the water pump No. -8 (see photo)
- 2109-1303093-01 Tube for connecting the thermostat and bypass of the water pump “long elbow”, No. -7 (see photo)
Next, friends watch the video:
Dear car enthusiasts, did you like my previous publication? What do you think about it? I will continue the topic of rubber hoses for the cooling system of VAZ cars.
What other repair kits do you need to learn or create in a video about the cooling system of vases for yourself, write in the comments.
Cooling system for carburetor engines.
This cooling system consists of:
- Radiator for the stove.
- Heater radiator hose (steam outlet)
- Pipe from the heater radiator for removing antifreeze.
- Antifreeze supply pipe to the heater.
- Coolant temperature sensor (DTOZH)
- Connection for supply to the pump pipe (water).
- Thermostat.
- Filling tube
- Plugs for expansion barrels
- Sensor indicating coolant level.
- Expansion tank.
- Exhaust pipe.
- Exhaust manifold liquid heating chambers.
- Exhaust pipe (from the radiator).
- Pipe for supplying fluid to the radiator.
- Steam output (from the radiator).
- Left radiator tank.
- Electric fan activation sensor.
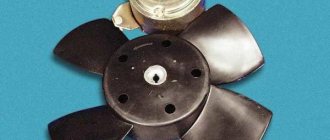
- Electric motor to drive the cooling fan.
- Fan impellers.
- Right radiator barrel.
- Radiator coolant drain plugs.
- Housings for electric fans.
- Timing belt.
- Cooling pump impellers.
- Pressure hose (to water pump)
- Tube for supplying antifreeze to the liquid chamber of a carburetor starter.
- Outlet pipe.
The role of pipes in the VAZ stove
The heating system in the car operates automatically, thanks to which the air enters the cabin at the required temperature with an error of about 2 degrees. To connect various elements to each other, where the working fluid is present, pipes are used. Experts recommend that VAZ 2110-2112 owners pay special attention to the pipes and monitor their condition.
Defects that are not corrected in time may subsequently affect the operation of the car engine. It is also important to monitor the condition of the clamps that are responsible for the tightness.
- The lower pipe serves as a supply of coolant to the radiator. Hot coolant flows here.
- The upper pipe plays a draining role; the cooled liquid leaves the heater radiator.
- Short couplings are required for the pump and thermostat.
If faulty pipes or coolant leaks are detected on a VAZ 2110-2112, professionals recommend immediately replacing the faulty elements.
Cooling system for injection engines.
Steps 1 through 26 are the same as for a carburetor engine cooling system.
Unlike the system described above, this system also consists of:
- Antifreeze supply pipe to the throttle valve.
- Fluid drain pipe to the accelerator pipe.
- DTOZH.
- Radiator hose inside.
- Radiator cores.
Features of the VAZ 2110 cooling system
Engine cooling type - liquid, closed, with forced circulation. The system operates at excess pressure, nominal heating is 87-94 C. The system is hermetically sealed, the expansion tank is closed with a lid with two valves: discharge and suction. The intake valve opens at a pressure of 0.035-0.135 kgf/cm2, this occurs when the engine cools down until the required volume of air is sucked in. And the exhaust turns on at a pressure of 1.05–1.55 kgf/cm2 to relieve excess pressure.
Maintaining the optimal engine temperature is possible using an electric fan and thermostat. The first one starts when the contacts of the thermal switch (located in the radiator tank) are closed. Contacts close at a temperature of 99-101 ° C, and open at 92-94 ° C.
In a VAZ 2110 car, the electric fan turns on automatically simultaneously with the sensor signal that the antifreeze temperature is exceeded.
The fan is rotated by a brushed DC motor.
The antifreeze temperature is determined by a sensor. It is located in the cylinder block. If your engine has electronic injection, you may find a different sensor in the cylinder head. It transmits information to the electronic control unit about the degree of heating.
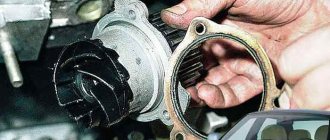
The fluid circulates through the system using a conventional centrifugal pump called a pump. Its rotation occurs due to the operation of the engine (through a belt).
Pump mechanism: Inside the aluminum housing there is a shaft, which ends with a toothed pulley on one side and an impeller on the other.
The cooling of the VAZ 2110 engine can take place in a small and large circle. If the antifreeze temperature is lower than the set one, the thermostat (the mechanism responsible for distributing the coolant) shuts off the flow of liquid to the radiator using a valve. In this case, cooling in a small circle. When the fluid temperature reaches 86-88°C, the thermostat opens the fluid path through the main tube. At this point, more than half of the antifreeze passes through the radiator. When the fluid temperature exceeds 101 C, the pump valve opens completely, in which case all the fluid passes through the radiator, which in turn is cooled by a fan.
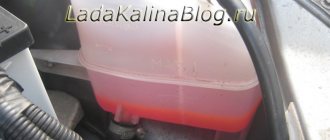
Coolant is poured into the reservoir under the hood. Contains minimum and maximum level divisions. In addition, a level sensor is built into the tank, which informs you via a warning light on the instrument panel that there is no antifreeze.
Why did the automaker invent the steam pipe here? It's simple, for removing steam from the heater radiators and cooling in the expansion tank. Thanks to this, steam plugs will not appear in the system, since all the steam will escape through the valve on the cap of the expansion tank.
It is strictly forbidden to use water as a coolant for the VAZ 2110 engine, since the first thing that starts is corrosion, and the second thing is that hot water tends to corrode aluminum parts.
The last thing I want to say about the device in this article is the heatsink. Its composition: core, two plastic tanks. The one on the left is divided inside by a partition. The core is made of aluminum tubes with plates also made of aluminum.
Indeed, the cooling system pipes on a VAZ 2110 car cannot be called strong, reliable and durable elements. Over time, they can wear out and lose effectiveness. Therefore, the car owner can only replace them.
Rubber hoses for CO
Today we will tell you how to remove and replace these elements. You must act strictly according to the operating instructions and observe all safety precautions. This will save you and your car from unnecessary hassle.
The principle of operation of the cooling system
As soon as you start the engine, the cooling system starts working. Of course, when starting, the main task is to heat the air in the cabin and achieve the operating temperature of the engine parts (approximately 90 degrees). However, the circulation of the cooling system of the VAZ 2110 is forced, that is, it is constant and is ensured by the operation of the pump, so it is impossible to influence its on/off.
The system is represented by small and large circles, in which liquid circulates depending on the temperature of the working parts and the engine. At the beginning of operation, the antifreeze moves in a small circle, which does not include the cooling radiator. As soon as the liquid reaches a temperature of 85-90 degrees, the main thermostat valve opens and antifreeze enters a large circle that connects the cooling radiator.
If the air flow passing through the radiator grille is strong, then the liquid is cooled well, but if you move slowly, the antifreeze cools slowly and the temperature gradually rises, then the temperature sensor is triggered and the fan turns on, which helps cool the liquid.
Preparation
Silicone
It is necessary to remove the pipes only if the car engine has completely cooled down. Therefore, if you have just entered your garage for procedures, take your time. It's better to leave the car overnight and return to work tomorrow morning.
- Make sure the hoses are actually damaged and need to be replaced.
- Be sure to drain the coolant from the system. If you recently changed it, there is no need to dispose of the fluid. Just use a clean waste container so you can refill it later.
- The operating procedure depends on the hoses used on the vehicle.
Standard pipes with union connector
Standard
In the case of such pipes, work on their dismantling is carried out as follows:
- Elements of this type are usually secured using clamps. Just check what kind of ties they are: disposable twisted or standard worm gear. If they are disposable, we strongly recommend replacing them with worm elements. They are more practical and reliable;
- Armed with a screwdriver, slightly loosen the retaining clamp and slide it along the pipe. This way you can completely free the siding;
- The tube is carefully removed from the receiver, that is, from the fitting, without unnecessary or sudden movements. Sufficiently new pipes that have not worn out can be easily removed, but old ones can “stick”;
- If the element does not want to be removed this way, turn it on the receiver, pry it with a sharp object, and pull it. You can not only put in a lot of effort, because the pipes are very fragile. If the situation is unsuccessful, cut the pipe with a knife. It is simpler, simpler, even if it requires large financial costs;
- When installing new hoses, clamps are first applied and then pulled onto the cooling system receivers;
- If you have previously used a swivel clamp, be sure to remove it. An alternative is a screw or worm-type clamp. There is not much difference in price, but the level of reliability is much higher;
- If you have difficulty attaching the elastic tube to the fitting, lightly moisten the latter with soapy water. Another option is to heat the ends of the pipes in hot water;
- Never use lubricants containing oils to facilitate installation;
- Pull the ends of the pipes onto the fitting, check the correct installation and gasket in the engine compartment;
- Now install the clamp in the desired position and fix it, thereby ensuring that the new element of the cooling system is firmly secured;
- Follow the procedure for filling the system with coolant;
- Start the powertrain and look for any signs of coolant leaks. It is quite possible that the clamp was not tight enough or the pipe itself was faulty. Although these things are worth checking before purchasing.
Work procedure
Replacing hoses on a VAZ 2110 stove
In the process of performing any work, a certain sequence must be observed; only if you take into account the instructions, recommendations and advice, the actions will be correct, high-quality and effective. So:
- First you need to disconnect the negative wire from the battery.
- Next, drain the coolant.
Note! Before draining the coolant, the engine must be completely cool, since at high temperatures the drained liquid will also be hot.
- Carefully remove the lining on the windshield - the frame trim and the sound insulation lining.
- The heating fan is removed.
Replacing hoses from the stove on a VAZ 2110
- The vacuum hose clamp is detached from the heater body.
- Using a screwdriver, remove three spring brackets designed to secure the front housing of the heating air collector.
- The fastening screws of the front housing are unscrewed.
- Now you can easily remove this housing directly.
- It is necessary to loosen the clamps and also disconnect the hoses from the fittings.
Installation of new hoses
Replacing heater hoses on a VAZ 2110
When replacing heater hoses on VAZ 2110 cars, it is also recommended to change the clamps that serve to connect all elements. It is advisable to carry out the work according to the algorithm below:
- Replacement is being made. The hoses on the stove, through which coolant is supplied and discharged from the stove radiator, are replaced with new ones.
- Other elements with nodes are secured in the reverse order.
- Coolant is poured into the cooling system and the tightness of the hoses and connections is assessed. If necessary, they need to be tightened.
Changing a tee or hose for draining fluid
Note! In some situations, coolant leaks at the connection points of the tee to the heater radiator, expansion tank and to the engine cooling system pump.
Replacing heater hoses on a VAZ 2110
In such cases, you can only get by by tightening the hose with new clamps.
Note! Tightening the clamps must be done with extreme caution so as not to damage the rubber of the hoses. This may result in replacement of the outlet or inlet element.
The hose can be repaired without removing it from the machine
VAZ 2110 hoses from the stove
It is recommended to carry out work in the following sequence:
- first the damaged end of the hose;
- the same piece of the new element is placed on a metal pipe, the length of which is about 60 mm and the diameter is 20 mm. Due to the low cost of this part, you can significantly save money and time on repairs;
- to reduce the tension of the hose, it needs to be increased by about 8 mm;
- if antifreeze leaks (see Replacing antifreeze - details of the process) from the joints of the hoses and the heating radiator, you will need to dismantle the vacuum booster.
Heater heat exchanger hoses
The remaining pipes in the cooling system of the VAZ 2110 are pipes going to the heat exchanger of the heater.
Pipeline diagram
When removing them and installing new elements, it is necessary to replace the O-rings. Therefore, we recommend purchasing them in advance. The disassembly procedure itself is as follows.
- Two heater tubes are connected to the heat exchanger through one connector. Some modifications of the VAZ 2110 may require dismantling the camshaft cover.
- Remove the metal clip located above the connector.
- Push the plastic tab toward the left side of the connector to release it.
- We remove the heat exchanger connector and remove the old O-rings. It is strictly not recommended to return them.
- An alternative to these connectors is hoses with metal spring clamps.
Replacement
Replacement
Now all that remains is to install a new set of nozzles and complete the job. Because of this:
- Install in the reverse order of disassembly and disassembly;
- Make sure you reinstall new o-rings;
- Pour coolant into the cooling system;
- Start the engine and check for coolant leaks.
As you can see, replacing the cooling system pipes can be done manually. This will require accuracy, consistency in your actions, and the use of new high-quality parts to replace old ones.
If you cannot or do not want to solve such problems yourself, contact a good auto repair shop, where they will quickly and efficiently bring your cooling system back to normal.