AUTOFIZIK.RU / auto repair
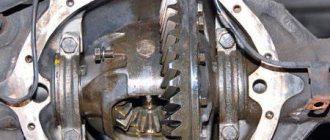
We assemble the main gear in the reverse order of disassembly, lubricating the bearings and gears with transmission oil.
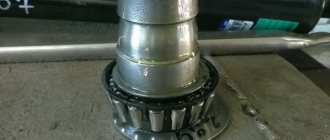
Having installed the drive gear in the gearbox housing,... ...with a torque wrench, tighten the flange nut with a torque of 16–20 kgf.m, while the gear must be rotated for proper installation of the rollers in the bearings.
We install an indicator with a division value of no more than 0.01 mm on a tripod, resting its leg against the end of the flange...
...and moving the shaft by the flange, we measure the axial play of the drive gear.
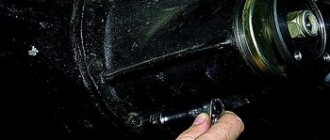
To eliminate play, remove the spacer ring installed on the gear shaft (see Dismantling the rear axle) and measure its thickness with a micrometer. We select and install a new spacer ring. It should be thinner than the amount of play removed and additionally thinner by 0.05 mm - if the drive gear bearings are new or by 0.01 mm - if the bearings are left the same. If there is no axial play of the drive gear, use a special torque wrench with a scale of up to 0.5 kgf.m to check the moment of resistance to shaft rotation. With proper adjustment, the resistance moment should be 15–20 kgf.cm for new bearings or 7–10 kgf.cm if the bearings are left the same. With sufficient accuracy, the moment of resistance can be measured using a household steelyard...
...hooking its hook onto the hole in the flange.
In this case, the required values will be less - 3.8–5 kgf and 1.8–2.5 kgf, respectively. If the moment of resistance is greater, we change the spacer ring to another one, 0.01–0.02 mm thicker; if it is less, we select a ring of smaller thickness accordingly. Before assembly, the bolts for fastening the parts of the differential box and the bolts for fastening the driven gear, as well as their threaded holes, are degreased and coated with anaerobic sealant. We pay special attention to the cleanliness of the end mounting surfaces of the gears and the gearbox; the slightest contamination or nicks are unacceptable.
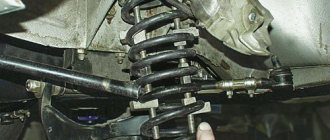
When installing the driven gear on the gearbox, we center it using long M10×1 bolts (you can use bolts from old connecting rods).
When installing the driven gear on the gearbox, we center it using long M10×1 bolts (you can use bolts from old connecting rods). Using adjusting nuts, we tighten the differential bearings with a slight tension, while turning the gear in one direction or the other so that the bearing rollers take the correct position.
To measure the lateral clearance in the meshing of the final drive gears, we attach an indicator to the rear axle housing by moving its probe to the top of the tooth on the outside of the driven gear.
The gap should be 0.15–0.20 mm. Measurements should be repeated on at least six teeth in opposite zones of the crown. To reduce the gap (using a screwdriver or a thin steel rod), loosen the adjusting nut on the side opposite the driven gear and tighten the other. You need to unscrew one nut and tighten the other by the same amount, guided by the grooves of the adjusting nuts. In this case, each unscrewing of the adjusting nut must be completed by tightening it slightly. For example, to loosen a nut by five grooves, unscrew it by six, and then tighten it by one groove. This will ensure that the bearing outer race is in constant contact with the nut and thus ensures that it remains in place during operation. To increase the gap, repeat the entire procedure in reverse order. After adjusting the lateral clearance in the engagement, we check the axial play in the differential bearings, for which:
...we fix the indicator on a tripod, resting its probe against the end of the driven gear. By rocking the gear in the axial direction, we measure the play in the differential bearings.
Using an adjusting nut located on the opposite side of the driven gear, we set the axial play to 0.035–0.055. Next, by tightening the nut, we set the bearing preload: 0.1 – when the bearing mileage is less than 10 thousand km; 0.05 – with a mileage of more than 10 thousand km. Turning the nut one notch corresponds to “compressing” the bearing by 0.03 mm. Once adjusted, tighten the bearing cap bolts and install the locking plates (see Rear Axle Disassembly) and check the side clearance again.
ATTENTION Before final tightening of the cover bolts, turn them out one by one and apply anaerobic sealant to the threaded part.
Adjusting the final drive according to the contact patch of the teeth is an effective way to adjust the gear mesh. It also allows you to check the quality of adjustments made by other methods.
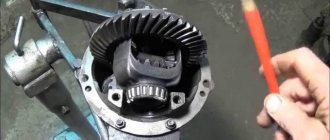
Apply paint, preferably bright paint, to the teeth of the driven gear.
We turn the drive gear flange several times in both directions, while simultaneously slowing down the driven gear until the paint wears off at the points where the teeth contact. We inspect the contact spots on the driven gear teeth from the convex and concave sides. If the contact patch is located at the top of the teeth, it is necessary to increase the thickness of the adjusting ring at the drive gear, and if at the base, reduce it. If the contact patch is shifted to the center of the gear, it is necessary to increase the gap between the driven and driving gears, and if outward, reduce it. After adjustment, we install the gearbox in the rear axle, while applying a thin layer of oil-resistant sealant to the mounting bolts and flange. Having assembled the rear axle and filled it with oil (see Changing the oil in the gearbox), we test the gearbox on the move. To do this, we travel at a speed of 60–70 km/h for 20–30 minutes. The temperature of the crankcase neck should not be higher than 95° (water drops should not boil). Otherwise, it is necessary to reduce the preload of the pinion bearings.
Contact patch in final drive gears
A – forward sides; B – reverse sides;
1 – correct location of the contact patch;
2 – the contact patch is located at the top of the tooth – to correct it, move the drive gear towards the driven gear;
How to make repairs
To begin, remove the gearbox from the machine, and then clamp it into a clamp. Unscrew both bolts for the locking plates and remove them.
Next, the bearing caps are marked for their future assembly. To do this, you will need a center punch and use a hammer to make marks. Use wrench No. 14 to unscrew the bolts and remove the covers.
It is important to note that the covers are removed together with the adjustment nuts. You must also remember to remove the roller bearing races.
It is important to immediately inspect the bearings for wear and serviceability. The outer races of each bearing are marked, since they are selected in pairs and cannot be disassembled.
The radial play located on the axle gears is checked. If its size exceeds 0.5 mm, then the box is replaced. In normal condition, the bearing is removed and the planetary gear is unscrewed.
Next, you need to knock out the satellite axis using the adapter and pull them out.
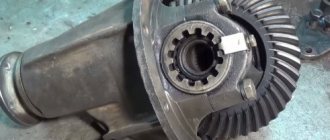
You need to remove the drive shaft and gear from the gearbox housing. A soft metal punch is perfect for this. The inner wheel of the roller bearing is knocked out.
It is also necessary to replace the adjusting sleeve with a new one.
After knocking down the bearing, you need to remove the adjustment ring.
Next, use a drift to knock out the outer rings of the bearings.
Now you can wash all parts in kerosene or diesel fuel. After the washing is done, all parts are diagnosed. There should be no chips or cracks. If these defects are present, it is important to replace the parts. In case of small scuffs, they can be polished with sandpaper.
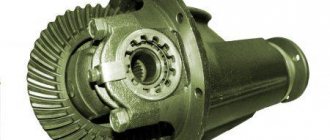
Purpose and principle of operation of the gearbox
The rear gearbox of the “seven” is a transmission link between the axles of the rear wheels and the engine. Its purpose is to transmit torque from the engine crankshaft to the rear wheels while simultaneously converting the rotation speed of the axle shafts.
In addition, the gearbox must be able to distribute torque depending on the load applied to the left or right wheel.
Principle of operation
Here are the main stages of transmitting torque from the motor to the gearbox:
- the driver starts the engine and the crankshaft begins to rotate;
- from the crankshaft, torque is transmitted to the car’s clutch discs, and then goes to the input shaft of the gearbox;
- when the driver selects the desired gear, the torque in the gearbox is transferred to the secondary shaft of the selected gear, and from there to the driveshaft connected to the gearbox with a special crosspiece;
- the cardan is connected to the rear axle gearbox (since the rear axle is located far from the engine, the “seven” cardan is a long rotating pipe with crosses at the ends). Under the action of the cardan, the main gear shaft begins to rotate;
- rotating, the gearbox distributes torque between the axle shafts of the rear wheels, as a result the rear wheels begin to rotate.
Self-locking differential
The most common way to increase a car's cross-country ability is to install a self-locking differential. The main advantage of this device is that it prevents wheel locking “forever”. This is important because preventing lockup from engaging when not required helps protect the axle shafts from critical loads.
There are the following types of differential locks:
- Disc - implemented through the use of friction clutches. These clutches come into action as soon as the wheels begin to rotate at an uneven speed. The disadvantage of this mechanism is that it requires the use of expensive gear oil, and also requires quite frequent adjustment work to set up the unit. This is far from the best mechanism for a VAZ 2107 car.
- Viscous coupling blocking - the operation of such a device is based on the use of sticky discs immersed in a special liquid. It hardens when heated, allowing the gears to engage—that is, the differential locks. The liquid heats up when the angular speed of the wheels on the axle changes (when the speed of rotation of the wheels becomes different). The disadvantage of this mechanism is that they require complete sealing of the assembly, and work effectively only during short-term slipping.
- Screw locking or worm locking is the best option for automatic locking for the VAZ 2107. The mechanism is implemented using worm screws, which rotate when the car drives in a straight line, and when the angular speed of the wheels changes, they shift into grooves, thereby locking the differential. As soon as the car gets out of the mud captivity, the blocked mechanism resumes its normal operation by moving the worm screws to their places.
- Planetary - the operating principle is similar to a worm circuit, only instead of gears, balls are used. Due to the balls, the wheels are blocked, and they come into operation when the traction force between the engines and the axle changes. Compared to a self-locking worm gearbox, a planetary gearbox costs about 2 times less.
In addition to automatic differential locking, there is also a forced one, which is activated if necessary.
Differences in VAZ rear axle gearboxes
RZMs differ in the gear ratio of the main pair; in total, there are four types of gearboxes on the VAZ classic:
- 2101;
- 2102;
- 2103;
The slowest one is the RZM 2102, its drive gear has 9 teeth, and the driven gear has 40 teeth. To calculate the gear ratio, you need to divide the number of planetary gear teeth by the number of teeth on the drive shaft; for the VAZ 2102 the drive gear is equal to 4.44.
The “penny” gearbox (2101) accordingly has the number of teeth on the gears 10/43, so its IF is 4.3. The next, faster one is RZM 2103 - it has a ratio of 1041, which means the gear ratio is 4.1. And finally, the “fastest” will be the 2106 gearbox, with the number of teeth 11/43 and an inverter frequency of 3.9, respectively.
Many VAZ 2101-07 owners strive to install the fastest gearbox, but this is not always necessary. If the car often carries cargo, that is, the car is a “workhorse”, high speed is of no use, but high-torque power will be very useful. It should be noted that RZM 2102 was not supplied as spare parts; it was installed only on station wagons.
Device
In order for the car to move, it is necessary to transfer the rotation of the engine to the wheels. But the engine speed is too high, and in order to correctly distribute the torque, a mechanism is needed that changes the gear ratio. Due to the gearbox and different engine speeds, the speed of movement changes, and the main pair of the rear axle takes over the rotation and transmits it to the wheels through gears.
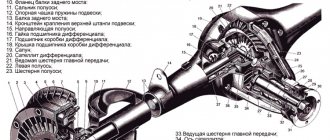
The VAZ rear axle gearbox consists of the following parts:
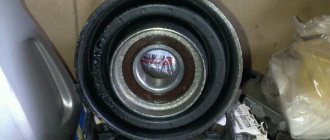
- flange, it is fixed on the drive gear (shank) of the RZM, and is an intermediate link between the driveshaft and this gear;
- the shank of the main pair, at one end of which there are splines for pressing the flange, at the other end there is a bevel gear with a small number of teeth;
- driven gear (planet gear), it is in mesh with the drive gear, and it is with it that it forms the main gear;
- center differential, allowing the rear wheels to spin at different angular speeds.
The differential design is very simple - the mechanism consists of two axle gears, two satellites and a satellite pin. From the gearbox, the movement is transmitted to the axle shafts, on which the wheels are mounted.
Diagnostics and causes of malfunctions
The fact that the gearbox is in a faulty condition is indicated by the appearance of a characteristic noise (hum) when the vehicle is moving. To accurately determine the gearbox malfunction, there is the following experiment.
You need to accelerate the car to 25 kilometers per hour and gradually pick up speed, starting from this mark. If suspicious hums appear, be sure to record the speed at which you hear them.
Once you reach the desired speed, slowly release the gas pedal and apply engine braking. Again, listen for extraneous noises and pay attention to the speed at which they appear or disappear.
Certain noises should appear and disappear at the same speed. If this happens, it means that the rear axle gearbox is in a faulty condition. However, to be 100 percent sure, be sure to put the car on the parking brake, put the gear in neutral and try to gain speed, if the noise appears again, then the problem is not in the rear axle gearbox, and if there is no noise, then you can be sure that it is rear axle gearbox.
The cause of malfunctions, most often, lies in the use of low-quality oil, loss of its viscosity, as well as its complete absence. In addition, the gearbox may fail due to failure of oil seals, bearings and special gears. Sometimes, the cause of a rear axle gearbox failure is a broken axle shaft.
Removing the rear axle gearbox of VAZ 2107
Before removing the gearbox, it is necessary to drain the transmission oil that is poured into the rear axle of the VAZ 2107. To do this, place an oil container under the drain hole of the axle and unscrew the drain plug.
Important: after repair, new transmission oil should be poured into the gearbox.
The next procedure is as follows:
- Unscrew the bolts securing the cardan to the gearbox flange;
- Uncouple the rear part of the cardan and lower it down;
- jack up the car (if it is not on a lift) and remove the rear wheels;
- Unscrew the guide screws of the brake drums;
- remove the brake drums;
- unscrew the 4 bolts securing the axle shafts;
- pull out the axle shafts, freeing the gearbox;
- unscrew the 8 gearbox mounting bolts;
- remove the gearbox.
When and how does the gearbox hum if the bearings are worn out?
If the VAZ gearbox howls constantly, regardless of the driving mode, and the sound resembles a buzzing, there is most likely a problem with the bearings. Moreover, we can say with confidence that the parts on which the drive shaft of the gearbox rotates have exhausted their service life. The fact is that the roller bearings of the shank rotate about 5 times faster than the axle shafts and satellites, and wear out faster. Another reason for accelerated wear is an overtightened shank nut. If the gearbox hums not very melodiously, the sound is more like a crunching sound - the problem should be looked for elsewhere. This is usually how a malfunction of the differential bearings or axle shafts makes itself known. You can verify this by listening to a car with the drive wheels hanging out. The operation should be performed in a viewing hole or on a lift.
Where is the gearbox located?
On the "sevens", as on all representatives of the rear-wheel drive family, the gearbox is located at the rear, under the bottom of the car. It connects the cardan to the VAZ 2107 axle and causes the wheels of the car to rotate. Rotation occurs thanks to axle shafts engaged in the gearbox, which, due to the technical features of the rear axle of the VAZ 2107, will have to be removed later. If the car is lifted, or when viewed from a garage pit, the gearbox is simply impossible not to notice.
Signs and malfunctions of the classic rear axle gearbox
Replacing a gearbox with your own hands is a labor-intensive process, which includes not only the purchase of a new unit (quite expensive), but also time costs. Therefore, before you start, you need to make sure that the gearbox is faulty. You can define the signs like this:
- gradually accelerating the car, listen carefully and remember at what moment the noise appears;
- while driving, start engine braking (remove your foot from the gas pedal at speed), at this time listen to the gearbox and note the moment the noise appears;
- accelerate the "seven" to hundreds, switch to neutral and turn off the engine - listen to how the gearbox behaves while coasting.
“If the bridge is noisy both in neutral and at speeds, the gearbox has nothing to do with it. If the hum occurs only at speed (regardless of the number), repairs, or, as a last resort, replacement of the gearbox are inevitable.”
When the signs are identified, it is necessary to carry out another check:
- park the car, secure the front wheels with shoes;
- jack up the rear so that the bridge hangs over (it is necessary that the wheels come off the surface);
- start the engine and accelerate the “seven” to the point at which noise occurs, while the wheels should spin without load.
If the noise has not changed, then the gearbox is clearly in good working order and it is not the cause of the trouble. Here other drive units are checked. Well, if there is no noise when driving without a load, then we are talking about worn gears of the gearbox, which make noise only when driving with a load.
The “seven” gearbox itself is a fairly reliable unit that can withstand a period of 100 to 300 thousand mileage, and there is no need to even look into it. Gears, gear spacer, differential adjustment - all these problems arise during improper operation:
- the use of oil with a low viscosity level, as well as failure to comply with the terms of its replacement;
- operating the “seven” with an amount of oil insufficient for this;
- During movement, the bridge is subject to extreme loads (frequent and unsuccessful slips).
Gearbox removal process
In order to repair or replace the rear axle gearbox of a VAZ 2107, you first need to remove it from the car:
- Drain the oil. This, by the way, may be a reason to replace it.
- Separate the flanges of the cardan and gearbox. To do this, you need to unscrew four bolts and nuts. At this time, it is necessary to fix and immobilize the cardan with a screwdriver or by holding the brake pedal. After unscrewing the nuts, you need to tie the cardan to the muffler. You can simply hang it, but this can also lead to negative consequences for the cardan.
- Remove the axle shafts, because without this the gearbox cannot be removed. At the same time, you can inspect the seals, and if they are worn out, replace them. This will save time and prevent possible malfunctions.
- Separate the beam and gearbox by unscrewing all eight bolts that secure it. When unscrewing the latter, it is necessary to hold the gearbox so that it does not fall. The bolts are unscrewed - carefully remove the gearbox.
Repair and adjustment of the VAZ 2107 gearbox
Before you start repairing the gearbox and its subsequent adjustment, you need to have certain skills, backed up by skills, observe all the nuances and subtleties of this process, and also strictly follow the technological nuances of the process. Therefore, if a person starts work for the first time, then it is better to abandon this idea. In addition, you must have all the necessary tools:
- pullers;
- stands;
- a set of keys, screwdrivers and other accessories.
Clarifying the diagnosis
Many motorists, out of ignorance, confuse noise from the gearbox with other faults, and then begin to change completely working parts. Often they are helped in this by garage “masters” who are incompetent in the work of gearboxes. Following their advice, the owner of a VAZ 2106 can pour some additive into the crankcase of a working gearbox, which will disable it. This cannot be done; additives will not restore a humming unit, but they can ruin a working one.
To make an accurate diagnosis, you need to check the following points:
- make sure there is lubricant in the crankcase;
- check if the seals are leaking;
- measure the amount of play in the mechanism.
The backlash is determined by freely turning the cardan manually and placing marks on it and the gearbox housing. The ideal backlash is 2-3 mm, the acceptable one is 10 mm.
In order not to confuse the noise from the gearbox with the hum of axle bearings or the crunching of crosspieces, it is recommended to perform an on-site hearing test. To do this, you need to, together with an assistant, hang the rear of the car so that both wheels do not touch the ground. After starting the engine, turn on the gear and listen in different modes to where the sound source is. The procedure is performed on an inspection ditch or lift.
The axle gearbox is such a pest that when it starts howling, you wonder what this gearbox needs to do, how to eliminate the howling that begins to hurt your ears when driving a car.
There are few craftsmen who are engaged in adjusting the gearbox, since you need to know and feel the gaps between the gearbox and the cone, the tightness of the bearings.
Usually the howling starts due to bad oil, wear of the tip and gearbox, or improper tightening of the nut on the shank of the tip. If you overtighten the nut, tighten the cone bearings too much, the gearbox can jam, if you tighten it too weakly, the gearbox will howl, tighten the nut so that there is no play and The gearbox was easily turned by hand.
I will give you the factory instructions for adjusting the gearbox, I hope you can repair and adjust the axle gearbox yourself at home.
Changing the oil in the rear axle of a VAZ 2106
Often, car enthusiasts who own a vehicle such as the VAZ 2106 ask the same question. They are interested in which oil fluid is best suited for the rear axle of their car. At the same time, they ask - what volume is needed and how to change the oil?
There are different opinions. But experts recommend filling the rear axle gearboxes of this machine with transmission oil, which is marked 80W90 . For example, this is Lukoil 80W90 GL. This group of oils also includes TAD-17 80W-90 or the so-called TNK.
When we've sorted out the oil, it's time to answer another question. Perhaps he is one of the most important. Namely, how much oil is required? So, the oil volume is as follows - 1.3 liters. At the same time, it is possible to change the oil in the gearbox. True, in this case you will need 1.4 liters.
As for the interval, it is necessary to change the oil fluid after every 30,000 kilometers of the vehicle. If you convert the mileage into a time frame, you get 3 years of operation.
The oil fluid is replaced in accordance with the established procedure:
- First of all, you need to use a lift or inspection hole. You will also need a key for “seventeen” and a hexagon for “twelve”.
- Next, unscrew the drain plug in the bridge and place a special container designed for draining the oil fluid. At the same time, the filler plug is also unscrewed. This is necessary so that the oil fluid flows out faster.
We unscrew the drain and filler bolts. When the oil fluid is drained from the bridge, the drain plug is screwed in and new oil is poured. Here you need to use the filler hole. You will also need a special syringe or other suitable tool.
Fill with a watering can