A lot of time has passed since AvtoVAZ put on sale a car called Lada Kalina. Advertising and the hope of domestic car enthusiasts for a bright future did their job - every third Russian chose Kalina as a new car. However, the joy of owning a domestic car ends sooner or later.
After just a few months of operation, the Kalina car showed its rather capricious character. And it just so happened that the owners of the Lada Kalina began to disappear more and more often in the garage, once again doing some kind of repair, rather than driving the car. AvtoVAZ engineers are well aware of the shortcomings and childhood diseases, and are doing their best to get rid of them in the next generation in order to increase reliability. However, the result of the improvements is insignificant. The car still cannot please with its endurance and resistance to wear. It’s especially unpleasant when the Kalina doesn’t start at the right moment. And the car owner is forced to start troubleshooting. Let's try to understand the reasons for the car's reluctance to start.
Immobilizer
If the car refuses to start, then this is one of the possible reasons. You can notice problems in the operation of this system yourself. If the corresponding icon blinks and a characteristic beeping sound is heard, then you should read the operating instructions. If the Lada Kalina does not start, the immobilizer is a common problem. The problem is not easy to fix. In the instructions for the car, the manufacturer indicates the decoding of sounds and blinking lights - the car owner needs to count the time between flashes, the number of buzzer signals, and then read what the manufacturer writes about this.
In winter, it often happens that the car starts normally after about the sixth time. In most cases, this problem can be solved by retraining the key - after this procedure, problems with starting should not appear.
How and why the immobilizer fails
Let's dwell on this topic in a little more detail. The thing is that the ECU controller on this model is located under the heater radiator. In second-generation models, the controller was moved.
So, if the Kalina does not start, you need to remove the side wall from the left side in the passenger seat and visually check the ECU. The block must be dry. If it is wet, then it is filled with coolant - in this case, it will not be possible to restore the ECU, only replacement will help.
First of all, when exposed to liquid, the output switch burns out. The chip can be re-soldered, but after such repairs the problems will go away for literally two months, and then they will appear again. The heater radiator will need to be replaced. If this problem exists, then experts recommend installing a new controller between the engine compartment partition and the stove.
Now about the immobilizer - in Kalina cars the manufacturer installs APS-6 immobilizers. In very rare cases, these devices fail on their own. Often, the problem is hidden in the wiring or control panel. The key fob body is held together with one self-tapping screw - the screw can be overtightened or undertightened. A crack appears on the remote device chip between the transponder contacts. In this case, if the Kalina does not start, only a spare or training key, or replacing the remote control will help.
Algorithm for determining and debugging the blocking system
Before you start solving the question of why the reverse gear on the Lada “Kalina” does not engage, you should learn a little about the theory of the functioning of the locking system.
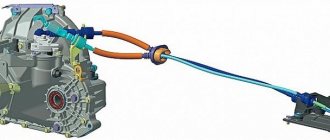
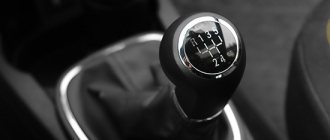
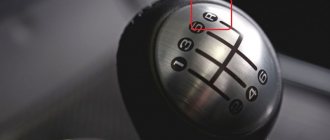
Power to the solenoid wiring is supplied through a special switch ring located on the gearshift handle. The principle of operation is as follows: the driver lifts the switch, which activates the solenoids, then the rod is pulled inward. Such actions lead to the fact that the reverse gear is unlocked.
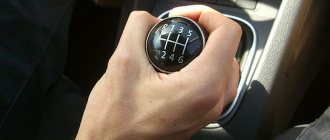
After carrying out such manipulations, the car owner is able to switch the reverse gear; to do this, it is necessary to move the shift knob. Then the “limit switch”, which is located on the box, is activated, and the reverse signals light up, emitting a characteristic sound in the cabin.
To fix the problem you will need the following tools:
- copper wire and soldering iron;
- tester;
- insulating tape (heat shrink);
- wrench marked “36”.
Connection diagram on Kalina
The control circuit for the locking mechanism looks like this - a current of 12 volts passes through a special fuse. It is supplied to the solenoids, after which the circuit is closed using a switch on the lever. Then the solenoid coil starts up.
The debugging procedure occurs according to the following steps:
- the required fuse is located on the safety block on the left side, it is the eighth in the list. You need to get it out and diagnose it using a special tester. If the unit malfunctions, it will need to be replaced;
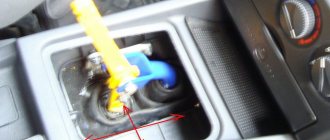
- We check the switch itself directly. To do this, you will need to lift the cover on the gearbox. Below it is a connector connected to the switch. Unplug slowly and carefully;
- short the contacts using a paper clip. After this, you should try to switch to reverse gear. If the actions lead to the desired result, then the obstacle is a malfunction of the switch. If the rear one does not work, continue to determine the reasons;
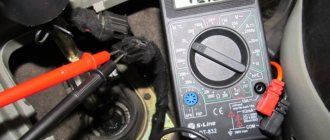
- Remove the plug from the solenoid and place 2 pins inside. Next, using diagnostic equipment, measure the voltage. The device should provide information that the voltage level is 12 volts. When connected to a 5-watt light bulb, a light signal should appear. If there are no changes, it means that there are breaks in the wires somewhere. In such a situation, the voltage is due to the resistance generated by the copper oxide. Most often, breaks and refractions are located in the section of the harness where the torpedo is located;
Voltage level measurement
- remove the clamp. To do this, you need to squeeze the latch at the bottom;
- Next you will need to disconnect the plug from the switch. After performing these manipulations, it is possible to pull out the tourniquet completely. Remove the insulating tape from the corrugation and analyze the wiring. If there are breaks or refractions, you will note visual signs;
- damaged wires are removed using wire cutters, and in their place place new ones with the same cross-section and diameter. We recommend soldering the twisted area and applying insulation using heat shrink. If you wish, replace the corrugation with another one. Make sure that moisture does not get on the wiring;
- After connecting all connectors, you can check the functioning of the system.
A broken solenoid is not a common problem. To determine this malfunction, you must connect a tester. When the device operates correctly, it will show 2.2 Ohm data. If the parameters do not match, you will need to drain the car oil from the gearbox.
There is an alternative option without removing the oil, but it requires certain skills and abilities. In such a situation, it is necessary to quickly close the hole through which the substance is escaping and place a new part. After installing the new solenoid, we recommend applying a sealant compound to the threaded area. If you skip this step, the substance will soon begin to flow through the threads.
Starter
The immobilizer has been checked and does not give any alarms, but the engine still does not want to start. Another reason for this behavior is the starter. It is easy to notice a problem with the starter - you will not hear the characteristic sound of the engine starting. The mechanism simply does not spin, which means the engine will not be able to start. Everything is clear here - you need to remove and check the starter.
If the Kalina does not start, the first reason may be the battery. It may simply be discharged. If the lights in the cabin and on the dashboard are not lit, the driver will be able to immediately notice this. However, it often happens that everything is in order, but the starter still does not work. For diagnostics, turn on the high beams and get out of the car. Dim headlights are due to the battery. It is discharged, but only to a critical level, when there is not enough power to turn the starter.
If the Kalina does not start, the starter does not turn, the best way out of this situation is to charge the battery. But if the headlights are bright in high beam mode and are not going to dim, then you will have to look for the reason elsewhere.
Dismantling and repairing the locking mechanism
About theory.
The solenoid power circuit in the Lada Kalina car includes a switch ring located in the gear selector handle. The device operates as follows. By lifting the ring, the driver activates the power supply to the solenoid, which in turn causes the reverse speed control unit to unlock. Access to activating this transfer is now open. When the lever is moved to the required position, the limit switch located on the Lada Kalina transmission housing is activated. This allows you to activate the rear brake lights and an audible warning signal sent through the interior speaker.
Starter or wiring problems
You can use a multimeter to test the wiring. The red wire is connected to the starter contact, the black wire to ground. In a normal situation, the device will show from 12.5 to 14.5 V. If the reading is less or even zero, then there is something wrong with the wiring.
The first step is to clean the contacts, check the integrity of the wires and fuses.
If the check shows that there is current, then the starter will have to be replaced. If the latter makes clicks but does not rotate, then the starter motor has failed. If everything is the other way around, then the problem is with the retractor coil.
ECU
This is another popular problem when Kalina does not start. ECUs are the “brains” of the car; they themselves are quite reliable, and if you don’t touch them, then no problems will happen. However, most often the ECU is flooded.
This often happens when antifreeze leaks. This has already been discussed in the section on the immobilizer. When installing an alarm system or when pulling car wires, they forget to install the plugs - water gets into the ECU. Repairing an electronic unit is a futile exercise.
In the new generation, this problem was solved, and now the ECU is located in a different location. However, now another problem has appeared - if the drain hole, which is located next to the cabin filter, is clogged, then water can enter the computer through the holes.
Spark plug
If everything is in order with the electronic filling, you should look for the problem in the candles. Often, and especially in winter, it floods.
Compression in the engine in cold weather does not meet the standards, so the engine may not start immediately. Often flooding of spark plugs occurs due to a discharged battery, which is unable to produce a normal spark. If not, the reasons may also be in the wiring or the spark plugs themselves. The easiest way to dry the spark plugs is to press the gas to the floor and crank the engine with the starter two or more times. Often, after this the car will start. If this does not help, then for more thorough drying you should dismantle the spark plugs, then clean them, check the gap, and then dry them with a hairdryer or in the oven.
Viburnum speed switches poorly
An automatic transmission is much more demanding in terms of accuracy in maintaining the oil level in it than a manual transmission. Both too low and too high oil levels are very harmful to her. Both of these can lead to serious damage. In both cases, oil foaming occurs. When there is a lack of oil due to the fact that the oil pump begins to capture air along with the oil. When there is excess oil, it foams on the rotating parts, which in this case are immersed in it. Foamed oil compresses better and has low thermal conductivity. Therefore, if you operate a machine with such oil, the pressure in its control systems will be low. Which will lead to slipping of the clutches and their intensive wear. Deteriorated thermal conductivity will not allow all excess heat to be removed. Which, together with low pressure, will lead to the machine failing and requiring serious repairs.
Gasoline pump
The vagaries of the fuel pump are often observed, especially in winter. The starter works, but the Kalina car refuses to start, you can’t hear the fuel pump running, the dashboard may flash
First of all, check the pressure in the fuel system. To do this, open the hood and look for the cap on the ramp with the injectors. You can see the nipple there - if you press it, fuel should spray out. If it splashes, then the problem is not with the fuel pump.
Another reason is the relay. There is a cover in the transmission tunnel on the passenger side. It contains power coils. To eliminate the malfunction, just knock or warm them up.
It may send the wrong signal, resulting in fuel being delivered incorrectly. Fuel injectors also become depressurized. As a result, the fuel mixture becomes over-rich. The injectors need to be replaced or cleaned.
These are all the reasons why the Lada Kalina refuses to start.
A modern car is literally packed with electronics, and the Lada Kalina is no exception in this sense. On the one hand, electronics make life much easier for the driver. On the other hand, it can also become a cause and source of headaches for the driver, since the abundance of electronics can seriously complicate troubleshooting. The most common electronics-related problem on Kalina is the inability to engage reverse gear. We will tell you why the transmission does not turn on and how to fix it in this article.
What's the result?
So, the main reasons why gears are difficult to engage are problems with the clutch mechanism and gearbox. However, most of them can be eliminated yourself if you have tools, spare parts and certain skills.
Why may it be difficult to engage gears or why first gear, second, reverse, etc. may not engage? The main causes of gearbox malfunctions, recommendations.
Reasons for difficulty shifting gears with the engine running. Transmission oil and level in the gearbox, wear of synchronizers and gearbox gears, clutch.
How to change gears without a clutch: driving a manual car without a clutch in case of malfunction. Tips and tricks.
Manual transmission gears (speeds) do not engage after replacing the clutch: main reasons, settings and adjustments. Diagnosis of problems, useful tips.
Clutch: basket, release, clutch disc. Purpose and design, principle of operation of the clutch basket. How to increase clutch life.
The automatic transmission does not change gears: the car does not move forward or backward, the automatic transmission does not switch to individual gears, reasons.
Source
The design of the reverse gear locking mechanism in the Lada Kalina
All the main elements of the locking mechanism are listed
To engage reverse gear on Kalina, the driver needs to move the gearshift lever slightly towards himself and then forward. This must be done by lifting a small plastic ring on the lever, which serves as a kind of insurance. There is a solenoid in the gearbox that prevents reverse gear from being engaged until the ring is raised. After lifting the ring, the magnetic switch built into the lever is activated, the solenoid is connected to ground, after which the rod inside the solenoid moves. This leads to the fact that the stroke of the gear selection mechanism increases and it becomes possible to engage another speed - reverse.
Removal and installation of gearbox Lada Kalina 1117 2004 - 2021
Tools:
Parts and consumables:
Note:
We carry out the work with an assistant on an inspection ditch or overpass.
1. Drain the oil from the gearbox as described here. Disconnect the wire terminal from the negative terminal of the battery. Remove the air filter as described here. Remove the starter as described here. We remove the clutch cable lead from the groove of the clutch release fork lever, following the instructions described here.
2. Disconnect the wiring block from the reverse light switch.
3. Disconnect the wire block from the speed sensor.
4. Using a 10mm wrench, unscrew the three bolts securing the lower clutch housing cover.
5. Remove the clutch housing cover.
6. Remove the right and left front wheel drives, as described here. Using a 13mm spanner, loosen the tightening of the nut of the coupling bolt of the clamp securing the control rod to the shank of the gear selector rod hinge. Then disconnect the transmission control rod.
7. Using a 19mm wrench, unscrew the nuts of the two bolts securing the clutch housing to the gearbox housing (which also secure the torque rod bracket), holding the bolts from turning with a head of the same size.
8. We remove the reaction rod with the bracket from the gearbox.
9. Disconnect the plastic throttle cable holder from the gearbox bracket.
10. Using a 13mm socket, unscrew the bolt securing the ignition coil bracket to the clutch housing.
11. Using a 19mm socket, unscrew the two upper bolts securing the gearbox to the cylinder block, which simultaneously secure the bracket with the holders of the throttle cable and wiring harness. The front bolt (in the direction of vehicle travel) is shorter than the rear bolt. We remove the bracket with the cable and wiring harness from the gearbox.
12. Remove the left front suspension brace as described here. We install adjustable stops through wooden blocks under the engine oil pan and gearbox housing.
13. Using a 19mm spanner, unscrew the nut of the lower rear mounting of the gearbox to the cylinder block.
14. Using a 19mm socket, unscrew the bolt of the lower front fastening of the gearbox to the cylinder block.
15. Using the “E-14” head, unscrew the two screws securing the front left support bracket of the power unit to the support.
16. Using a 15mm socket, unscrew the three nuts securing the bracket for the front left support of the power unit to the gearbox.
17. Remove the bracket.
18. Using a 19mm socket, unscrew the two outer bolts 1 securing the rear support bracket of the power unit to the gearbox, and using a 17mm socket, unscrew the middle bolt 2.
19. We move the gearbox away from the engine, removing the input shaft from the hub of the driven clutch disc.
20. When removing and installing the gearbox, do not rest the gearbox input shaft on the clutch diaphragm spring petals so as not to damage them. Before installing the gearbox, apply a thin layer of CV joint-4 lubricant to the splined end of the input shaft.
New Lada: New Lada Vesta engine intake system - what has changed? » Lada.Online
21. We insert the input shaft of the gearbox into the splines of the driven clutch disk and, orienting the gearbox so that the two guide pins fit into the corresponding holes in the clutch housing, and the standard pin of the clutch housing into the hole in the cylinder block, push the gearbox all the way into the engine cylinder block .
22. Fill the gearbox with oil as described here.
The article is missing:
Why did reverse gear stop turning on and how to solve it
Difficulties engaging reverse gear can arise for a number of reasons, the most common of which are listed below.
The interlock fuse has blown: reason number one
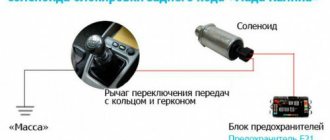
Fuse F21, responsible for blocking reverse gear, is located in the bottom row, in the eighth connector
This is the first element that you need to pay attention to in case of breakdowns related to electronics. In the Lada Kalina car this fuse is designated F21. Its rating is 10 A, and it is located in the main fuse block of the car (there it is eighth from the left). The fuse is removed and its jumper is inspected. If it is broken, the fuse is replaced with a new one. Then the car starts and an attempt is made again to engage reverse gear. If the new fuse blows again, this indicates that there is a short circuit in the solenoid's power supply circuit, therefore, not only the fuse will have to be changed, but also the solenoid itself.
Video about where the fuse box is located in Kalina
The magnetic switch is faulty
The arrow shows the connector that must be closed using a wire or a regular paper clip
This doesn't happen often because the part is quite reliable. The solution is obvious: you need to remove it and check it. To do this, you need to remove the cover mounted on the gear shift lever. Next, you should find the connector that is connected to the lever. It is carefully disconnected, and its contacts are closed with some kind of wire (an ordinary paper clip, which can be attached to the connector with a piece of electrical tape, is also suitable). After closing the contacts, you must try to turn on the reverse gear again. If it succeeds, then the reason was in the magnetic switch, and it needs to be changed. Another option is possible here: the plastic ring itself, to which this switch is connected, does not rise high enough (usually this is due to its wear). So before disassembling the lever and removing the switch, it makes sense to make sure that the ring rises freely and to the required height. If the ring sticks, it must be replaced.
No voltage is supplied from the solenoid to the gear shift lever
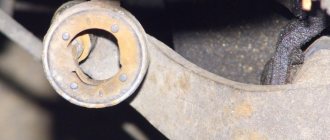
The arrow shows a clamp with a frayed wire.
The most common reason. The wire connecting the solenoid and the gear shift lever is located very poorly. It passes under the bottom of the car, near the side member on the left. Here it is affected by moisture, anti-ice chemicals, and finally, it can simply tear due to a falling stone. And most often, this wire breaks where it is attached to the spar with a clamp: dirt accumulates under the clamp, which acts as an abrasive material, literally grinding both the insulation and the wire itself. As a rule, these damages are visible to the naked eye. To identify them, the car is driven into an inspection hole, where an inspection is carried out (in which a flashlight will be very helpful). If the wire is damaged, it is replaced. The second option is also possible: the damage is not visible, and the wire looks intact. In this case, you should use a multimeter to check whether there is voltage at the solenoid output. If it is not there, then the problem is in the wire.
Lockup solenoid burnt out
If upon inspection it turns out that the blocking fuse is intact, the wiring is intact, and there is still no voltage at the solenoid outputs, then the solenoid itself has failed. The first step is to determine whether current is flowing to the solenoid. To do this, both wires are disconnected from it, and the voltage on each is checked. If there is no voltage on both wires, then the cause of the breakdown is somewhere in the area between the solenoid and the fuse. If voltage is supplied to one of the wires, it means that the winding in the solenoid itself has burned out. In order to verify this, you need to switch the multimeter to the ringing mode, and then touch the outputs on the solenoid with a probe. If the multimeter display shows zero all this time, the winding is burned out and the solenoid must be replaced.
To summarize, the vast majority of problems with reverse gears are caused by damaged wiring that is located in a very bad place. In fact, this is a serious miscalculation of the designers of the Lada Kalina, who not only placed the wires where they should not be, but also did not bother to properly protect them. It is for this reason that troubleshooting reverse gear problems should always begin by inspecting the wiring under the left side member. In most cases, this saves a lot of time.
As you know, not only the movement of the car, but also its functioning as a whole depends on the operation of the gearbox (gearbox). Transmission malfunctions entail not only the inability to change gears, but also expensive vehicle repairs. Therefore, if you are the owner of a Lada Kalina car, then you will be interested to know whether the Kalina does not turn on at all. We will also tell you about repairing faults at home.
Remember that transmission problems in any vehicle should not be neglected.
Otherwise, a series of breakdowns may occur, which will require you to spend not only a lot of time and effort, but also money.
[Hide]
Gears engage with effort: gearbox malfunctions
In cars with a manual transmission, gear shifting is done by the driver himself. Using a lever from the interior, it acts on the rocker and then on the entire gearbox mechanism. Simply put, the driver moves the gears on the shafts.
Since the shafts rotate at high speeds, cooling is required. This is done using special gear oil. Oil also protects the surfaces of rubbing parts from premature wear. The lubricant must be changed on time. On average, this is done after every 40-50 thousand kilometers.
As for the reasons for tight gear engagement, there may be several of them. However, most often they are associated with problems in the clutch or the gearbox itself. If you study the list of the most common breakdowns, then you can highlight the following:
The exception is reverse gear, since it does not have synchronizers; By the way, when the reverse gear is difficult to engage, extraneous noises, clanging, and crunching often occur. Such phenomena directly indicate wear of the gear teeth.
Why might there be interruptions when engaging first gear?
The reasons for the breakdown of this unit worry many Kalina owners, since the failure of certain gearbox elements, due to which the gears are poorly engaged, can already be called a “disease”. And this disease, one way or another, is associated with a certain defect in the production and assembly of serial models of this car at the plant, which, unfortunately, was never eliminated by AvtoVAZ engineers.
In fact, there may be quite a few direct reasons why the first speed does not engage well, as a result of which even experienced specialists will not be able to immediately calculate the breakdown. What can we say about ordinary car enthusiasts?
So what makes first gear difficult to engage?
- failure of the cardan or rocker - these faults often cause the inability to engage first gear;
- breakdown of the Kalina gearbox lever itself is also a common problem;
- loosening the clamp;
- the slots of the box have served their service life - they have worn out;
- A malfunction in the release bearing is a fairly rare breakdown encountered by car owners of this Lada model. Usually, when the release bearing breaks down, all gears without exception are switched on with an unpleasant sound, one might say a crunch, and additional effort must be made to shift;
- incomplete disengagement of the clutch - the solution is to replace it;
- failure of the gear drive control rod;
- in the gearbox, the screws securing the hinge or the speed selector rod lever have become loose, so they need to be tightened;
- oil seal failure;
- incorrect regulation of the gear shift drive;
- failure or expiration of the service life of plastic elements in the gearbox control drive;
Gears are difficult to engage: causes, solutions
With the car running, first gear became difficult to engage. Reverse gear engages with a crunch, as if the clutch is not fully depressed. If you apply the gas several times, first or reverse gears are engaged. Starting today I start in second gear. When the car is turned off, all gears shift normally and easily. Today I stopped by Shabashkin’s office, they announced: Replacement of the clutch kit - 4,000 rubles + 6,000-10,000 rubles. the cost of this kit. Expensive. Tomorrow I want to go to another, expensive service, I’ll listen to what they say. What thoughts does anyone have? PS I would like to know the part numbers for the clutch kit for my car, can anyone help me with this? In our area the prices are sky-high, I want to order from Exist.
Just arrived from the service. The masters said: if the rear speed crunches, change the clutch 100%. The price was announced on the street as 2000 rubles, when they took it up on the lift, the price increased to 2400 rubles, I don’t know why. Then they told me to go home and film for three hours. They called for lunch, come. I saw the disassembled clutch assembly and said to replace it in its entirety. The box was removed for the first time (the words of the master). After 13 years of operation, this is not a bad result. Ferrido was eaten down to the rivets, the rivets began to shuffle along the basket disk. All the tabs on the basket were intact, but the basket disk had circular purple stripes, which indicated that the clutch was not pressed or was slipping. There was no “pocket” on which the rod rests, it was torn off, along with the rivet. The old rod was shorter than the new one I brought by 2 mm. When replacing the support bearing, half a liter of oil spilled out! One day they found two places where antifreeze was leaking. From under the thermostat cover (I bought a new one) and from the pipe that goes to the recently installed gas equipment reducer. As luck would have it, I forgot my camera and cell phone at home today, no photos. I hope to take pictures of everything tomorrow for the report, but perhaps by then the box will have already been delivered.
Ways to solve the problem
If you decide to repair your gearbox yourself, we suggest you use our instructions. You must be prepared for the fact that any repair involves dismantling and disassembling the gearbox. Remember that if during disassembly of the gearbox you replaced at least one part, then you need to select an adjusting ring for the differential bearings.
Tools
To dismantle and repair the Kalina gearbox, prepare:
- set of socket wrenches. In particular, you will need keys for “10”, “13”, “14”, “17”, “32”;
- large slotted screwdriver;
- beard;
- hammer;
- container for draining transmission fluid;
- pliers;
- syringe for filling the unit with transmission oil;
- Phillips screwdriver.
Steps
Also ask a friend for help, because for removal you will need an assistant and, of course, a garage with a pit or an overpass. So, let's remove the unit:
Let's look at repairing the main breakdowns found in Kalina cars. These breakdowns can be fixed at home if you have basic knowledge of gearbox repair.
Replacing the clutch release bearing
- Having removed the unit, you need to remove the ends of the spring retainer from the junction with the bearing coupling;
- then remove the release bearing;
- disconnect the spring holder clamps, and then remove the clutch bearing;
- take the new bearing and inspect it - it should rotate around its axis easily and without problems;
- Before installing the part, it is necessary to lubricate the guide sleeve with grease;
- you need to insert the part into the coupling so that its protruding part is directed away from the coupling;
- the element must be fixed with a spring.
Replacing oil seals
- pull the inner joint oil seal out of the unit using a flat-head screwdriver;
- take a new part and press it all the way inside the unit;
- now unscrew the bolts securing the guide sleeve and remove it;
- using a screwdriver, remove the input shaft oil seal;
- Press in the new part in the same way so that its working side is directed into the unit;
- now disconnect the unit control rod from the gear shift joint;
- unscrew the bolt fixing the side dish to the gear shift rod and dismantle it;
- carefully, using a hammer and chisel, knock out the cage from the crankcase of the unit and dismantle it as an assembly with the gear shift rod oil seal;
- remove the oil seal directly and replace it with a new one, driving it into place until it stops;
- It is better to lubricate the working side of the part with transmission fluid.
Replacing the clutch release fork
- To replace the clutch fork, it is necessary to dismantle the gearbox and remove the clutch release bearing from it. Here you will need a knife or screwdriver and pliers;
- pry the clutch boot and disconnect it from the fork lever;
- then disconnect the fastening tabs from the inside of the crankcase;
- use a knife or screwdriver to pry up the plastic bushing of the fork axle. If this element in your unit is already in poor condition, then immediately replace it. You also need to replace the part if the fastening petals are worn out;
- Move the clutch fork and remove its end from the bushing located in the crankcase. Remove the fork and gearbox lever;
- disconnect the retainer from the clutch fork by first squeezing its ends with pliers. If the latch itself has already served its service life and it is clear that it has lost its elasticity, then the part must be replaced;
- after this, inspect the fork: if its lever is cracked, bent, or the legs are damaged in the places where they directly connect to the release bearing clutch, then replace the part. To do this, the bushing must be knocked out, and the new component must be pressed in until it stops, not forgetting to lubricate the metal and plastic elements with grease or oil before doing this;
- Installation of the clutch fork on Lada Kalinas is carried out in the reverse order.
Now you know what to do if the first speed is difficult to engage. You can replace these components yourself at home. The main thing is to strictly follow the instructions. If you are not confident in your abilities, then seek help from specialists. Having done everything as stated in the instructions, install the gearbox back in its place, and then fill it with transmission fluid.
Troubleshooting methods
Once the source of the problem has been found, you can begin to eliminate the causes of the malfunction.
If the problem is in the engine
The simplest cause of problems when shifting gears can be a leak of brake fluid, which is the working fluid for the clutch. If there is insufficient lubrication in the clutch hydraulic system, it will not engage fully. Therefore, first check the fluid level in the car's tank. If the level is low, check for leaks, repair defects and bleed the clutch. When the fluid level is at the normal level, the clutch elements should be inspected.
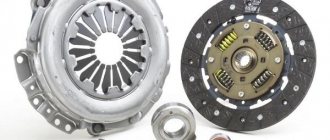
Clutch problems
The clutch consists of three main components:
- disk;
- release bearing;
- baskets (pressure disk).
Malfunctions of these units can lead to problems with gear shifting when the engine is running.
A faulty basket can also cause the problem. This often results from critical wear of the petals. In this case, the basket stops performing its functions when heated, and it is not possible to completely remove the pressure disk. Therefore, after removing the box, it is necessary to carefully inspect the basket for deformations and other defects. If the condition of the unit is not satisfactory, it should be replaced with a new one.
Finally, the last reason for problematic gear shifting associated with the clutch is wear or deformation of the disc and the friction linings on it.
The problem is at the checkpoint
The most common cause of a gearbox malfunction is wear of the synchronizers. You may have previously been warned about this by a characteristic crunch when changing gears. Synchronizers that smooth out the angular speeds of the shafts are usually made of copper and are therefore subject to wear.
Much less often, the gearbox shafts themselves can fail. In this case, a separate transmission may not be included. The degree of wear and the need for replacement is also determined after dismantling and disassembling the transmission.
However, you should not immediately think about the bad. Sometimes a problem with gear shifting can be caused by a lack of oil in the gearbox. Loud noise while driving or a metallic grinding sound in the box may indicate insufficient oil level. If there is a complete lack of oil, you will not be able to change gears at all: the synchronizers will not function properly. Changing the gearbox oil is recommended every 60-80 kilometers.
In addition to checking the oil level in the gearbox, you will also need to inspect the unit body for damage and the absence of lubricant leaks through the gaskets and seals.
Video “Repair of the gear shift unit in a VAZ car”
This video shows the process of repairing a gearbox in a VAZ car. The instructions are general and suitable for Kalina cars.
What to do if reverse gear on Kalina does not engage
?
Until this happens, make sure that in your set of keys that you carry with you all the time, you must have a 36-socket spanner. A key of this size is rarely available in stores where they sell tools. But they are almost always available at car markets. The cost of such a key is around 200 rubles, but it’s worth it. The reverse speed lock on Kalina
is made using a solenoid, the rod of which performs this function.
Power is supplied to the solenoid using a switch ring located on the gear shift handle. By lifting the ring, we turn on the solenoid, the rod is pulled into the solenoid and unlocking occurs inside the box. And then, by moving the handle to the reverse gear position, we can engage reverse gear. The limit switch located on the box is activated, and the reversing lamps and an intermittent sound signal in the car interior turn on. And when, at the most inopportune moment, we don’t hear this signal and realize that we cannot engage reverse gear, a shocking moment occurs! So what should we do now?! Well, it’s not all that scary! The solenoid control circuit
just didn't work ! You are very lucky if all this happened in your garage or near your home! But if this happened on the way, then don’t be too upset, because we have the same key for 36 in the trunk! Turn the steering wheel all the way to the left and look under the front of the car from the left wheel side, you will see on the box the same solenoid to which the connector with wires is connected. Disconnect the connector and use a 36 mm wrench to unscrew the solenoid by 7-8 mm. We wrap a wire or even electrical tape into the resulting gap and tighten the solenoid a little. We try to engage reverse gear. Happened?! Now you can safely drive to the garage. Just be very careful, as first gear and reverse are located very close. Once we get to the garage, we will look for the problem. Consider the electrical circuit for controlling the solenoid:
12 Volts are supplied through fuse F21 to solenoid L1. Using switch S1 on the handle we close the circuit to ground. The solenoid coil is activated. Fuse F21 10A is located in the fuse block - it is the 8th from the left. The removal key is located in the same block at the top right. We take out the fuse and check it with a tester or tester (supply power from the battery through a test lamp). We replace the faulty fuse with a new one of the same rating. The next step: checking the switch (by the way, it is a reed switch). We lift up the cover on the handle.
We immediately see the connector connected to the switch. Let's disconnect it.
We take a paper clip (metal) and use it to close the contacts of the connector, the wires from which go down into the underground floor of the car. If after this you can engage reverse gear, then the switch is faulty. If the “miracle” does not happen, we move on. Remove the connector from the solenoid. We insert two needles into it (I used sewing needles, for potholders, with balls - they do not allow them to close with each other). We measure the voltage. It should be 12 volts. But that is not all. It is necessary to load it with a light bulb. I used 5 W at 12 V. If the light bulb does not light, then we have an open circuit, and the voltage is present due to the resistance formed by copper oxide. In 99% of cases, a wire break (fracture) occurs in the harness, at the location where the clamp is installed on the pallet. Remove the clamp by squeezing it from the bottom of the mount. Disconnect the connector from the reverse lamp switch and remove the entire harness. Remove the electrical tape from the corrugation and pull out the wires. The broken wire is immediately visible. We cut off the wires with side cutters and extend them with others that are suitable in diameter (according to the cross-section of the wire). 10 cm of wire is enough. It is best to solder the twist with a soldering iron and insulate it. I did this using heat shrink tubing. Then we insulate everything with PVC tape. You can wear another corrugation. The main thing is that moisture does not get there, otherwise sooner or later everything will have to be repeated. We throw away the clamp, it is not needed there. If you want, you can secure the harness with a plastic tie - it costs pennies at an electrical goods store. We install the connectors in place and check the operation of the solenoid. The solenoid itself very rarely fails. To check, its resistance is 2.2 Ohms. If you unscrewed the solenoid, do not forget to tighten it again! An option when the solenoid still fails. To replace the solenoid, you need to drain the oil from the box. Although you don't have to drain it. Just quickly plug the hole with something and then quickly screw in a new one. A little oil will spill out - then add more. When installing a new solenoid, its threads must be lubricated with silicone sealant to prevent oil from oozing down the threads. Good luck everyone!
There are quite a few reasons why reverse gear does not engage, so sometimes it is not at all easy to understand what caused this malfunction. Moreover, in cars “stuffed” with electronics and all kinds of sensors, it is the problem with the electronics or contacts that becomes the reason why the reverse gear stops engaging.
In this article I will talk about possible causes and malfunctions due to which the reverse gear on the Lada Kalina does not engage. You will also learn how to find and fix a malfunction in the reverse gear locking mechanism with your own hands.
Relay and fuse box
The fuses in the Lada Kalina are located under the dashboard, in a block located to the left of the steering wheel. To get to it, you need to open the cover in which the headlight switch is built in. The lid has latches; if you pull it towards you by the upper part, it will open and fold down (its lower part is fixed on an axis).
F1 (10 A) - immobilizer, dashboard lamps and sensors, reversing light, turn signals
. If any of the gauges on your dashboard stop working, or one or all of the warning lights stop lighting up, check that fuse, as well as the gauges or bulbs themselves. If the rear white light does not come on when you engage reverse gear, it could also be this fuse or the reverse switch.
The reverse switch is located on the transmission, to change it you will most likely need to remove the engine cover to get to it. Located on the left side in the direction of travel on the rear of the gearbox. If the turn signals do not work and this fuse is intact, also check relay K5, the turn signal control knob, its connector, as well as the turn signal lamps themselves.
F2 (30 A) - electric windows
. If the power windows stop working, check this fuse, as well as relay K2. If the fuse and relay are good, there could be a number of reasons. First, try pressing the power window button and slamming the door. If the mechanism “bites” when the glass is raised, this may help.
Otherwise, you need to disassemble the casing and look at the mechanism. When disassembling, you need to check the serviceability of the gears and all components of the window lifter, including the motor brushes. It could also be a problem with the power window module. It is located in the left rear door; if there is something wrong with it, then most likely you will have to change this module to a working one.
F3 (10 A) - alarm
.
If the emergency lights do not work and this fuse is good, check relay K5. If your left or right turn signals come on and are constantly on, even when you turn off the ignition, this is a factory defect. In this case, it is necessary to replace the body electronics control unit. This can be done in official salons.
F4 (20 A) - windshield wiper, heated rear window
. If the windshield wipers do not work and this fuse is intact, also check relays K4 and K6. The issue may be in the windshield wiper motor or its mechanism. Check the wiper switch and its connector.
If the rear window heating does not work, check fuse F8, the heater terminals, their contacts, as well as the contacts of this fuse and relay K6. Another issue could be poor contact on the body. The wiring ground is connected to the body under the dashboard. If there is poor or oxidized contact in this area, it can also cause problems with the correct readings on the panel instruments.
F5 (25 A) - heater, electric power steering, windshield washer
. If this fuse and relay K4 are intact and the stove does not work, the problem may be in its electric motor (brushes) or the power button, as well as its contacts. If the electric power steering does not work, this fuse and fuse F31 are intact, then it is better to contact a workshop, because it will be difficult to find and fix this malfunction yourself.
F6 (20 A) - sound signal
.
If this fuse and relay K8 are working, but the signal does not work, check the horn itself. It is located under the front bumper near the radiator. Sometimes it is enough to turn the tone adjustment screw. The location is inconvenient because water can easily get into it; alternatively, you can reinstall it in a higher place, or install another horn that is less sensitive to water and moisture.
F7 (10A) - LCD dashboard indicator, brake lights, interior lighting
. If your brake lights don't work, check this fuse. If it is intact, check the brake light switch, which is located at the base of the brake pedal; it is a round piece with two wires connected to its terminals. If this is the case, then replacing it will help. Costs about 100 rubles. Also check the bulbs in the taillights. If one brake light does not light, then the lamp is most likely burned out. If both signals do not light up, then most likely the problem is in the relay, fuse or switch.
F8 (20 A) - rear window heating element
. If the rear window does not fog up when the heating is on, check this fuse, relays K4 and K10, and fuse F4.
F9 (5 A) - right side lamps, lamp in the glove box
. If the right side does not work - the right front and right rear lights do not light up, check this fuse, as well as the lamps themselves.
F10 (5 A) - left side lamps, control lamp for turning on the lighting on the dashboard, license plate lamps. Similar to the previous one.
F11 (7.5 A) - rear fog lamps
.
F12 (7.5 A) - right low beam lamp, right headlight range control motor
.
F13 (7.5 A) - left low beam lamp, left headlight range control motor
. If one of the low beam headlights does not light, check one of these fuses, as well as the lamp itself. If both headlights do not work, check the serviceability of the light switch, its connector, as well as the lamps themselves (it also happens that both burn out at the same time).
F14 (10 A) - right high beam lamp, high beam indicator lamp on the dashboard
.
F15 (10 A) - left high beam lamp
. If the high beams do not work, also check relay K7. If it fails, replace it. It could also be the lamps themselves, the wiring, the high beam switch and its connector.
F16, 17 (10 A) - front fog lamps
.
F18 (15 A) - heated seats
.
F19 (10 A) - ABS
. If the fuse is good, but the ABS does not work, most likely one of its mechanisms has stopped working. If the ABS warning light on the dashboard is on, it means one of its elements has failed. It is necessary to diagnose the fault codes and eliminate the cause.
F20 (15 A) - cigarette lighter
. Frequent problems with Kalina's cigarette lighter can be caused by its non-standard configuration. When connecting various connectors, proper fixation does not occur, so there may be short circuits, which causes the fuse to fail. Alternatively, you can install an additional connector or use a splitter with 12 V sockets.
F21 (10 A) - gearbox reverse lock
.
F22 (15 A) - alarm control unit
.
F23 - reserve F24 - reserve F25 - reserve
F26 (25 A) - ABS
. Same as F19.
F27 (5 A) - spare F28 (7.5 A) - spare F29 (10 A) - spare F30 (20 A) - spare
F31 (50 A) - electric power steering
. If the steering wheel is difficult to turn, check this fuse as well as fuse F5. If the cause of the malfunction cannot be determined, contact a car service center, because steering is a serious thing that affects safety. There may be something wrong with the control unit or wiring.
Reverse does not engage - reasons
- Before you start drastic actions and disassemble “anything and everything”, check the gear shift lever itself, this may be the reason. The linkage and cardan are quite often the cause of this breakdown. The splines could also be worn out or the clamp loosened. In this case, you will need an inspection hole.
- A faulty release bearing is an option. Although it is unlikely, since in this case all gears without exception would be engaged with a characteristic crunch and with great effort.
- Reverse gear may stop engaging due to problems in the reverse gear locking mechanism; in order to confirm or refute this, remove the gear shift knob along with the dashboard between the seats and perform a visual inspection.
In my case, the problem was precisely the faulty wiring of the transmission lock solenoids (break or fracture), how I solved this issue, read on.
How to check and repair the reverse gear locking mechanism of a Lada Kalina with your own hands?
Theory:
Power comes to the solenoid through a switch ring located on the gearshift knob. It works like this: you lift the ring, thereby turning on the solenoid, the rod is pulled into the solenoid, which leads to unlocking the reverse gear. After this, you can engage reverse gear by moving . Next, the “limit switch” located on the box is turned on, and the rear stops are turned on, and an intermittent sound signal is turned on in the cabin.
To fix this problem you will need:
- Key to "36";
- Electrical tape or heat shrink;
- A piece of copper wire;
- Tester;
- Soldering iron.
Here is the solenoid control circuit:
Through fuse F21, +12 Volts are supplied to solenoid L1, using switch S1 on the handle, the circuit is closed to ground, after which the solenoid coil is activated.
1. The 10A fuse we need, F21, is located 8th on the left in the fuse block. Take it out and check it with a tester. If replace with a new one of the same value.
2. Now it's time to check the switch, to do this, lift the cover on the handle, after which you will see the connector connected to the switch. Carefully turn it off.
3. Using a paper clip, you need to close the contacts of the connector from which the wires go down under the Kalina floor. Now try to engage reverse gear; if it does, the switch is faulty. If not, continue troubleshooting.
4. Remove the connector from the solenoid, install two pins in it, then use a tester to measure the voltage, the device should show 12 volts. In addition, you need to load it with a light bulb. A 5-Watt 12 V is suitable for this; if the light bulb does not light up, you have an open circuit, and the voltage is explained by the resistance formed due to copper oxide. As practice shows, 99% of breaks and fractures occur in the harness, in the place where the clamp is installed on the pallet.
5. Remove the clamp by squeezing its fasteners from below.
6. Disconnect the connector from the stop switch and remove the entire harness. Remove the electrical tape from the corrugation and remove the wires. If the wire is broken or broken, you will notice characteristic signs.
7. Using wire cutters, pinch off the wires and connect others of similar cross-section and diameter. It is better to solder the twist itself and insulate it or use heat shrink. If desired, you can put on another corrugation, the main thing is that moisture does not penetrate, otherwise the problem will very soon recur. I personally threw away the clamp, if you need it you can leave it. Secure the harness with a plastic clamp.
8. Connect the connectors and check the operation of the solenoid. Failure of the solenoid itself is a fairly rare phenomenon; to check it, connect a tester; the resistance should be 2.2 Ohms. If, however, there is a problem there. There is a way. in which it is fashionable not to drain, but here a certain skill is required, the main thing is to sharply plug the hole with something, and then screw in a new one. A little oil will, of course, spill out, but you can add it back. When installing a new solenoid, do not forget to lubricate the threads with sealant, if this is not done over time, oil will begin to ooze along the threads.
If previous checks did not lead to anything, there are several options left, namely:
- The mechanism for fastening the gear selection mechanism has failed;
- The fixing bolt has been cut off;
- The spring in the gearbox has broken.
The worst thing is that each of these three points requires mandatory dismantling of the gearbox, and this is already in the category of “serious repairs”, which is not always within the power of an ordinary driver, and it will take much more time than in the case of a rocker or lock transfers.
That's all I wanted to say! I hope I helped solve the problem. If after all the above manipulations and checks you still do not engage reverse gear, seek help from a specialist or go to a service station.
Lada Kalina lost all gears
- To the beginning of the forum
- Forum Rules
- Old design
- FAQ
- Search
- Users
good day.
Here I became the owner of a Viburnum 1117 in the “luxury” version. Year 2010, mileage 37 thousand km. (I took it from a good friend, I watched the car for several years and I am 100 percent sure about the incorrect mileage). I understand that there will most likely be one answer to what is described below - “an autopsy will show” and an autopsy will most likely
can’t be avoided.. But I’m just interested in the opinion. So, after several days of travel, when driving on a dirt road, it suddenly stopped turning on.
second gear. It feels like the lever doesn’t go as deep as it should and doesn’t lock. Either it is fixed
halfway and after releasing the clutch it returns to neutral. The rest of the gears were switched on without
There were no problems, no crunches, no extraneous noises. I reached my destination in 1st-3rd gears, then
When driving home on the asphalt, I decided to try turning on 2nd - it turned on. More problems with 2nd gear
It wasn’t there for a week - it turned on without problems when moving from 1st to 2nd and from 3rd to 2nd. My daily mileage is 50 - 70
km. The second coming of the “sore” came on Friday evening - while driving on the highway, I slowed down in front of the railway
moving, the lever in second gear is not fixed. ok, again 1-3, after a couple of km I entered the city -
the second one appeared. A similar picture appeared yesterday - I drove about 200 km along the highway, after one of the intersections -
the second one was gone, then I drove a couple of tens of kilometers and the second one appeared. another 200 km - the second one was where it needed to be. Now there is a second one too.
What are your assumptions? The drawstring is still probably unlikely and you need to open the box? The synchronizer receives
end? A very long trip is expected soon and it’s better to solve all the misunderstandings before it..
Source