The speed on the VAZ crashes: Causes and troubleshooting
Often, VAZ 2110 owners encounter a problem while operating the car: the first gear slips out . The reason for this behavior of the gearbox is its design features and the extremely poor condition of our roads, which negatively affects the wear of spare parts. And if the car loses second gear , this, in most cases, leads to almost a complete overhaul of the entire gearbox, so it’s better not to delay solving the problem!
However, first you should figure out: why the speed drops and where exactly to look for the reason for this behavior of the car?
The main cause of problems with the gearbox is excessive wear of the synchronizer, secondary shafts, looseness of the gearshift lever, or violation of the rules for fastening the gearbox and engine to the car body. It is better not to delay troubleshooting this kind of problem, because an inopportunely thrown gear can endanger not only you, but also other road users.
Repair usually comes down to adjusting the shafts, adjusting the rocker clamp; less often there is a need to replace synchronizers, and in very rare cases the flywheel needs to be replaced. If the problem is not solved immediately after it occurs, after a couple of thousand kilometers (and sometimes several hundred kilometers are enough), the box may become unusable and cannot be repaired, but only completely replaced. However, in general, the VAZ 2110 gearbox is quite reliable and repairable, and it will not be easy to bring it to the point of needing a complete replacement.
You can clarify the nature of the problem if you conduct a short test drive on a flat section of road with a high-quality surface. It is enough to drive along it at low speed and listen to the operation of the gearbox when changing gear. To simplify the task and speed up the work, it would be useful to have the help of a neighbor or friend, who, sitting in the passenger seat, will also carefully “listen” to the car.
We have more than figured out the question “ Why does the speed go out
In the case when the gear departure is accompanied by knocking, ringing or a slight grinding sound , the problem almost always lies in the box itself - looseness of the secondary shaft or wear of the synchronizers. This problem can only be solved in a well-equipped garage or technical station and with minimal experience working with gearboxes. Longitudinal play of the secondary shaft is usually eliminated by replacing the retaining rings and subsequent adjustment of the shaft; worn synchronizers must be replaced.
But if the speed comes out silently, then the cause of all the troubles lies in the slide: either clogging with foreign objects, or a displacement of the clamp, or deformation of the retainer ball.
If the problem has just discovered itself and the first gear goes out , and there is no opportunity to visit the workshop, you can try to correct the situation in a regular garage. Adjusting the rocker consists of loosening the clamp and then shifting gears in order, while monitoring the quality of gear engagement. You may need to do a few test runs during the adjustment process. Experienced craftsmen also advise using a grinder to deepen the grooves in the slide, which are intended for the locking ball, thereby increasing the reliability of fixing the lever in a given position.
But if over time you notice that the problem has not only returned, but has also worsened - namely, the second speed is falling out - then you can’t do without a visit to a specialist and a major overhaul.
So, now you know why the speed on the VAZ 2110 drops and how to eliminate this unpleasant and sometimes even dangerous drawback.
see also
Comments 23
First check the rod spring of the first and second gears, maybe it is broken and does not hold. If the spring is normal, then change the first and second gear clutches, also change the first and second gear synchronizers and a set of new bearings and seals so that in the future you will have peace of mind and a quiet gearbox
it’s not that complicated if you know what to change, what to change, just twist the nuts and twist it
I am doing exactly the same operation, I also had problems with the first one, I showed the box to a knowledgeable person, I told him to change the first clutch first and the synchronization of the first and second ones, and the stopper on the drive gear in the main pair fell apart because of this, there were problems, tomorrow I’ll put it together and write about the result of the operation )
Great! I will be waiting you!
In general, the following were replaced:
1. First speed gear assembly with synchronizer and clutch 2. Retaining ring for secondary shaft gear 3. Second gear synchronizer
Now about what happened - because the ring of the secondary shaft gear scattered (this is the gear that transmits torque to the 17-teeth differential ring on a VAZ 2110), as a result of which the gear itself was significantly damaged (chips), and most importantly, it shifted by about 2 mm, which pulled This resulted in a displacement of the first speed gear on the secondary shaft, as a result of which the clutch was not engaged.
Issue price: about 3.5 - 4 thousand rubles. for spare parts, I did everything myself according to the book
Wow! Quite expensive! Perhaps the coupling is expensive? And thank you for not forgetting to write back!
In general, the following were replaced:
1. First speed gear assembly with synchronizer and clutch 2. Retaining ring for secondary shaft gear 3. Second gear synchronizer
Now about what happened - because the ring of the secondary shaft gear scattered (this is the gear that transmits torque to the 17-teeth differential ring on a VAZ 2110), as a result of which the gear itself was significantly damaged (chips), and most importantly, it shifted by about 2 mm, which pulled This resulted in a displacement of the first speed gear on the secondary shaft, as a result of which the clutch was not engaged.
Issue price: about 3.5 - 4 thousand rubles. for spare parts, I did everything myself according to the book
And tell me, are the 1st and 2nd gear synchronizers the same/interchangeable?
I can’t answer this, they are very similar, I just came to the store and said what parts I needed.
And tell me, are the 1st and 2nd gear synchronizers the same/interchangeable?
And the symptoms were the following: - From the beginning, sometimes the first one would be knocked out - Then I held it with my hand while accelerating - Then, at the place where the first one should have engaged, there was just the noise of the gears barely engaging, if you press further, it seemed to engage, but when releasing the clutch, it was knocked out with a loud knock
Well, I have the same thing, only it doesn’t fly out when accelerating, only when starting off. Damn, I really want to take on repairs, but it’s already cold outside to do repairs, and there’s no garage. It's not even about the money. I want to learn myself, I also need to change the clutch along the way. Well, it’s clear in general, how does the box work now? Like new I guess?
Works great! The first one is a little difficult to engage due to new parts not yet developed, and surprisingly there is no howling, although I changed the secondary shaft gear on the main pair, I thought it would howl until it was used, but there is no silence, the speed is all right, I also advise you to change the oil seals along the way drives, it won’t hurt, but in the seals, shorten the springs a little, by 3-4 turns, so that they press better against the drives, I also replaced the release valve, there was not much noise, and the clutch was still not working properly.
Well, I have the same thing, only it doesn’t fly out when accelerating, only when starting off. Damn, I really want to take on repairs, but it’s already cold outside to do repairs, and there’s no garage. It's not even about the money. I want to learn myself, I also need to change the clutch along the way. Well, it’s clear in general, how does the box work now? Like new I guess?
It’s hard without a garage) I did it in all conditions in a warm garage on a lift
In general, the following were replaced:
1. First speed gear assembly with synchronizer and clutch 2. Retaining ring for secondary shaft gear 3. Second gear synchronizer
Now about what happened - because the ring of the secondary shaft gear scattered (this is the gear that transmits torque to the 17-teeth differential ring on a VAZ 2110), as a result of which the gear itself was significantly damaged (chips), and most importantly, it shifted by about 2 mm, which pulled This resulted in a displacement of the first speed gear on the secondary shaft, as a result of which the clutch was not engaged.
The first gear of the VAZ 2110 falls out
for those who are unclear. You can find it for 7.5. Probably, only from 7.5 you need to deduct the work of removing/installing the gearbox, the cost of synthetic oil - you will do these procedures with the new one. for 5 I think you won’t find a new one. + these 7.5 also included replacing the boot on the external grenade and a couple of other minor things
Opening the gearbox will show that the synchronizer has died or it’s simply time to change the fork with the rod, or maybe the retainer spring has simply burst. The legs of the fork are worn out or the owner simply bent it. The rod may have wear on the retainer holes. I won’t say anything about the price, I make it myself.
Changing the oil
According to the documentation, the lubricant component in VAZ 2110 engines and transmissions must be changed every 15 thousand kilometers or at least once a year.
So, we need to warm up the engine well and prepare the required oil and, preferably, a new oil filter, as well as the tools necessary for the job.
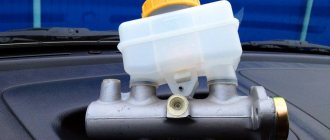
gearbox housing 2110
To drain the waste, you will need to unscrew the plug from the oil pan. Next, within 10-15 minutes, the oil is drained into a special container, which will need to be prepared in advance. Then the drain plug returns to its original position and is screwed tightly. Now you can replace the old oil filter with a new one (if necessary).
Now that the old oil has been drained, pay attention to its color and presence of inclusions. If the oil is dark brown in color and to the touch contains various types of inclusions such as metal dust or pieces of dirt, then the transmission will need to be flushed.
DON'T WASTE MONEY ON REPAINTING! Now you can remove any scratch from the body of your car in just 5 seconds.
For this purpose, special solutions are used, which are poured into the engine and gearbox before new oil. In this case, you will need to drive the car with such a solution for a short time and not quickly, five minutes along the garage will be enough, and then drain the mixture and the dirt that it has collected in the same way as described for the process of draining the “working off”.
In order to fill with fresh oil, you will need to remove the filler cap. In this case, from 3 to 4 liters of oil are poured into the engine, depending on the readings of the dipstick. Ideally, the oil level is between the min. marks. and max.
These marks are marked on the dipstick as the minimum and maximum values. Next, you will need to start the engine and wait until the oil light (or oil pressure light) goes out. After this, turn off the engine, check the oil level and, if necessary, remove excess or add more oil.
There are times when the light bulb just won't go off. In such cases, it is better to check the quality of the oil filter or replace it if it was not changed during the replacement process.
Messages 4
1 Topic by Ursadon 2015-02-01 18:21:12
- Ursadon
- Participant
- Inactive
- From: Novosibirsk
- Registration: 2014-02-15
- Messages: 83 Thanks : 25
- Auto: 21120
Topic: Resolved: 1st and 3rd gear slipping
There was a problem with the 1st gear falling out - if you don’t hold it at the start, it will fly out. Then the second one began to knock out. You can't hold it with your hand. An autopsy showed that the synchronous hub had died. As a result, I replaced: Rod 1-2 Fork 1-2 Locking rings 1, 2 Synchro 1-2 assembly
A week later it started to slip out of 3rd gear, and after another week - into 1st gear, you couldn’t hold it with your hand. The pillows are normal, I also installed a 5th mount - the engine sits firmly.
I myself understand that most likely the synchronizer has fallen apart again and an autopsy will show. However, has anyone had the same problem and how did you solve it?
Tomorrow or the day after tomorrow I’ll take it to a friend’s garage, I’ll take it apart
2 Reply from Goodfree 2015-02-01 22:40:02
- Goodfree
- New member
- Inactive
- Registration: 2014-06-18
- Messages: 82 Thanks : 8
- Auto: 21102
Re: Resolved: 1st and 3rd gears slip out
1st and 3rd gears were falling out. A friend changed the scene and became happy with life.
3 Reply from 7491cm3x 2015-02-01 23:08:44 (2015-02-01 23:09:56 edited by 7491cm3x)
- 7491cm3x
- Connoisseur
- Inactive
- From: Norilsk
- Registration: 2015-01-29
- Messages: 467 Thanks : 119
- Car: VAZ 2112 1.5l 16v
Re: Resolved: 1st and 3rd gears slip out
It was a little different for me: When changing gears, I had to press harder on the lever and shift more smoothly, otherwise the gear would not engage completely and would fly out. First gear could only be engaged through second. In addition, the lever itself dangled quite a lot and it was easy to miss between the first and third. Then I had little experience and I panicked, I thought the box was falling apart. Now I know that this is just a loose curtain. It was then that one master gave me valuable advice: the rocker is made in such a way that it practically never wears out, but there is one bolt on it that often unwinds - and right before my eyes this bolt tightens! That's it, the box works fine and I'm happy =)
Messages 9
1 Topic by ponkratov1993 2015-06-26 17:30:16
- ponkratov1993
- New member
- Inactive
- Registration: 2015-06-26
- Messages: 28 Thanks : 4
- Car: VAZ 21103
Topic: Resolved: Gear failure after repair.
Hello! I’ve been on the site for a long time, there was no need to register on the forum until a certain point. The moment has come. Registered and need help
I drive a VAZ 2110. Even after the purchase, the first and second gears crunched. I drove like this for almost 2 years until I decided to remove the box, study how it works, gain experience and, of course, repair it.
So. We drove the car into the garage, removed the box, and disassembled it. They did some troubleshooting. It was decided to change the first gear, synchronizer rings, clutch and hub assembly, second gear, retaining balls with springs, oil, gaskets. They changed it and installed it. Everything works, no crunches, but! First and second gears began to slip out. They fly off ONLY WITHOUT LOAD . Let's say you're driving in first gear, everything is fine, you squeeze the clutch to cross the rails, for example, you release the clutch, give the gas, and the gearshift knob has been in neutral for a long time. Those. on bumps, on sharp turns, it jumps to the neutral position on its own. A week later, it was decided to disassemble the box again to see if everything was assembled correctly, to see the condition of the fork and its stem. Surprisingly, everything is fine! Desperate, they began to look for the problem in a variety of places. Another annoying thing was that the gearshift knob moves with tension towards 5th gear, but in the direction of 1-2 it is very easy. The first and second gears can be engaged with one finger, they go there, let’s say, not difficult, but you can throw them into neutral with one finger without any effort at all. They don’t seem to be fixed... To prevent the bunch from hanging around like that, they changed the rubber “thing”, which is located directly under the gearshift knob; its “ears” still come off. They installed a new one: the second gear began to engage more clearly, it does not crash, but the first gear remained the same.. The linkage is adjusted normally.
Operating principle and troubleshooting of the VAZ 2110 gear shift mechanism
Like any car, the VAZ 2110 also has a gear shift mechanism. The VAZ gearbox is five-speed, activated by a lever located in the car's interior.
In order to be able to fix problems yourself, you need to understand a little about how exactly the switching mechanism works, which is why there are cases when some speed does not turn on or goes out. And also know how to fix it on your own.
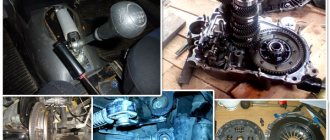
Gear knob
Clutch basket
Over time, the clutch basket fails on all cars with a manual transmission. Sometimes it’s due to wear and tear, sometimes the petals or the so-called “spider” break. Let me start, perhaps, with the “spider”, this is a mechanically fixed release bearing on several extensions (done like this on some VAZs), if the extension breaks, then it cannot be effectively fixed to the basket - the gears do not engage.
Next, the petals of the box break, or they become weakened. This leads to the fact that it is very difficult, almost impossible, to release the clutch disc. Therefore, the “speeds” do not switch – we just change the basket.
Well, the last wear and tear is the basket disk. It has a metal disk inside, and over time, especially from high mileage, wear forms there. When starting, the car will shake, and if the wear is very large, the gears may not shift.
In any case, we need to change the clutch basket.
Checkpoint diagram
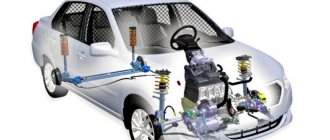
The gearbox design is as follows:
- To ensure gear shifting, the gearbox contains a primary shaft consisting of a gear block. They are constantly engaged with the drive gears from the first to the fifth speed (that is, those that are oriented towards driving forward);
- The secondary shaft is equipped with a drive gear for the main transmission, and it also has gear synchronizers that ensure forward movement of the driven gears. There are also bearings plus an oil sump;
- VAZ two-satellite differential, with the driven gear of the main gear attached to the flange of its box;
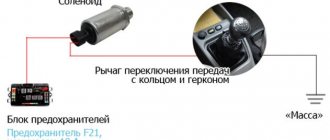
- the gearbox drive consists of a gear shift knob, a ball joint, a selector rod, a rod, gear selection mechanisms, and gear shifting mechanisms;
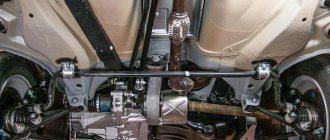
- Jet thrust is designed to protect the gearbox from flying out of gear. Its ends are attached to the support and the power unit.
What to do?
Next, we will look at several ways to solve the problem that can be done at home. The process of repairing a transmission is not such a simple task, so if you are not confident in your abilities, then do not try to do it yourself. It is better to contact specialists, because if you make even a small mistake, it can develop into more serious problems in the future.
Tools
Regardless of what kind of breakdown you have, prepare in advance all the necessary tools that you may need to disassemble the gearbox:
slotted screwdriver; a set of heads for unscrewing bolts; set of wrenches; mounting blade; hammer; pliers with thin jaws; Phillips screwdriver; Litol lubricant; jack; container for draining transmission oil from the gearbox; technological plug for the hole in your robotic gearbox.
A set of tools for dismantling and repairing the VAZ Priora gearbox
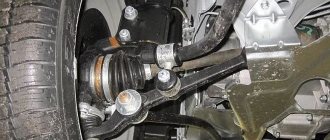
Removing the manual transmission
- First of all, before disassembling the gearbox, it is necessary to drain the transmission fluid from the gearbox. To do this, find an oil drain hole under the bottom of the vehicle, place a previously prepared container and unscrew the plug. Wait 40-60 minutes until the oil is completely drained. Now you can begin dismantling the gearbox.
- To begin, find in the cabin under the instrument panel the fastening nut of the clutch cable housing, which is connected to the pedal. It needs to be unscrewed. To do this, you will need an "8" socket or wrench. When the nut is unscrewed, remove the stop from the bracket.
- Then you need to dismantle the locking element and the housing of the wear compensation device for the driven shaft linings from the clutch pedal pin. To do this, take a slotted screwdriver and pry out the element.
- Now remove the plastic bushing from the pedal and then inspect it. If the bushing shows signs of wear or any physical damage, the bushing should be replaced. Before installing it directly, take “Litol” and lubricate the element so that it does not become dry.
- Next, dismantle the rubber seal of the clutch pedal cable sheath - it is located in the engine compartment.
- Then you need to remove the end element from the cable fork, after pulling it forward in the direction of travel of the vehicle.
VAZ Priora gearbox disassembled
Remove the nut securing the clutch cable end to the bracket, which is located directly on the gearbox. To do this, use a wrench set to “17”. Remove the cable end from the bracket hole. Then you need to remove the cable from the car. Now remove the plastic retaining plug and remove the wiring block from the speed sensor. Using a 10mm wrench, you need to unscrew the three mounting bolts on the front crankcase cover and remove it. Now you should support the engine of your vehicle with a reliable support or secure it using a device for lifting loads. Next, remove the nut securing the rear suspension support of the power device directly to the bracket. To do this you will need a key or socket on “15”. Now you need to remove the rear airbag upper limiting device. Unscrew the bolts securing the airbag to the vehicle body. Remove the cushion and its lower stop.
Adjustment
On a VAZ 2110, it is not so uncommon for the gears to shift poorly or get knocked out. A mechanism for adjusting the speed selection drive is provided specifically for this purpose.
Adjustment may be necessary if:
- the box was recently removed for repairs;
- one of the gears falls out;
- the speeds do not engage well or simply get knocked out when the car is moving.
If you have one of these problems, try making adjustments first. Its sequence:
- Under the bottom of the VAZ 2110, find and slightly loosen the nut on the bolt that tightens the clamp that secures the rod designed to control the gearbox;
- Use a screwdriver to slightly move apart the grooves in the end of the rod and the resulting gap on the clamp itself. This is necessary to ensure easy movement of the rod in relation to the gear selection rod. Place the rod in the neutral position;
- Release the shift knob from the cover in the cabin;
- Align the lever using a special template. This is done like this: install a template in the window of the rear speed lock bracket lining. After this, insert the lever axis stop into the groove of the template, pressing it without unnecessary force in the transverse direction;
- Then adjust the axial play of the rod in the rear direction, and its axial play by turning to the left;
- Install the clamp, not reaching a few millimeters from the end of the rod. Then tighten the clamp thoroughly with the bolt.
Repair work
If the adjustment does not give the desired result, you will have to work more carefully with the box. A common problem is knocking out the gears responsible for speeds 1 and 2.
When dismantling, make sure that each individual fastener is in good working order. The latches are springs, of which there are a total of three. The first one is the longest, it is responsible for speeds 1 and 2. The second is medium in size, and its prerogative is 3 and 4 speeds. The third detent is the smallest, and its “guardian” is fifth gear.
CPT diseases
VAZ 2110 owners often complain that the first gear is difficult to engage or crashes.
- often the synchronizer is to blame;
- perhaps the clamp spring has burst, the lever is hanging loose, the speeds are switched on as desired;
- The stem and fork may need replacement.
Another complaint is that second gear is difficult to engage and often gets knocked out.
Here you can suspect the main culprits:
- the second one flies out most often because the gear teeth do not mesh well with the clutch that turns on the speeds;
- The tips of the gear teeth and clutch are already worn out, so the speed is difficult to engage. If you don’t intervene, it will soon fly out;
- as an option, when it knocks out on bumps, the clutch dies.
Sometimes (albeit rarely) when the second one does not turn on well enough and falls out, replacing the retaining spring helps. If the speeds often drop out, some of them are difficult to turn on, which means that half-measures will no longer help - the box needs to be overhauled.
Poor activation due to the slider
First, let's look at why first gear doesn't engage well and the problem is with the transmission.
Often the problem with turning on the speed lies in the latch and slider. The appearance of a burr near the groove for the retainer on the slide can easily prevent the ball retainer from entering the groove. When moving the slider, the latch rests on this burr and cannot overcome it without significant effort from the driver. In this case, the gears come very close to each other, but do not engage, and the teeth of one gear hit the other.
In the future, such beating can lead to flaring of the teeth, and the impossibility of engagement will be due to the fact that due to this flaring, the teeth will no longer be able to engage.
Operating principle and troubleshooting of the VAZ 2110 gear shift mechanism
Like any car, the VAZ 2110 also has a gear shift mechanism. The VAZ gearbox is five-speed, activated by a lever located in the car's interior.
In order to be able to fix problems yourself, you need to understand a little about how exactly the switching mechanism works, which is why there are cases when some speed does not turn on or goes out. And also know how to fix it on your own.
Reasons for complete jamming
There are not so many reasons for a complete jamming of the gearbox. One of these reasons is the destruction of the teeth of a gear. Broken tooth fragments can become meshed with the teeth of other gears, which in turn makes the gears unable to rotate.
It is also possible that one of the internal bolts of the box may rupture or spontaneously unscrew. In this case, the bolt gets between the gears and blocks them.
To check whether the cause of jamming is the destruction that occurred inside the box, simply drain the oil from the box crankcase and check it. The fact is that if any element of the box is destroyed, a large amount of metal shavings will get into the oil.
Checkpoint diagram
The gearbox design is as follows:
- To ensure gear shifting, the gearbox contains a primary shaft consisting of a gear block. They are constantly engaged with the drive gears from the first to the fifth speed (that is, those that are oriented towards driving forward);
- The secondary shaft is equipped with a drive gear for the main transmission, and it also has gear synchronizers that ensure forward movement of the driven gears. There are also bearings plus an oil sump;
- VAZ two-satellite differential, with the driven gear of the main gear attached to the flange of its box;
- the gearbox drive consists of a gear shift knob, a ball joint, a selector rod, a rod, gear selection mechanisms, and gear shifting mechanisms;
- Jet thrust is designed to protect the gearbox from flying out of gear. Its ends are attached to the support and the power unit.
Gear shift drive diagram
Adjustment
On a VAZ 2110, it is not so uncommon for the gears to shift poorly or get knocked out. A mechanism for adjusting the speed selection drive is provided specifically for this purpose.
Adjustment may be necessary if:
- the box was recently removed for repairs;
- one of the gears falls out;
- the speeds do not engage well or simply get knocked out when the car is moving.
If you have one of these problems, try making adjustments first. Its sequence:
- Under the bottom of the VAZ 2110, find and slightly loosen the nut on the bolt that tightens the clamp that secures the rod designed to control the gearbox;
- Use a screwdriver to slightly move apart the grooves in the end of the rod and the resulting gap on the clamp itself. This is necessary to ensure easy movement of the rod in relation to the gear selection rod. Place the rod in the neutral position;
- Release the shift knob from the cover in the cabin;
- Align the lever using a special template. This is done like this: install a template in the window of the rear speed lock bracket lining. After this, insert the lever axis stop into the groove of the template, pressing it without unnecessary force in the transverse direction;
- Then adjust the axial play of the rod in the rear direction, and its axial play by turning to the left;
- Install the clamp, not reaching a few millimeters from the end of the rod. Then tighten the clamp thoroughly with the bolt.
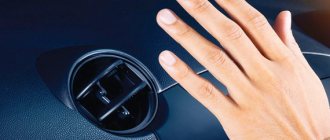
Setting the temperature of the supplied air from the heater
To fine-tune the control unit, it has an adjusting screw. To check the accuracy of temperature control, close all doors and windows and place a control thermometer next to the temperature sensor. Set the fan control knob to position A, and the temperature knob in accordance with the temperature measured by the control thermometer. If after 15 minutes the actual temperature in the cabin does not correspond to the set temperature, remove the controller from the socket and turn the adjusting screw clockwise to increase the temperature and counterclockwise to decrease it. After adjustment, check the operation of the control unit again. The control unit, temperature sensor with microfan, micromotor and heater damper position sensor cannot be repaired and must be replaced with new ones if they fail.
Malfunction of the interior temperature sensor and controller in VAZ 2110 2111 2112 cars
1. If the interior temperature sensor is working properly, the heater operation algorithm should be as follows: at maximum (red dot) - movement to open the damper; at minimum (blue dot) - movement to close the damper, other positions are fixed depending on the temperature set by the interior temperature sensor
To see if the damper is moving, it is better to remove the front deflectors; they have two plastic latches on the right and left (be careful not to tear off the backlight wire when removing). After removing the deflectors, you can clearly see whether the damper is moving or not, i.e.
air flows through the heater or not. In addition, you can check the resistance of the interior temperature sensor.
Checking the interior temperature sensor on VAZ 2110 2111 2112 cars.
Temperature characteristic - the resistance of the temperature sensor should be as follows: at 22 C - 20 Ohm; at 16 C - 25 Ohm.
Checking the controller with a heater (stove)
Checking the controller is as follows. We take out the controller from the socket. Turn on the ignition, turn the temperature knob and measure the voltage on the pink and brown wires (long controller connector). If the voltage changes (should turn on after changing the position of the temperature knob and turn off after about 13 seconds), then the controller is working, if not, then the controller needs to be changed.
Checking the micro-gearbox VAZ 2110 2111 2112
We check whether voltage is supplied to the micro-reducer. It's not that simple here. To get to it you need to remove the frill. Open the engine compartment. We unscrew the sound insulation, unscrew the two screws for 10 fastening the frill, remove the wiper drives and unscrew the three fastening screws that are under the round plugs and move away the frill, which prevents the washer hose from being completely removed. We see two connectors. One is a damper position sensor, and the second is a micro-gear drive, to which the brown and pink wires fit. We remove the connector, turn the temperature knobs and measure the voltage. If it changes, it means the wire is not frayed anywhere; if it doesn’t change, then it means the wire is broken somewhere in the harness. Checking the micro-gearbox. We supply 12 volts from the battery to the micro-gearbox connector. If it doesn’t spin, then definitely change it; if it spins, then the contacts in the connector have simply oxidized. To be absolutely sure that the gearbox is working, you can remove it by unscrewing the three screws that secure it (be careful not to drop the screws inside) and move the micro-gearbox to the right. Unscrew it, take it out and check it. If it's faulty, we buy a new one. There is a position sensor on the micro-gearbox. So don't worry during installation, you don't need to configure anything. The controller itself will set the damper according to the sensor.