Almost from the very appearance of the VAZ 2110, the same defect was often observed in new and old cars - leakage of brake fluid from the master cylinder (GTC), first into the vacuum chamber, and later to the ground:
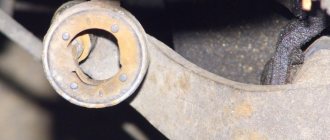
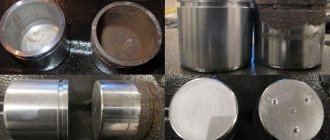
This was due to the fact that the elasticity of the working and collar cuffs (and even the BRTI) dropped sharply after -23 C, which caused brake fluid to leak from the reservoir and the GTZ. To do this, a channel hole was made on the GTZ to “drain” excess brake fluid from the cavity between the vacuum booster and the main cylinder:
In the photo the cylinder is lying on its side. There was nothing that could be done with rubber bands in the USSR (no such effect was observed on foreign cars), so AvtoVAZ calmed down with this compromise. As the years passed, the GTZ began to fail more often; 90% of them had problems with the collar cuff and the first working chamber. The distant contour was almost always intact. In my practice as a repairman, once on a VAZ 21074 the GTZ suddenly failed completely, upon opening it revealed “cut” cuffs and transparent needle-shaped crystals flowed out of the cylinder with the brake fluid, which cut the cuffs. It turned out that the client mixed brake fluid BSK and Neva. So here is an analysis of the reasons for 90% of the leakage of the “first” cuffs - this is dirt at the end of the gas turbine engine. How did she get there? Very simple - through the drain cut/frost hole.
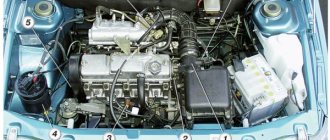
Problems that arise with the brakes while traveling are considered critical and must be corrected immediately. The culprit of the malfunction is often the main cylinder, installed in the engine compartment and rigidly connected to the pedal. To find out the cause of the breakdown and repair the unit yourself, you need to know the structure of the brake master cylinder (MBC) and its principle of operation. During the diagnostic process, it is necessary to distinguish and filter out problems with other elements of the system.
How to check the fuel fluid level?
By looking under the hood, where a special tank is located, you can check the level. The tank is made of translucent plastic, so it is easy to determine by the minimum and maximum value marks whether the brake fluid has left or remains in the original amount. In case of topping up, it is better to familiarize yourself with the car's instructions in detail: in some brands that have ABS, bleeding of the brakes is required.
If you do lose brake fluid, you should first understand the reasons. Under no circumstances should you continue driving.
How to check the GTZ? Signs of master brake failure
The operation of any vehicle with a faulty brake system is prohibited, so it is better to detect the first symptoms before they turn into a full-fledged breakdown.
The brake master cylinder (MBC) was called “main” for a reason; a lot depends on its operation, for example, how effective braking will be when you press the brake pedal. The master or master cylinder is located under the hood and is connected to the brake pedal.
The tank is cracked - what to do first?
Some motorists mistakenly begin to dismantle the entire brake assembly. Calmness and a visual inspection are the first step towards a successful repair. Wet marks and smudges indicate a decrease in the level of the substance. If a crack is detected, experienced car owners advise replacing the tank immediately - sealing it will not help. What to do if an incident happens on the route?
Nuances of repair
O-rings require special attention. The time the rings are in isopropyl alcohol should not exceed twenty seconds, after which they should be dried immediately using a compressor.
The surfaces of the mirror, as well as the piston elements, must be completely clean and free of rust. Every disassembly and repair of a faulty brake master cylinder must be accompanied by replacement of the O-rings, even if they are in good condition. The cuffs of the device also require attention; if they are swollen and frayed, they must be replaced.
After all, it is necessary to check the elasticity of the piston springs; this should be done under load. The length of the spring under load should be 39.01–45.9 N (3.8–4.8 kgf) - 41 mm, with another option the following indicators should be 82.01–99.48 N (8.35–10 .15 kgf) – 21 mm. When free, the spring should have a length of 59.8 mm. If the springs do not have such indicators, then they must be replaced.
First aid when a crack is detected
The reasons why brake fluid leaves the reservoir can be different. This may occur as a result of the machine hitting an obstacle. The car service is far away - what should I do? Repairing a crack in the path is only possible to continue moving. Upon arrival at your destination, you will have to purchase a new tank. Glue doesn't help in most cases. Craftsmen recommend using a regular 40-watt soldering iron, slightly extending the rod and slightly loosening the top screw. A piece of plastic tape similar to the body of the tank is cut off. It is unsoldered and used as a patch. First you need to go over the crack with a soldering iron, then use a strip of prepared plastic.
What is GTZ?
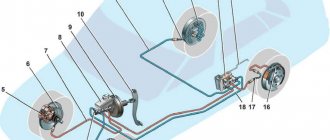
The main brake cylinder consists of a metal housing, which has holes for the supply of brake fluid (BF), a pedal rod and an expansion tank, which is located at the top. And also 2-3 pistons with seals and return springs, guide bushings and an end cap with a gasket.
The expansion tank is necessary to maintain the reserve, as well as excess fuel fluid. Inside, the GTZ has 2 cylinders with separate pistons located on the same axis. The edge of the metal case is tightly closed with a screw plug, and on the opposite side there is a flange for attaching to the vacuum booster. The brake pedal is attached to the first piston by means of a rod. The brake circuits of the front and rear wheels in the form of tubes are attached to the lower holes of the GTZ housing.
Replacing the tank on a VAZ-2109
The algorithm for replacing the tank is simple. The car must be washed outside and in the engine compartment. This should be done manually, avoiding moisture getting on the pads, starter, and sensors.
Then you need to jack up the car and clean the threaded connections that you will have to deal with. By visual inspection, you can recognize where the brake fluid goes. The reasons for this trouble will also in most cases become clear.
By unscrewing the nuts and disconnecting the cover wires, a person gains access to the tank, which must be removed.
Important advice from experienced car owners! To loosen hose clamps, it is better to unscrew the bolts using pliers.
Tools
To repair the VAZ 2110 brake master cylinder, you will need the following tools:
- Pliers;
- Screwdrivers;
- Keys 13, 15, 17;
- Socket wrench 17;
- Socket wrench 13;
- Special purpose wrench for brakes 10;
- Brake fluid;
- Some components: plug fittings; rubber caps.
After this, you can begin repairing the VAZ 2110 and replacing parts.
To replace and repair a damaged master brake cylinder, you need to remove it from the VAZ 2110; to do this, you should carry out several steps:
- Carefully disconnect all pipelines from a part such as the main cylinder;
- Disconnect the block equipped with wires from the emergency brake fluid indicator. They are connected by terminals;
- It is necessary to prevent fluid leakage and contamination of the mechanism; to do this, it is necessary to cover the openings of the unit and pipelines;
- Next, you need to remove it along with the tank; to do this, unscrew the fastening nuts that secure it to the vacuum type amplifier;
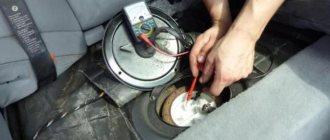
- After the VAZ 2110 fluid level sensor is removed, you need to drain all the brake fluid from the cylinder and basque;
We can only add to this that if there is no great need, you should not remove the reservoir from the master cylinder. To completely disassemble it, you need to remove the tank. Assemble and then install in place in exactly the reverse order.
Before you begin assembling the unit, all components must be washed with purified brake fluid or isopropyl alcohol. After this, everything must be carefully dried using a compressor, and then each of them must be wiped with a dry, clean cloth.
The main thing is not to get mineral oils directly or indirectly on the components; it is also dangerous for the front components of the main type brake cylinder, kerosene and diesel fuel to get on them.
Clutch hose repair method
Experts say one of the common reasons why clutch brake fluid has leaked is a damaged hose through which fluid circulates from the reservoir to the clutch.
Effective replacement tips:
- You need to remove the tank itself by removing the clamp from below.
- You should purchase a new hose, preferably red.
- You need to pull out the damaged hose carefully so as not to accidentally break off the plastic fitting.
It is important not to allow fluid to leak onto the fender or paint. After removing the tank, you should rinse it with water; it is also recommended to replace the clamps. We install the hose and tighten it without much effort. Don't forget to tighten the nuts as well.
Experts say that the hose often wears out. It must be checked periodically and, if damage is detected, replaced with a new one.
Emergency situation: how to get to the repair site without brake fluid available
Of course, the best option in these conditions is to transport the car by tow truck. Far from home, it is more convenient to find the nearest gas station, buy an analogue of the filled brake fluid and continue on your own. I repeat, the manufacturer does not matter, the identity of the bases is important. Referring to extreme circumstances, when the brakes no longer work and the pedal fails, you won’t be able to get away with just topping up - the system will have to be pumped without it.
Once upon a time, there were tips on the Internet to use oil, soapy water and alcohol for topping up. So, it is categorically not recommended to adhere to them: alcohol and oil, be it engine, transmission or power steering, are partly compatible only with mineral brake fluids. Glycolic additives like these can only do harm. Well, as for soapy water - yes, it works and is also harmful - corrosion begins, and flushing the brake system after it is not a pleasant pleasure.
Brake cylinder leak
A common cause of brake fluid loss is a leaking cylinder. The occurrence of a problem is judged by the stain left under the vehicle. Finding out the reason is easy.
- You will have to remove the wheel and carefully inspect the brake disc.
- The calipers should be checked for leaks.
If you have a brake drum system, there is an urgent need to remove the drums. The problem involves wear of the rubber seals. Especially often, such troubles await residents of regions with severe frosts.
No fluid flows from the Priora master brake cylinder
- To the beginning of the forum
- Forum Rules
- Old design
- FAQ
- Search
- Users
We pumped the brakes here with a string. Damn where to dig, the rear right circuit is not pumped (for the life of me) All the rest were pumped normally. I turned the spool completely (one fig barely drips, the brake pedal does not go down all the way) very rarely, for unknown reasons, the carrion still fell through!, but the next time pumping everything returned to its place again (i.e. something like brake fluid dripping)
the question is how to diagnose the gas turbine engine correctly and how to check the line
Insert a screwdriver under the sorcerer's rod and you will be happy
Exactly, this is a type of protection if the circuit is leaky, the brake fluid will not all leak out and you can drive in emergency mode.
We pumped the brakes here with a string. Damn where to dig, the rear right circuit is not pumped (for the life of me) All the rest were pumped normally. I turned the spool completely (one fig barely drips, the brake pedal does not go down all the way) very rarely, for unknown reasons, the carrion still fell through!, but the next time pumping everything returned to its place again (i.e. something like brake fluid dripping)
the question is how to diagnose the gas turbine engine correctly and how to check the line
Well people, you give it. If you carefully read the Kama Sutra, you can find out that it is the valve in the rear brake pressure regulator that is triggered. In general, it should be triggered in the event of a failure (depressurization) of the right front-left rear circuit, but in practice, in the case of a jamming of the central bushing (I don’t remember what it’s called correctly), or for reasons leading to lower brake pressure on the other side of this bushing (read: in the front-left-rear-right circuit, this valve is activated, which in this case works as a pressure limiter in the rear-right. brake cylinder, and pressing the pedal harder is useless. This most likely happens if the car has not been used for a long time. In my case, everything was cured after intensive two to three weeks of use. I was already getting ready to buy a new regulator, but I decided to check it one more time before going to the store, but the trip to the store was postponed. In general, you should blame the regulator only if you know for sure that the front ones brake equally (like a normal GTZ). The advice to drive in a screwdriver will only give you the opportunity to bleed it; when you remove the screwdriver, the rear-right one will slow down the weakest of all.
That's how it is!! there is truth in your words! Where did you get such a cool Kama Sutra... for three years I couldn’t solve this problem... I couldn’t understand why one RIGHT REAR WON’T PUMP. and the left rear pumps into the lungs!! Damn bitch regulator!! I’ll buy a new one, how can I seal it damn it -))) so that it doesn’t turn sour again!! -))
and in my case, my right rear was not pumped even with a screwdriver.. and therefore the ENTIRE CONTOUR left front right rear brakes WORSE.
In short, the sorcerer will replace him on the weekend.
If the STAND showed weak braking of this CONTOUR, then IMHO the reason is in the GTZ, because the “sorcerer” does not affect the front brakes. In my case, only the right rear was weak, the front was one to one, which indicated the serviceability of the GTZ, I think SO.
everything seems to be correct but... my opinion is the following. (although I don’t know the workings of the brake circuit very thoroughly, but I at least became familiar with it)
So my thoughts. THE CIRCUIT MAY BRAKING WORSE if it is impossible to bleed the rear right wheel due to the fact that there is AIR IN THE CIRCUIT. and the piston stroke of the GTZ circuit is partially spent on compressing this air instead of putting pressure on the front and especially the rear pads.
Source
About the consequences
There can be many answers to the question of where the brake fluid goes from the reservoir. It can go into the vacuum muffler. This indicates a high percentage of wear on the master cylinder piston cuff. For simple rubber there is nothing terrible about this. Another issue is the accumulation of the product in the form of a dangling layer. This will result in an increase in resistance at high diaphragm speeds. There is an opinion that such a situation simply kills the diaphragm. By changing the cuff, movement will become safe. Sometimes you have to install a repair kit while disassembling the vacuum unit.
Some motorists ask whether brake fluid can leak into the engine. Experts give a negative answer. She can only get there if she confuses the canisters with liquid.
Topping up brake fluid: do's and don'ts
The general automotive rule, top up what you put in, is relevant for all technical fluids, including brake fluids. If you don’t remember the brand of the compound you poured, and you don’t have any maintenance records with you, welcome to the world of Department of Transportation standards.
According to DOT regulations, brake fluids are classified by boiling point and viscosity. The requirements are important - the brake fluid must not boil: when the brakes heat up excessively, gas bubbles form. They compress and the pedal falls, leading to system failure. Viscosity is also clear: brakes must be equally effective in cold and hot weather.
So, there are four types of brake fluids:
- DOT 3 – low-speed equipment.
- DOT 4 – civil small cars with disc and drum brakes.
- DOT 5.1 – sports and civilian modifications with “discs” in a circle.
- DOT 5 – racing cars.
A numerical explanation of the differences between these four products is provided by FMVSS No. 116, an excerpt from which is given in the table. To understand what can be mixed with what, you need to understand the differences in chemical composition.
The structure of brake fluid is similar to motor oil - it is a base, which can be mineral, glycol, silicone, + additives, additives, dyes. The conversation about what kind of engine oil to use for topping up came up the day before. The conclusion was this: if you mix products from different manufacturers with each other, then only if the base and viscosity indicators are 100% similar. The same analogy can be drawn with the braking system. But first, let’s look at the chemical composition of each DOT:
- BSC – mineral base (castor oil and alcohol in a 1:1 ratio).
- DOT 3,4,5.1 – glycol base (chemical compound based on polyhydric alcohols).
- DOT 5 – silicone base (silicon-organic polymer products).
Considering that the vast majority of cars use glycol brake fluids, it is good practice to have a sealed bottle of DOT 4 or DOT 5.1 with you. Why sealed? The fact is that already in the open state, the technical fluid absorbs moisture from the atmosphere, which is why after a year it becomes unsuitable for use.
If you are a fan of retro technology, then keep in mind that you cannot add glycol to mineral liquid. However, it is also prohibited to fill the empty brake lines of an old car with glycol fluid: the cuffs will swell, and clots will form from the remains of the “mineral water”.
Symptoms of defects in the master brake cylinder
Rubber seals on the brake master cylinder cause leaks. They cause penetration of the vacuum booster. In such a situation, replacing the cylinder will help. If a malfunction occurs with the cylinder, the brakes fail completely or do not work correctly. The main challenge for this part is the aging of the brake pads. Diagnostics involves an initial warning to the driver using indicators on the dashboard and checking the pressure in the system. What does the motorist see as a result of the problems that have arisen?
- Pressing the pedal, the owner of the steel horse feels its slow stop. The point here is the loss of tightness of the pistons or wear of the cuffs.
- A short pedal stroke means a high concentration of brake fluid; it has nowhere to go due to a clogged hole or a swollen rubber seal.
- There is a failure of the pedal: the matter is in the liquid rushing into the expansion tank.
Brake fluid leaks: when is this considered normal?
Normally, the fluid level in the reservoir above the master cylinder should drop very slowly and be restored to its previous value after replacing the pads.
In total, if we neglect the hygroscopic tendencies of the overwhelming number of “brakes”, then the volume of technical fluid (working fluid) in the system should not change. A temporary decrease in brake fluid level is associated with pad wear. To be precise, the brake pistons in the calipers and cylinders move out as the friction material wears, increasing the volume of the entire system. Since no one has added brake fluid, its level in the reservoir drops accordingly, while the amount remains the same. In total, a constant gap between the pad and the disc/drum maintains the sharpness of the brakes as the pads wear, and the level usually fluctuates within the permissible gap - between the MIN and MAX marks.
Before installing new pads, it is customary to press in the pistons in the calipers. Similar work must be done with the drum brake cylinders. And now, with regard to the brake fluid level, we see a completely opposite picture: it is rising and this is absolutely normal. So it turns out that there is no need to add fluid to a working system, provided that its level is above the minimum.
Secrets of bleeding brakes
To complete the repair process, the brake system needs to be bled. You can do the work yourself or contact the service.
- Fill the reservoir with brake fluid up to the max mark.
- The wheel brake fittings need cleaning.
- Take a separate container and a hose attached to the fitting.
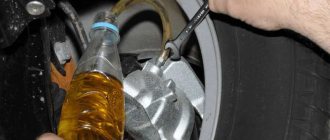
The assistant sitting behind the wheel must press the gas pedal evenly and firmly three times. When pressing the fourth time, the pedal does not need to be released. At this time, you need to unscrew the fitting and look at the outlet of the fuel injection fluid. Bubbles in the stream will indicate air in the system. After the air is released, the fitting is wrapped, and the process is repeated on another set of wheels. Observing all pumping rules, it is impossible to be completely sure of the reliability of the result. Experienced car enthusiasts recommend not to neglect the services of service stations.
When making repairs yourself, experts advise tilting the car slightly towards the wheel in question. The air will rise upward and reach the threaded valve sooner. Lightly tapping the caliper optimizes the process. In addition to the above-mentioned bleeding technique, there is a technique for adding brake fluid to the supply reservoir. This is difficult to do and only experienced vehicle owners can do it. This procedure is not feasible for machines with return pressure control valves.
If handled incorrectly, there is a high risk of causing new breakdowns and having the opposite effect - the appearance of air in the brake system in even larger quantities. Professionals will come to the rescue; they will complete the work competently within the optimal time frame.
Sources of brake fluid leaks
Brake fluid may leak from one (or several) elements of the brake system. May leak:
- brake hose;
- brake pipe;
- tank;
- cylinders;
- places of fastening and connection of the components of the assembly.
Crack in the tank
The fluid level may drop due to mechanical damage to the reservoir. This malfunction is easily identified by a simple inspection: oil leaks are visible. The tank will have to be replaced with a new one, do not be greedy and do not try to solder it.
Depressurization of the brake line
One of the most dangerous breakdowns. It manifests itself simply: when pressed, the pedal goes to the floor almost without resistance, and the car does not noticeably slow down. If this happens to your car, stop immediately. Use the handbrake or use the engine brake. You cannot drive with such a malfunction; you risk your life.
Damage to the brake hose
Hoses are made of rubber, so sooner or later they will crack. This can be determined by carefully feeling the hose. It must be dry (without leaks of fuel fluid), without damage or tears, and be easy to bend. If something is wrong, the hose is changed.
The hose may fly off the fitting - this is another reason for brake failure. To repair, either put it in place, tightening the clamp tightly, or replace it with a hose of smaller diameter.
Clogged hoses and pipelines
Using low-quality brake fluid, neglecting daily car care and violating maintenance schedules can lead to blockages in the main pipeline. Eliminating this malfunction will take a lot of effort and time, so don’t skimp on the TZ and don’t forget about prevention.
Loosening the fastening
All transitions and seals between components in the braking system must be as tight as possible, otherwise leakage of fuel fluid and air leaks cannot be avoided.
The main brake cylinder is faulty
Most often, seals fail. It's easy to change them even yourself. A malfunction will be indicated by leaks of technical fluid.
Violation of the integrity of the brake cylinder
The absence of traces of fuel fluid on the master cylinder does not necessarily indicate its serviceability. The fluid does not always flow outward; it can go inward, into the brake booster. It is more difficult to identify this failure; you will have to remove the cylinder. In this case, the unit must be replaced, we are not talking about repairs.
The wheel brake cylinder is faulty
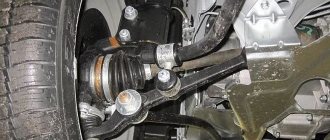
If you see traces of fuel oil on the asphalt near one of the wheels, most likely the reason is the wear of the wheel cylinder seal. To replace a defective seal, you will have to jack up the car, remove the wheel and caliper, and only then begin repairs. If you do not consider yourself a car repair specialist, it is better to turn to professional car mechanics.
How to get to a service station if brake fluid leaks on the road
If you notice that the brake pedal is sinking, this indicates a brake fluid leak. In this case, the corresponding indicator signals an emergency situation. If you see such a red icon on the dashboard, you need to take immediate action, otherwise the trip may end in an accident.
If you see a red brake light while driving, you should stop immediately. Look into the reservoir with the brake fluid, if you see that its level has dropped below the minimum, you have found leaks of brake fluid, it must be topped up. If you do not carry suitable solutions with you, you will have to drive to the store. It is possible that over the next year or longer the warning light will no longer bother you.
But if after a few days or even weeks the indicator again begins to signal a malfunction of the brake system, and you again observe leaks of brake fluid, then the matter will no longer be limited to just topping up. The reason may be wear on the caliper cylinder pads; brake fluid leaks through these places. You may find brake fluid leaks under the clutch cylinder, which means this is a problematic system that needs to be inspected and repaired.
If you find that the level of fuel fluid in the reservoir is rapidly falling, and no brake fluid leaks are visible, it means that the brake booster has broken down - a defect has formed in the membrane, through which liquid is leaking into the large container. The system will have to be repaired at a car service center. Call the technician and find out what parts are needed. Then you will need to place an order for parts and schedule a repair date.
It happens that during the next inspection, brake fluid leaks are discovered on the rear wheel. What to do in this case?
A leak on the inside of the wheel indicates that the brake cylinder seal has torn. The caliper may also come out of the cylinder or the pads may wear out badly, and this also leads to intense leakage of brake fluid. If the tank turns out to be empty, in order to get to the repair shop, you need to pour at least some liquid into it. This could be vodka; it is preferable to water in winter because it will not freeze. You can also pour oil, it will not boil under pressure. In extreme cases, you can pour water. If you urgently need to repair your car, then there is no choice.
For example, you diluted soap in water and poured this mixture into the tank to the top, but when you press the brake pedal, the solution suddenly begins to flow away. A few presses on the pedal will completely empty the barrel, and there will be brake fluid leaks under the car.
How to be in this case? There is only one way out - call a tow truck. The brake system of your car does not work at all; you cannot drive such a car. Such a vehicle cannot be towed. But what if you are, for example, in a deep forest or on a deserted highway, and you can’t reach a tow truck?
In this case, you can proceed as follows:
- fill the empty tank as completely as possible;
- jack up the wheel on which the cylinder is faulty and brake fluid leaks are detected;
- remove the wheel;
- find a piece of rubber from a tube, an old tire protector will do (you can look along the road or in a landfill). As a last resort, you can use a knife to cut off a small piece of the wheel tread;
- unscrew the brake pipe;
- Place a cut piece of rubber on the place where it is attached, blocking the hole;
- put the tube in place.
Problem: after replacing the brake fluid on the car, the pedal became soft and uninformative
By changing the brake fluid, the car enthusiast fulfills one of the requirements of routine maintenance on the car. Namely, replace the fluid after two to three years. The manufacturer confidently states that if this is not done, it will be bad. In fact, the emulsion is hygroscopic and can “grab” moisture from the air during this time. Of course, this will negatively affect the functioning of the system as a whole.
Safety comes first - we change. We fueled everything up, tightened it up, started it up and drove off. And then we notice that after replacing the brake fluid, the pedal became soft and uninformative. What to do? There are several reasons for this problem floating around the web:
- The system is filled with low-quality components.
- The replaced elements of the assembly did not get used.
- The system is poorly pumped.
The first feature is more often a myth than a reality. The second one can appear when replacing the pads due to the fact that they have not gotten used to the disk and are pressed into the grooves of the groove. There are two ways out - wait 900-1,000 km until everything breaks in or sharpen the discs to get an instant effect. However, most often the problem of a soft pedal is associated with other problems:
- The main brake cylinder is not bled.
- The brake force distributor between the rear and the front is not pumped (sorcerer) - this does not apply to all cars.
- One of the components of the assembly is leaking (fuel fluid will leave the tank).
- One of the rubber hoses is inflated.