In what cases will it be necessary to remove the wing?
The front fenders of any car, including 2114, are one of the most vulnerable elements of the body. It is they, along with the front bumper, that are primarily subject to mechanical damage as a result of the car being involved in various accidents. In addition, due to the extensive treatment of the road surface in winter with salt and chemicals, the parts begin to rust intensively.
In some cases, it is not necessary to replace the element with a new one; it will be enough to restore it.
Typically replacement occurs when:
- Severe mechanical damage as a result of an accident.
- Mechanical wear as a result of long-term use. This refers to numerous small mechanical irregularities that can no longer be completely eliminated by straightening.
- Numerous extensive areas of corrosion. In particularly advanced cases, it “eats” through the metal.
The procedure for dismantling hanging elements
Structurally, the wings of the car in Samara are closed. Before replacing the unit, it is necessary to dismantle the body parts that are directly connected to the element. These include:
- cladding or molding;
- fender liner left, right;
- front bumper;
- threshold.
The cost of work in a car service starts from 5,000 rubles, the price is associated with the difficulties in dismantling all the mounted body elements. In addition, in 40% of cases the thresholds also have to be changed, since after a thorough diagnosis the parts turn out to be worn out by more than 50%.
The procedure for independently dismantling the facing linings step by step:
- Remove the front piston that secures the molding. To do this, carefully remove it with a screwdriver so as not to damage the paintwork.
- Move the molding a little to the side, remove another clip, which is located at the back.
- Remove front molding.
The procedure for dismantling the threshold:
- Using pliers, remove the clip that secures the upper part of the sill.
- Use a screwdriver to remove the 5 top screws that hold the car sill in place.
- Remove the 3 bottom screws that secure the outer part of the threshold.
- Remove the outer threshold panel.
Correct disassembly of the mudguard and fender liner on the Lada Samara step by step:
- Using a socket wrench, remove the two screws that secure the mudguard to the fender liner.
- Unscrew the nut that secures the rear part of the fender liner to the car body.
- Remove the pressure plate and two washers.
- Using a screwdriver, remove the three screws located below; they hold the fender liner to the bumper.
- Unscrew the bolt using a socket wrench; it secures the fender liner to the bottom of the mudguard.
- Use a socket to remove the two bolts that secure the fender liner at the very top.
- Remove the fender liner.
How to remove the wing on a VAZ 2114: consider the subtleties of the process
The cars coming off the VAZ assembly line were distinguished by fairly durable body elements. This was explained by the fact that domestic designers, taking into account the operating features of such machines, made every effort to give all components characteristics that ensure uninterrupted operation for a long time.
Over time, the development of technology has made it possible to use new materials that significantly reduce the overall weight of the car. However, this point had some negative impact on the strength of body elements.
So, for example, on a VAZ 2114, the front wings are the parts that are most often damaged during operation.
The causes of such damage may be:
- car accidents;
- consequences of unsuccessful parking maneuvers;
- natural wear and tear, etc.
Wing of a VAZ 2114
That is why car owners of such models will not be superfluous to learn how to change the front fender of a VAZ 2114. This information will allow you to easily repair the car with your own hands, as well as competently carry out its maintenance.
Regardless of what was the reason for removing the wing (its straightening or replacement), it is important to properly prepare for the procedure.
When the VAZ 2114 wing requires replacement
- As already noted, the impact on the wing of the environment and moisture, especially in winter, when the roads are sprinkled with salt and all kinds of reagents, becomes extremely destructive.
In order to prevent the wings and body of the car from reaching a critical state, it is necessary to carry out anti-corrosion treatment on the VAZ 2114 in a timely manner.
In order not to spend money on repairs in a car repair shop, an experienced car owner, if he has the tools, can change the wings of a VAZ 2114 with his own hands. It is better to replace the front wing of a VAZ 2114 in a garage, following the instructions.
To perform this procedure you will need a tool such as:
By the way, the price for an original VAZ front left fender with article number 21140840301100 or a front right fender with article number 21140840301000 will be about 1,800 rubles. The cost of the rear right wing with article number 21090840401400 or the rear left wing with article number 21090840401100 will be about 2100 rubles.
Prices are indicated for spring 2022 in Moscow and the region.
Preparation for wing replacement and necessary tools
First you need to prepare the car itself. To do this, he should drive the VAZ 2114 into a technical pit or overpass. If this is not possible, then it will be enough to simply lift it with a jack on the side from which the wing will be replaced and securely fix it in this position. Next, you need to remove the wheel and remove all interfering parts. These include:
- front bumper;
- facing linings;
- thresholds;
- wheel arch liners
This is interesting: Do-it-yourself replacement of optics, headlight bulbs, side lamps on a Hyundai Solaris
Before removing the bumper, you need to disconnect the contacts of the fog lights. To do this, simply remove the terminal with “minus” polarity from the battery. Such a simple procedure will significantly reduce the risk of damage to all vehicle electronics, saving the owner from unnecessary financial costs.
Front bumper
For independent work you will need the following materials and tools:
- socket wrench with 8, 10 head;
- flat-head screwdriver;
- ratchet, extension;
- rags;
- pliers or pliers;
- knife;
- anti-corrosion lubricant WD-40;
- new part.
It should be noted that in the process of replacing a wing, not all of the above tools may be needed. It will be enough for an experienced master to have only a few of them on hand. However, if this is your first time deciding to remove the wing yourself, then it is better to prepare the entire kit so that during the work you will not be distracted by searching for the missing tools.
After completing all the preparatory work, you can begin replacing the old VAZ 2114 wing and installing a new one.
Algorithm of actions for removing and replacing the front wing
Initially, you need to carefully remove the front piston using a screwdriver. As a result of this operation, the molding will come into a movable state. It must be moved to gain access to the rear piston. By prying the front and rear fixing parts, the molding can be completely removed. Then you need to remove the upper part of the threshold. In the VAZ 2114 and 2115 models it is secured not only with pistons, but also with eight screws. Five of them are attached to the top, while the remaining three fix the lower part of the part. By unscrewing all the fasteners, the upper part of the threshold can be easily removed from the car body.
The next step is to remove the fender liner. Since the wheel has already been removed, there is excellent access to all fastening elements. There are several of them. Two bolts with washers responsible for fixing the mudguard, and a nut with a pressure plate connecting the rear part of the fender liner and the car body can be easily removed using spanners or wrenches. Next comes the work with a screwdriver. With its help, you need to unscrew the three screws responsible for fixing the fender liner with the VAZ 2114 bumper. Only two bolts remain that secure the fender liner to the upper part of the wheel arch. They can be easily removed with a wrench.
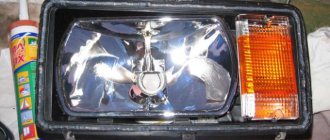
Removing the turn signal cartridge is the next step on the path to replacing the front wing of the VAZ 2114. Simply unscrew it and pull it towards you. After completing this operation, access to a pair of locking petals will open. By clicking on them, you can easily dismantle the turn signal. Having completed this sequence of actions, you need to find the block of the wires responsible for connecting the headlight unit with the turn indicators. By pressing the latch, disconnect it from the lighting element. The wing can be installed by performing the above steps in reverse order.
It is highly advisable to treat the replacement area with an anti-corrosion compound. This operation will make the joint more durable and protect the car from wear of parts.
Author: Ekaterina
How to remove the rear wing
The rear wing on the VAZ 2114 is attached to the load-bearing parts of the body by spot welding. Dismantling and replacement require skills in welding and the presence of a semi-automatic welding machine to install a new element. If the rear fender has a significant dent from an impact, the metal will need to be pulled out before dismantling and cutting. Dismantling process step by step:
- Prepare the car: remove the battery, bend the carpet.
- Empty the trunk.
- Unscrew the rear bumper and disconnect the headlight unit. If the right rear is to be replaced, then the fuel tank must be removed.
- Remove the seal.
If you are making a cut for a repair insert, then you need to remove the side glass: pull out the rubber seal and press out the glass. During installation, the seat is processed and the old sealant is cut out.
- Using a thin chisel or machine, cut out the old part, retreating 1-1.5 cm from the joint.
- Drill out the welding points with the frame cross member.
- Disconnect the part.
- Cut off the remaining metal, grind it, straighten the edge.
- Attach a new part, secure with spot welding, check the gaps.
- Weld by contact welding, in increments of 4-5 cm.
At the final stage, the part is primed, treated with anti-corrosion agent and painted to match the body color.
Features of replacing the rear wing of a VAZ 2114
It should be taken into account that the process of replacing the rear wing of a VAZ 2114 is much more difficult and complex, and requires the necessary specialized tools (for example, a welding machine) and highly qualified plumbing work.
You can do your own VAZ repairs only if you understand body work and know how to work with a welding machine. When you encounter it for the first time, you are unlikely to be able to perform high-quality repairs.
Below is a DIY guide for replacing your rear fender.
- We remove unnecessary and flammable items from the trunk.
- Unscrew the bumper.
- Disconnect the headlights.
- Remove the seal.
- We remove the fuel tank if the right wing is to be replaced.
- We dismantle the glass of the rear wing, it is removed like a windshield.
- Using precise movements, using a thin chisel or a grinder, cut along the wing, adhering to the joint indentations:
From the rear wheel arch along the bend, departing from the edge of the wing 12–15 mm; from the floor of the spare wheel (or fuel tank) along the bend, 12–15 mm away from the edge of the wing; from the rear panel, 2 mm away from the connection line; from the cross member panel of the rear window, 2–3 mm away from the edge of the bend; from the rear of the sidewall along the bend, 15–20 mm away from the edge of the wing.
- Using a drill with a diameter of 6–7 mm, we drill out the rivets at the junction of the wing with the transverse frame.
- Disconnect the rear fender.
- Using a tool, we remove excess metal that remains on the body.
- We straighten and polish the edges of the wing.
- We attach the new wing using resistance welding in increments of 40–50 mm.
- We paint the new wing in the body color.
What to pay attention to when installing a new one
Before installing the new wing in its place, you must immediately install the turn signal and carefully remove the wiring so that you can connect it later.
It is advisable to carry out the installation with a partner, since the part is voluminous and it is possible that it may accidentally fall.
It is very important to start the installation correctly. First you need to install the element in place of the old one and then tighten the bolts around the perimeter without tightening them completely. Then start tightening the bolts crosswise - first, not fully tighten the upper corner of the body, then the lower one on the bumper side. Then it’s the other way around – the top one is on the bumper side and the bottom one is on the body side. After this, the bolts in the middle are tightened. In this case, it is necessary to carefully ensure that the wing is at the level of the body, and does not protrude above it and does not fall through. This procedure will allow you to quickly and efficiently install a new part on the body.
When purchasing new fenders, pay attention to the manufacturer. The best metal front fenders for the VAZ-2114 car are considered to be original products from the AvtoVAZ plant. Their price in Russia varies from 2200 to 3300 rubles. a piece.
Wing replacement process
So, let's start replacing the wing!
I don't know how to do this correctly. That's why I'm writing as I did.
Removing the wing
First of all, I unscrewed the 4 bolts under the hood, but you will most likely still need to remove the plastic fender liner.
Next, we remove the plastic trim on the threshold, unfortunately I didn’t take a photo of it, but everything is simple there - a few screws on top and a few on the bottom.
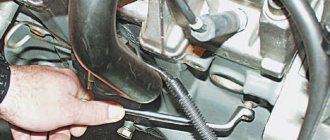
Next we need to unscrew one side of the bumper - under it is the bolt that secures the wing.
After everything has been unscrewed, we need to unscrew all the bolts securing the wing - this is a bolt under the threshold, under the bumper, two bolts under the wing closer to the door and bolts on top under the hood. And yes, don’t forget to remove the turn signal from the wing, everything is simple - it is latched.
That's it, the wing is unscrewed - you can remove it!
Difficulties may arise if the wing is original - it sits on the factory sealant, it can be carefully trimmed with a knife.
Wing installation
The wing was removed, then I applied black sealant to the joints where the factory sealant was.
Assembly is done in the reverse order, adjust the gaps so that the door does not catch the fender, the gap between the fender and the hood.
We install a new wing, connect the repeater, and screw on the fender liner, if any.
The wing is in place, it took me about 4 hours because... I did it for the first time and without help.
Good luck to everyone with the renovation!