General information
The purpose of the Kalina ZZ is no different from other cars - turning on the ignition and controlling the engine starter. It is equipped with a mechanical interlock and protection against restarting the starter without turning off the ignition. This allows you to protect the flywheel crown and bendix from accidental turning of the key. There is also electronic protection in the form of an immobilizer, the antenna of which is integrated into the 3Z.
The Kalina ignition switch has 3 positions, each of which is described in the table.
| Position | Consumers |
| 0 | Side lights, radio, hazard warning lights, brake lights, courtesy lamp |
| 1 | Car ignition system, low and high beams, heater, washer and wipers, turn signals, fuel pump. |
| 2 | Starter |
The key can only be pulled out in the zero position. In order not to forget it in the lock, when the engine is turned off, an audible alarm is provided, which turns on simultaneously with the opening of the driver's door.
Design
The lock consists of mechanical and electrical parts. Briefly about the design of each of them:
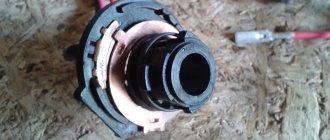
- The mechanical part is a cylindrical mechanism, which can only be turned with a key designed specifically for it. In addition, this includes an anti-theft latch that prevents the steering wheel from turning.
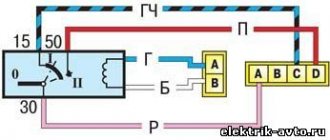
- The electrical part consists of terminals and contacts that close accordingly with each turn of the key. For this purpose, it is connected to the lock mechanics. There are only three contacts. One of them, the thirtieth, is supplied with plus directly from the battery. The remaining two (15 and 50) are intended to turn on consumers and the starter, respectively. To limit the current through the fiftieth contact, a relay is included in its circuit. The starter is powered through its contacts, and not through the Kalina ignition switch.
The immobilizer antenna is located in the decorative ring covering the 3Z. It responds to the transponder of the key inserted into the lock. The immobilizer recognizes only its own unique signal and gives permission to the control unit to start the engine.
Kalina car ignition key
The first key, which with the remote control performs the following functions:
- directly working ignition key
- door and trunk lock key
- remote control
- APS-6 immobilizer working key
The second key with a red insert at the end performs the following functions:
- ignition
- key for door and trunk locks
- APS-6 immobilizer training key
The keys have tags (in Figure 1, tags number 2), which indicate the key number. It's better to remove these tags and save them. Using them, it will be possible to produce new keys for the ignition switch of the viburnum by contacting a certified PSSS.
Instructions for learning the second key of the Viburnum fret:
- collect the second key provided when purchasing a new Lada Kalina
- close the doors
- Next, you need to insert the red key into the ignition and turn it on
- Then we wait for 3 sound signals (squeaks), if there are none, then wait 6 seconds and take out the key
- then, immediately within 6 seconds you need to turn on the ignition with the first black key
- after 3 beeps and 2 “pi” signals, remove the key from the ignition
- then, within 6 seconds, turn on the ignition with the second black key
- also, having heard 3 and 2 squeaks, remove the ignition key from the lock
- after which, you need to turn off the ignition, but do not remove the key from the ignition switch of the viburnum
- waiting for 1 squeak
- again, within 6 seconds, turn on the ignition for 5 seconds, and be sure to wait for the signal - the emergency signal should blink and a short beep sound
- turn off the ignition. the red key before the light on the instrument panel goes out.
Correct use of instructions. If the orange icon (car with key) is on or blinking all the time while the second key is learning, then everything is correct. If the icon does not light up or blink, you will have to start all over again.
How to check whether the ignition key has been learned correctly? The correctness of key learning is checked as follows:
- insert the key into the ignition
- turn the key to position II of the ignition switch.
In this key position, the car's instrument panels turn on, but the car does not start. If within 7 seconds the orange icon (car with key) does not light up, then the ignition key has been trained correctly. If the first time you slide in a new key, your car does not start, this is not a reason to panic. On its first operational start, the key undergoes final synchronization between the key itself and the controller.
The only way to train the ignition key for a Kalina, or any car in general, is with a completely new key. Those. a key that has never been trained by the immobilizer and has not undergone the learning process with a special training key. You can train working keys only in conjunction with an ECU (electronic control unit), which does not include an anti-theft system, or training can be done with an ECU that has been trained together with the training key used in this type of training.
Warning. The training key should be stored separately from the working key. Use the training key for the Viburnum fret only if you have lost the working key. It is extremely undesirable to lose the training key of the ignition switch; without the training key, learning a new key becomes impossible. Relevant dealer centers do not accept claims in case of malfunction of the control system or if the training key is lost.
If the problem is the spark plugs
The Kalina engine does not always start due to a faulty ignition switch. You can also start looking for problems with the spark plugs. What kind of candles are needed for Kalina? A17DVRM products are recommended. They can be replaced with A15DVRM. Candles of our own production can be replaced with imported analogues. Their brand largely depends on the engine:
Engine with 8 cl. Motor with 16 cl. A17DVRM AU17DVRM 14R-7DU 14FR-7DU RN9YC RC9YC BPR6ES BCPR6EC W20EPR Q20PR-U11 LR15YC DR15YC WR7DC FR7DCU. Candles have different prices in different regions of the country. A set of them costs from 200 to 500 rubles.
Some manufacturers' spark plugs may have a different number of electrodes. In addition to the standard single-electrode plugs, there are several electrode plugs. Standard single-electrode spark plugs are recommended for VAZ Kalina cars. Their duration depends on the operating conditions of the vehicle.
It is recommended to change spark plugs every 30,000 km. Many Lada Kalina car owners identify the following spark plugs as the best brands: Brisk, Denso, NGK. A fairly significant group of motorists singles out the A17DVRM spark plugs produced by Engels. To replace spark plugs on Kalina you will need a special spark plug wrench. The procedure is quite simple.
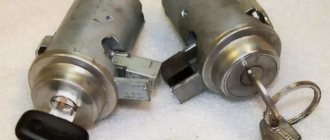
- The engine in the area where these products are located must be cleaned to prevent debris from entering the cylinders when the caps are unscrewed.
- Well-fitting strands are removed one by one from each candle.
- The candles are turned over and examined (image No. 4).
- The spark plugs are first screwed in by hand, then tightened with a wrench.
The ignition switch in a car is a reliable unit that can work for a long time and without accidents. But sometimes it needs to be removed for repairs or complete replacement. You can do it yourself. At the same time, you can check the functionality of parts that may not work.
The causes of engine malfunction may be hidden in the malfunction of other components and mechanisms of the car. These include the spark plugs, ignition coil and ignition module. The search for these reasons will be carried out professionally by an auto electrician.
How to remove the ignition system lock? Recommendations from experts
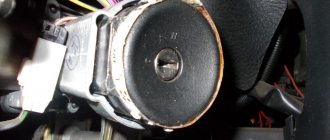
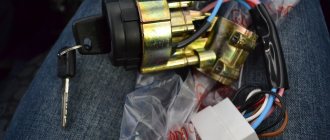
In Lada Kalina, the lock (image No. 1) of the ignition system sometimes needs to be removed due to various reasons. Next, we will tell you how to remove and also how to replace the lock if a malfunction occurs. So, replacing the ignition switch has the following aspects:
- mechanism failure;
- the need to replace the APS coil;
- need to replace the lock contact assembly.
To carry out dismantling actions you will need to use a simple set of tools, namely:
- well sharpened chisel;
- small hammer;
- a screwdriver with a flat tip profile;
- pliers.
Manipulations are performed according to the algorithm below.
- Disconnect the negative terminal from the corresponding battery terminal.
- We dismantle the switch block located under the steering wheel.
- Using a chisel, remove the bolts holding the switching mechanism. You will also need pliers here.
- Remove the bracket from the steering column. Now the lock itself becomes accessible for removal.
- Using a screwdriver, pry up the retainer of the APS coil cable connector and remove it completely.
- The contact group block must also be disconnected from the common wire connector.
If you need to install the lock in its original place, then we carry out the entire list of actions using the reverse algorithm. Work of the indicated nature must be carried out with an eye to the recommendations that experienced craftsmen kindly share with Lada Kalina owners.
- The casing located around the steering column can be removed by unscrewing 7 screws. To do this, you will need to use a Phillips screwdriver and begin the procedure. Note that there are two screws on both the left and right sides, and three mounting components are located directly below.
- Now pull down the control lever and lower the column. Both halves of the casing can be dismantled quite easily.
- To remove the steering column switch block, you will need to squeeze the locking elements and remove them from their mounting sockets.
- The bolts that hold the ignition switch usually have their heads sheared off when tightened. To dismantle them you will need to use a chisel. It is applied tangentially, after which gentle blows are applied with a hammer. After the bolt head has begun to move, further unscrewing is carried out using pliers. When installing the lock, it is recommended to use bolts with a hex key head profile. The length of such fastening components is 20 mm, and the thread is M6.
- Removing the lock requires tightening the wiring harness and releasing the connectors present under the casing.
- Before installing the lock, insert the key into its cylinder and move it to position 1. In this position, the steering wheel lock latch moves inside the lock. Next, you will need to check the functioning of the locking mechanism. When the functionality is correct, we continue installing the lock and connecting all the necessary wires. If blocking does not occur, then we resort to adjusting the installation position of the lock, achieving the ability of the latch to move inside the corresponding groove, which is located on the steering shaft.
- Sometimes there are situations in which there are difficulties with immersing the key inside the lock hole. Here you will need to apply a dab of WD-40, which we inject into the lock cylinder. If there is no such penetrating agent, then use one drop of synthetic oil. Thus, the replacement of the ignition switch is completed.
General diagram of electrical equipment of VAZ 1118
1 — block headlight; 2 — windshield wiper gear motor; 3 - generator; 4 - battery; 5 - starter; 6 — sound signal; 7 — hood open sensor; 8 — power window switch for the right front door; 9 — motor-reducer for window lifter of the right front door; 10 — electric pump for windshield washer; 11 — connecting blocks of wires for connecting the right (front) speaker of the audio system; 12 — electric drive for locking the lock of the right front door with an open door sensor; 13 — ambient air temperature sensor; 14 — connecting block of the wiring harness for connection to the engine control system harness; 15 — electric drive for locking the left front door lock (with an open door sensor and a central locking switch); 16 — sensor of insufficient brake fluid level; 17 — connecting blocks of wires for connecting the left (front) speaker of the audio system; 18 — right front door power window switch (installed on the driver’s door); 19 — left front door power window switch; 20 — central locking switch; 21 — motor-reducer for window lifter of the right front door; 22 — remote control unit; 23 — immobilizer control unit (APS-6); 24 — mounting block; 25 — instrument panel; 26 — right side turn signal; 27 — glove box lighting lamp; 28 — switch for the glove compartment lighting lamp; 29 — brake signal switch; 30 — ignition switch (lock); 31 — lighting control unit; 32 — steering column switches; 33 — left side direction indicator; 34 — connecting blocks of wires for connecting the left (rear) speaker of the audio system; 35 — electric drive for locking the left (rear) door with an open door sensor; 36 — electric heater fan; 37 — additional heater resistor; 38 — heater switch; 39 — alarm switch; 40 — reverse lock solenoid switch; 41 — rear window heating switch; 42 — connecting blocks of wires for connecting the right (rear) speaker of the audio system; 43 — electric drive for locking the right rear door lock (with a door open sensor); 44 — fuel module of the engine control system; 45 — reverse light switch; 46 — parking brake warning lamp switch; 47 — cigarette lighter; 48 — reverse lock solenoid; 49 — connecting blocks of wires for connecting the head unit of the audio system; 50 — backlight lamps on the trim of the center console of the instrument panel; 51 — electric power steering control unit; 52 — interior lamp; 53 — rear light; 54 — block for connecting the electric drive for locking the trunk lid lock*; 55 — luggage compartment lid open sensor; 56 — license plate lights; 57 — additional brake light; 58 — rear window heating element; 59 — luggage compartment lighting lamp.
ZZ malfunctions
Most often, damage to the Kalina ignition switch is associated with its mechanical part. In this case, it is impossible to turn the key to the desired position. A malfunction does not arise, as they say, out of the blue. As a rule, frequent jamming of the key is observed over the course of several months, which is eliminated by rocking it in the cylinder.
Rarely, there are cases of failure of the electrical component of the Lada-Kalina ignition switch. Basically they come down to a lack of contact when turned on. This is typical only for locks with a long service life. True, there is another common reason for burnt contacts - the car owner himself.
When installing additional equipment, the owner of the car does not take into account that the maximum permissible load on contact is 15, only 19 amperes. This is quite enough for regular consumers, but the lock can no longer withstand additional light and sound devices, especially those installed at home. The contacts begin to spark and eventually fail. Therefore, when installing additional equipment, it is necessary to use an additional relay to power it.
Repair or buy a new one
There is no clear answer to this question. The fact is that it is very difficult to find a new contact group on the Kalina ZZ, in contrast to the classics, Samara and the tenth family. Therefore, you have to repair it, which without experience, skills and desire is not the best idea. Most often, owners install a new ZZ by purchasing it assembled.
In this case, it is necessary to take into account that the Kalina ignition switch has an immobilizer that will not respond to the new key and the car will not be able to start. Of course there is a way out. You can retrain the immobilizer for a new key. In this case, you will also have to change the cylinders on the door locks.
You can do it easier - carry two keys with you. True, it is not clear whether it is worth keeping them on one bundle. Therefore, the most reasonable thing would be to make a new “tip” and install it on the old key. By the way, it may be included in the delivery of a new lock.
How to train (Retrain) the immobilizer on a VAZ 1117-VAZ 1119?
Note! After you carry out the entire immobilizer training (Retraining) procedure, the following will happen to the car, namely: The anti-theft system will turn on if it was previously disabled, the system will also change the password to a new one, which will be selected randomly and which will be automatically recorded on the training key, and also all previous passwords will be erased from the immobilizer memory and with the old password (with the old training key on which the old password is written) you will not be able to disable the anti-theft system of the car, in addition, those working keys with which you trained the system will be written into memory !
1) Before starting the training, let’s note one fact: in fact, you are not training the immobilizer as such, but simply flashing working keys for it, so that the car can start not only with one key (Over time, keys are lost) but with two, or even if you want from three, but you won’t find exactly the same working keys in car dealerships, they will need to be made to order from the manufacturer, and what series of key you will need, you can find out on the tag (see photo below) on which the serial number will be written and which came with the car (it should hang on the key) when it was purchased.
2) Let's go further and move on to the key learning procedure itself, first, close all the doors of the car and then insert the learning key into the ignition (The learning key must be without a remote control, because the remote control on which the trunk opening and also opening buttons are located and closing doors, only working keys are equipped) there is a red insert on the end of it (Indicated by an arrow in the large photo) so you definitely won’t confuse it, so this is how it will be inserted, turn the key until all the devices light up (This is the ignition position on) and wait at least 6 seconds, then turn off the ignition by turning the key and make sure that the immobilizer warning lamp (Indicated by an arrow in the small photo) begins to blink very quickly (it should blink 5 times per second), while learning the working keys (Key ) it should continue to blink, if it stops, then either something was done incorrectly, or there is some kind of malfunction with the working key (Maybe it has already been trained by another immobilizer), after checking, remove the key from the lock and insert the working one there.
3) Now turn the operating device to the same state (When all the devices light up) and if the operation is carried out correctly, the buzzer (the buzzer is a part that is built into phones and not only, it can emit a signal, in a regular phone this is a beep, for example) will sound three beeps at the moment when the ignition is turned on, then wait another 6 seconds (more is possible, but not less) and after all this time has passed, the buzzer will sound two more beeps and then turn off the ignition by turning the key and removing it .
Note! If suddenly, after 6 seconds, two signals coming from the buzzer do not ring, and the rapid flashing of the indicator lamp stops, then you either made a mistake somewhere, or the working key has already been trained, or there is some kind of malfunction in the immobilizer, but first of all, try repeating the whole operation again , if this happened to your car!
4) If you take out the working key and the immobilizer warning light continues to flash, then continue working, now you will need to reinsert the training key into the ignition switch and turn it until all the devices light up, then wait for three signals ( They should immediately ring when the key is turned) and wait for two more (After 6 seconds the buzzer will sound them) and finally turn off the ignition (Just do not remove the training key) and wait for 6 seconds for the last signal that the buzzer will give, while the warning lamp should start flashing twice as often, if this is the case for you, then no later than 6 seconds (It is best to do this immediately) after the signal, turn on the ignition again with this key and wait 2-3 seconds, turn it off, within 5 seconds ( No later than) the buzzer should sound three more times and the rapid flashing of the immobilizer warning lamp should stop, after which do not turn on the ignition for at least another 10 seconds and when the time has passed, you can use the working key(s) that were trained again.
Note! It is possible (Not on all cars) after completing all procedures, it will be necessary to re-synchronize the codes, otherwise the controller may not allow the engine to start when the ignition is turned on for the first time. To carry out this procedure, turn on the ignition with one of the trained keys (We are talking about the workers that you trained) and pause for 6 seconds, if the control lamp starts flashing once per second (This indicates that there is an error in the system), then turn off the ignition and wait again for at least 10 seconds, when the time has passed, repeat the operation again and if everything goes well, the lamp will not blink at intervals of 1 time per second (It should be constantly on, not blinking, but after a while it will go out), so if it does not blink, then start the engine and it should start working, but if However, after turning on the ignition and after 3 seconds, the lamp will not go out (And it should go out after a while) and will remain on, this indicates that the anti-theft function of the controller has not been activated and in this case the learning procedure will have to be repeated!
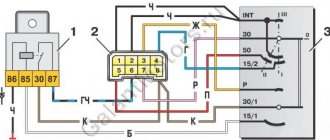
Pinout of lock VAZ-2108, VAZ-2109, VAZ-21099
Pinout according to the old type
Pinout of the VAZ-2109 ignition switch with unloading relay:
- comes +12V in position I, II, III (parking)
- comes +12V in position I, II, III (parking)
- comes +12V in position III (parking)
- position I, +12V goes out after turning on the ignition (contact 15/2), disappears at start (II);
- position I, +12V goes to the starter (pin 50);
- position I, +12V goes away after turning on the ignition (pin 15), does not disappear when starting II;
- +12V comes from the battery (pin 30);
- comes +12V constantly.
New pinout type
Pinout of the new VAZ-2109 ignition switch:
- comes +12V constantly
- comes +12V constantly
- +12V arrives after turning on the ignition (pin 15), does not disappear when starting II;
- +12V arrives after turning on the ignition (contact 15/2), disappears at start (II);
- position I, +12V goes to the starter (pin 50);
- +12V arrives after turning on the ignition (pin 15), does not disappear when starting II;
- +12V comes from the battery (pin 30);
- comes +12V constantly.
The purpose of the key and its capabilities
The remote control for a car is designed to remotely open and lock doors, turn on the alarm, block the trunk door, lower the windows and perform other actions. This key is also used as a coded electronic key for the immobilizer. The immobilizer can be disabled, then the car will be able to start from a “normal blank”.
Such a system is attached to the metal part of the key itself and is intended for connection to the car system by:
- Radio channel.
- Transponder channel.
Correct use of the key
Regular remote control key Lada Kalina
To use the remote control key in a car, it must first be trained (activated). To do this you need to use a training key. Also, using such a key, you can remove restrictions on starting the engine. It is possible to use such a key with two remote controls.
Causes of breakdowns
Faulty contacts are a common cause of ignition switch failure.
Being an electromechanical device, the ignition switch of the Lada Kalina most often fails for the following reasons:
- Due to sudden surges in voltage, contacts burn out. At the moment the unit is started, there is a sharp increase in temperature in the system, which leads to burnout of the insulating layer.
- Oxidation of contacts due to increased dampness in the interior can lead to breakdown.
- Mechanical damage . Exposure to dust and dirt, manufacturing defects and careless operation lead to increased wear of the unit.
Pinout of lock VAZ-2110, VAZ-2111, VAZ-2112
Pinout of the ignition switch VAZ-2110:
- comes +12V for the microphone of the sensor of the inserted key;
- the mass comes when the driver's door is open;
- +12V goes to the starter (pin 50);
- +12V goes out after turning on the ignition (pin 15);
- +12V goes out when the key is inserted to pin 5 of the BSK;
- comes +12V to illuminate the lock cylinder;
- +12V comes from the battery (pin 30);
- not used.
Training procedure
Why is it necessary to carry out the procedure, how to train the key and what does it give? When you run the action, you can achieve the following results:
- activate the anti-theft function;
- Change password;
- erase all previous remote controls;
- enter new codes for Lada.
A system is used to achieve certain goals. Usually, in order to train the ignition key, it is necessary to carry out a number of manipulations. Before describing them, it is worth considering the basic results during training. So, the actions are carried out:
- to activate the anti-theft system;
- to remove outdated data, including passwords;
- for training remote control systems;
- to enter a new password.
In most cases, only new remote controls can be programmed. It is impossible to manipulate using a key from another car.
One important point needs to be noted. The ignition key for programming is not used in everyday life. After achieving the goal, it is advisable to put it in a safe place.
Before starting programming, it is recommended to fill the car with 10 liters. This will allow you to carry out all the actions correctly without getting confused by the signals emitted by the machine.
How to train a key and what is required for this? In fact, the procedure is simple. All manipulations are carried out according to a specific algorithm.
It is suitable for both Lada Priora and Kalina. In general, there are no significant differences between car brands. This kind of “influence” also lends itself well to Grant.
What do you need to know about the protection zone on Kalina?
Do I need to remove the immobilizer to repair the ignition switch on Kalina? First of all, let's get acquainted with the basic information regarding this node. The ZZ is a complex unit in its design, necessary to control the transmission of voltage to the starting system and prevent battery discharge.
On a Lada Kalina car, the ZZ includes several elements:
- the mechanical part, that is, the cylinder of the device itself;
- the electrical part, which is a group of contacts designed to close signals when the key in the lock is turned to different positions.
ZZ for Kalina, removed with a key.
It should also be noted that this unit can operate in several modes:
- In mode 0, the driver can remove the key without any problems. In this mode, optics, alarms and radios work.
- Mode 1 is fixed, since in this case it is impossible to extract the key from the lock. In this mode, the ignition system is activated, and voltage is supplied to all components except the starter. Leaving the key in this position for a long time may cause the battery to discharge.
- In mode 2, the starter starts working.
Typical faults
Typical malfunctions for 3Z operation:
- Moisture getting into the protection structure and constant dampness in the interior will lead to oxidation of the contacts. In this case, the contact group will need repair.
- The contacts themselves could burn out; this is usually caused by voltage surges. As a rule, jumps in the system occur at the moment when the power unit starts up.
- Mechanical failures. For example, if, when trying to turn the key in the lock, the driver encounters a problem, then most likely the fault lies in the assembly cylinder. It is quite possible that it was simply clogged with dust, but the possibility of a defect cannot be ruled out (the author of the video is Alexey Wolf).
Pinout of lock VAZ-2113, VAZ-2114, VAZ-2115
Pinout of the ignition switch VAZ-2113, 2114, 2115:
- comes +12V for the microphone of the sensor of the inserted key;
- the mass comes when the driver's door is open;
- +12V goes to the starter (pin 50);
- +12V goes out after turning on the ignition (pin 15);
- +12V goes out when the key is inserted to pin 5 of the BSK;
- comes +12V to illuminate the lock cylinder;
- +12V comes from the battery (pin 30);
- not used.
Remote control power supply
The key contains a lithium battery, which is powered by 3 V. If the power supply is normal, then the diode on the key should light up for a short time when you press any button. If there are more flashes or no flashes at all, then you should change the power supply in the key. To do this, unscrew the screw, which is located on the back side of the power buttons. The halves are separated, the board is removed from the case and the battery is replaced. It is important to observe the polarity of the element. Assembly occurs in reverse order.
How to use the lock?
The standard Lada Kalina lock has three key positions.
- Position “0” is fixed. From this position the key can be easily removed. In this key position, external lighting devices can operate. The functionality of the alarm and sound system is also available.
- Position “1” is also fixed. Here the key is locked inside the lock and cannot be removed. The ignition is turned on. Power from the on-board network is available to all consumers, excluding the starter. It is not recommended to leave the key in this position for a long time, as the battery may be discharged. Before starting the engine, it is advisable to hold the key in this position for about five seconds. During the specified period, the fuel supply pump will be able to create sufficient fuel pressure in the line for trouble-free starting of the engine.
- Position "2". This mode ensures that the starter unit is turned on. When the key is released, it returns to position “1”. If you completely remove the key and turn the LADA Kalina steering wheel to one side, the mechanism shaft will be blocked. This is necessary as an anti-theft measure. To “free” the steering wheel, you will need to set the key again to the “zero” position and rotate the steering wheel with rocking movements to achieve the ability to move the key to position “1”.
In the position corresponding to the starter activation mode, the key should not be held for more than 8-10 seconds. If an attempt to start the power plant is unsuccessful, you must pause for about 15-20 seconds and repeat the start. Also, do not hold the key in this position while the engine is running.
When driving, it is forbidden to remove the key from the lock cylinder. If this is neglected, the shaft will block, which will cause loss of controllability.
If the key is left in the lock and the driver's door is open, the audible warning signal will be activated. When the key is removed, but the parking lights are on, when the Lada Kalina door is opened, an audible warning will again sound in the form of short beeps.
Replacing the front wheel bearing Kalina
Tighten the handbrake on Kalina
Replacing the Kalina 8-valve thermostat
The lock has a function to block the starter from turning on while the engine is running.
An immobilizer sensor is also integrated into the lock design. This is an anti-theft agent. Note that a lock with an immobilizer can function without problems in the following range of external temperatures: from minus 40 to plus 45 degrees Celsius.
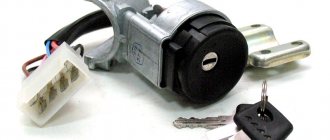
The set usually consists of two keys. The first key integrates a remote control for the central locking of LADA Kalina, and the second has a red insert.
The main (first) key is responsible for the following functions:
- turning on the ignition;
- luggage compartment and door lock;
- possibility of remote control;
- activation of the APS-6 immobilizer.
A key with a red insert provides:
- possibility of turning on the ignition;
- unlocking doors and luggage compartment lid;
- ensuring the immobilizer learning process.
How to disable the immobilizer with your own hands?
It is possible to temporarily disable the immobilizer, which may be necessary when installing an auto start alarm.
To install the bypass system, use:
- Control unit with built-in key or label. Used to insert a key or chip into a device that is located on the back of the dashboard. When autostart is activated, the signal relay activates the unit and the engine starts, bypassing the main circuit.
- Immobilizer bypass blocking. A separate control device is installed that simulates an ignition key with a microcircuit.
Another way to disable the immobilizer on Kalina depends on the type of ECM (control unit).
Bosch M7 4 block
Before you start working on a car with a Bosch M7.4 unit, you need to prepare:
- a computer or laptop with Winflashecu v.1.14 preinstalled (the distribution is available for free download);
- k-Line adapter and cable, for example VAG-COM 409.1;
- pre-loaded software for the unit with disabled immobilizer support;
- several strands of different lengths.
To disable the immobilizer on Kalina, you need to do the following:
- Disconnect the wires from the battery terminals and disconnect the wiring harness assemblies from the engine control module under the hood of the vehicle. To disconnect, you must remove the top protective cover and remove the flat connector block. All work is performed on a large block. There is no need to disconnect the unit from the unit.
- We insert the wire into contacts A4 and B2 on the side of the harness. These cables will be used to provide an additional 12V positive voltage source. To do this, they are connected to the battery terminal via an intermediate switch.
- Install the connector and close the latch.
- Connect the adapter to the diagnostic connector located inside the car. The connector is located under a plastic cover installed on the center console.
- In your computer settings, set the baud rate to 38400 bps.
- Launch the Winflashecu application and select the port number, speed (38400 bps) and M7 block type in the dialog box. 4. “No connection” will be written in the lower right corner of the window.
- Apply additional power to pins A4 and B2.
- Turn on the ignition. The "No Connection" notification should change to "ECU Communication" and the buttons to start operations will become active.
- Read the EEPROM (device software) data and save it to your computer's hard drive.
- Select the new software and load it into the block memory using the "Write EEPROM" button.
- Wait until the download is successful.
- Close the program and turn off the ignition.
- Disconnect the auxiliary power cables.
- Check whether the car can be started with a key without a chip. The immobilizer symbol will illuminate on the instrument cluster upon startup and will go out after a few seconds.
Bosch block 7 9 7
When installing the Bosch 7.9.7 control unit (Euro 2 standard), it is necessary to modify it by welding a resistor. It is best to entrust this task to someone experienced in soldering small electronic components. Next, the block is “stitched” according to the procedure described above.
Block January 7 2
In the case of ECM type January 7.2, the procedure looks completely different.
Before starting work you need to prepare:
- K-Line adapter, for example BM9213;
- computer or laptop with ChipLoader 1.97.7 installed;
- soldering iron with a power of 25-40 W;
- solder and rosin;
- wires and switch;
- resistor with a resistance of 3.6 to 5 kOhm;
- plugs for connecting cables to the control unit;
- 12 V battery (standard or from an uninterruptible power supply);
To remove the immobilizer from the unit you must:
- Disconnect power from the vehicle's on-board network and remove the ECU.
- Wrap the block body with insulation.
- Assemble the diagram from the photo.
- Connect the adapter to your computer.
- Use the toggle switch to simulate turning on the ignition.
- Launch the application and establish a connection with the device.
- Read the unit's factory data and save it to your hard drive.
- Read the EEPROM and click the "Remove IMMO" button. Wait until a confirmation window appears with the text “Immobilizer removed successfully.”
- Close the application.
- Turn off the ignition with the toggle switch.
- Before installing the control unit on the car, turn off the signal from the immobilizer. If the lock from the IMMO unit is removed, you need to close the contacts with numbers 9 and 18 in it.
Block January 5 1
To disable the immobilizer in the January 5.1 block, it is necessary to unsolder and reprogram the EEPROM flash memory. It is not recommended to do this operation alone, but rather to do it in a workshop, since in the process of completing the task you will need a programmer and a hot air gun for welding.
How to replace the ignition switch on a VAZ 1117-VAZ 1119?
Removal: 1) At the beginning of the operation, you will need to remove the casing from the steering column, to do this, use a screwdriver and use it to remove the seven screws that secure the casing (see photo 1), after all the screws have been unscrewed, fully pull out the handle by which the steering wheel is adjusted (see photo 2, it is indicated by an arrow) and then remove the lower casing, and then lifting the upper one, also remove it from the steering column.
Note! When you remove the lower and upper casings, look at the side of them or look under the pedals for the rubber o-ring that is needed to seal the ignition switch from dust and dirt!
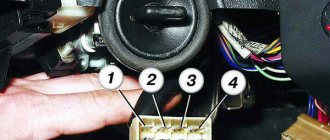
2) Then you will need to look at the lock itself and pay special attention to the wires that come from it, Kalina also has an immobilizer in addition, so there will be a lot of wires coming from the lock itself, and there will be only two wire connectors (One of the connectors will go to the starter is thus responsible for starting the car, and the second connector will go to the immobilizer and it is responsible for preventing the car from being stolen), so disconnect each connector from the pads (Each connector will be connected to the other two pads), to do this, grab your hand connector and simply disconnect it from the block using a little force (Do the same operation with the other connector).
Note! The photo above shows an example with an arrow where the wire connector coming from the ignition switch is connected to another block (This connector goes to the starter, the one that goes to the immobilizer looks a little smaller)!
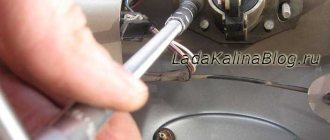
3) Next, as shown in the photo below, using a hammer and chisel, remove the four bolts (They have no edges and are indicated by arrows) that secure the lock to the steering column, how do you remove them, you ask? Let's explain! Take a chisel and a hammer in your hands and place the chisel on the edge of a bolt, then hit it and thereby try to move the bolt out of place, etc., until the bolts are completely turned out.
Note! If you don’t like this method, then you can also drill out these bolts, but only in this case, be careful not to damage anything!
4) When you have removed all four bolts, remove the bracket on one side of the steering shaft, which is indicated by the arrow, and on the other side, remove the ignition switch itself and put it aside if you no longer need it and you are going to put a new one in its place.
Note! In the event that you still suddenly need the old lock (For example, not all new locks are sold with a contact group, so you have to remove it from the old lock and install it on a new one), to remove the contact group from the lock, you must first be convinced that it’s not all about it, but about the lock and it needs to be replaced, for example, if you have problems with the electronics in the cabin, let’s say you turn the key and the devices don’t light up, then most likely it’s all in the contact group and the lock itself can’t be changed necessarily (But it’s not a fact that there may be a problem with the immobilizer, to do this, disassemble the contact group and check which contacts it has, oxidized or not), so here’s how to remove the contact group from the lock, for this:
1. Using a screwdriver or by hand, bend the lock that is located on the wire connector and then remove all the terminals together with the wires from this connector (see photo 1, but be sure to remember the location of each wire in the connector, although just below we described how you can install the wires into the connector without previously remembering their location, but it’s still better to remember so that problems do not arise in the future), then squeezing the latches of the contact group cover (see photo 2) remove it from the lock body itself (see photo 3) and then bending two plastic latches (see photo 4), separate the contact group cover and the contact group itself (see photo 5), and after the contact group itself is in your hands, remove the moving part from it and inspect all its contacts as shown in the sixth photo, if the contacts are found oxidized or burnt, then try cleaning them with fine-grained sandpaper, and if the contacts are severely damaged and cleaning them will not lead to anything, then in this case replace the contact group itself.
Note! When you reassemble the moving part of the contact group, install it so that the widest part that is present on it engages the protrusion on the cover as shown in the photo below:
Installation: The new lock is installed in the reverse order of removal and assembled the same way, but only during assembly there are some nuances, namely, when you install the terminals of the wires coming from the contact group into the wire connector, pay attention to the fact that each terminal must have its own position , so find the block of wires to which this connector will be connected and, looking at it, connect all the wires into the connector exactly in the same places where they go on the block, for example, on the block of wires you see that the red wire runs on the far left side, then, accordingly, do it on the wire connector in such a way that the same red wire can be connected to that wire, so that you can at least understand the situation a little lower, we posted a photo showing two terminals, and so the terminals and the wire connector will be exactly the same same terminals (there will be Males on the connector and females on the block) so try to combine them so that each color of the wire matches.
Replacing the lock return spring:
Note! This spring itself is easy to replace, but there is one But! It is not sold in stores, so you will need to either remove it from an old lock or make a homemade one, it looks like this:
1. At the beginning of the operation, in order to remove the spring, you will need to pick up the lock itself and unscrew the three bolts that secure the bracket to it. For an approximate location of these bolts, see the photo below, in which one of the screws is clearly visible .
2. When the bolts are all unscrewed, carefully remove the bracket and make sure that the ball located inside does not fall out (It is shown in the photo below), but if it falls out then put it in place, now let’s talk about the return spring, as you have already seen in the photo it is located in the cylinder of the lock itself and with its antennae it rests on the grooves that are in the cylinder, so using a screwdriver, remove the old one from there and install a new one in its place and assemble the entire mechanism in the reverse order of removal.
Additional video: For more information on how to replace the ignition switch, see the video below:
X
Removing and disassembling the ignition switch Lada KalinaVAZ 11173-11183-11193
Communities Lada Priora Lada Priora Club Blog Ignition switch wires
We remove the ignition switch to replace its assembly, as well as to replace the contact group of the switch or the APS coil. Disconnect the wire terminal from the negative terminal of the battery. We remove the steering column switches (see “Removing the steering column switches”). The heads of the ignition switch mounting bolts are cut off. That's why..
...unscrew them using a chisel. Loose bolts can be removed using pliers.
Remove the bracket from the steering column...
...and the ignition switch. Use a slotted screwdriver to pry up the clamp of the APS coil wire block...
...and disconnect the coil wiring block from the APS block wiring block.
By pressing the block latch... ..disconnect the ignition switch contact block from the wiring harness block.
Using a Phillips screwdriver, unscrew the three screws...
...and remove the ignition switch bracket.
We take out the locking rod of the anti-theft device. Turn the key in the ignition switch...
...and remove the locking rod drive. We remove the rod spring from the drive...
...and a stopper with a spring. We push the cylinder out of the switch body...
...and remove the locking ball.
Remove the cylinder from the switch body.
We remove the locking ball spring from the hole in the cylinder.
Using a screwdriver we pry off the two plastic latches of the wire block cover...
...and open the lid. We mark the wires located in the block.
Using a thin awl or stiff wire, bend the locking tendrils of the wire tips...
...and remove the wires from the block.
Remove the insulating tube from the wires.
Squeezing the three plastic latches with a screwdriver… ..remove the contact group from the body…
...and bring the wires out through the holes in the housing.
Using a screwdriver we pry off the three plastic latches...
...and disconnect the contact group.
Remove the moving part of the contact group.
By pressing the moving contact and turning it counterclockwise...
...remove it from the body.
Remove the contact spring.
Using a screwdriver...
...remove the APS coil. We assemble and install the ignition switch in the reverse order. We install the moving part of the contact group like this...
...so that the wide protrusion of the movable contact is located opposite the protrusion on the cover with the fixed contact... ...and the protrusion on the lock cylinder must fit...
...into the recess on the body of the moving part of the contact group.
..
220
221
223 ..
Replacing the ignition switch
As always, if the work involves electricity, you need to start by disconnecting the negative terminal of the battery. The tool you will need is a shaped screwdriver and a small chisel. You must purchase an ignition switch in advance. In this case, you need to take into account the presence of an immobilizer. If everything is ready, you can proceed to replacement. The sequence of actions is as follows:
- After unscrewing the five bolts, remove the decorative steering column cover. The screws are different, so it’s better to remember which one was placed where. In addition, to remove the casing, you need to lower the steering column adjustment knob.
- The ignition switch is secured to two clamps, secured with bolts that cannot be unscrewed with a key. Therefore, you will have to use a chisel. You need to rest it against the cap and unscrew it with careful but rather strong blows until it becomes possible to do it with your hands. That is, you should not cut off the bolt with a chisel, but use it as an analogue of a key.
- Thus, you will have to unscrew all 4 screws.
- The lock will remain hanging on the wires.
- We disconnect the electrical connectors, and the ignition switch can be easily removed.
- Installation is carried out in reverse order.
It is worth noting that this sequence of actions is similar for all modifications of the car, including the ignition switch of the Kalina 2, produced since 2013.
Working with a chisel
First you need to remove it so as to disconnect the ignition switch wiring harness blocks. In this case, the blade of the tool should rest against the edge of the bolt head, after which the bolt should be loosened by hitting the chisel with a hammer.
Next, you need to loosen the remaining bolts in exactly the same way. It is very important not to cut the head of the bolt with a chisel. To loosen the bolt, the bolt must be turned counterclockwise. When the tension is loosened, you can remove the bolts with pliers.
When removing the last bolt, you must hold the ignition switch. This removes the fastening bracket and the lock itself.
>Before installing the lock back, insert the key into it and move it to the first position. This slides the steering shaft lock latch into the lock.
Next, you need to install the ignition switch in place, remove the key from it and check whether the steering shaft lock works. After making sure that all mechanisms are in good working order, you need to connect the ignition switch wire blocks and attach the pads to the steering column.
Similar materials
Detailed programming instructions
How to train a key? To train the key in LADA Kalina you will need to follow eight steps.
- So, programming the key begins with closing the doors and activating the ignition. We carry out this manipulation only using a training key. Having started the engine, we perform a delay for 6 seconds.
- Now we turn off the LADA Kalina engine. At this moment, the tidy control indicator is switched to flashing mode. This action continues until the end of the learning process. When the indicator stops blinking for unknown reasons, this indicates the presence of an incorrectly performed manipulation at some stage. If this situation occurs, then repeat the ignition switch with a delay.
- The third stage of action is also characterized by the blinking of the indicated indicator. This happens for 6 seconds. At this time, you will need to re-insert the key into the lock and activate the ignition. When all manipulations are performed correctly, three sound signals will start coming from the buzzer.
- With the beginning of the 4th stage, you will need to do a little holding. Upon completion of repeated sound signals, insert the learning key and repeat the procedure. If we fail to complete this process, we conclude that an error was made during the manipulations. One might suspect that this chip key has previously been subjected to a similar procedure.
- The fifth stage involves turning off the ignition. The operation regarding the second element will need to be repeated about 3 times.
- In the next step, the control symbol starts flashing again. Here you will need to remove the trained key, after which we insert the training remote control. Correctly performed manipulations will be confirmed by a three-time buzzer.
- At the penultimate stage, we wait for a couple of signals to sound.
- We complete the action by turning off the ignition. Next, we wait for a single buzzer signal. Now you know how to train a key.
Key programming instructions for Lada Kalina, Priora, Granta, etc.
- Close all doors. Turn on the ignition with the training key and wait in the on state for at least 6 seconds.
- Turn off the ignition. The indicator light in the warning lamp unit should flash quickly (at a frequency of 5 times per second) while the learning procedure is being carried out correctly. If the lamp stops flashing quickly, it indicates an incorrect operation, an out-of-time interval, or a malfunction. Remove the training key from the ignition switch.
- Wait 6 seconds for the buzzer to emit two more beeps and turn off the ignition.
- If it is necessary to train the second remote control, then you should perform steps 3...4 again, using the second learning remote control to turn on the ignition. If not, continue from step 6.
- After turning off the ignition for no more than 6 seconds, while the indicator is flashing, remove the remote control, insert the learning key and turn on the ignition. The buzzer should beep three times. Wait 6 seconds until the buzzer beeps two more times.
Let's sum it up
Upon completion of the entire list of manipulations, this chip key can be considered trained. Sometimes the first attempt, when the key is trained, may not bring the expected result. You should not despair, because if you repeat the procedure, the situation is guaranteed to improve. And now you know how to register the key correctly.
Sources
- https://FB.ru/article/424366/lada-kalina-zamok-zajiganiya-ustroystvo-printsip-rabotyi-pravila-ustanovki-sistema-zajiganiya-dostoinstva-nedostatki-i-osobennosti-ekspluatatsii
- https://successfulauto.ru/otechestvennye-avtomobili/lada-kalina/167-ignition-key-viburnum.html
- https://Vaz-Lada-Granta.com/kalina/elektrika-i-tormoz/zamok-zazhiganiya.html
- https://Vaz-Russia.com/remont-vaz-1117-kalina-universal/obuchenie-immobilayzera-na-kaline.html
- https://carfrance.ru/kak-obuchit-klyuch-na-lada-kalina-svoimi-rukami/
- https://korean-car.ru/menaem-zamok-zazhigania-na-lada-kalina/
- https://1ladakalina.ru/obsluzhivanie/kak-obuchit-klyuch.html
- https://avtozam.com/vaz/lada-kalina/menyaem-zamok-zazhiganiya/
- https://Vaz-Russia.com/remont-vaz-1117-kalina-universal/zamena-zamka-zazhiganiya-na-kaline.html
- https://Vaz-Lada-Granta.com/kalina/elektrika-i-tormoz/obuchenie-klyucha.html