Removing the front door lock and outside handle
Front door lock with locking drive and outside handle
Remove the front door trim (see “Removing the front door trim”).
Using a Phillips screwdriver, unscrew the screw securing the base of the inner handle. . and remove it from the mounting pin. We bend the edge of the protective material behind the inner door panel.
Using a screwdriver, we disconnect the rod from the cylinder mechanism of the outer handle lock.
Similarly, disconnect the rod from the outer handle.
Using a 8mm socket, unscrew the bolt securing the outer handle.
Using the “8” socket, unscrew the handle securing nut.
. and remove the outer handle.
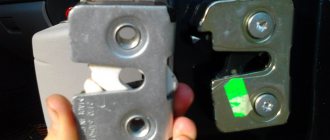
Using a Phillips screwdriver, unscrew the three screws securing the door lock. Move the red block lock up.
. and disconnect the block from the locking drive.
Use a screwdriver to press out the plastic rod clamp, turning it around its axis. . and, having disconnected the rod of the inner handle from the lock, remove the rod.
We remove the front door lock along with the locking drive and rods through the technological opening in the inner door panel. Install the front door lock in reverse order
Dismantling Kalina locks
Tools and materials: (for torture and attempting to restore the lock) - “Bulgarian’s wife” - set of screwdrivers - soldering iron - welding
1) One of the experimental samples on the operating stool. Let's start disassembling. You will need a set of “stars”.
2) We gradually disassemble it into details. And we remember what and where it was installed. This is an important point. Otherwise, you'll get tired later.
And here is the first bummer. Rivet installed. Many people stop at this point and do not dare to further dismantle the non-removable lock))) This is a tautology
3) The lock is already faulty, there is nothing to lose. We grind the rivet with a grinder.
Construction of standard locks: features and disadvantages
The Kalina rear door lock has a simple mechanism when compared with the devices equipped in foreign cars. The VAZ mechanism has to be changed more often than foreign cars. The electric lock circuit for a Zhiguli hatchback, sedan, station wagon is concluded in the operation of the left and right core blocks. When they close, the door is blocked, when it opens, it opens.
A car lock is a device consisting of a cylinder, pins, teeth and a rod. The inner block can be replaced, then the main body does not have to be dismantled. The cost of the core is about 500 rubles, and the one-piece device is 1500 rubles. The interlocking pins create the coding, but if one of the teeth is broken, one side of the core will not fit into the groove when the key is turned.
If the part creaks when opening or the key operates with difficulty, these are the first signs that the Grant door lock cylinder needs to be repaired or replaced.
Repair of door handle on Kalina VAZ-1119
A very simple way to quickly repair a door handle
, no need to open the
door
, everything is done from the outside.
3. To remove the door lock, disconnect the wire terminal from the “negative” terminal of the battery
Using a Phillips screwdriver, unscrew the screw securing the intermediate lever of the locking rod, and remove the lever together with the rods from the rectangular protrusion, removing the locking rod from the plastic holder (shown by the arrow).
4. Use a Phillips screwdriver to unscrew the screw securing the base of the inner door handle and remove it. together with traction from a hollow pin. Remove the decorative glass trim and take out the glass guide.
5. Removal, installation, replacement and repair of the outer front door handle of the Lada Kalina | Section 10. Using a Phillips screwdriver, unscrew the three screws securing the door .
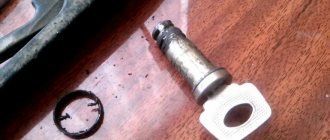
Replacing the larva in Kalina
First of all, replacing the lock elements means that the door trim will be completely missing. Therefore, first we will figure out how to dismantle the trim on Lada Kalina cars. The second chapter is devoted to how to remove the larva and install a new one in its place. The last step will actually be the simplest.
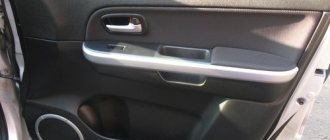
Removing the door trim yourself
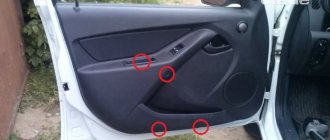
The casing is attached not only to screws, but also to plastic pistons. The number of screws holding the part in question is four:
Front door trim 1118
Numbers here indicate all fastening elements. But to get to them, you need to remove the screw cap “3”, as well as the inner door handle. The pawl handle also needs to be unscrewed.
If these actions are completed successfully, the casing begins to be dismantled, moving it away from the metal. Dismantling is carried out starting from any of the corners, but care must be taken: the pistons holding the plastic are fragile.
How to remove plastic trim
If the package includes power windows, you will need to disconnect the connector connected to the button block. Also, another similar connector is present in most trim levels - where there is a central lock. Both connectors must be disconnected.
All the steps described here involve electronics in any case.
Therefore, at the stage before dismantling the trim, you need to open the hood, take the “10” key and unscrew the negative terminal. We are talking about the battery terminal, which can be connected last (when the last screw is screwed in). Anyone who breaks this rule will look for blown fuses. Draw a conclusion.
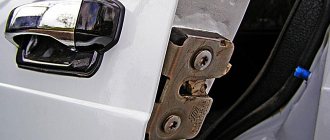
How to get to the door mechanism
According to the recommendation of the magazine "Behind the Wheel", in the absence of casing, access to the lock is always available. Simply put, there will be no need to remove the inner lining made of metal. The steel sheet is simply bent to the side.
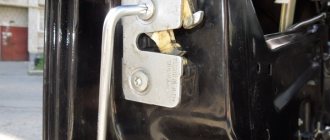
Lock mechanism
The rotating part with the protrusion is called the “drive”, and this is what you will need next.
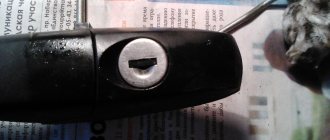
Replacing the larva will be easy:
- The key in the cylinder currently fixed in the door is turned 90 degrees;
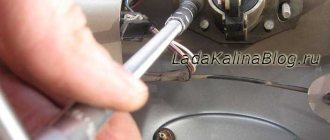
- Using a steel ruler, knife or thin screwdriver, you need to press the locking tongue located opposite the slot in the body of the cylinder. You need to place a screwdriver between the rotating and stationary parts of the mechanism. Know that in the driver's door the slot is made from the bottom (looks “to the floor”), in the passenger doors - from the top!
- By pulling the key towards you, the larva is pulled out;
- The new cylinder is installed like this: with the key inserted, it is pushed into the lock until it stops. The locking tab will need to be pushed inward.
The following photo illustrates the “second step”.
Slot above the locking tongue
The slot itself, when the mechanism is assembled, is located between the drive and the lock body (at least that is how it is designed). You need to manage to squeeze a screwdriver into the space between these parts. Sometimes this action does not lead to a positive result, and then the lock has to be removed as an assembly.
Prevention
As a measure to prevent breakdowns, experienced specialists recommend periodically performing maintenance on electrical circuits. This requires a complete review of all wires and disconnectors twice a year for damage to the braiding and oxidation of copper contacts. Damaged parts or loose joints must be replaced with new ones.
Also, advice from “experienced” motorists speaks of the rationality of treating parts with special dielectric oil - this prevents air and moisture from entering sensitive areas and significantly increases the service life of devices.
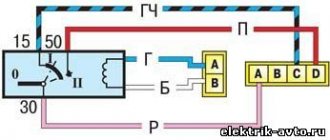
The pinout of panels of the Kalina car from Lada is distinguished by its simplicity and reliability. There are no complex controllers or blocks here. Consequently, system maintenance and troubleshooting do not require in-depth knowledge of electronics or expensive tools.
When installing an alarm system, they most often make mistakes with connecting the central locking system. Standard central locking is now installed on many cars, and the Lada Kalina of generation “1” was no exception. But the fact is that in the “Norma” configuration one scheme for connecting locks is used, and in the “Lux” this scheme is different. And the connection of the signaling, of course, is also done differently. Let's consider how alarm and alarm systems can be combined if we are talking about any of the specified configurations.
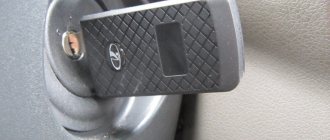
What to do if a key is stuck in the lock and other problems
There is a very rare malfunction - the key gets stuck in the ignition switch of the Lada Kalina. The car owner can neither unlock the steering wheel nor start the car. As a result, the car becomes immobilized.
This can happen for two reasons:
- The lock is defective - it begins to jam due to manufacturing errors.
- The key is defective or its copy is incorrect.
Keys are often lost. Car owners, in order to save on the original, turn to the services of people who know how to make spare parts. The result is not the copy that the castle needs.
However, the key cannot unexpectedly get stuck tightly. The malfunction first manifests itself in the form of rare jams, which are eliminated by rocking the key from side to side.
Below is a table that tells you what to do in case of various ignition switch malfunctions:
| Malfunction | Method for starting the engine or solving a problem |
| The starter does not turn on, but the ignition works | Turn on the ignition, apply positive voltage to the starter relay directly from the battery. |
| The key won't turn | Rock the steering wheel in different directions. Perhaps it was blocked. At the same time you need to try to turn the key. |
| The key blade broke and remained inside the lock. | Heat a piece of hot melt glue and apply it to the end of the sting. Pull it out of the mechanism. If this fails, you can insert the knife into the hole of the cylinder and turn it together with the rest of the key until the engine starts. After starting the engine, move to the repair site. |
The car owner can replace the faulty ignition switch himself. However, it is important to be able to choose it correctly.
How to program new keys for Lada Kalina
This process is called immobilizer training. Its purpose is to write new key chips into the ECU memory in case the old ones are lost. This is relevant after replacing locks, keys, etc.
You need to perform the following procedure:
- Close all doors. Turn on the ignition and wait 6 seconds.
- Turn off the ignition. The immobilizer indicator on the panel will begin to blink quickly, confirming the start of the learning procedure.
- Pull out the red key and insert a new one, turn on the ignition. Wait for three beeps from the buzzer.
- We wait until the buzzer gives two more signals and turn off the ignition.
- If you need to train another key, then repeat steps 3 and 4. After completing training, insert the training key again for 5 seconds while the indicator is flashing and wait for three beeps. After this, two more signals should sound after some time.
- Turn off the ignition.
- We wait until the buzzer beeps once.
- Turn off the ignition for 2-3 seconds and turn it off.
- The hazard warning lights will flash and the horn will sound.
- Turn off the ignition and remove the learning key.
- We wait more than 10 seconds, then turn on the ignition with a new key.
- We wait 6 seconds and try to start the engine, if it fails, then turn off the ignition again, wait 10 seconds and repeat this procedure.
Keys with a built-in remote control for electric locks are registered in the same way.
Purpose in different cars
Without the participation of limit switches in a car, even such a process as opening and closing doors, hood or trunk is not complete. If there is an unauthorized attempt to open them, the security alarm is immediately triggered, which is connected to the corresponding parts through certain wires.
Without the help of a switch, the lamp inside the car will not automatically turn on at night, the control sensor will not work, etc. The trunk lighting will not turn on when it is opened. The brake lights will not light up when you press the brake pedal if the corresponding part – the “frog” – is faulty.
The units vary in shape and installation location depending on the make of the car. The door elements of many cars are located in the door opening (slam). It’s just impossible to see where the door switches are located on Kalina, since the part is hidden in the door lock.