In some cases, domestic Lada Priora requires replacing the ignition switch, although this procedure is quite rare. I would like to add that this repair cannot be called complicated, everything is quite simple and clear, the main thing is to know how to remove such a device as the ignition switch with an immobilizer and follow the instructions step by step, but at the same time you need to understand that the matter must be approached responsibly.
Replacement on Lada Priora and any other car is always carried out if damage/wear occurs. The ignition switch with an immobilizer is replaced if the car does not start due to its fault, as well as if the electrical circuits of the car are faulty, because the ignition switch with an immobilizer is their starter. Let's give a simple example: you turn the key to one position, at this moment not only the car ignition system is alerted, but also other other functions of the Lada Priora, including:
- High/low beam headlights;
- Exterior/side lighting;
- Power unit cooling system fan;
- Dashboard lighting;
- Interior heating system fan.
It follows from this that a mechanism such as an ignition switch with an immobilizer must always be in full working order.
How to replace the ignition switch on a Priora
In order not to think about how much it costs to repair an ignition switch in a service center, go through the update process yourself. If the car does not start, consult a specialist. We will talk about the features of the ignition switch and the process of replacing it yourself.
- What is the device?
- Design Features
- Why the system might break down
- Troubleshooting
- Replacement with immobilizer
- Brief conclusions
- We recommend watching:
Standard ignition switch - article number, price, how it works, device
The module on Priora does not work directly with the components that initiate the engine start. For it to work properly, you need to wait a few seconds before starting until the fuel pump creates the required pressure. On the Priora, only wires are connected to it - the paths along which messages pass from the ignition switch to the electronic control unit.
The ECU of the Priora car just receives data about the position of the key and can crank the starter if this operation is “not blocked”. Due to a breakdown, it can only turn on the ignition, leaving the battery to work.
After the ECU key has turned, it gives commands to several parts at once. When you turn on the second position, let the fuel pump run for 5 seconds so that it pumps fuel from the tank closer to the engine.
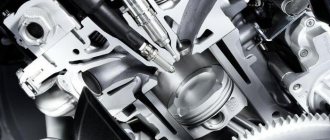
When the starting process itself begins, the starter rotates - the force it creates goes to the crankshaft;
the ignition system element converts the low voltage current coming from the battery into a high one so that the spark plugs are “charged” and give a spark at the right moment;
The injector creates the first batch of air-fuel mixture to put it into the chamber, where everything is ready for it - the pistons “move”, the spark plugs spark.
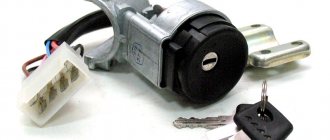
In the module itself, everything is simple - there is a cylinder with a return spring inside, between the coils there is a locking ball that does not allow it to curl up more than necessary, and a locking rod holds the structure in place. Finally, as a complication of the entire system, there is an “immobilizer” - an anti-theft system that you can install yourself. It just takes a long time to set it up.
A regular kit with a master key and several door cylinders (with an immobilizer) costs from 1,800 - 2,000 rubles, catalog number - 2170-3704005. A set without a master key (without an immobilizer) can be purchased for 1,200 – 1,400 rubles, article number -2170-3704006.
Let's sum it up
Now you have an idea of how to remove such an important device as the ignition switch with immobilizer on the popular LADAPriora model. Sometimes it is enough to carry out repairs, because replacement is not always necessary. There should be no problems with independent work; this will help save money and time spent on car service. The main thing is to do everything carefully and consistently.
When I bought the car, the standard alarm system did not work; the previous owner said that the battery in the key fob needed to be changed (LIED)! Then later it turned out that the ignition switch had already been changed and the training key was not from it, the immobilizer was not activated, so I drove for 3 years opening the doors with the key!))) TIRED! I recently purchased an ignition switch with all the keys and a new key fob, changed it quickly, but I was in no hurry to retrain it (you never know the immobilizer is buggy or something else, for some reason it was turned off!) I read it on forums and websites and decided to train it, it worked on the first try. When I pressed the door lock on the key fob, the car locked and beeped once! I started to check what the reason was, if some door was open, then the lamp would be on, the trunk would be on - I recently changed the lock and there is a limit lock, it also works because when you open the trunk the light comes on and when you close it goes out! The hood remains. I removed the connector from the limit switch and the exact contact was oxidized, cleaned it and, just in case, stuck a little noise on the hood to put more pressure on it. Everything stopped beeping! Now it has become convenient to open doors with a button, as I lived before)))).
KEY LEARNING - A. Close all vehicle doors. Turn on the ignition with the training key and wait in the on state for at least 6 seconds. B. Turn off the ignition. The lamp should start flashing quickly (5 times per second) all the time. Remove the training key from the ignition switch. C. While the lamp is flashing (about 6 seconds), you must insert the working key into the lock and turn on the ignition. The buzzer will emit three beeps when the ignition is turned on. D. Wait with the ignition on (about 6 seconds) until the buzzer sounds two more beeps. E. Turn off the ignition. F. While the lamp is flashing (about 6 seconds), you must remove the key from the ignition switch, reinsert the learning key into the lock and turn on the ignition. The buzzer will emit three beeps when the ignition is turned on. G. Wait with the ignition on (about 6 seconds) until the buzzer emits two more sound signals. N. Turn off the ignition. Do not remove the training key from the ignition switch. Approximately 6 seconds after the ignition is turned off, the buzzer should emit a single beep and the lamp should begin to flash twice as fast. I. No later than 6 seconds after the sound signal (while the lamp is flashing quickly), you must turn on the ignition with the same training key. In this case, the car should flash the emergency lights, the buzzer will give three beeps and one car beep. After waiting 2-3 seconds, turn off the ignition. No later than 5 seconds after turning off the ignition, the buzzer should emit three beeps and the light should stop flashing quickly. Do not turn on the ignition for at least another 10 seconds and do not remove the key, wait until the status indicator in the instrument cluster goes out. J. 10 seconds after removing the key, check the operation of the remote control (key fob) for opening and closing doors. At the end of the learning procedure, it may be necessary to resynchronize the immobilizer and controller codes, since after completing the learning procedure, the controller may not allow the engine to start when the ignition is first turned on. To resynchronize the codes, turn on the ignition with any trained key (preferably a working one). Pause for 6 seconds. If the immobilizer warning lamp begins to indicate an erroneous system state (flashing once per second), turn off the ignition and wait at least 10 seconds. After this, turn on the ignition again. The lamp should not flash and the engine should start. If, 3 seconds after turning on the ignition, the indicator light is constantly on, it means that the anti-theft function of the controller is not activated and the learning procedure should be repeated again.
IMMOBILIZER INDICATIONS AND SOUND SIGNALS — When the system is in good condition, the immobilizer indicator does not light up and there are no buzzer signals.
If, when you turn on the ignition, the immobilizer indicator lights up with a constant light or starts flashing, and after about 10 seconds the immobilizer buzzer sounds and the same signal is repeated after another 10 seconds, this means that the immobilizer is either untrained or there is a malfunction in the immobilizer system.
The number of beeps and indicator signals indicates the type of malfunction.
1. If 1 buzzer sounds and the immobilizer indicator flashes, the diagnosis is “The key cannot be read”
1.1 Malfunctions of the transponder circuit - this group of malfunctions is characterized by the absence of a “signal about the key left in the ignition switch” when the ignition is turned off and the driver’s door is open.
1.1.1 Malfunction in the ignition switch communication coil circuit.
Measure the resistance of the communication coil between the contacts of the 2 black terminal block from the ignition switch, which should be within 6 - 8 Ohms.
If the coil resistance is normal, check the continuity of the circuit between the 2-terminal block to the communication coil and contacts 1 and 11 of the APS-6 unit.
1.1.2 There is no transponder in the key.
In the training key - check the presence of a transponder and its designation, it should be PCF7936AS. If there is no transponder, take a “clean” training key and a “clean” engine control system controller (ECSC) and retrain the immobilizer system.
1.1.3 The transponder in the key is faulty; it is detected during pre-sale preparation at PSSS.
In the training key - you need to take a “clean” training key and retrain the immobilizer system.
In a working key with a remote control (RC), you need to replace the remote control with a “clean” one and retrain the immobilizer system.
1.1.4 Malfunction of the input transponder circuit of the APS-6 unit - it is necessary to replace the APS-6 unit and retrain the immobilizer system.
1.2 “Alien” remote control – this malfunction is characterized by the presence of a “signal about the key left in the ignition switch” when the ignition is turned off and the driver’s door is open.
It is necessary to replace the remote control with a “clean” one and retrain the immobilizer system.
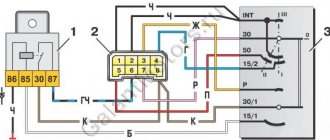
2. If 2 beeps sound and the indicator blinks - diagnosis “No connection with ECSC”
2.1 Break in the communication line along the W line - restore the circuit between contact “18” of the APS-6 unit and contact “71” of the KSUD M7.9.7 (January 7.2).
2.2 Malfunction of circuits in the APS-6 or KSUD block on the W line - to identify a faulty product, it is necessary to carry out a test replacement of them one by one. If after replacing the product the fault code does not recur, it must be replaced.
2.3 There is no supply voltage on the APS-6 or KSUD unit.
Check the presence of voltage on the contacts of the KSUD M7.9.7 (January 7.2):
a) contact “12” – power supply from terminal “30” of the ignition switch;
b) contact “13” – power supply from terminal “15” of the ignition switch;
c) contacts “44”, “63” – power supply from terminal “30” of the ignition switch after the main relay.
3. If 3 buzzer beeps sound and the immobilizer indicator is constantly on or blinking - the diagnosis “The code of the read key is not in the APS memory.”
3.1 If, after turning on the ignition, the immobilizer indicator lights up continuously for 20 seconds and 3 buzzer sounds sound, then the immobilization system has not been trained; the system should be trained.
3.2 If, after turning on the ignition with the training key, the immobilizer indicator flashes and 3 buzzer signals sound, then the APS-6 unit is “foreign” or the key is “foreign”.
If the APS-6 unit turns out to be “foreign”, to restore functionality it is necessary to retrain the system with a “own” training key for the KSUD.
3.2.2 “Alien” training key.
If the training key turns out to be “foreign”, to restore functionality you need to take a “clean” training key and a “clean” ICS and retrain the immobilizer system.
4. If 4 buzzer beeps sound and the immobilizer indicator flashes, the diagnosis “ECS does not confirm permission to start the engine.”
This means that the KSUD was previously trained with a different system; it is necessary to replace the KSUD with a “clean” one and retrain the immobilizer system.
5. If, after turning on the ignition, the immobilizer indicator lights up for 20 seconds and the buzzer does not sound, then the immobilizer is trained with its keys, but the ACS is not trained.
If the car does not start, and you are sure that the components are working properly and the battery is charged, you will have to remove it in any case to inspect and identify the fault. Repairs can be done by anyone; it’s enough to understand all the steps in detail. If it does not help, then the ignition switch needs to be replaced.
How to change and remove it on a Lada Priora car and how many actions need to be performed, you will learn from the article.
Once the ignition switch is turned, the car remains in the ignition even when you remove the key. Unfortunately, Priora is not deprived of this; as the lock wears out, this happens.
How long it will work depends on how you use it. If you use force once, you can break the ignition switch.
Possible malfunctions of the protection system and ways to eliminate them
If the ignition switch fails on a VAZ 2170, many motorists may confuse this problem with a breakdown of the ignition coil or, for example, the ignition module. But as for the 3Z specifically, its repair or replacement is carried out only if the key is not moved to position I or the steering wheel is not blocked after the key is removed. The key must always return to position I after starting the engine. If this does not happen, then you can either repair or replace the ignition switch.
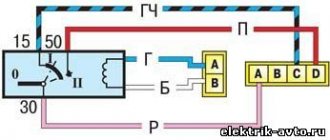
Pinout of lock VAZ-2108, VAZ-2109, VAZ-21099
Pinout according to the old type
Pinout of the VAZ-2109 ignition switch with unloading relay:
- comes +12V in position I, II, III (parking)
- comes +12V in position I, II, III (parking)
- comes +12V in position III (parking)
- position I, +12V goes out after turning on the ignition (contact 15/2), disappears at start (II);
- position I, +12V goes to the starter (pin 50);
- position I, +12V goes away after turning on the ignition (pin 15), does not disappear when starting II;
- +12V comes from the battery (pin 30);
- comes +12V constantly.
New pinout type
Pinout of the new VAZ-2109 ignition switch:
- comes +12V constantly
- comes +12V constantly
- +12V arrives after turning on the ignition (pin 15), does not disappear when starting II;
- +12V arrives after turning on the ignition (contact 15/2), disappears at start (II);
- position I, +12V goes to the starter (pin 50);
- +12V arrives after turning on the ignition (pin 15), does not disappear when starting II;
- +12V comes from the battery (pin 30);
- comes +12V constantly.
Replacing the ignition switch yourself
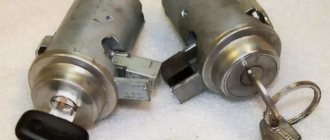
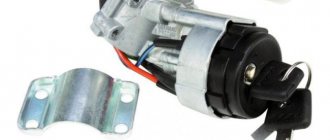
Unfortunately, the Lada Kalina cannot please you with its reliability and durability; many systems, including the ignition switch, fail within a couple of years, so in order to save on repairs at expensive car repair shops, it is better to find out how to do it yourself. So, having come to the conclusion that the lock needs to be changed, we buy a new lock, which costs around a thousand rubles. In the kit we will receive three cylinders (on the doors and trunk) and 2 keys. You also need to purchase four shear bolts , since the old ones will no longer be suitable after dismantling.
In addition to the product itself, we will need the following tools:
- chisel;
- two screwdrivers, a flat one for removing the clamps and a cross for the bolts;
- 10mm wrench or 10mm ratchet;
- key to 8.
Let's get started
1. First you will need to disconnect the battery cable from the negative.
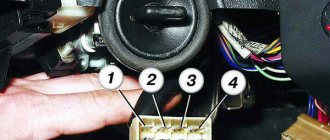
2. Armed with a cross-head screwdriver, unscrew the fasteners on the steering column. To make it more convenient for you, we immediately warn you: there are two bolts on the right and left sides (3), two at the bottom in the middle (2), and two at the very bottom (1). There is also a self-tapping screw located directly under the steering wheel (4).
Repair instructions
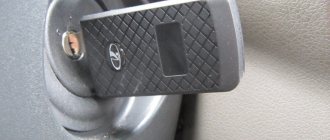
The location of the 3Z is known to everyone - this unit is located directly under the steering wheel. To properly replace or repair a device, you must follow the instructions:
- First, disconnect the battery and remove the plastic steering column cover, which is secured with bolts.
- Next, press out the fastening and disconnect the connector with the 33 wiring from the control panel wiring block. When unplugging, be careful not to damage the plug.
- Having done this, you will also need to disconnect the plug with the 3Z wires from the connector with the wiring of the immobilizer control system. Using a hammer and chisel or a drill, you need to remove the four breakaway screws and remove the assembly from the steering column. You can't just unscrew these bolts. VAZ engineers decided to use this method of installing the protection in order to protect car owners from possible thefts. This method of fastening, as you can guess, makes it very difficult to dismantle the protection, so at this stage you will have to tinker. In any case, the bolts can be dismantled or drilled out, but instead you will have to purchase new ones in advance.
- After completing these steps, you can bend the connector mount with wiring from the 3Z. The terminals with wires are removed from this connector. Next, you need to compress the latches again and dismantle the plastic cover of the device itself. If you plan to simply change the node, then this can be done at this stage. We suggest that you familiarize yourself with more detailed information on repairs - it is quite possible that simple steps will restore the unit’s functionality and save money.
- So, if you decide to repair the mechanism, then at this stage you need to press out two more plastic clips and remove the contact group from the cover.
- Next, it is necessary to carry out a thorough visual diagnosis of the contacts. If you notice that the contacts have oxidized or burnt, you can restore their functionality by cleaning them using fine-grained sandpaper. Get rid of oxidation and plaque, but do not go too hard so that the contacts do not wear off. If the damage to the contacts is too severe, then cleaning will not solve the problem - you will only need to change either the contactor itself or only the contact group.
- If everything worked out with the contacts, then you can assemble and install the protection. During assembly, pay attention to the position of the terminals with the wiring in the connector; under no circumstances should they be mixed up.
- After completing these steps, install the locking device back into place, while pre-sinking the locking rod of the anti-theft unit. To do this correctly, install the key in the 3Z and turn it to any position, the main thing is that it is not in the “0” position. If the key is replaced, then the transponders must also be changed - these are special electronic code components on the head of the key. If you do not do this, then you will also have to carry out the training procedure, as well as change the lock cylinder on the trunk and doors, and this is a rather labor-intensive process. Otherwise, you will have to use the old key to open the doors and trunk and the new one to start the engine. Agree, this is completely inconvenient, but this is only relevant for those car owners who have changed their license plate.
Replacing the remote control battery
The remote control is equipped with a CR2032 lithium battery, the initial supply voltage of which is 3 V. If the remote control supply voltage is within normal limits, then each time you press any button on the remote control, the indicator lights up with a short flash. If, when you press any button on the remote control, the indicator lights up with two short flashes or does not light up at all, then you should replace the battery with a new one.
To do this, you need to unscrew the screw from the side of the case opposite the control buttons, separate the halves of the case, remove the board from the case, replace the battery with a new one, observing the polarity; insert the board into the case; snap the housing halves together and tighten the screw.
We fix the most common problems
Then we begin to correct problems in the wiring system.
Most often, problems in the ignition system are associated precisely with oxidation or chafing of the wire group. Carefully pry (using a flat-head screwdriver) the plastic latches on the cover of the wire block and open it
It is important to remember, or better yet, note the location of the wires there, so as not to get confused during reassembly. If you are not a pro, the easiest way is to record the location of the wires using a camera on your mobile phone
We sequentially unbend the metal “antennae” and take out the wiring. During this operation, we will be able to clean the contacts and check their integrity.
We go directly to the ignition mechanism, remove the wires located on the ignition system housing. To do this, use a screwdriver to press out the latches (they are plastic, so disassembling them is not difficult, but this must be done carefully) and remove the wiring from the housing.
The housing contains a contact group, which starts the vehicle systems
It is important to check its condition and possible problems
The part we have to pay special attention to is the moving contact. It needs to be disassembled and checked
To do this, we separate it from the stator contact group and disassemble it. Disassembly is carried out by simply pressing on this mechanism and turning it counterclockwise. As a result, the contact spring is separated and checked, and it is also possible to access the check of the car's anti-theft system.
Cleaned and replaced contacts or APS-6 will allow you to fix your car's ignition system.
Report on replacing the ignition switch on a Lada Priora
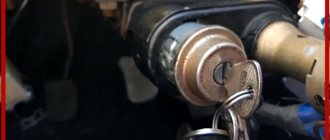
So, to get to the lock mount, we first need to remove the steering column cover. After this, this entire structure becomes available to us. Now, using a sharp chisel, you need to tear off all the bolts securing the lock, since the caps there are without edges.
When all 4 bolts are broken, you can finally unscrew them by hand, or using long-nose pliers, as shown more clearly in the photo.
When they are all unscrewed, you can remove the lock from the steering shaft, since there is nothing else holding it.
And in order to completely release the ignition switch, you need to disconnect the two plugs with wires.
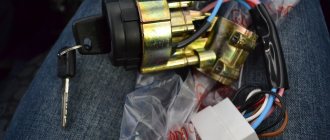
We install the new part in the reverse order, having previously purchased a new one. The price of a lock on a Priora is no more than 1,800 rubles complete with keys and door cylinders. But you can buy the same one at a disassembly for half the price, although it is no worse in quality.
Removing the ignition switch, replacing the contact group and immobilizer coil
We remove the ignition switch to replace it if its cylinder mechanism fails, to replace the contact group of the switch, and also if it is necessary to replace the immobilizer coil. Disconnect the wire terminal from the negative terminal of the battery. To access the ignition switch, remove the upper and lower steering column casings (see “Removing the steering column switches, switch connector and spiral cable drum device”).
Remove the sealing ring from the ignition switch. Having released the pad lock...
...disconnect the ignition switch contact block from the instrument panel wiring harness block. Use a slotted screwdriver to pry up the edge of the immobilizer coil wire block...
...and disconnect the wiring block of the instrument panel harness from it. The heads of the ignition switch mounting bolts are torn off.
Loosen the bolts using a chisel... ...and unscrew the bolts with pliers
Remove the bracket and ignition switch from the steering column.
Using a Phillips screwdriver, unscrew the three screws...
...and remove the ignition switch bracket.
We take out the locking rod of the anti-theft device. Turn the key in the ignition switch...
...and remove the locking rod drive and the drive spring.
Remove the stopper with the spring from the drive. We push the cylinder mechanism out of the switch body.
We take out the locking ball and cylinder mechanism.
We remove the locking ball spring from the hole in the mechanism.
Prying it with a screwdriver. ... we disengage the two plastic latches of the cover of the ignition switch wire block and open the cover. We mark the wires located in the block.
Using a thin awl or stiff wire, bend the locking tendrils of the wire tips...
...and remove the wires from the block. Remove the insulating tube from the wires.
Squeeze the three plastic latches with a screwdriver. ...remove the contact group from the switch body and bring the wires out through the holes in the body.
Prying it with a screwdriver. ...we disengage the three plastic latches...
Malfunctions of the ignition switch LADA “Granta”
Ignition switch failures can be divided into two types: electrical and mechanical. Electrical faults include malfunctions of the contact group of the lock, as a result of which individual energy consumers (most often the starter) or the entire Granta electrical system as a whole stop working. This also includes a breakdown of the car's immobilizer. Mechanical malfunctions occur due to breakdown of parts of the ignition switch or contact group, as well as physical wear of the contacts. This also includes cases when, due to poor contact, heating and melting of the plastic parts of the contact group occurs. Signs of a malfunction in the ignition switch of the LADA Granta:
- the key does not turn;
- when turning the key the ignition does not turn on;
- The starter or other electrical appliances do not work.
The last two signs do not necessarily indicate problems specifically in the ignition switch, but they certainly appear when the contact group is faulty.
To eliminate the malfunction, it is necessary to replace the LADA Granta ignition switch or part of it, for example, a contact group.
What is needed to replace the Granta ignition switch
To replace the ignition switch you will need:
- key to 10;
- a thin chisel and a hammer (or a drill with a drill bit to drill out bolts with self-cutting heads);
- screwdriver;
- new ignition switch LADA “Granta” or contact group.
The structure of the lock and its possible breakdowns
Ignition includes:
- locking rod;
- body part;
- roller with contact disk;
- sleeve;
- protrusion on contacts;
- block;
- wide protrusion of the contact part.
The locking mechanism comes into contact with a large number of wires. They reach to the battery and connect automotive electrical appliances into a single chain. At the moment the key is turned, the electrical circuit is closed from the “negative” terminal of the battery, as determined by the connection diagram for the VAZ 2106 ignition switch that comes to the coil. If the key begins to turn poorly or jams, this means that the secret is broken. Experts recommend spraying VD-40 into the larva, but the effectiveness of this is low and rather short-lived.
Has the contact group burnt out, after which you have difficulty starting the starter? Change the ignition switch.
Troubleshooting Starter Problems
The starter is an important element of the engine starting system. Its task is to ensure vigorous rotation of the crankshaft, which transmits translational motion to the piston group, creating the necessary degree of compression in the combustion chamber and removing exhaust gases.
Basic starter malfunctions:
- short circuit in the traction relay winding;
- oxidation of wire tips;
- bendix jammed;
- break or short circuit in the starter winding;
- worn or damaged starter brushes.
First, you should conduct an external inspection of the Priora starter fuse: check the condition of the contacts, clean the oxidized terminals. It is necessary to evaluate the reliability of the ground connection with the engine and body. Then you need to try to start the car again. If the Lada Priora starter traction relay clicks, but it does not spin, the breakdown needs to be repaired.
If the device fails in the field, when it is not possible to contact a service station, you can jump start the car. For this you will need an assistant. Having accelerated the car with the ignition on, you need to quickly engage second gear and release the clutch: the car starts to twitch, but after two or three jerks it starts. This is the most popular method of starting the engine when the battery is dead or the starter is faulty, but it can only be used on vehicles with a manual transmission.
Repairing the Lada Priora starter can be done by removing it from the engine: this makes it easier to carry out preventive maintenance, unlock the bendex, and replace brushes. If a winding break occurs, you need to install a new starter assembly, and it is advisable to do this on a cold engine.
Sources of the problem
Communities Lada Priora Lada Priora Club Blog what is affected by the clutch release switch The reasons why the Lada Priora does not start may be a malfunction in the fuel system:
- clogged fuel filters;
- failure of the fuel pump;
- lack of gasoline in the tank;
- clogged injectors;
- condensate freezing in the fuel line.
Having certain skills, every car enthusiast can fix these faults with his own hands. First you should check whether gasoline is supplied to the ramp with injectors. To do this, you need to disconnect the fuel hose from the rail and connect the pressure gauge. Then ask an assistant to start the engine. When the fuel pump is running, the pressure in the fuel line should be 2.7 atmospheres. If the pressure is lower than specified, you should look for the cause in the fuel filters.
A complete lack of pressure when a voltage of 12 V is applied means that the fuel pump has failed. To fix the problem, you need to replace the fine filter, wash or change the fuel pump filter, or replace its electric motor.
If the pressure in the fuel line is normal, the cause should be sought in the injector rail. You need to remove it from the engine, wash it with a special liquid and blow out all the holes with compressed air. To prevent condensate freezing from causing a lack of fuel supply, repair work should be carried out in a warm room.
List of possible malfunctions related to the operation of electrical equipment:
- Insufficient battery charge.
- Battery terminals are oxidized.
- The starter does not work.
- The traction relay is faulty.
- The timing belt is broken.
- Malfunction of the electronic control unit.
- The valve timing is disrupted.
- Severe contamination of high-voltage wires or lack of contact.
- Pulse transformers are faulty.
- The fuses responsible for the operation of the ignition system and starter have blown.
- Spark plugs are flooded or faulty.
- Burnt ignition switch terminals.
- The immobilizer is faulty.
Before you start looking for these problems, you need to make sure that the contacts and connections of all wires are reliable, that there is no oxidation, breaks or abrasions.
Replacing the ignition switch
To solve all these problems, the surest solution is to replace the ignition switch. Many motorists are in no hurry to immediately contact a car service center, but try to repair their beloved child with their own hands. Is it possible to replace the lock yourself without having special abilities and skills? Yes, this is quite possible, and any real man can do it.
Wiring ringing
So, depending on the cause of the malfunction, replacement may be:
- Complete lock replacement
- Replacing the lock cylinder
- Replacing the contact group.