Now comes the fun part. Description of replacing the ignition switch (ignition switch) or contact group on VAZ-2101, VAZ-2104, VAZ-2105, VAZ-2106, VAZ-2107, Classic cars: 1. Be sure to remove the negative terminal from the battery.
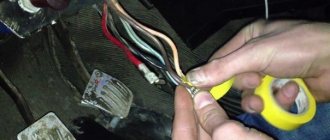
2. Turn the key to the horizontal position, position “0” (photo 2).
3. Unscrew the 5 mounting screws of the plastic steering column casing (photo 3)
The key element of the car is the ignition switch, which is entrusted with the task of controlling the electrical system. The main purpose of the ignition switch on a VAZ 2107 is to start the engine. In addition, if this element on the car is faulty, then the wipers, heater, heated rear window, as well as low and high beams will not work. If it fails, you will need to replace the ignition switch of the VAZ 2107, which is quite possible to do yourself, following the instructions.
Ignition switch device for VAZ 2107
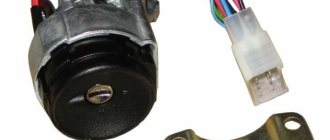
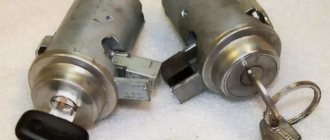
An ignition switch is a cylindrical part that consists of making and breaking contacts inside. On the end side, the ignition switch has a recess for inserting a key. The second end of the cylindrical body has a block with contacts for connecting a plug with electrical wiring. All keys have a universal design, so they are suitable exclusively for “their” locks.
The side of the body has a protrusion, the main purpose of which is to lock the steering wheel in one position. This lock is automatically activated immediately after the key is removed from the ignition switch. Inside, the part consists of two parts - this is the cylinder, which includes the ignition key, as well as a contact group. Scrolling the cylinder causes the contacts to close and open.
On injection and carburetor models of the VAZ 2107, ignition switches of the same design are used.
Larva
The cylinder is the internal part into which the key is inserted and which interacts with it. This element in the lock design has a movable locking pin, which moves when the key is rotated in a clockwise direction. When the key is turned in the opposite direction in the lock (the ignition is turned off), the finger moves out.
When the car owner leaves the vehicle, removing the key from the lock, the finger enters a special recess in the steering column, blocking the steering wheel from rotating in one position. This is an anti-theft system that prevents the car from being stolen without a key. If the larva fails, it can be replaced separately, without a contact group, but using a new key. To replace, you will need to dismantle the lock and remove the cylinder.
Contact connector
The contact group of the VAZ 2107 ignition switch (lower part) consists of two elements. The first element is a movable disk on which conductive plates are located. The second part is a block with contacts in the form of protrusions that connect to the conductive plates.
The movable plate is driven by the lock cylinder when the key is turned. The fixed plate on the outside has protrusions - terminals, through which the supply wires are connected. To connect the wires to the 3Z, a plastic block or chip is used. This connection to the lock is called quick-release.
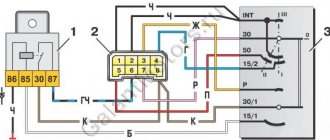
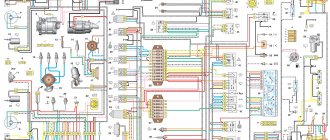
Connection diagram
The connection diagram for the VAZ 2107 ignition switch is implemented using a plastic chip, which is connected to the contacts of a fixed plate on the back of the mechanism. The chip contains wires of different colors, which are responsible for the operation of electrical appliances on the car. Let's look at what the wiring diagram for connecting the wires to the ignition switch of a VAZ 2107 is. This chip has digital symbols. Wires of different colors are connected to each plug, the purpose of which we will learn further.
Operating principle
So, the ignition switch on the VAZ-2101 is an element located in the cabin near the steering column. The entire lock structure is hidden under the decorative trims of the column, so from the driver's side the lock looks like a large round washer with a slot in the center. Along the circle you can see marks - 0, I, II and III, each of which has its own effect.
Label “0” is the position in which all electrical appliances powered by the lock are disconnected from power. It should be noted that some of the equipment (interior lighting, brake light, cigarette lighter) do not depend on the position of the key in the lock; they are constantly powered by the battery. In this position the key can be removed from the lock.
Mark “I” - the position of the lock at which electricity is supplied to the on-board network. In this position, control and measuring instruments, light and sound alarms and headlights, the ignition system and a number of other electrical appliances receive power. This position is fixed, and when moving the key to it, it is not necessary to hold it.
Mark “II” is the position at which voltage begins to be supplied to the starter to start the engine. This position is not fixed, that is, the driver moves the key to this position and holds it to start the engine. After starting, the key is released and, under the action of a spring, it returns to position “I”.
Position “III” is parking. In this position, all electrical appliances are de-energized, and a lock is inserted into the groove of the steering column, which is an anti-theft device for the car.
It should be noted that the lock positions do not follow each other. So, to move the key to positions “I” and “II”, it must be rotated clockwise from “0”. And to set position “III”, the key is turned counterclockwise from “0”.
Ignition switch device VAZ 2107
The lock has a cylindrical shape with a side protrusion - a steering wheel lock. In the closed position, the lock serves as an anti-theft system, blocking the rotation of the steering wheel.
At one end of the lock there are terminals for connecting wires, at the other there is a hole for a key. Only a certain key allows you to change the position of the ignition switch, which serves as additional protection against unauthorized use of the car.
The ignition switch consists of two main parts - a contact plate (or “group”) and a switch mechanism. When the key is turned, the mechanism sets part of the contact group in motion, ensuring the closing/opening of the contacts.
Both parts of the lock may have faults, but they are not repairable. Repair of the VAZ 2107 ignition switch consists of replacing the faulty part or assembly.
Why is it needed?
As soon as cars appeared, there was no ignition key, and the engine was started using a curved element for the engine, which was quite large and stuck in the front or back of the car. Thus, it turned out that the engine was started manually in the literal sense.
Now this function has been inherited by the starter, which turns the internal combustion engine by the flywheel - a large flat disk with teeth. This disc is located between the engine and the clutch.
When starting, the teeth on the flywheel and starter engage, which allows the engine to spin up according to a directed control signal from the ignition switch.
This does not happen without the participation of battery power, of course.
The ignition switch is a device that, when turned on, ensures the supply of electric current from the battery to the traction relay. This is a kind of first push to move the vehicle. Therefore, the ignition switch is an important element, and when it breaks, replacement cannot be avoided, and in order to install a new one, you need to remove the old one.
Malfunctions of the ignition switch VAZ 2107
If the mechanical part of the lock (“secret”) malfunctions, the key begins to turn tightly in the mechanism and may jam. This often ends with the key itself breaking, part of which remains in the lock. You can try to slightly prolong the operation of a stuck lock using WD-40 or brake fluid, but this will not eliminate the need to replace it immediately.
The second problem is that the lock contact group burns out or breaks. Especially often the contact pair responsible for turning on the starter fails. In this case, when you turn the key, the starter does not work or does not turn on on the first try. You can verify that the contacts are not working by checking the voltage at the terminals of the contact group with a voltmeter or “tester”. Faulty contacts are not a reason to completely replace the lock. In this case, you can only replace the contact group, which does not even require completely dismantling the ignition switch. Taking into account the low cost of the contact group, if the mechanical part of the lock malfunctions, it is easier to replace the entire lock assembly, so that you do not have to waste time replacing old contacts.
What is he like?
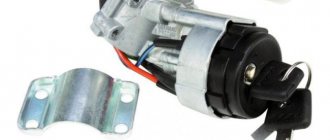
Here is a unit used on GAZ, ZIL, Moskvich, Volga cars and other models produced in the USSR.
The ignition switch is used to connect consumers of electrical energy to the vehicle’s on-board network; it turned on the starter to crank the crankshaft and start the power unit. The design of the device did not have any means of protection against car theft. In case of failure, it is enough to remove the wires from the contact plates, to continue movement, just short them together.
If you can’t turn the starter, don’t despair too much. This can happen due to deformation of the key itself or jamming of the larvae. Before disassembling the switch, try resuscitation. WD fluid is well suited for this purpose; it should be injected into the cavity of the faulty ignition switch. Sometimes lightly tapping the body restores the switch's functionality. Difficulties in turning the key may be caused by natural wear and tear on the lock slats. If there is a second copy of the key, compare them and make sure the products are identical. If noticeable wear is detected, order a duplicate of the product.
The appearance of the first VAZ models showed drivers a completely new design of the device. He had a vehicle anti-theft device. After pulling out the key, the steering wheel locked, making it impossible to continue driving. In the era of fuel shortages at gas stations, drivers turned off the ignition while driving to save gasoline; as a result, the steering was blocked, leading to emergency situations.
The photo shows a representative of the VAZ 2101-2107 family of switches.
This model is not a problem-free product; breakdowns occur in such units. Moreover, problems occur in the contact group, the locking mechanism, jamming occurs, and the lock cylinder falls apart. Contact group problems are easily solved. The wires are removed, and consumer circuits are switched manually. You can continue driving for a long time; the car’s protection against theft becomes practically zero.
To prevent the steering wheel from jamming, you should remove the inoperative device from its seat. This operation will require several Phillips and flat blade screwdrivers. First of all, you should remove the plastic steering column cover and disconnect the wiring. The switch is fixed with screws, they should also be unscrewed. Next, use a thin screwdriver with a flat blade to press the latch in and remove the product out.
To replace the larva you need to disassemble it, you will need:
- Drills with a diameter of 2 and 4 mm;
- An awl with a strong tip, 30-40 mm long;
- Small side cutters, knife.
Procedure for replacing the larva:
- The chrome cover is rolled in three places; it needs to be bent and removed;
- A locking pin is found under the cover; it should be removed;
- A hole is drilled next to it with a 4 mm drill approximately 2 mm deep;
- In this recess, a hole is drilled with a smaller drill, but at an angle to the pin;
- When the drill reaches it, drilling is stopped;
- Now an awl comes into play, they push the pin out;
- Use the sharp tip of a knife to remove the faulty larva.
Reassembly must be done in reverse order.
Replacing the contact group of the ignition switch VAZ 2107
If the ignition switch contacts are burnt and when you turn the key, the electrical circuits do not turn on (usually this is the power supply to the starter traction relay), you can repair the VAZ 2107 ignition switch by replacing the contact group.
The tools you will need are an awl or a thin flat-head screwdriver. The procedure is as follows:
- Disconnect the ground wire from the battery.
- Turn the key vertically (to position “0”).
- Unscrew the screws securing the plastic casing covering the steering column.
- Remove the casing.
- Disconnect the terminals of the wires going to the ignition switch contact group.
- blue with a black stripe on terminal 15;
- brown to terminal 30/1;
- pink to terminal 30;
- red (magenta) to terminal 50;
- black to the INT terminal.
The wiring diagram is also indicated on the box.
- Using an awl or a screwdriver, pry up and remove the retaining ring that holds the contact group in the ignition switch housing (this operation is inconvenient and sometimes difficult to perform without some experience).
- Pull out the old contact group.
- Insert a new contact group.
- Install the retaining ring into the housing groove.
- Connect the wires to the terminal of the contact group.
- Install the cover on the steering column and tighten the fastening screws.
- Connect the ground wire to the battery.
- Check the functionality of the lock.
At this point, the replacement of the contact group is completed and the machine is ready for operation.
Color gradation
To correctly connect the contacts on the back side, you need to know the colors of the wires. Each of the chips comes with a cable with insulation of a personal shade. We recommend focusing on the diagram:
- pin 50 – contacts the red wire connected to the starter;
- pin 30 – pink contact;
- pin 30/1 – brown cable;
- pin 15 – blue with a dark stripe is in contact with the heater, ignition, etc.;
- INT pin – black cable, responsible for starting the head optics and operating the dimensions.
After all the wiring is connected, we can reconnect the battery terminals and check the functionality. We start the ignition in each position one by one, testing the performance of the devices.
Replacing the ignition switch of a VAZ 2107
If the ignition switch sticks or does not turn, it is necessary to change the “secret” or the lock assembly. Replacing the ignition switch of a VAZ 2107 is carried out as follows:
- Disconnect the ground from the battery (if this is not done, the probability of a short circuit when removing the lock will be 100 percent).
- Set the lock to position “0”.
- Unscrew the steering column housing screws.
- Remove the steering column cover.
- Unscrew the two ignition switch mounting bolts.
- Through the technological hole in the place where the lock is attached, press the latch holding the lock body and push the lock out of the installation location.
- Disconnect the wires going to the ignition switch contact group.
- If it is necessary to change only the mechanical part of the lock, use a screwdriver to pull out the retaining ring, dismantle the contact group and move it to the new lock.
- Install the new lock into the seat.
- Tighten the ignition switch mounting bolts.
- Connect the wires to the ignition switch contacts in accordance with the connection diagram.
- Install the protective (decorative) cover of the steering column.
- Tighten the bolts securing the protective cover.
- Connect the ground wire to the battery.
- Make sure the ignition switch is working.
The operation to dismantle the ignition switch is quite simple. Therefore, it is recommended to remove it entirely to replace only the contact group. This greatly facilitates the removal and installation of the retaining ring holding the ignition contact group.
Removal and installation
Removing this element from the car is quite simple and all you need is a Phillips screwdriver and a thin flat-head screwdriver or an awl. Before starting work, be sure to disconnect the negative terminal from the battery.
To get to the fastening of this element, you will first need to unscrew the bolts securing the lower facing panel of the steering column, and then remove it.
Afterwards, you need to unscrew the two bolts securing the lock, which hold it in its seat. In the same seat there is a small technological hole. By inserting a thin screwdriver into this hole, you need to press the latch that holds the lock, and then push it out of its seat.
Only then disconnect all the wires. On some models, the wiring going to the lock is collected in a chip that is put on the contacts of the lock. This feature will greatly facilitate the installation of a new element, since such a VAZ-2101 ignition switch does not require a wiring diagram.
| Remove the two screws securing the ignition switch (bottom view). | Insert the key into the ignition switch, turn it to position “0” (turning off the anti-theft device), press the lock with a screwdriver through the hole in the bracket and... |
| ...remove the switch from the bracket and the key from the switch. | Label (or remember the connection order) the wires and terminals of the ignition switch. Disconnect the wires from the switch. |
But there are also versions of the car in which the wiring is directly connected to the contacts, and when installing a new element with this type of wiring connection on a VAZ-2101, an ignition switch circuit will be required.
If the lock assembly is replaced, then you can connect the wiring to the new one, install it in place, secure it and cover it with a decorative panel.
If only the contact group is changed, then the removed lock is disassembled. The contact group is fixed using a locking ring, which must be pryed off with an awl or screwdriver and removed. After this you can remove the group. A new one is installed in its place and secured with the same retaining ring. After this, everything is put in place and the VAZ-2101 ignition switch is connected.
How to replace a lock if there is no key
You can do this like this:
- First, remove the casing.
- Next, use an awl or a thin screwdriver to pry up the ring with the possible key positions marked on it and remove it.
- The larva is located underneath it. It is into the gap between it and the body that you will need to drive a screwdriver in order to loosen the fastening pin.
- Afterwards, the cylinder must be removed, and the component located under it must be squeezed out in order to unlock the shaft.
- Now the device can be removed from the steering wheel and replaced.
Thus, it is absolutely possible to carry out all the repair procedures yourself – there is absolutely no need to go to a workshop.
Sources
- ladaprofi.ru/vaz-2107/kak-samomu-snyat-i-pomenyat-zamok-zazhiganiya-na-vaz-2107.html
- drive2.ru/b/1548034/
- bumper.guru/klassicheskie-modeli-vaz/elektrooborudovanie/panel-priborov/zamok-zazhiganiya-vaz-2107.html
Second phase
We remove the dashboard.
To simplify the work of laying wires, it is better to remove the dashboard completely. To do this, you need to pierce the points that are located next to the screws securing the front panel. Find the location of the wires under the dashboard and in the glove compartment. It is through them that the wires will be laid.
Dismantling old wires.
At this stage of the work, you need to remove the old power window wires and lay new ones. Next you need to connect them to the drive.
Connecting the activator wires.
Along with connecting the activator wires, you need to insulate them and lay them inside the door. In order for them to be secured, it is better to secure them to the door structure using the same electrical tape.
Laying wires.
After the work has been done, you need to push the wires on one side under the dashboard, on the other side into the glove compartment. Such work cannot always be achieved the first time; it is at this stage that you need to show skill and dexterity.
Installation of the pass-through tube.
You can install the pass-through tube into the rack on both sides using a screwdriver
This must be done carefully so as not to damage the rubber tube itself.
Connecting wires to the connector.
Next, a fuse is attached to the connector and connected to the central locking power supply. All this is installed under the dashboard.
Connecting the central locking wire to the housing.
The negative wire of the central locking must be connected to the car body. The positive wire is connected to fuse No. 1 on the battery side.
Checking the functionality of the central locking system.
After you have connected the battery, check the functionality of the mechanism - both its mechanical and electrical parts. The movement of the rods should be smooth and easy.
Restoration of the dashboard and door trim.
After making sure that everything is working properly, install the dashboard and side door trim in their place.
Video shows how to install central locking: