Although replacing the ignition switch of a VAZ 2114 is an important and time-consuming procedure, nevertheless, any driver can carry it out independently, without contacting a car service center. This procedure is useful not only from a budget point of view, but can also be exciting for some car enthusiasts and be of some “sporting” interest. This unit, which is a kind of “switch” of the car, plays a very important role in the starting system of the car. It takes part in the operation of a variety of electrical circuits, such as the starter, headlights, turn signals, and window lifts. As a result, its failure leads to the fact that the car becomes impossible to drive. Let's consider what to do if this trouble does occur.
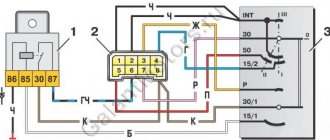
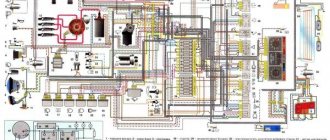
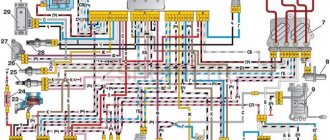
Connection diagram of the ignition switch to the electrical wiring of a VAZ-2114 car
Electrical diagram
In the technical documentation for the VAZ-2114 there is a separate section that specifically describes the design of the vehicle’s electrical equipment. So, all the elements are described in full. But, in this particular case, the issue of independently connecting the ignition wires will be considered.
So, let's look at the diagram to see how the contact connections of the ignition switch are connected.
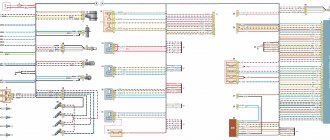
Ignition switch pinout diagram
Regardless of the ignition being turned on, the following devices can operate: high beam, interior and instrument panel lighting, hazard lights, brake light, sound signal, as well as exterior lighting.
A separate item worth highlighting is additional equipment: a car radio (of any format), speakers, additional lighting devices are powered directly into the battery or on-board network, and much more.
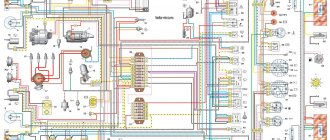
Ignition switch device
Next, we will consider the switched circuits of various key positions in the ignition switch:
| Key position | Live contacts | Switched circuits |
| 0 (Disabled) | 30 | _ |
| 1 (Ignition) | 30-15 | Ignition system, generator excitation, headlights, turn signal, control devices, windshield and headlight cleaners and washers, heater fan motor, rear window defroster, cigarette lighter |
| II (Starter) | 30-15 | See Regulation I |
| 30-50 | Starter |
Ignition switch pinout
Ignition circuit
Product selection
There are several options for the ignition switch on the VAZ-2114. Let's look at each one separately:
- 2110-3704005 or KZ-881 – original catalog numbers of the ignition switch manufactured by AvtoVAZ. The wiring diagram is standard, that is, factory. Installation is quite easy. The average cost is 1000 rubles .
Egnition lock - Master-sport 2110-3704005-PCS-MS is a German analog replacement for the original part. It can also be installed on a standard seat and does not require modifications. The cost is 1000 rubles.
Checking the Lada Samara ignition module
The correct functioning of the ignition module not only has a significant impact on the start of the vehicle’s power plant, but also ensures the stability of its operation in all modes. To carry out a complete diagnosis of this electronic device, you need quite complex equipment, available only in large specialized workshops. However, you can check the functionality of the ignition module yourself in an amateur garage. The only logistical support for this test will be a multimeter, or tester.
Attention! When using a donor car for testing, do not forget that only the first Lada Samara models were equipped with the ignition module, as a separate device. Cars of later releases are equipped with separate type devices (the switch is included in the electronic control unit). The procedure for replacing the ignition module includes the following measures:
The procedure for replacing the ignition module includes the following steps:
Another method involves measuring the resistance of individual module elements using a multimeter (tester). Using the tester probes, we close the “paired” terminals of the module, which provide connection to high voltage wires, and measure the resistance value.
There is another, so-called “folk” method, or the “shake-up” method. With the power plant running, lightly tap the module. Despite all the “technical non-scientific” nature of such manipulations, they are capable of producing results. True, only in the case when the contact of the elements inside the housing is broken.
Sources
- https://avtozam.com/vaz/2115/zazhiganie-remont-zamena-i-nastrojka/
- https://remontautomobilya.ru/modul-zazhiganiya-vaz-2114-princip-raboty-vozmozhnye-neispravnosti-i-zamena.html
- https://vipwash.ru/sistema-zazhiganiya/modul-zazhiganiya-vaz-2115
conclusions
The pinout or connection diagram of the VAZ-2114 ignition switch wires is quite simple and understandable, so every car enthusiast can carry out repairs or replace a spare part without resorting to the help of car service employees.
Content
Sometimes during repairs or replacements you have to disconnect the ignition switch from the on-board network and then reconnect it. This seemingly simple operation is fraught with many features, without knowing which you can make serious mistakes. Today we will look at what the VAZ 2114 ignition switch circuit looks like, how to connect this device according to it, and also what important points should be taken into account.
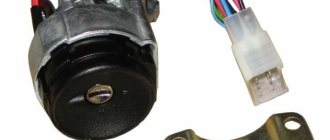
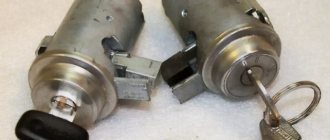
Ignition switch VAZ 2114
Purpose and principle of operation
The ignition switch is an electrical device responsible for both starting the engine and turning on the power in the on-board network. It has 3 different sector switch positions controlled by the ignition key.
Each of them is responsible for its own separate function, namely:
- Position “Off 0” - power is supplied to contacts 30 - all equipment is turned off.
- Position “Ignition 1” - power is supplied to contacts 30-15 - current goes to the ignition system, instruments, headlights, windshield wipers, stove, cigarette lighter, glass heater, turn signals.
- Position “Starter 2” - power is supplied to contacts 30-15 and 30-50 - all the same circuits are energized as in position “1”, as well as the starter.
It is worth noting that the car has a number of electrical circuits that can be turned on regardless of the position of the key, namely: interior lighting, hazard warning lights, high beams, brake light and horn.
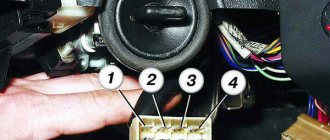
Pinout of the ignition switch
In turn, the pinout of the ignition switch of the VAZ 2114 is as follows (the legs of the lock connector are indicated):
- 1 - +12 volts for the key sensor;
- 2 - to ground (if the driver's door is open);
- 3 - +12 volts to the starter (aka contact 50);
- 4 - +12 volts with the ignition on (aka - pin 15);
- 5 - +12 volts with the key inside the lock;
- 6 - +12 volts for lock illumination;
- 7 - +12 volts from the battery (aka - pin 30);
- 8 - not applicable.
The VAZ 2114 ignition circuit, according to which the lock is connected to the on-board network in accordance with the pinout presented above, looks like this:
How to determine the malfunction?
Lock failures can be mechanical or electrical.
In the event of a mechanical breakdown, the key rotates with force in the lock and in the future may break off or jam. You can extend the life of the lock a little by lubricating the cylinder with WD-40 penetrating lubricant. Of course, this is a temporary measure and will not save you from replacing the lock in the near future.
In the event of an electrical breakdown, a group of contacts breaks or burns out. The most common problem is burnout of the contacts that supply power to the starter solenoid relay. You turn the key to start the engine, but the starter is silent. If the contact group breaks down, you should not replace the entire lock. There is a separate group of contacts for sale and below we have described the replacement procedure step by step.
Basic malfunctions of the ignition switch and their elimination
The most common reasons why a car owner has to replace the ignition switch include:
- loss of a key (and lack of a spare one);
- mechanical damage (including a piece of key getting stuck in the lock);
- burning of the lock contact group.
If the first two problems can be established without additional diagnostics, then you can find out whether the entire ignition switch is externally working only by carrying out a small check. You will need any multifunction tester (multimeter) for this.
Checking the ignition switch
It is performed as follows:
- Set the device to ohmmeter mode.
- Remove the column casing.
- Disconnect the block with wires from the lock.
- Find pins 7 and 4 on the lock connector.
- Connect the probes to them, and then turn the key in the lock (setting it to the “Ignition” mode).
- Find pins 7 and 3 and connect the probes to them.
- Turn the key, setting it to the “Engine Start” mode.
If the ignition switch is fully operational, then in both cases the ohmmeter will show no resistance (otherwise it can be concluded that the lock is faulty).
Primary diagnosis and possible symptoms
A justified need for timely replacement of the lock may arise for several reasons. This mainly happens in the following situations:
- the car owner lost his keys;
- the contact group has worn out or failed for any reason;
- the structure is deliberately damaged to allow unauthorized access.
Important! Many problems can be identified after a careful inspection of the area.
It is necessary to pay attention to the behavior and responsiveness of the node during the startup process. You should pay attention and conduct a thorough diagnosis in the following situations:
- after switching to the first position, not all electrical appliances connected to the contacts started;
- after further rotation there is no reaction from the starter, for example, there are no clicks when the starting relay is pulled in;
- The key fits tightly into the cylinder; some effort is required.
We recommend resorting to primary diagnostic measures. Often auxiliary electrical devices are used for this: testers, multimeters, ohmmeters. The verification algorithm consists of the following steps:
- we turn off the power supply from the lock, having first gotten rid of the casing from the steering column;
- We switch the measuring instruments to resistance measurement mode;
- on the connector coming from the ignition, look for contacts marked “15” and “30” (according to the vehicle’s operating instructions);
- we connect the “crocodiles” or tester plugs to them (it doesn’t matter which contact is which);
- turn the “ignition” to the first position and look at the tester screen;
- scroll to the next position and compare the values on the screen.
There should be zero values on the screen to confirm functionality. This applies to both positions.
Replacing the lock
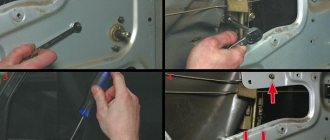
If after diagnostics it turns out that the lock has stopped working normally, it should be replaced with a new, similar one. This is quite simple to do, but before doing this, for greater convenience, it is recommended to remove the steering column casing and switches.
You can do this as follows:
- Disconnect the negative terminal from the battery.
- Unscrew the 3 fastening screws of the casing halves.
- Unscrew the self-tapping screw that connects the housing to the switches.
- Unscrew the 2 screws holding the housing to the column.
- Pull down the latch holding the column.
- Lower the steering wheel down.
- Remove the lower casing.
- Disconnect the power supply from the alarm system.
- Remove the top casing.
- Simultaneously press the latches holding the steering column switches.
- Remove the switches by disconnecting them from the block with wires.
Preparing to remove the ignition switch
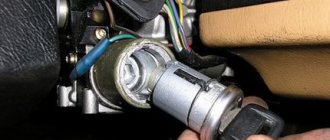
The removal of the lock itself is carried out as follows:
- Disconnect the wires suitable for the lock from its connector (remember that the terminals from the battery must remain removed, otherwise there is a risk that the ignition system of the VAZ 2114 injector 8 valves will receive additional damage as a result of a short circuit).
- Using a hammer and chisel, loosen and slightly turn (preferably several turns) the anti-theft shear bolts.
- Unscrew the bolts using pliers.
- Remove the bracket from the steering column.
- Remove the ignition switch.
Removing the ignition switch
Installing a new lock is carried out in exactly the same way, but in the reverse order. In this case, standard 20 mm fastening bolts with M6 thread can be used as bolts.
It is worth noting that the use of “ordinary” bolts can play into the hands of car thieves, because unscrewing them is much easier than special fasteners. That is why it is recommended to use tear-off bolts, which can be purchased both online and to order in auto stores.
After the new lock is installed, all that remains is to test it in action, simultaneously testing the performance of the on-board electronics in different key positions.
Preparatory activities
Before you start removing the ignition switch on a VAZ-2114, you need to stock up on a set of tools and materials. In addition to a new lock, an independent car mechanic will need the following tools:
- hammer;
- Phillips head screwdriver;
- head or horn for 10;
- pliers;
- a small chisel with a diameter of 10–12 mm.
There is no need to purchase a lock mount. Manufacturers usually include several bolts to hold the clamp in place. We recommend stocking up on a headlamp to illuminate the treatment area .
First of all, you will need to provide access to the fastening of the old lock. To do this, you need to get rid of the casing that hides the steering column. Next, the worn-out unit is dismantled. The following technique is often used:
- removes the negative terminal from the battery;
- use a screwdriver to unscrew several screws holding the protective plastic case;
- remove the self-tapping screw that secures the casing with switches;
- remove a couple of screws from the bottom side of the column;
- remove the lever that blocks the rotation of the steering wheel;
- lower the steering wheel down;
- get rid of the lower casing;
- We disconnect the power contacts from the emergency lights;
- it becomes possible to dismantle the upper casing.
The steering column switches are removed one at a time. After pressing simultaneously, we remove the pair from their seats, and then remove the power and connecting wires.
Useful video
You can find more information on this issue by watching the video below:
Published on July 21, 2022Home » Ignition system » Replacing the ignition switch of a VAZ 2114
Although replacing the ignition switch of a VAZ 2114 is an important and time-consuming procedure, nevertheless, any driver can carry it out independently, without contacting a car service center. This procedure is useful not only from a budget point of view, but can also be exciting for some car enthusiasts and be of some “sporting” interest. This unit, which is a kind of “switch” of the car, plays a very important role in the starting system of the car. It takes part in the operation of a variety of electrical circuits, such as the starter, headlights, turn signals, and window lifts. As a result, its failure leads to the fact that the car becomes impossible to drive. Let's consider what to do if this trouble does occur.
How to check the ignition switch of a VAZ 2114
There are several ways to determine the source of the problem:
- diagnostic;
- visual.
First you need to check the car's reaction to different positions of the key in the lock. To begin with, the key must be set to position number one, which is also the ignition. If the module is in order, all the car's electrics should work. However, in the case when all or part of the electrical system does not work, we can conclude that the lock is damaged.
In position number two of the key, the engine starts, for which the starter is turned on. If, when you turn the key, you do not hear the sounds of the starter operating (rotation), as well as the sound of the relay clicking, then either the ignition switch or the starter itself is broken. In this case, you need to run a diagnostic to get other details about the problem. In this case, you will need a multimeter set to ohmmeter mode. Also, before removing or installing the lock, you need to remove the steering column cover.
Pinout of the ignition switch VAZ-2114:
- +12V comes for the inserted key sensor microswitch;
- the mass comes when the driver's door is open;
- +12V goes to the starter (pin 50);
- +12V goes out after turning on the ignition (pin 15);
- +12V goes out when the key is inserted to pin 5 of the BSK;
- comes +12V to illuminate the lock cylinder;
- +12V comes from the battery (pin 30);
- not used.
- The first thing to do is disconnect the ignition switch power connector.
- After this, connect the multimeter to wires four and seven, and then do the same with wires fifteen and thirty, respectively.
- Turn the key in the lock to position number one. If during testing the node is not damaged, the multimeter should show a zero resistance value.
- Next you need to turn the key to position number two. The resistance on the multimeter screen, as in the case described above, should have a zero value.
In a situation where, after checking the lock with a multimeter, the resistance value in at least one of the cases was not equal to zero, it needs to be replaced. Otherwise, the lock is working properly and other components of the car should be checked for malfunctions.
Troubleshooting Methods
There are two methods for detecting faults:
Ignition switch circuit
We suggest studying a visual method for determining a malfunction or breakdown of the contact elements of the ignition switch using the table.
| Action | The device is working properly | The device is faulty |
| Turn the key to the right position (ignition) | All electrical equipment turns on | All or part of the electrical equipment does not work |
| Turn the key to the second position | The starter is spinning | The starter does not work, the traction relay does not click under the hood |
To work, you will need a mini-tester and a multimeter in ohmmeter mode:
- Disconnect the power supply from the ignition switch. To do this, you need to remove the skin from the steering column;
- Switch your multimeter to an ohmmeter;
- On the block coming from the lock you need to find pins 7 and 4, which correspond to pins 15 and 30;
- Connect the multimeter probes to them;
- Turn the key to the “Ignition” position;
- On the block, find pins 7 and 3, corresponding to 50 and 30. Also connect a multimeter to them;
- Turn the key to the second position - Start the engine;
- If serviceability is present, the device will show zero resistance in both test cases.
Preparation
It is necessary to prepare spare parts and other equipment for work. A new ignition switch will be needed. It is quite easy to find original parts and analogues on the Internet, but it is worth considering that it is advisable to purchase the lock “assembled”.
Catalog number of the original VAZ 2114 ignition switch: 21103704010. Approximate price: 500 rubles for a used part and 1200 for a new one.
As a replacement, you can use analogues with numbers: 09401, 24370407. Approximate price: 1000 rubles (new part).
In addition to the lock itself, you will need the following tools:
- spanners;
- chisel;
- pliers;
- screwdriver.
Before you begin, you must also remove the steering column cover and steering column switches.
Removing the ignition switch
To remove the ignition switch, you must do the following:
- Loosen the breakaway bolts using a hammer and chisel.
- Now the bolts can be removed by hand or with pliers if they are not loosened enough or cannot be loosened sufficiently.
- Remove the ignition switch mounting bracket from the steering column.
- Disconnect the power connector and dismantle the unit.
Video: replacing the ignition switch of a VAZ 2114
Recommendations
Reassembling and lubricating individual parts will not work if the fragments are heavily worn. It is better to remove the cylinder from the core and install a new one. Recommendations for replacing the VAZ 2114 door lock:
- Partial repairs or lubrication will only temporarily restore life to the closing mechanism. If problems arise, it is better to replace the entire cylinder.
- After installation, it is necessary to periodically lubricate the mechanism. Experienced motorists use silicone substances for this.
- The repair procedure is carried out in a well-lit room at a comfortable temperature.
- To change the element, you will need a set of screwdrivers, pliers and lubricant.
- Sometimes the springs have to be replaced along with the cylinder. They are purchased separately.
The cylinder fragment is sold as a set. The price depends on the manufacturer. If you buy a cheap Chinese version, it will cost about 150 rubles. It is better to give preference to VAZ spare parts. The cost of such a kit is 400-500 rubles.
Installation and connection of a new lock
Now that the old ignition switch has been removed, you can begin installing the new one. In order to do this, you need:
- Take a new lock, insert the key into it and turn it to position number one. This is necessary so that the latch responsible for locking the steering shaft goes inside and does not interfere with the installation process.
Breakaway bolts to prevent the lock from being stolen