The development of the Lada Kalina design began at AvtoVAZ in the 90s. A line of cars was conceived, including the 1119 sedan, 1118 hatchback and minivan. The last model was never implemented; instead, a station wagon 1117 was developed. In 1999, a hatchback prototype was demonstrated, and in 2000, a future sedan model was demonstrated. The first generation of cars lasted on the market for about ten years; since 2014, AvtoVAZ has been producing an updated series, including the Kalina Cross all-terrain vehicle, which is distinguished by greater comfort, a new engine and design.
On all Lada Kalina models, a steering mechanism was installed only with a rack and pinion drive, depending on the configuration, equipped with or without electric power steering (EPS). Hydraulic power steering (power steering) was installed only on the Lada Priora and the Niva SUV.
Characteristics of the steering mechanism of different modifications of Kalina
The steering mechanism (RM) is one of the most important elements of a car and is designed to change the trajectory of its movement. Control is carried out by turning the steering wheel, and the greater the angle of rotation, the more the car turns. Among the variety of PMs, rack and pinion mechanisms are most widespread due to their simplicity of design, low weight and size, high reliability and low cost.
All models and modifications of the Lada Kalina car have a standard safety rack and pinion mechanism, which is equipped with an electric amplifier.
The steering column can change its angle depending on the driver's height, ensuring comfortable driving. Currently, there are three manufacturers supplying components for electric power steering: Makhachkala, Aviaelectronics in Kaluga and Korea. All electric boosters are available for free sale and you can choose any one, but experienced drivers prefer the Korean device.
Lyrical digression
In Lada Kalina, the steering rack never makes a knock when we are talking about a new car. This is also true for the break-in period. Let's say in your case this is not done. Then, do not try to repair anything, but go straight to the dealer. According to reviews, the defect in question is covered under warranty, and most car dealers do this: the steering rack assembly is replaced with a new one.
This is what the replacement unit looks like, the rack assembly
There is a logic here. At the factory, adjustments are made correctly (this is true in 99.9% of cases). If a defect appears, the dealer replaces the assembly without expecting that adjustment will solve the problem. The owner does not need to hope for this either. The choice is yours.
Operating principle and design of rack and pinion steering mechanism
When the steering wheel rotates, torque is transmitted through the column shaft through a helical gear to the rack, which is connected to rods that change the angle of rotation of the wheel hub. The working pair in the rack and pinion mechanism is the helical gear located on the column shaft and the PM rack.
Kalina's steering rack is placed in an aluminum housing (case), which includes a helical gear connected to the column shaft. The helical drive gear meshes with a rack and is supported by two bearings and a bushing on the crankcase. The rack also has an oblique tooth with a variable pitch, with a smaller pitch on the peripheral part. As a result, the driving behavior becomes more natural and comfortable, and the steering wheel angles are reduced. In a car with a variable ratio rack, the steering range of rotation is 720°. In this case, the driver, turning the wheel one revolution, reaches the right or left stop. During linear motion, the gear shaft is in the zone of straight teeth. When cornering or maneuvering, the steering responds more dynamically. In the area of the rack, which has oblique teeth, the gear ratio decreases rapidly as the steering angle increases.
For fans of fast driving, a Kalina Sport steering rack can be installed, which has a gear ratio of 3.1, unlike other models, in which this figure is 4.02. This shortened version allows you to feel the car better, but increases the risk when driving at high speeds.
How to change the steering cardan
- It is better to roll the car into a pit (at least raise it in front of the car).
- Fix the steering wheel and steering wheel at a right angle. You should also not move or touch the wheels during repairs.
- Remove the front wheel, then unscrew the mounting bolt through the interior. If all operations are carried out correctly, the shaft should come off the steering wheel on its own.
- Remove both casings (top and bottom), make sure there is a boot on the steering shaft. If it is not there, it is better to install it after repair; the part costs no more than 200 rubles.
- Unscrew the bolt on the crosspiece, then the shaft will come off the steering rack on its own.
- Pull down and pull out the shaft. Before repairing, it is better to wash it from dirt and rust; it also affects the quality of movement.
- Secure the shaft in a vice. When it is secured, take the head and knock out the cross on one side to remove the bearing cup. Repeat the same action from the other end.
- Insert a new cross in the same order (one at a time on each side).
- Press in a new crosspiece with a vice (do not overpress).
- Align the cups and roll them with a hammer and chisel.
- Install the new part on the car in reverse order.
Many car owners note when they are looking for where and how to change the steering joint on a Toyota that steering crosses from the VAZ-2015 are very suitable for this brand. This greatly simplifies the process of finding parts and reduces the overall cost of repairs.
If we are talking about repairing a “workhorse”, a vehicle engaged in transportation or cargo transportation, repairs or replacements have to be made more often than once every 100 thousand km (due to the condition of most of the roads). Experienced craftsmen who give advice on how to change the driveshaft on the steering wheel of a gazelle note that it is better to install two boots at once so that the sound from the engine is quieter. At the same time, the anthers themselves can also be sealed with foam rubber rings, this significantly reduces squeaks and noise in the car interior.
The driveshaft part itself will cost from 650 rubles for domestic cars and higher for foreign cars. Plus - consumables in the form of boots and nuts.
Malfunctions of RM Kalina and ways to eliminate them
Even the most reliable mechanisms wear out, especially if they are not protected from dust, dirt, water and aggressive environments. Although the steering rack of the Lada Kalina is located under the hood of the car and is protected from below by a pallet, during operation, especially in off-road conditions, it is exposed to all of the listed factors. The main malfunctions of the PM can be grouped into three groups:
- large free play of the steering wheel;
- knocking, noise and creaking in the mechanism;
- tight steering wheel.
Increased play, squeaks and knocking of the Kalina PM can be caused by:
- loosening the tie rod nuts,
- wear of their tips and silent blocks,
- loosening the PM fastening nuts,
- large gap between the rack and the adjusting nut.
These faults are easy to fix: you need to tighten the nuts and pin them where necessary, and replace the silent blocks with new ones.
Difficulty turning the Lada Kalina steering wheel can be caused by more serious reasons:
- wear of the bearings of the upper support of the steering column upper universal joint,
- damage to the rack support bushing,
- failure of the telescopic strut of the front suspension,
- faulty electric power steering or low tire pressure.
If the last reason can be dealt with quite easily by inflating the wheels to the level specified in the car’s operating manual, then to eliminate the rest you will need to replace parts and assemblies with new ones.
Many Lada Kalina owners are interested in whether it is possible to replace the standard rack with a mechanism of a different design. It's possible, but not necessary. The manufacturer does not structurally provide for the replacement of the rack and pinion steering mechanism with other types. Worm or screw PMs simply won't do. To facilitate steering wheel rotation, an electric power steering is installed on all Kalina models.
Video text
Step-by-step instructions for repairing the Lada kalina 2 steering rack using a caprolon bushing from https://mirvtylok.ru/
in 9 out of 10 cases, play and knocking of the steering rack on the Lada Kalina occurs due to a worn bushing. Replacing a standard bushing with a reinforced one made of caprolon will save you from expensive repairs to the steering rack.
What are the advantages of installing a caprolon steering rack bushing?
1) Eliminates knocking and play in the Lada Kalina steering rack 2) Cost savings. You are guaranteed to save 2500-7500 rubles per steering rack replacement. Multiply this figure by the number of replacements you will make over the entire life of the car. Decent savings, agree! 3) Excellent level of quality. The original bushings wear out quickly because they are made of plastic. 4) The technical characteristics of caprolon and the experience of scientific specialists who worked in conjunction with qualified Lada Kalina repair technicians made it possible to develop a high-quality product that works effectively throughout the entire life of your car. 5) Ensuring good vehicle handling, familiar comfort and absolute steering control. 6) This bushing lasts an average of 80-100 thousand kilometers
Design features and differences: 1) The original version uses ear latches. 2) Our bushings are securely fixed in the rack body due to press fits. We consider this fixation to be optimal, taking into account the properties of graphite-filled caprolon.
Changing the EUR on Lada Kalina
The electric power steering is mounted on the steering column and is removed along with it. First you need to turn off the power to the car by removing the battery terminal and position the front wheels straight. To dismantle the Kalina steering wheel, remove the lower cross member of the instrument panel, disconnect the wires from the EUR control unit and the switches located on the column, and then lower the steering wheel to the floor.
Now it is convenient to unscrew the nut of the bolt securing the lower universal joint to the steering gear shaft. Then we open the joint connection, use a flat screwdriver to remove the intermediate cardan from the pinion shaft of the RM Kalina and dismantle the column along with the electric power steering. After replacing the EUR with a new one, installation is carried out in the reverse order to that described above.
For safety reasons, replacement of various components and mechanisms should be carried out only with those approved by the Kalina manufacturer. If the vehicle requires repair, it must be carried out immediately, otherwise the risk of creating dangerous situations on the road increases. If damage is detected or there are irreparable faults, the mechanism must be replaced.
Every Lada Kalina car owner will sooner or later be faced with the problem of steering rack failure and repair. Of course, experts and auto mechanics recommend changing this element, but not everyone can buy this element, so repair is the way out.
Video about steering rack repair on Lada Kalina:
The video material will tell you how to repair the steering rack, give basic recommendations and assembly features.
Required spare parts and materials
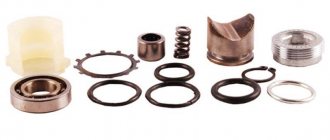
To repair the Kalina steering rack (steering rack 2110, 2111, 2112, etc.) I bought this repair kit for the 2110 steering rack . The main thing is to replace the bushing and stop of the rack, which will eliminate play in the rack and noise when driving over small irregularities.
On the price tag in the BBC it was indicated that the repair kit was “factory”, but in fact it turned out that the manufacturer was some kind of individual entrepreneur. I hope the quality of the bushing and stop is not inferior to the factory one. From the kit we used: a rack bushing, a rack stop, a rack stop O-ring (small) and a stop nut . The rings are medium and large, I left the old ones as they were in perfect condition.
In addition, while preparing for the repair, I noticed a tear on the left (short) rack boot . The impulse arose thanks to the “fender liners” installed by the craftsmen of the car dealership when purchasing the car. The left front fender liner has been touching the protective cap of the steering rack all these years and as a result has worn it out. I don’t even know how long I drove like this, but eventually there was some play and I was ready to repair the rack. In the right photo, taken from the left wheel arch, the part of the fender liner protruding from above has already been cut off and it no longer rests against the boot:
Before repairing the rack, I bought this very left (short) boot of the steering rack 2110 (for 80 rubles), but I was not able to find it right away. There are anthers from 2108 on sale, but the “eight-foot” ones are not suitable for us, they are a centimeter smaller in diameter. Later, having already removed the rack from the car, I discovered that the central corrugation was also damaged. For 5 years and 140 thousand km. it rubbed against the body of the rack (photo will be a little lower), no wonder that dust got inside.
I still bought the corrugation, thank God, one of the nearest stores had it in stock, but for the future the conclusion is this: the central corrugation must be changed , and therefore it should be bought in advance. The side caps are not subject to friction; decide for yourself whether to change them or not by first inspecting them visually.
a set of Kalina steering rack boots looks like (steering rack 2110). The one on the left in the photo is my original one.
When assembling, it is best to secure the rubber covers with disposable plastic clamps ( nylon ties ), but 30 cm long (28 cm minimum). I bought a hundred zip ties for 75 rubles, but they sell them individually for 5 rubles. each. If everything is normal, then for repair you will need 4 such ties.
In order not to unscrew the studs that secure the rack to the body, their threads must be soaked with a wedge (WD-40) or kerosene before unscrewing, and it is advisable to do this a couple of days before unscrewing the nuts. The bitter experience of many car enthusiasts suggests that rolling the studs is as easy as shelling pears, and this leads to the need to drill the engine compartment shield and insert bolts of the appropriate size from the inside. Attention! Remember this danger and unscrew the rack fastening nuts very carefully! Don't put in much effort! It is very convenient to use a small Vedashka cylinder with a tube in the engine compartment, but if you are going to use kerosene, do not forget to prepare a small syringe, because the nuts securing the rack to the body are in very hard-to-reach places.
If the inside of the rack turns out to be dirty and rusty, then it will need to be washed (with the same kerosene, diesel fuel or gasoline), and then, to be on the safe side, it would be a good idea to blow out all the dirt with carburetor cleaner .
When assembling the rack, it will need to be generously lubricated. In theory, for this you need to use low-temperature lubricant FIOL, but it is quite difficult to find, and it is only sold in large jars, costing 600 rubles.
Litol-24 in severe frost reduces its plasticity, but at higher temperatures it successfully replaces FIOL. In addition, Litol-24 is sold on every corner and is inexpensive.
So, spare parts and materials used in the repair:
- Steering rack repair kit 2110 (RUR 210)
- Protective covers for steering rack 2110 (245 RUR + 80 RUR)
- Plastic clamps 30 cm (at least 4 pieces)
- Penetrating bolt lubricant (WD-40 or kerosene)
- Rail cleaner (carburetor cleaner, diesel fuel or gasoline)
- FIOL lubricant (as a last resort Litol-24)
Signs of a faulty steering rack
Steering rack repair kit
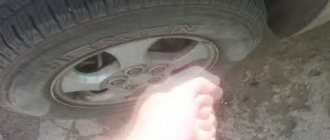
Before you begin repairing an element, you need to accurately determine that it is the steering rack on your car that has failed. For this, there are indirect and direct signs that will indicate the part. Of course, it is best to carry out diagnostics at a specialized car service center, but you can try with your own hands, for example, tighten the steering rack, but here you need to act carefully.
So, let's look at the main signs of a faulty steering rack:
- When turning the steering wheel there is a knocking noise under the hood.
- Longitudinal play of the steering wheel.
- Increased effort when turning the steering wheel.
- Oil stains under the car.
- Steering wheel sticks when turning.
All these signs are direct if the steering rack is faulty, which will be the first signs that the element needs to be diagnosed and repaired.
Causes of malfunction
General view of the steering
There are not many reasons for steering rack failure, but you need to know them. Timely maintenance, as well as diagnostics of the unit, can extend the life of the element.
Let's consider the main causes of steering rack malfunctions:
- Wear of elements that make up the rack.
- Damage due to an accident when the impact hit the wheel.
- Other reasons that caused the rack to start leaking.
All these reasons become the reason for repairing the steering unit.
Design characteristics
In order to repair the steering rack, you need to know its design and the elements that make up it. Let's look at the design diagram of the unit:
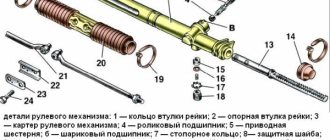
Steering rack diagram
Steering rack parts: 1 – rack bushing ring; 2 – rack support sleeve; 3 – steering gear housing; 4 – roller bearing; 5 – drive gear; 6 – ball bearing; 7 – retaining ring; 8 – protective washer; 9 – sealing ring; 10 – bearing nut; 11 – lock washer; 12 – boot; 13 – rack; 14 – protective cap; 15 – rack stop; 16 – sealing ring; 17 – retaining ring; 18 – stop nut; 19 – clamp; 20 – protective cover; 21 – inner tie rod end; 22 – connecting plate; 23 – locking plate; 24 – bolt securing the rod to the rack; A - mark on the boot; B - mark on the crankcase
What will be needed for repairs?
For restoration work related to the steering rack, a repair kit will be required. Usually, they cannot be found in specialized stores, and car enthusiasts, as a rule, go to the car market, where they can purchase a set of spare parts. In terms of price, this is much cheaper than buying a new rail.
The steering rack repair kit can be purchased either individually or as an assembly.
Repair kit for steering rack manufactured by Ricardo
2110-3403090-11 is the catalog number of a complete steering gear repair kit for the Lada Kalina. You can buy bushings and plastic inserts separately, but it is not recommended, since the quality of the products may be different, and accordingly, the wear on the left and right sides may differ.
Rail repair
Great! The steering rack is in your hands. Now you need to carefully cut off the plastic clamps from the anthers without damaging the rubber bands themselves if you plan to reuse them. The left clamp securing the rack to the body can be left untouched, but the right one must be removed along with the rubber band: this is necessary to replace the central corrugation.
You can also remove the gasket located at the point where the rack contacts the hole in the engine shield.
We remove the left and right anthers, and then the corrugation. Look at the picture I discovered when I removed the left steering rack boot. There was grease here, but mixed with dirt.
On the right side, on the contrary, there was no trace of lubricant, but a whole mountain of rust spilled out from there.
The central boot is reluctantly, but still removed from the steering rack housing.
The right end of the rack was covered with a thick layer of rust without the slightest hint of lubrication. Not surprisingly, it dangled loudly in the broken bushing.
Soak the stop nut with kerosene or WD-40, and in the meantime you can try to remove the worm shaft.
Having unscrewed two hexagon bolts, I found a bearing and a disc spring, but I could not remove the worm shaft, no matter how much I knocked the rack body against a piece of wood.
As a result, I realized that I didn’t need this, because I could wash and lubricate the insides of the rail without even completely disassembling it. Having thoroughly lubricated the bearing, I returned the cover to its place and began to unscrew the stop nut. To do this, you will need a very good key, I came across this one.
Having unscrewed the nut, I saw the same picture as in the rail itself. Everything was covered in grease mixed with dirt, or maybe the grease had become unusable over time.
We take out the spring and rubber band, turn it upside down and hit it against a wooden block until the stop pops out.
When I took out the stop, I discovered that it was covered in dirt, like everything else inside the rack housing.
Compare the new stop with the old one: the plastic lining has worn off, the rack has become less pressed against the worm shaft, and now it is clear how the play in the steering arose.
But the rumble when driving over small irregularities comes from the steering rack bushing. To get out the old broken bushing, you need to use a thin long screwdriver to bend inward each of the two protrusions that hold onto the recesses inside the rack body, and pull the bushing out of the body using a steel wire hook.
Here's what the old and new steering rack bushings look like:
So, we have disassembled the steering rack, and now it’s time to wash it properly. To do this, you can use gasoline, diesel fuel or kerosene, as well as dry rags and something long and thin to clean the insides of the steering rack housing. By moving the rack inside the case and cleaning out the remaining old grease and dust from it, I achieved almost perfect cleanliness of both the rack itself and the case, and also cleaned off the rust as much as possible.
But the worm shaft, which I couldn’t get, still didn’t look perfect:
If you want to bring the rack to a perfectly clean state, then right now you need to blow it with carburetor cleaner. Do not forget to rotate the worm shaft to blow out all the dirt from its reverse side. After such a wash, the rack looked almost like new, all internal surfaces shone with a dazzling shine and newness. This is the feeling for which we do it ourselves - the feeling of satisfaction from a renovation done in a way that no one else could do it.
Now we wipe everything down, lubricate it generously and assemble it. We turn the worm shaft and lubricate it.
We do not spare grease on the toothed part of the rack - it is here, between the worm and the rack, that the main friction occurs.
We also coat the right end of the rack with lubricant, which will not only play the role of a preservative here, but should also extend the life of the new bushing.
Having thickly lubricated the right end of the rack, check whether the bushing fits onto it. It must be put on with some effort, only in this case the repair will bring silence when driving over small irregularities.
The bushing must then be removed from the rack and carefully inserted into the pre-lubricated housing. The locking protrusions on the bushing must fit into their seats on the inner surface of the rack body.
Now screw in one of the bolts that secures the tie rods to the rack, and with the rack housing with the bushing facing down, being careful not to damage the bushing, insert the rack into it. The rack should fit tightly, but with a certain force applied to the bolt, it should still move.
Attention! The following actions will determine whether you will be able to assemble everything so that the steering wheel faces straight. First of all, you need to find the middle of the window in the frame body, mark it, for example with a file or marker, and set the frame to the middle position. In this case, the central hole should be opposite your mark.
Since the stop is not yet inserted and does not press the rack against the worm shaft, by turning the rack body over with the stop hole up, we can put the worm shaft in any position we need. Install the shaft as it was when you removed the rack from the car. My groove on the shaft was on the right and was almost vertical. Unlike you, dear readers, I was not armed with this experience at that time, and therefore assembled the rail at random. As a result, in order to install the steering wheel vertically, I had to disassemble the rack a second time.
Having installed the shaft in the desired position, make sure once again that the rack is in the middle position and then, through the hole in the rack stop, press the rack to the worm shaft. In this case, neither the worm nor the rack should change their position.
Now lubricate everything generously and install the new stop, spring and rubber sealing ring in place, and screw it all on top with the stop nut.
Next, use a special wrench to tighten the nut by hand, and then unscrew it back 2 notches, which will correspond to 24°, as indicated in the instructions.
When you install the rack on the car, the steering wheel may seem a little heavy to you, but after a couple of hundred kilometers the stop and rack will break in, and you will get perfect steering.
Now we assemble everything in the reverse order, and do not forget to put all the removed parts back in their places. Secure the anthers with nylon ties.
Dismantling and disassembling the rack on Lada Kalina
When all the materials for repairing the steering rack have been collected and purchased, you can proceed directly to the repair operations.
Before you begin, you need to completely clean the steering rack. This can be done manually, but it is best to use a steam mechanism under pressure, which will efficiently remove dirt and dust from all elements without damaging the parts.
Now, let's proceed to sequential operations to repair the steering rack:
Tips for use
A complete replacement and repair is a series of actions, for the implementation of which you need to have not only special knowledge, but also a considerable amount of free time, so if the car owner does not have either the first or the second, it is preferable to go to the nearest service station.
At the same time, in order not to become their regular guest, you should know some secrets for operating the steering rack, which can significantly extend its service life.
- We strongly do not recommend “jumping” your car on curbs, or driving at high speed on rails, since each such trip causes cracks to appear on the rack itself, as well as deformation of the shaft that is part of the steering mechanism.
- It is not recommended to frequently turn the steering wheel all the way. Of course, in this case it will be very difficult to demonstrate your maneuvering capabilities, but this will significantly increase the life of one of the most important parts of the machine.
- Carefully monitor the condition of the protective anthers, which must maintain their tightness. Replacing anthers is several times cheaper than replacing the entire rack.
- It is also worth monitoring the level and condition of the hydraulic fluid, since its decrease or change in color is associated with problems in the vehicle’s hydraulic system, which can result in rack failure.
From time to time you need to undergo a full maintenance, which will allow you to eliminate faults in advance, which can cause irreversible consequences, injury to yourself, your loved ones and other road users. And also, if problems are detected in the operation of the car, it is better not to take risks and go to the nearest car service center as quickly as possible.
conclusions
Experience shows that it is possible to repair the Lada Kalina steering rack with electric power steering with your own hands. Of course, this procedure will take a day, maybe two. The main thing is not to rush and choose all the parts of high quality and correct. It is recommended to install new bearings, since even if there is no play, it is not known how long it may appear.
A properly functioning steering mechanism is one of the main conditions for ensuring the safety of any vehicle. If the owner of a Lada Kalina detects suspicious signs of failure of any component components of this unit, then he urgently needs to take effective measures to find and eliminate the malfunction. The main characteristic symptom of problems is knocking. It is clearly audible when driving over bumps or when turning the steering wheel while driving. When the owner determines that the steering rack requires steering rack repair, then he has two options: go to the station to the experts or dare to repair the steering rack on his own. You can make the replacement with your own hands; of course, it is not easy and troublesome, but nevertheless it is possible. Especially if you have a repair kit on hand.
Necessary tool
Now let’s look at what tools you will need to repair the rack yourself. This list is no less important than the list of spare parts, because if you do not have the correct key, then the repair may stop at the most interesting place.
Let's start with the most exotic and most important key, on which the repair of the rack depends entirely. You will need it at the moment when the rack is already removed from the car and turning it over you will see the rack stop nut . In preparation for the repair, I stuck my camera under the rail and took a couple of pictures. And this is what I saw. the rack stop nut looks like (bottom view):
The steering rack key comes in two types: for rack 2108 and for rack 2110. For rack 2108 it is a simple 17 octagon, it is not suitable for us. Our option is a 24 octagon, with a recess in the center, this is exactly what the wrench for the rack stop nut 2110 looks like. I’ll say right away, do NOT buy this option under any circumstances:
The stop nut sits quite tightly in the body; in addition, its thread is jammed during assembly so that it does not unscrew. Such a wrench is not capable of unscrewing this nut; at the first attempt it falls apart:
To avoid running around looking for a solution when the rack is removed, immediately buy a more reliable wrench that does not have flimsy welded joints. I was lucky, and in the nearest store I bought this good-quality key, the handle of which is screwed into the head:
Now let's look at the second, no less important for rack repair, key. We will not disassemble the suspension parts and thereby violate its geometry. We simply unscrew the steering rods from the steering rack, and during assembly we will install them in place, so we will not need to adjust the camber after repair. However, the steering rods are attached to the rack with fairly powerful bolts, which you are unlikely to be able to unscrew with a regular wrench. To do this, you need a powerful 15 mm socket and a wrench with a long handle of about a meter.
I had at my disposal an articulated wrench with a 40 cm handle and a half-meter piece of steel pipe that served as an extension.
The third key, which, in my deep conviction, is mandatory for repairing the rack, is a ratchet wrench , which is incomparably more convenient for unscrewing and tightening the nuts securing the rack to the body. The fact is that the nut needs to be driven along almost the entire length of the stud, and you have to work “by touch” - there is very little space there. With a ratchet, you can unscrew and tighten all 4 nuts securing the rack to the body in 5 minutes, but without it you can carry it for an hour.
For the ratchet, it is necessary to prepare heads for 10 and 13, and the head for 15 must fit the wrench mentioned above. Also useful are spanners 10 and 13 (for removing the battery and the platform under it), a jack, a sharp knife (to cut off the clamps), a pair of gloves, a flashlight, a medium-sized flat-head and Phillips screwdriver for unscrewing steel clamps. To work in the area of the pedals, you will need a flashlight, and for removing and installing the rack, I found a large pry bar very useful.
A pry bar or something similar is a must if you install the rail without a partner. I wanted to call my neighbor in the garage, but I managed this operation myself. However, wiping the sweat from my forehead, I’ll say right away that this is not an easy task and it’s better to call your neighbor in advance.
Here is a list of tools used in the repair:
- Special wrench for steering rack stop nut 2110
- Large hinged knob (for head 15)
- Medium ratchet wrench (for heads 10 and 13)
- Heads for 10, 13 and 15
- Socket wrenches 10, 13 (optional).
- Knife
- Screwdriver flat and Phillips
- Jack
- Flashlight
- Large mount
Design features
The structure of the Lada Kalina steering unit includes:
- electric amplifier;
- steering column, adjustable for reach and tilt;
- electric power steering rack with gear ratio change mechanism;
- rods with tips, as well as rotary levers.
In the mechanism housing there is a unit with mechanical gearing, where the main operating element is a helical gear, the pitch of the teeth of which varies depending on the length of the rack.
The figure shows the design of the Lada Kalina rack and pinion unit.
The pressure in the rack-and-pinion pair is carried out by means of a spring, and the plastic liner present is designed to reduce the friction force. The compression level of the spring element is adjusted using a nut. The factory gap between the steering shaft and the rack is 0.1 mm in the LADA Kalina model.
If a knock appears inside the unit, it can be eliminated by adjusting the gap with your own hands. The steering shaft is centered using two bearings, one of which is located in the column bracket, and the second is located inside the electric power steering housing. The bracket is connected both to the pedal mounting unit, or rather to its front part, and to the body. Structurally, the bracket together with the pipe forms a hinged connection from a pair of plates. This unit provides a change in the position of the steering wheel, where the width of the range of movement is limited by slots in the designated plates.
The specific position of the pipe is fixed by a lever, which is connected to a special bushing that performs an adjustment mission. It is screwed onto a coupling bolt located just in the slots of the plates. When the lever is turned, the sleeve rotates synchronously. At this moment, the fixation of the plate weakens, and the steering wheel begins to change its position. Springs located in the middle of the bracket and plates, when the fastening is loosened, pull the pipe in the upward direction.
Let us repeat, the steering unit of the Lada Kalina has two rods and rotary levers. The rod design includes two tips, one of which is external, and the second is internal. The process of adjusting the length of the rod is carried out by rotating the threaded bushing present here. Having completed the adjustment manipulation, the position of the tips should be fixed with specially designed bolts. The outer rod end is connected to the swing arm bracket via a ball joint.
The power steering mechanism, operating on an electric drive, changes its degree of gain depending on the driving speed. When the car is stopped, the amplifier produces maximum torque, and the steering wheel turns very easily. As the speed increases, the force on the steering wheel of the Lada Kalina increases, which is facilitated by a decrease in the torque generated by this unit. The mechanism is based on an electric motor, which transmits rotation through a gearbox “hidden” under the column casing. The amplifier is controlled using an electronic unit, which is supplied with impulses from speed sensors, recognizes the amount of force when rotating the steering column shaft, and also reads the number of revolutions of the engine shaft. The instrument panel has a special indicator that allows you to monitor the operation of the amplifier.
Reasons for shutdown
The main reason lies in the electric power steering. When ignited, the system performs a self-diagnosis and if the mechanism does not pass it, a signal is turned on indicating a malfunction. The color of the signal indicates the degree of danger. The light turns red, the problem needs to be fixed urgently. If the color is yellow, the vehicle can be operated, but safety precautions should be taken. There may be several reasons why the electric power steering on Kalina does not work:
- speed sensor malfunction;
- torque sensor malfunction;
- speed exceeds 60 km/h;
- engine speed is less than 400 per minute;
- failure in the control unit;
- poorly soldered contacts;
- insufficient tension.
Software shutdown
- The electric power steering on Kalina turns off after 60 km/h. Therefore, keep this point in mind; it is set in the system unit and is not a breakdown. The Priora's electric power steering is switched off at a speed of 110 km/h.
- Also, the EUR does not work at low engine speeds. If the value is less than 400 rpm, it is not active.
This is software planned inactivity. It is needed to give information to the steering wheel at high speed and reduce wear of the mechanism.
Electrical booster malfunctions
In the event that it is impossible to immediately check the cause of failure of the electric power steering on Kalina, you need to remove the fuse from the block. This is necessary to prevent sudden activation of the mechanism, which leads to emergency situations.
A direct indicator of a malfunction of the speed sensor in Kalina's electric power steering is a non-working speedometer, as well as a lit-up exclamation mark on the dashboard. It may not work for several reasons. Check the appearance of the sensor; if it is covered with dirt, simply clean it. See if any metal shavings have become magnetized and remove those as well.
If this does not help, then the sensor is probably faulty. Such sensors are now inexpensive and can be found in many auto parts stores. We do the same for the torque sensor. But where is the speed sensor? It is usually located in the gearbox housing, see photo on the left.
Another cause of malfunction of Kalina’s electric power steering is the generator. The control unit requires a voltage of 13.6 V to operate; if you have less, change the voltage regulator (chocolate) on it.
Also, the contacts could simply become disconnected due to poor-quality soldering. You can either disassemble and solder the contacts or send it to service.
If the problem is in the control unit, it is difficult to solve this problem yourself; the service will either solder it or you will have to buy a new one.
Causes of knocking noises and dismantling the rack
The most common cause of knocking is excessive wear on the ball joint of the tip. This malfunction requires an immediate replacement of the specified element, since further movement may become unsafe, and everything can be done with your own hands using a special repair kit.
The presence of malfunctions in the mechanism considered here, in addition to knocking, can also result in feedback in the steering wheel, which is noticeable to the driver.
It is also possible for the LADA Kalina steering wheel to “bite” in extreme positions. Here, adjustment and repair of the steering rack are extremely necessary. If after these measures the expected result is not observed, then the only way is to replace the steering rack assembly. A fairly common cause of knocking is a banal loosening of the bolt fasteners on the crankcase of the unit.
The design solutions present in the rack do not allow adjustment and tightening of the spring without dismantling the mechanism. But replacement is possible with your own hands using a repair kit.
To remove the rack you will need to perform the following sequence of actions.
- We lift the front of the LADA Kalina car using available specialized tools.
- We operate in the interior of the LADA Kalina and unscrew the bolt that holds the steering column in the adjusted position.
- Remove both front wheels.
- Unscrew the nuts of the swing arms and remove the ends.
- Under the hood you will need to remove the battery paired with the platform.
- We take out the heat reflector.
- We unscrew the fasteners that hold the electric power steering rack to the body. Now we calmly remove the knot out.
To disassemble the mechanism, you will need to acquire the following tool kit.
- A special key that allows you to adjust the slats of the VAZ design.
- A dial indicator with which the gap size will be adjusted.
- Pliers, screwdrivers and key sets.
- Using a hammer, mallet and tie rod end puller.
- Chisel, caliper and paint brush.
Installing the rack
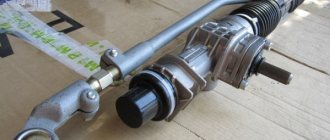
Through the opening of the left wheel we return the steering rack to the engine compartment, install the seal in its place and begin the most difficult operation - installing the rack on the car.
Ideally, one person will hold the rack against the engine bay while another person connects it to the steering shaft flange. I did this without an assistant, so I lightly tightened the nuts securing the rack to the body and pressed the rack to the body with this lever:
Not without difficulty, I installed the steering rack shaft and flange in their original position (picture on the left), but this was the second time, and the first time I incorrectly aligned the rack and worm shaft (picture on the right).
After the first assembly of the rack, the flange bolt, with the steering wheel in a straight position, did not fit into the recess on the shaft, so when trying to tighten it, I also damaged the thread on it. I had to replace the bolt and rebuild the rack again.
Once the steering rack shaft axle and splines are aligned with the steering column flange, you can screw the rack to the body. Here the ratchet wrench will help us again, but remember that using excessive force is unacceptable. Hold the key literally with two fingers.
When the shaft is in place, with the steering wheel turned 45° to the right, it will all look something like this:
To ensure that the flange is completely seated on the steering rack shaft, you can grab the steering wheel and push it away from you. It will turn out like this:
After this, you need to tighten the flange coupling bolt , but this must be done by hand, without using keys, so as not to damage the threads of the bolt if for some reason it does not fit into the recess on the shaft.
The thread of the coupling bolt is very easy to damage, so it must be tightened without using a key - by hand
I admit, I myself did not foresee this, and therefore I ruined this bolt and went to buy a new one. In theory, you can’t drive without this bolt, but I replaced it with a thinner one with a nut and that’s how I got to the store, but in general, it’s better not to joke with the steering. If anything, buy a ball joint bolt from a classic - it will definitely fit.
So, if you push the steering wheel away from you, then there will be no gap left between the steering wheel and the steering column pad. You can’t leave it like that, because when you turn the steering wheel, all this stuff will creak.
Now the bolt should easily screw into the flange by hand, to approximately this state.
I remind you: there is no need to tighten it with a wrench yet . We do everything with our gloved hands. Now that the bolt is screwed in, but not yet tightened, pull the steering wheel towards you, it will extend about a centimeter and a gap will appear:
Great! Now you can tighten the bolt with a 13mm spanner - you won’t damage the thread.
So, at this point, your rail is already screwed to the body. I recommend that you lightly lubricate the protruding threads of the four studs securing the rail to the body with lithol. This will avoid problems during future possible dismantling of the steering mechanism.
If the steering wheel is turned, then return it to the “straight” position and screw the steering rods to the rack. the large 17mm bolts that secure the rods to the rack with the same “meter” wrench and quite firmly.
We put a locking plate on top. This must be done, otherwise the bolts may come loose.
Now is the time to check the rack again for knocks. To do this, you need to grab the steering rod and pull it up and down. If everything is good, then during such a check there should be no knocking, the steering rods should be absolutely motionless.
Next, we screw on the thermal protection, connect the IAC and TPS connectors, install a platform under the battery and fix two wires to it from below, and install the battery itself on the platform. Not forgetting to remove the rags (if there were any), install the air duct between the air filter and the engine, and tighten all the clamps with a screwdriver.
How to adjust the spring and tune the amplifier?
Rail
The spring requires adjustment due to its natural tendency to stretch over time. The tightening should be done after disconnecting the steering unit shaft. The action does not imply the need to remove the entire mechanism from the car.
Repairing the steering rack involves correctly setting the amount of gap observed between the shaft gear and the rack itself.
- To do this, the rack assembly will need to be set to the central position and secured against spontaneous displacement.
- Remove the rubber plug.
- Place the indicator probe inside the opened hole and make sure it comes into contact with the stop (close).
- We rotate the gear shaft, with the help of which the stop is pushed out. We measure the length of its movement with an indicator, which should be within 0.05 mm.
If we observe an excess of the measured value beyond the designated limit, we resort to eliminating it by rotating the adjusting nut. After completing the procedure, we check whether the electric power steering rack rotates easily in the crankcase by rotating the steering wheel all the way in both directions.
Note that the adjusting nut should be rotated with a special wrench. Do not try to tighten this nut with great force, as this may cause difficulty in turning the steering wheel, especially in extreme positions. It is advisable to make adjustments in stages. First, turn the key 20-25 degrees and check the assembly for absence of knocking during the rack movement. If the knocking does not disappear, then we add the angle of rotation by about 10-15 degrees and again resort to control. It happens that a lift does not lead to the expected result. This hints at repairs, and perhaps only the steering rack will need to be replaced.
Checking the technical condition of the steering
1. Visually check the condition of the protective covers of the tie rod ends and steering mechanism.
Damaged covers (torn, cracked) must be replaced.
2. Make sure that the steering column locking lever is raised all the way.
Trying to move the steering wheel in a vertical plane, we check that the steering column is securely fastened with the locking mechanism.
If the steering column moves, remove the steering column pads, use a 10 mm wrench to loosen the lever fastening bolt (left thread) and use a 17 mm wrench to tighten the steering column fixing lever axle nut.
After this, tighten the bolt.
3. Trying to move the steering wheel along the axis of the steering shaft, we make sure that there is no play in the steering wheel on the splines of the shaft and shaft in the steering column.
4. To check the play in the steering, turn the steering wheel to the position corresponding to straight movement.
We place a slotted screwdriver on the instrument panel so that its blade is located next to the rim of the steering wheel (for reliability, it can be secured with masking tape).
Turning the steering wheel to the right until the wheels begin to turn (selecting play), and then to the left and using the blade of a screwdriver as a guide, use chalk, pieces of wire, or otherwise mark these positions on the rim.
The play should not be more than 5° (or 18 mm) when measured along the outside of the rim.
Increased play indicates the need to troubleshoot and fix the problem. As a rule, the first thing to fail in the steering system is the tie rod ends.
5. To check that there is no play in the tie rod ends, an assistant slightly rocks the steering wheel from side to side.
We place our hand at the junction of the steering rod with the swing arm of the suspension strut so that the palm touches them at the same time.
When play appears in the tie rod end, a displacement of the steering arm relative to the rod will be felt.
6. Check the tightness of the nuts on the steering column universal joint bolts.
7. Repeat the check on the other side of the car. We replace faulty hinges.
8. When rocking the steering wheel from side to side, listen to the operation of the steering mechanism.
A knocking sound from the right edge of the steering gear indicates wear of the support sleeve.
We remove the faulty steering mechanism and repair or replace it.
9. Turn on the ignition - the electric power steering fault warning lamp on the instrument panel should light up.
Let's start the engine.
The warning light should go out and the steering wheel should turn easily with one hand.
If the lamp lights up while the engine is running, it indicates a malfunction of the electric amplifier and the need for repair.
| Tightening torques for steering wheel connections | ||
| Name of nodes | Thread | Torque, Nm (kgcm) |
| Steering gear nut | M8 | 15—18,6(1,5—1,9) |
| Steering column nut | M8 | 15—18,6(1,5—1,9) |
| Nuts for coupling bolts securing intermediate shaft flanges | M8 | 23—27,4 (2,3—2,8) |
| Tie rod pinch bolt | M10x1 | 19—30,9 (2,0—3,2) |
| Steering wheel nut | M16x1.5 | 31,4—51 (3,2—5.2) |
| Ball stud fastening nut | M12x1.25 | 27,1—33,4 (2,8—3,4) |
| Bolt securing the steering linkage to the steering mechanism | M10x1 | 70—86 (7,1—8,6) |
| Steering gear bearing nut | M38x1.5 | 45—55 (4,6—5,6) |
Electric amplifier
It is better to adjust this unit in the Lada Kalina after the electric power steering rack has been removed. However, there is a way to carry out this action without resorting to removing the specified mechanism.
- We install the car above the pit to provide access to the fasteners of the frontal part of the amplifier.
- We tighten the clamping nut. If we do this from below, then we rotate in the direction of the arrow clockwise, and if we act from above, then, naturally, the opposite.
- For preventive purposes, we check the integrity of the oil seal. Note that strong and frequent turning of the steering wheel leads to premature wear of this sealing element.
A little theory: front suspension design
Before attempting to fix any problem, there is a tendency to look at the blueprints or repair manual. It is known that the VAZ-2192 parts catalog contains the following object:
This is what the steering rack looks like in the drawing
Whether the knock will remain in the steering rack of Kalina-2 depends on the following: how accurately element “14” is adjusted. The adjusting nut, marked “14”, looks almost invisible here. But first impressions are deceiving. In the catalog, by the way, the element is called “Stop Nut”.
It is important to know that the thrust nut has external threads. And it spins clockwise. And the words “tighten the rack” mean screwing in the specified nut, and nothing more.
Now let's move on to practice and see what the node in question looks like in reality:
If you remove the rail, it looks like this
The nut has a non-standard notch, and it can only be rotated with a special tool. By the way, the recess will be closed with a cap. In the catalog it is designated by the number “15”, and now, let’s look at the appearance of the special key:
Rack adjustment key
The thrust nut is turned at small angles. We are talking about values of 10-15 degrees. What happens if you overdo it with tightening the rack? The knocking noise will disappear, but the steering wheel will turn with difficulty. Therefore, if necessary, the nut can be pulled back.
Preparatory actions, dismantling unnecessary parts
To remove the crankcase protection, you need to unscrew 4 screws located in one row near the bumper. Also, unscrew two screws having a standard size of M6x16. In some configurations, the protection consists of two parts, but in this case they are attached only with self-tapping screws. These words are illustrated by the following photo:
This is how the crankcase protection works in different configurations
First, unscrew the “10” screws, and then the two “18” screws. In the second case, there will be more screws (eight).
Now let's look at how to remove the battery. First of all, disconnect its terminals. Then, you need to move the additional fuse box to the side. In general, actions are performed according to the photo:
You also need to remove the mounting platform itself, for which you unscrew 4 screws. You will need a 13mm wrench, as well as a 10mm spanner. We will repeat the entire sequence again:
- Unscrew the nuts holding the battery terminals using a wrench 10;
- Remove both terminals;
- Move the fuse box to the side by unscrewing 2 fastening screws;
- Unscrew the nuts with a 10mm wrench and remove the battery;
- Unscrew the screws with a 13mm and remove the metal plate.
Just in case, here is a look at the fuse box mountings:
Mounting screws are located under the casing
Manuals usually recommend removing the negative terminal first. But when it comes to dismantling both terminals, the order in which they are disconnected is not important.
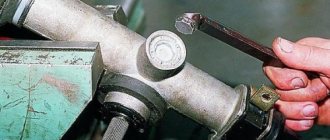
Making adjustments yourself
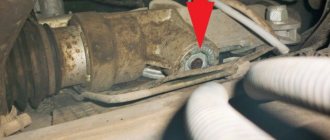
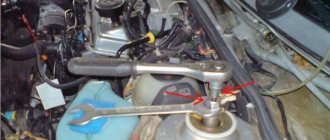
You can access the adjusting nut from the engine compartment, but to do this you will need to remove the battery, as well as the battery mounting pad. It is better to drive the car into a pit and then remove the crankcase protection (engine mudguard). If you look from under the bottom, the required element is immediately visible:
You need to turn this nut
And when you open the hood, you can feel the nut, but not see it. Its location is marked in the figure:
To make adjustments, place the key here
Before adjustment, remove the rubber cap from the recess. Its appearance is shown in the photo:
Remove the cap and install the key
If it is not entirely clear what exactly needs to be done, it is better to contact the service. The key is installed in the recess and then rotated 10-15 degrees.
When looking at the rack from above, turning the key clockwise corresponds to unscrewing it. The handle of the key comes from the center of the car - which means tightening is being done. By the way, the latter is true provided that the handle faces forward.
Making adjustments yourself
You can access the adjusting nut from the engine compartment, but to do this you will need to remove the battery, as well as the battery mounting pad. It is better to drive the car into a pit and then remove the crankcase protection (engine mudguard). If you look from under the bottom, the required element is immediately visible:
You need to turn this nut
And when you open the hood, you can feel the nut, but not see it. Its location is marked in the figure:
To make adjustments, place the key here
Before adjustment, remove the rubber cap from the recess. Its appearance is shown in the photo:
Remove the cap and install the key
If it is not entirely clear what exactly needs to be done, it is better to contact the service. The key is installed in the recess and then rotated 10-15 degrees.
When looking at the rack from above, turning the key clockwise corresponds to unscrewing it. The handle of the key comes from the center of the car - which means tightening is being done. By the way, the latter is true provided that the handle faces forward.