Hello, dear readers of the Kak-Kupit-Auto.ru . Today I bring to your attention a detailed photo report on such an event as replacing the Kalina steering rack (steering rack 2110, 2112 of the new model). It is now June 2014 and the odometer of my car has almost 170 thousand km, and a year ago, at 144 thousand km, I repaired the steering rack and now drumming is heard from the steering mechanism again. I must say that repairing a steering rack is not a pleasant task, and I would like to get rid of the problem for a long time, which is why I decided to replace the entire steering rack of Kalina .
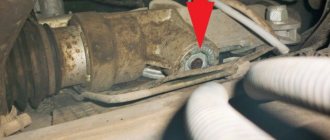
Strictly speaking, to replace the entire mechanism. It was necessary to replace only the rack (the so-called “rasp” ) and the plastic bushing in which the right end of this “rasp” moves, but I was unable to buy it separately, so I decided to replace the entire steering mechanism assembly. This is what the rack (“rasp”) looks like when fully extended to the right from the steering mechanism. As you can see, the right end of my Kalina's old steering rack was completely covered in rust.
The cause of knocking noises in the steering rack is the plastic bushing that secures the right end of the rack. When the bushing stops tightly fitting the rack, the latter begins to dangle, making a drum roll on uneven surfaces. I think that after last year’s repair, the bushing on my Kalina became loose due to rust that covered the right end of the steering rack. Last year, while repairing the steering mechanism, I replaced the bushing, cleaned the rack and lubricated it thoroughly, but after a couple of thousand kilometers the knocking in the rack began to return, and after another 5 thousand, the rack was already knocking no less than before the repair.
Characteristics of the steering mechanism of different modifications of Kalina
The steering mechanism (RM) is one of the most important elements of a car and is designed to change the trajectory of its movement. Control is carried out by turning the steering wheel, and the greater the angle of rotation, the more the car turns. Among the variety of PMs, rack and pinion mechanisms are most widespread due to their simplicity of design, low weight and size, high reliability and low cost.
All models and modifications of the Lada Kalina car have a standard safety rack and pinion mechanism, which is equipped with an electric amplifier.
The steering column can change its angle depending on the driver's height, ensuring comfortable driving. Currently, there are three manufacturers supplying components for electric power steering: Makhachkala, Aviaelectronics in Kaluga and Korea. All electric boosters are available for free sale and you can choose any one, but experienced drivers prefer the Korean device.
What's wrong with Lada Kalina and Lada Granta
No matter how hard the domestic tried, it didn’t happen. Both cars have their drawbacks, which apply equally to both models.
The quality of the interior trim leaves much to be desired. The plastic creaks and scratches easily. But the updated Kalina 2 received a number of improvements, based on the experience of Grants. There are fewer creaks in the cabin, and the sound insulation is better.
Operating principle and design of rack and pinion steering mechanism
When the steering wheel rotates, torque is transmitted through the column shaft through a helical gear to the rack, which is connected to rods that change the angle of rotation of the wheel hub. The working pair in the rack and pinion mechanism is the helical gear located on the column shaft and the PM rack.
Kalina's steering rack is placed in an aluminum housing (case), which includes a helical gear connected to the column shaft. The helical drive gear meshes with a rack and is supported by two bearings and a bushing on the crankcase. The rack also has an oblique tooth with a variable pitch, with a smaller pitch on the peripheral part. As a result, the driving behavior becomes more natural and comfortable, and the steering wheel angles are reduced. In a car with a variable ratio rack, the steering range of rotation is 720°. In this case, the driver, turning the wheel one revolution, reaches the right or left stop. During linear motion, the gear shaft is in the zone of straight teeth. When cornering or maneuvering, the steering responds more dynamically. In the area of the rack, which has oblique teeth, the gear ratio decreases rapidly as the steering angle increases.
For fans of fast driving, a Kalina Sport steering rack can be installed, which has a gear ratio of 3.1, unlike other models, in which this figure is 4.02. This shortened version allows you to feel the car better, but increases the risk when driving at high speeds.
Basic steering rack faults
Seal leakage
French and Japanese cars usually suffer from leaks in the input shaft seals. It occurs due to corrosion of the oil seal area.
Leaking power seals and corrosion of the steering column shaft
This problem occurs when water gets in through the rod boots.
Leaking hydraulic hoses
Connecting elements often leak due to rubbing.
Worn steering rack center tooth
Due to the fact that the steering wheel remains in the central position most of the time, the vast majority of all loads fall on the central part of the rack.
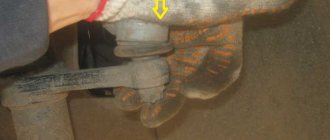
Support bushing knocks
The support bushings are designed to centralize the shaft in the steering rack housing; when it wears out, the shaft begins to knock on the rack housing.
Knocks of the pressure block
Over time, a sample forms on the surface of the cracker and the gasket wears off. At the same time, the cracker begins to knock on the steering rack, dangling in its body.
Steering wheel turns tight to one side
This effect is observed when the hydraulic fluid is contaminated and grooves are formed inside the distributor.
Tight steering in both directions
There could be many reasons:
- grooves described above.
- The Teflon ring on the piston could rupture.
- wear of the working pair could have occurred on the pump.
- The distributor torsion bar could have broken.
Malfunctions of RM Kalina and ways to eliminate them
Even the most reliable mechanisms wear out, especially if they are not protected from dust, dirt, water and aggressive environments. Although the steering rack of the Lada Kalina is located under the hood of the car and is protected from below by a pallet, during operation, especially in off-road conditions, it is exposed to all of the listed factors. The main malfunctions of the PM can be grouped into three groups:
- large free play of the steering wheel;
- knocking, noise and creaking in the mechanism;
- tight steering wheel.
Increased play, squeaks and knocking of the Kalina PM can be caused by:
- loosening the tie rod nuts,
- wear of their tips and silent blocks,
- loosening the PM fastening nuts,
- large gap between the rack and the adjusting nut.
These faults are easy to fix: you need to tighten the nuts and pin them where necessary, and replace the silent blocks with new ones.
Difficulty turning the Lada Kalina steering wheel can be caused by more serious reasons:
- wear of the bearings of the upper support of the steering column upper universal joint,
- damage to the rack support bushing,
- failure of the telescopic strut of the front suspension,
- faulty electric power steering or low tire pressure.
If the last reason can be dealt with quite easily by inflating the wheels to the level specified in the car’s operating manual, then to eliminate the rest you will need to replace parts and assemblies with new ones.
Many Lada Kalina owners are interested in whether it is possible to replace the standard rack with a mechanism of a different design. It's possible, but not necessary. The manufacturer does not structurally provide for the replacement of the rack and pinion steering mechanism with other types. Worm or screw PMs simply won't do. To facilitate steering wheel rotation, an electric power steering is installed on all Kalina models.
Main components of the ESD and their interaction
Thanks to the process performed by the electric power steering, the load when turning the car is reduced. Driving a Priora car becomes much easier - the system prevents dangerous maneuvers at above average speeds.
Main components of the EUR:
- steering wheel;
- column;
- shaft;
- electric motor;
- mechanism for turning the steering wheel;
- ECU (electronic control unit);
- torque sensor
When the car makes a turn, the electric booster is activated, and torque is provided with the help of the electric motor. After which the sensor takes measurements and sends them to the electronic control unit. Based on the degree of rotation and its sharpness, the unit calculates the required power and supplies it.
Previous VAZ cars had power steering; it produced the same power both when driving straight and when turning (this is unsafe). Electric power steering in this case is a more reliable system, as it senses all changes in the movement of the vehicle
However, with kilometers traveled or careless driving, this unit can quickly fail. Failure to detect a breakdown in a timely manner can result in death - the wheels will simply stop working.
As a result, an emergency situation arises. There may be different malfunctions, the methods of elimination depend on the characteristics of the breakdown.
Tightening and adjusting the rack
During the operation of the vehicle, natural wear and tear occurs on the contacting parts, including the PM rack. The presence of such wear can be easily recognized by the characteristic knocking sound of the mechanism at low speeds on uneven roads. This sound also produces a vibration that you can feel through the steering wheel. The initial stage of wear is easy to eliminate; this requires adjustment of the Kalina steering rack, which is easy to do with your own hands.
First of all, you need to loosen the three clamps on the air duct pipe:
- on the mass air flow sensor,
- on the crankcase ventilation pipe,
- on the throttle assembly.
After removing the air duct pipe, a large enough space opens up so that you can stick your hand in with a special wrench to adjust the rack and tighten the nut on the end of the PM crankcase. By turning the adjusting nut a quarter turn clockwise, you can begin installing the disassembled pipe and testing the machine. If the knocking noise has disappeared and when the car is moving, the steering wheel automatically returns from its extreme position, then the adjustment was made correctly. If the steering wheel does not return, you have over-tightened the rack. You will have to perform all the procedures again and loosen it somewhat, and then check again. If the knocking noise does not disappear when the nut is fully screwed in, then replacing the steering rack on Kalina is inevitable.
Removing old tips
To dismantle the old Kalina steering tips, you need to prepare the car for repair:
- Be sure to place two stops under the rear wheels to prevent the car from rolling away during repairs.
- Loosen the bolts on the wheel that is being repaired.
- Raise the side to be repaired and place the machine on secure supports.
- Remove the cotter pin that secures the nut on the steering joint pin.
- Unscrew the nut using a “17” wrench. It is best to use socket or socket heads.
- After this, you need to loosen the nuts that secure the tip to the steering rack.
- Unscrew the bolt that secures the end of the rod (tension clamp).
Problems can arise with this - the nuts often stick. Therefore, you need to treat them with a penetrating lubricant in advance.
If this still does not help, you will need to completely remove the rods. For this:
- Remove the protective cover by unscrewing the nuts with a 10mm wrench.
- Unbend the locking plate, which is located under the bolts securing the rods to the rack.
- Using a 22mm wrench (it is advisable to use a socket with a ratchet), unscrew the bolts that secure the rod to the steering rack.
- Install a special puller on the tip, rotate its bolt until the pin comes out of the strut knuckle.
- Completely remove the linkage from the car.
To unscrew the nuts securing the tip, you need to thoroughly heat the threads. Without this, it is not always possible to replace Kalina steering tips. You can warm it up on the stove or with a simple gas canister. After you warm up the metal, you need to tap the nuts. After this they will definitely get out. Count how many revolutions the Kalina's steering ends are screwed in.
Changing the EUR on Lada Kalina
The electric power steering is mounted on the steering column and is removed along with it. First you need to turn off the power to the car by removing the battery terminal and position the front wheels straight. To dismantle the Kalina steering wheel, remove the lower cross member of the instrument panel, disconnect the wires from the EUR control unit and the switches located on the column, and then lower the steering wheel to the floor.
Now it is convenient to unscrew the nut of the bolt securing the lower universal joint to the steering gear shaft. Then we open the joint connection, use a flat screwdriver to remove the intermediate cardan from the pinion shaft of the RM Kalina and dismantle the column along with the electric power steering. After replacing the EUR with a new one, installation is carried out in the reverse order to that described above.
For safety reasons, replacement of various components and mechanisms should be carried out only with those approved by the Kalina manufacturer. If the vehicle requires repair, it must be carried out immediately, otherwise the risk of creating dangerous situations on the road increases. If damage is detected or there are irreparable faults, the mechanism must be replaced.
The steering mechanism, or steering rack as it is also called, is one of the most important mechanisms in a modern car. It's no secret that on most Lada cars, the standard mechanisms are not of excellent quality, steering racks are no exception. In search of better quality parts, car enthusiasts, if possible, try to install analogues of the standard one, for example, the SS20 steering rack.
The SS20 steering rack for Kalina and Priora is of higher quality and durability compared to the standard factory one. In addition, steering turns will become clearer and more precise, which will undoubtedly increase maneuverability. You can choose various options:
- if you are a fan of calm, measured driving, conventional SS20 4.1-turn steering racks will suit you
- if you like maneuverability and a more aggressive style, the short-throw SS20 steering rack with 3.1 turns is suitable
Even the most reliable mechanisms wear out over time, and noise appears. In standard racks, a common culprit for rattling and rattling is a device that regulates the gap when the shaft and rack engage - this is a disc spring (washer). The quality of the factory spring leaves much to be desired; the gap often has to be adjusted due to the fact that it settles and loses its shape. As a result of numerous adjustments, when tightened, the steering wheel will be “tight”, and when loosened, the steering wheel will play. The SS20 disc spring does not lose its shape over time, lasts longer and the steering rack does not make noise much longer after adjustment. An ideal option for modifying a factory rack at minimal cost.
Did you replace the stock steering gear with an SS20 steering rack? Participate in the survey and leave your feedback about this product. Let us remind you that the website provides instructions for other modifications to Lada cars, for example, installing steering rod plugs. You can also find advice on the repair and operation of Priora and Kalina, for example, what to do if there is a creaking sound when turning the steering wheel, or how to solve the problem of a knocking steering rack.
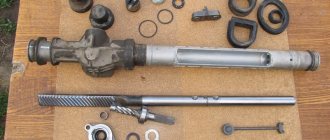
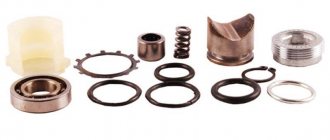
A properly functioning steering mechanism is one of the main conditions for ensuring the safety of any vehicle. If the owner of a Lada Kalina detects suspicious signs of failure of any component components of this unit, then he urgently needs to take effective measures to find and eliminate the malfunction. The main characteristic symptom of problems is knocking. It is clearly audible when driving over bumps or when turning the steering wheel while driving. When the owner determines that the steering rack requires steering rack repair, then he has two options: go to the station to the experts or dare to repair the steering rack on his own. You can make the replacement with your own hands; of course, it is not easy and troublesome, but nevertheless it is possible. Especially if you have a repair kit on hand.
Replacing the steering rack on a VAZ 1117-VAZ 1119
Note! Follow the terms: in the article we will call the rack a steering mechanism, because in front-wheel drive VAZ cars this is the case.
Removal
We recommend removing the front wheels from the car and placing it on blocks or two jacks (Satya will help you remove the wheels correctly: “Replacing wheels on cars”). Then be sure to remove the battery (read “in this article”) and disconnect the steering shaft from the steering rack. To do this, while in the cabin and having two 13mm wrenches, unscrew the bolt nut and remove the bolt (photo 1) that tightens the steering shaft clamp with the steering rack gear. Pry apart the clamp using a strong screwdriver or similar (Photo 2).
Note! Before unscrewing the nut of the tension clamp bolt, be sure to place the wheels level. This will help to avoid installation difficulties and you will not have to rearrange the steering wheel after replacing the rack.
Disconnect the two tie rod ends (on both sides) from the levers (for details, see the article: “Replacing tie rod ends on a VAZ”), then the four steering rack mounting nuts (two on each side). When faced with difficulties, WD-40 will help you: apply and let the lubricant penetrate inside for 5-7 minutes, then unscrew them (photo 1) and two metal clamps (one indicated by a blue arrow) that attach the rail to the body. Carefully remove the rack by hand through the left wheel arch (left side towards the car). Think about whether it is necessary to remove the steering rods? It happens that a new rack comes without rods, in this case, remove it from yours, if they are in good condition, of course, and transfer it to a new one. A flat-head screwdriver will help you do this: pry up the plate and remove it from the bolts securing both rods (photo 2), then apply WD-40 penetrating lubricant to the bolts, they are unscrewed (one bolt secures one rod, photo 3), removed and the rods are disconnected from the rack ( photo 4).
Note! If you did not remove the front wheels, loosen the lug nuts a little, then lift the left side of the car so that the wheel is lifted off the ground and continue unscrewing. We remind you that it is better to remove the wheels.
Installation
The new rack is installed in the reverse order of removal. Make sure that the rack is in a level position (in the position of straight-line vehicle movement, the wheels are straight). Make sure that the marks on the boot and crankcase coincide with each other, make sure that the flat on the gear shaft is on the right, as shown in the photo below. If the mark is knocked down, turn the staff all the way (in any direction), then move the staff in the other direction one full turn until the marks match.
Note! When tightening the rack fastening nuts, lubricate them and the studs with grease: they will not oxidize and rust. After a couple of years, you can easily unscrew the nuts again even without the help of WD-40!
Helpful advice
From the factory, lubricant is put into the rack, but in insufficient quantities, so over time it all dries out quickly and the rack begins to work dry without lubrication, which has a very detrimental effect. Filling the rack with lubricant before installing it will help correct the defect. The factory uses Fiol-1 lubricant (hard to find); Litol is suitable instead, but keep in mind that it is not very resistant to sub-zero temperatures. We do not recommend mixing Fiol-1 with Litol; it is better to wait until the original lubricant has completely dried and fill the rack with Litol.
- First, remove the boot and both tie rods;
- stock up on clamps: they are disposable and will have to be cut;
- cut off the clamps (photo 1) from both ends of the rail;
- remove the plastic bushings from both ends (photo 2);
- remove the rubber pads of the clamps (photo 3);
- cut off another boot mounting clamps;
- remove the boot along the rail (photo 4).
Note! Apply lubricant to the cross shaft and metal parts that move inside the steering rack housing and take part in steering the vehicle. For example, the transverse shaft carries out control, which means it must be lubricated everywhere, from beginning to end. However, the cutout (red arrow) is too small to lubricate without moving it - so move the shaft while lubricating
After the replacement operation, take the car to a wheel alignment: when replacing the rack, the alignment of the wheels is lost and they have to be adjusted.
Additional video
The video shows how to replace the rack on a VAZ 2114 - the operation is completely identical to that carried out on Kalina. Enjoy watching.
Note! The video shows an interesting way to lubricate a car's worm shaft without removing it. If you decide to repeat, make sure that no chips fly inside.
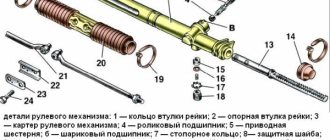
Design features
The structure of the Lada Kalina steering unit includes:
- electric amplifier;
- steering column, adjustable for reach and tilt;
- electric power steering rack with gear ratio change mechanism;
- rods with tips, as well as rotary levers.
In the mechanism housing there is a unit with mechanical gearing, where the main operating element is a helical gear, the pitch of the teeth of which varies depending on the length of the rack.
The figure shows the design of the Lada Kalina rack and pinion unit.
The pressure in the rack-and-pinion pair is carried out by means of a spring, and the plastic liner present is designed to reduce the friction force. The compression level of the spring element is adjusted using a nut. The factory gap between the steering shaft and the rack is 0.1 mm in the LADA Kalina model.
If a knock appears inside the unit, it can be eliminated by adjusting the gap with your own hands. The steering shaft is centered using two bearings, one of which is located in the column bracket, and the second is located inside the electric power steering housing. The bracket is connected both to the pedal mounting unit, or rather to its front part, and to the body. Structurally, the bracket together with the pipe forms a hinged connection from a pair of plates. This unit provides a change in the position of the steering wheel, where the width of the range of movement is limited by slots in the designated plates.
The specific position of the pipe is fixed by a lever, which is connected to a special bushing that performs an adjustment mission. It is screwed onto a coupling bolt located just in the slots of the plates. When the lever is turned, the sleeve rotates synchronously. At this moment, the fixation of the plate weakens, and the steering wheel begins to change its position. Springs located in the middle of the bracket and plates, when the fastening is loosened, pull the pipe in the upward direction.
Let us repeat, the steering unit of the Lada Kalina has two rods and rotary levers. The rod design includes two tips, one of which is external, and the second is internal. The process of adjusting the length of the rod is carried out by rotating the threaded bushing present here. Having completed the adjustment manipulation, the position of the tips should be fixed with specially designed bolts. The outer rod end is connected to the swing arm bracket via a ball joint.
The power steering mechanism, operating on an electric drive, changes its degree of gain depending on the driving speed. When the car is stopped, the amplifier produces maximum torque, and the steering wheel turns very easily. As the speed increases, the force on the steering wheel of the Lada Kalina increases, which is facilitated by a decrease in the torque generated by this unit. The mechanism is based on an electric motor, which transmits rotation through a gearbox “hidden” under the column casing. The amplifier is controlled using an electronic unit, which is supplied with impulses from speed sensors, recognizes the amount of force when rotating the steering column shaft, and also reads the number of revolutions of the engine shaft. The instrument panel has a special indicator that allows you to monitor the operation of the amplifier.
What we have as a result: differences between Grants and Kalina
Both models together cover all consumer demand for a variety of body styles. The latest, second, generation of Kalina is available in station wagon and hatchback body styles. And the second-generation Granta bodies are now available in sedan, hatchback, liftback and station wagon. Each of them has its own advantages. For example, access to the trunk of a sedan eliminates the flow of cold air in winter, and when loading and unloading things, people in the cabin do not have to freeze. "Kalina 2" is additionally equipped with climate control and other useful options.
Causes of knocking noises and dismantling the rack
The most common cause of knocking is excessive wear on the ball joint of the tip. This malfunction requires an immediate replacement of the specified element, since further movement may become unsafe, and everything can be done with your own hands using a special repair kit.
The presence of malfunctions in the mechanism considered here, in addition to knocking, can also result in feedback in the steering wheel, which is noticeable to the driver.
It is also possible for the LADA Kalina steering wheel to “bite” in extreme positions. Here, adjustment and repair of the steering rack are extremely necessary. If after these measures the expected result is not observed, then the only way is to replace the steering rack assembly. A fairly common cause of knocking is a banal loosening of the bolt fasteners on the crankcase of the unit.
The design solutions present in the rack do not allow adjustment and tightening of the spring without dismantling the mechanism. But replacement is possible with your own hands using a repair kit.
To remove the rack you will need to perform the following sequence of actions.
- We lift the front of the LADA Kalina car using available specialized tools.
- We operate in the interior of the LADA Kalina and unscrew the bolt that holds the steering column in the adjusted position.
- Remove both front wheels.
- Unscrew the nuts of the swing arms and remove the ends.
- Under the hood you will need to remove the battery paired with the platform.
- We take out the heat reflector.
- We unscrew the fasteners that hold the electric power steering rack to the body. Now we calmly remove the knot out.
Factory tips for Kalina
On sale you can find elements that are installed from the factory, or similar products. It should be noted that an analogue is not always a low quality part; sometimes they are much better than factory ones. The original ones have the following catalog numbers:
- “VAZINTERSERVICE” (OAT) – 11180-3414057-00. This is the end of the left tie rod, the cost is over 450 rubles.
- "VAZINTERSERVICE" (OAT) – 11180-3414056-00. This is the end of the right tie rod, the cost is over 450 rubles.
Factory items are almost always of good quality, so you can purchase them with confidence.
How to adjust the spring and tune the amplifier?
Rail
The spring requires adjustment due to its natural tendency to stretch over time. The tightening should be done after disconnecting the steering unit shaft. The action does not imply the need to remove the entire mechanism from the car.
Repairing the steering rack involves correctly setting the amount of gap observed between the shaft gear and the rack itself.
- To do this, the rack assembly will need to be set to the central position and secured against spontaneous displacement.
- Remove the rubber plug.
- Place the indicator probe inside the opened hole and make sure it comes into contact with the stop (close).
- We rotate the gear shaft, with the help of which the stop is pushed out. We measure the length of its movement with an indicator, which should be within 0.05 mm.
If we observe an excess of the measured value beyond the designated limit, we resort to eliminating it by rotating the adjusting nut. After completing the procedure, we check whether the electric power steering rack rotates easily in the crankcase by rotating the steering wheel all the way in both directions.
Note that the adjusting nut should be rotated with a special wrench. Do not try to tighten this nut with great force, as this may cause difficulty in turning the steering wheel, especially in extreme positions. It is advisable to make adjustments in stages. First, turn the key 20-25 degrees and check the assembly for absence of knocking during the rack movement. If the knocking does not disappear, then we add the angle of rotation by about 10-15 degrees and again resort to control. It happens that a lift does not lead to the expected result. This hints at repairs, and perhaps only the steering rack will need to be replaced.
Basic steering rack faults
Seal leakage
French and Japanese cars usually suffer from leaks in the input shaft seals. It occurs due to corrosion of the oil seal area.
2. Leaking power seals and corrosion of the steering column shaft
This problem occurs when water gets in through the rod boots.
Leaking hydraulic hoses
Connecting elements often leak due to rubbing.
Worn steering rack center tooth
Due to the fact that the steering wheel remains in the central position most of the time, the vast majority of all loads fall on the central part of the rack.
5. Knocks of the support bushing
The support bushings are designed to centralize the shaft in the steering rack housing; when it wears out, the shaft begins to knock on the rack housing.
Knocks of the pressure block
Over time, a sample forms on the surface of the cracker and the gasket wears off. At the same time, the cracker begins to knock on the steering rack, dangling in its body.
Steering wheel turns tight to one side
This effect is observed when the hydraulic fluid is contaminated and grooves are formed inside the distributor.
Tight steering in both directions
There could be many reasons:
- grooves described above.
- The Teflon ring on the piston could rupture.
- wear of the working pair could have occurred on the pump.
- The distributor torsion bar could have broken.
Electric amplifier
It is better to adjust this unit in the Lada Kalina after the electric power steering rack has been removed. However, there is a way to carry out this action without resorting to removing the specified mechanism.
- We install the car above the pit to provide access to the fasteners of the frontal part of the amplifier.
- We tighten the clamping nut. If we do this from below, then we rotate in the direction of the arrow clockwise, and if we act from above, then, naturally, the opposite.
- For preventive purposes, we check the integrity of the oil seal. Note that strong and frequent turning of the steering wheel leads to premature wear of this sealing element.
Installing new items
After removing both elements, you can begin installing new ones. For this:
- Screw the end onto the rod the same number of turns as the old one was screwed in. Thanks to this, you will be able to maintain more or less acceptable toe-in of the front wheels. You will get to the car service center without much tire wear.
- Tighten the nut securing the tip by hand. It is advisable to use new nuts for reliability.
- Reinstall the rod. First, tighten the bolt at the point where it is attached to the steering rack.
- Install the Kalina steering tip pin into the hole in the steering knuckle of the strut. You can hit with your hand from top to bottom so that your finger fits as tightly as possible. The use of a hammer is not recommended.
- Tighten the nut by hand.
After all these manipulations, you need to tighten the threaded connections. Bend the plate on the steering rack so that the bolt does not come out while driving. At this point, the replacement of the Kalina tie rod ends is completed, and you can begin operation. It is advisable to place a small amount of Litol-24 lubricant under the boot; this will help increase the service life of the elements.
How to disassemble and repair a rack when jammed?
The repair procedure, like replacing the steering rack, begins with disassembling the unit. To perform a set of actions, we purchase a repair kit.
- To disassemble the rack, unscrew the adjusting nut and then remove the thrust bushing. If at the moment we are experiencing difficulties, then we use a mallet, with which we apply gentle blows to the rack body.
- We dismantle the side plugs along with the boot. First cut off the plastic fasteners.
- We must replace the boot with a new product.
- We also use a mallet to remove the shaft from the rack body.
- Inside the freed crankcase we find a plastic sleeve, which we remove using a screwdriver. We also replace this component with a new analogue (present in the repair kit).
- We clean the internal cavity of the rack housing from old grease. Wash and dry.
- Apply new grease. We lubricate the gear pair with special care.
- We inspect all other components of the rack and pinion mechanism and, if wear is suspected, we replace them. Removing the steering wheel in Lada Kalina works like this.
1. Disconnect the battery.
2. Turn off the airbags. Loosen the clamps and move them to the side.
3. Disconnect the two-wire horn connector.
4. We move on to the steering shaft and in the area where the arrow is present, we outline the location (until removal).
5. We loosen the steering wheel nut, but do not completely unscrew it.
6. We take hold of the steering wheel and, using rocking movements to the sides, move it close to the indicated nut.
7. Now we align the wheels and place the steering wheel in a strictly straight position.
8. We remove the pin and then insert it into the switch block located directly under the steering wheel. At this moment, the steering wheel rim should be clearly fixed.
9. After removing the wires, we proceed to removing the steering wheel itself.
10. We check the integrity of all elements.
11. Assembly is carried out using the reverse algorithm.
What are popular “compatriots” hiding?
Both Russian models are in wide demand on the secondary market. In the last month alone, through avtocod.ru, “Kalina” was checked more than 21 thousand times, and “Grant” even more - about 30 thousand times. Moreover, 6 out of 10 reports contained information about twisted mileage.
Here is one such example:
The author of the ad indicated the mileage was 58 thousand km. However, in the report received through Autocode, we see completely different data - more than 112 thousand km. That is, the mileage is underestimated by almost two times. Probably in order to increase the profitability of the car in the secondary market.
In principle, it’s too early to discount such a car. But if the owner hid the mileage, then it is unknown what awaits when checking the technical part of the car.
Let's try to check the Lada Granta.
The situation is the same here. Moreover, the owner did not waste time on trifles and clocked up 75 thousand kilometers:
A twisted mileage is a great opportunity to lower the price tag. But if the car has other problems (theft, leasing, collateral, unpaid fines, etc.), it’s up to you to decide whether it’s worth purchasing the car.
We randomly selected 10 reports from each model from our database to identify the most common problems.
“Kalina 2” has legal problems in three cases: one is in pledge, two are with traffic police restrictions. Another one with an accident and unpaid fines. "Granta" meets traffic police restrictions. There were two such reports. Another car has the status of “recycled”. This could happen after a serious accident, where restoring the car is not economically profitable.