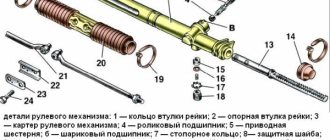
Classification of steering mechanism faults into groups:
- large play (free play) of the steering wheel;
- the presence of extraneous noises, knocks and creaks while driving a car in different modes (creaking, knocking, for example, can only happen when turning right or only when going uphill);
- tight turn of the steering wheel.
Causes of malfunctions:
- The tie rod nuts have become loose.
- The steering tips and silent blocks are worn out.
- The nuts securing the entire steering mechanism (RM) have become loose.
- There is a large gap between the nut and the adjusting rod.
Troubleshoot problems by tightening bolted connections, replacing tips and silent blocks.
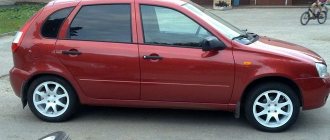
If the steering wheel on your Kalina car has become very difficult to turn, then the reasons for this may be:
- The bearings of the upper support of the steering column upper universal joint (RC) are worn out.
- The steering rack support bushing is worn or damaged.
- The telescopic strut of the front suspension broke.
- The electric power steering (EPS) does not work.
- Low pressure in the front wheels.
The fifth reason can be easily eliminated with your own hands. To eliminate other causes of problems, you will have to contact a car mechanic or study the device and replacement procedure yourself.
There are also worm and screw types of steering. Some people are interested in whether it is possible to install a mechanism of a different operating principle instead of the standard rack and pinion mechanism for driving a car. Answer: It is possible, it is possible, but is it necessary? It is better not to change the factory design at as many critical components as the machine control unit.
How to put the steering wheel straight on Kalina?
After repairing or replacing the steering rack, it is not always possible to position the steering wheel so that it faces straight, so many car enthusiasts have a question: how can Kalina place the steering wheel straight? Indeed, when the steering wheel is straight when driving in a straight line, it is not only pleasant, but also convenient. It's just easier to hold on to.
To then set the steering wheel straight , first, while driving in a straight line, make a mark at the top point of the steering wheel, and when you arrive at the repair site, place the steering wheel so that this point is at the very top. Next, pull the central part of the steering wheel towards you, it will detach and end up in your hands.
The horn terminals must be disconnected, the central part of the steering wheel can be put aside.
Using a 24mm wrench, unscrew the nut securing the steering wheel to the steering shaft.
Don't forget to mark the position of the steering wheel relative to the shaft with a marker.
Now we take the steering wheel with both hands (at 9 and 3 o’clock) and, alternately shaking each hand towards and away from us, carefully remove the steering wheel from the splines of the steering shaft. As soon as the steering wheel is removed from the splines, turn it to the position you need (that is, put it straight) and put it back on the splines. Now, when driving straight, your steering wheel will also point straight.
My steering wheel was slightly skewed to the right, so I moved it one slot to the left, like this:
Basic steering rack faults
Seal leakage
French and Japanese cars usually suffer from leaks in the input shaft seals. It occurs due to corrosion of the oil seal area.
2. Leaking power seals and corrosion of the steering column shaft
This problem occurs when water gets in through the rod boots.
Leaking hydraulic hoses
Connecting elements often leak due to rubbing.
Worn steering rack center tooth
Due to the fact that the steering wheel remains in the central position most of the time, the vast majority of all loads fall on the central part of the rack.
5. Knocks of the support bushing
The support bushings are designed to centralize the shaft in the steering rack housing; when it wears out, the shaft begins to knock on the rack housing.
Knocks of the pressure block
Over time, a sample forms on the surface of the cracker and the gasket wears off. At the same time, the cracker begins to knock on the steering rack, dangling in its body.
Steering wheel turns tight to one side
This effect is observed when the hydraulic fluid is contaminated and grooves are formed inside the distributor.
Tight steering in both directions
There could be many reasons:
- grooves described above.
- The Teflon ring on the piston could rupture.
- wear of the working pair could have occurred on the pump.
- The distributor torsion bar could have broken.
Causes of knocking noises and dismantling the rack
The most common cause of knocking is excessive wear on the ball joint of the tip. This malfunction requires an immediate replacement of the specified element, since further movement may become unsafe, and everything can be done with your own hands using a special repair kit.
The presence of malfunctions in the mechanism considered here, in addition to knocking, can also result in feedback in the steering wheel, which is noticeable to the driver.
It is also possible for the LADA Kalina steering wheel to “bite” in extreme positions. Here, adjustment and repair of the steering rack are extremely necessary. If after these measures the expected result is not observed, then the only way is to replace the steering rack assembly. A fairly common cause of knocking is a banal loosening of the bolt fasteners on the crankcase of the unit.
The design solutions present in the rack do not allow adjustment and tightening of the spring without dismantling the mechanism. But replacement is possible with your own hands using a repair kit.
To remove the rack you will need to perform the following sequence of actions.
- We lift the front of the LADA Kalina car using available specialized tools.
- We operate in the interior of the LADA Kalina and unscrew the bolt that holds the steering column in the adjusted position.
- Remove both front wheels.
- Unscrew the nuts of the swing arms and remove the ends.
- Under the hood you will need to remove the battery paired with the platform.
- We take out the heat reflector.
- We unscrew the fasteners that hold the electric power steering rack to the body. Now we calmly remove the knot out.
To disassemble the mechanism, you will need to acquire the following tool kit.
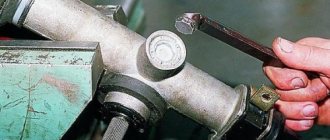
- A special key that allows you to adjust the slats of the VAZ design.
- A dial indicator with which the gap size will be adjusted.
- Pliers, screwdrivers and key sets.
- Using a hammer, mallet and tie rod end puller.
- Chisel, caliper and paint brush.
Basic steering rack faults
Seal leakage
French and Japanese cars usually suffer from leaks in the input shaft seals. It occurs due to corrosion of the oil seal area.
Leaking power seals and corrosion of the steering column shaft
This problem occurs when water gets in through the rod boots.
Leaking hydraulic hoses
Connecting elements often leak due to rubbing.
Worn steering rack center tooth
Due to the fact that the steering wheel remains in the central position most of the time, the vast majority of all loads fall on the central part of the rack.
Support bushing knocks
The support bushings are designed to centralize the shaft in the steering rack housing; when it wears out, the shaft begins to knock on the rack housing.
Knocks of the pressure block
Over time, a sample forms on the surface of the cracker and the gasket wears off. At the same time, the cracker begins to knock on the steering rack, dangling in its body.
Steering wheel turns tight to one side
This effect is observed when the hydraulic fluid is contaminated and grooves are formed inside the distributor.
Tight steering in both directions
There could be many reasons:
- grooves described above.
- The Teflon ring on the piston could rupture.
- wear of the working pair could have occurred on the pump.
- The distributor torsion bar could have broken.
conclusions
Experience shows that it is possible to repair the Lada Kalina steering rack with electric power steering with your own hands. Of course, this procedure will take a day, maybe two. The main thing is not to rush and choose all the parts of high quality and correct. It is recommended to install new bearings, since even if there is no play, it is not known how long it may appear.
A properly functioning steering mechanism is one of the main conditions for ensuring the safety of any vehicle. If the owner of a Lada Kalina detects suspicious signs of failure of any component components of this unit, then he urgently needs to take effective measures to find and eliminate the malfunction. The main characteristic symptom of problems is knocking. It is clearly audible when driving over bumps or when turning the steering wheel while driving. When the owner determines that the steering rack requires steering rack repair, then he has two options: go to the station to the experts or dare to repair the steering rack on his own. You can make the replacement with your own hands; of course, it is not easy and troublesome, but nevertheless it is possible. Especially if you have a repair kit on hand.
Repair, price
A lift is a fairly simple and quick way, but often it is only a partial, temporary solution to the problem. After all, the appearance of play can be caused by various reasons - the boot may be damaged, gaskets may leak and who knows what else, that is, there is a high probability that the steering rack is running dry. In this case, there is a risk that a short time after tightening it may simply jam. Therefore, troubleshooting the rack will be very useful, at least an external inspection, it will make sure that the anthers and corrugated casing are not damaged.
If you suspect the need for repairs, consider whether you can handle it yourself. Get ready for the fact that you will have to spend the whole day in interesting positions, and you will also need an assistant to perform some operations. Do you know how to install the rack so that the steering wheel is level? If not, you risk having to do the installation again.
An alternative is a service station. They will charge you around 3,500 rubles for repairs, 200 rubles and another 200 will be spent on anthers and so on.
The easiest option is to buy a new rack, complete with rods for about 6,000 rubles, there are, of course, racks with bells and whistles (short-stroke, sports, etc.), these cost about 10,000 rubles, the choice is yours.
Love and respect your steering rack and it will love you back!
Do-it-yourself VAZ steering rack repair
Any mechanism in a car does not last forever, so when driving on an uneven road, at one point a knock may appear, which can be heard in the steering wheel. Or, standing still, there may be a knock when turning the steering wheel. These are the first signs that it is time to repair the steering rack. The following signs will help you determine the condition of the steering rack:
- Grasp the steering shaft where it meets the rack and move it up and down. If there is a knock, then repair the rack housing (most often the reason is that the needle bearing is running without lubrication).
- You can check the play of the bushing and the contact of the rack with the steering gear by grasping the joint of the steering rods from under the hood.
It’s good if the reason turns out to be poor tightening of the nodes, but if there is knocking in the rack, then you can do the following:
- buy a new steering rack
- restore the steering rack at a service station
- repair the steering rack yourself
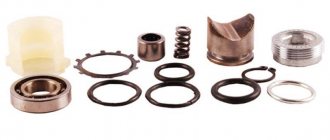
If the price of a new rack does not bother you, then of course it is better to install a new unit. Restoring it at a service station will also cost a pretty penny. Well, the cheapest way to get rid of the knock is to do it yourself. What should you know before starting work? Repair kits are sold to restore the steering rack. The steering rack repair kit can be configured differently:
- The minimum set with a washer, bearing, new nut and fluoroplastic bushings costs 250 rubles.
- A more complete set with bearings and shafts costs about 500 rubles.
- A complete repair kit for the rack, which includes the rack itself, will cost from 850 to 1100 rubles.
In addition, depending on the year of manufacture of the car, the rack may be old (VAZ 2108) or new (VAZ 2110-12).
In the latter case, the difference is that you do not need to disassemble the entire mechanism to replace the bushing. It is enough to tighten the corrugation, then unscrew the nut in the middle and the rack is disassembled into two parts (one part is the entire rack mechanism, the second part is where the bushing is located). The design of the steering rack is as follows. Removing and installing the steering rack on a VAZ 2110. The instructions are clear, except for one point. In order to pull out the shaft, you need a special 24 octagon key, and there must be a hole inside the key. If there is no such key, then you can take a long bolt with a 17 head. Then grind the hex head into an almost triangular one (one of the edges is slightly sharpened ). We sharpen the sides of the bolt to a 10mm wrench. The special wrench for the steering rack is ready! xn--2111-43da1a8c.xn--p1ai
Installation of the Kalina steering mechanism
Before installation, check that the rail is installed in the middle position. To do this, using sliding pliers, use the flat on the gear shaft to rotate the shaft in any direction until it stops, then turn the shaft in the opposite direction two full turns and turn the shaft so that the flat on the shaft is located vertically on the right side along the direction of the car. Otherwise, the installation of the rack is carried out in the reverse order.
Thus, it will take at least 1 hour to replace the steering rack on Kalina. If it is not possible to repair it, then you will have to buy a new one. The steering rack of the Lada Kalina is the same as the rack of the Priora or VAZ 2110-2112 of the new model and has a catalog number: 11183-3400010 (rasp inside 21100-3401068). Price approximately 3500 rub. For Kalina Sport:
- 11183-3400010-10 inside rasp 11183-3401068-00 (3.1 turns)
- 11183-3400010-12 inside rasp 11183-3401068-01
- 11183-3400010-01 without EUR inside rasp 21100-3401068-00 (4.1 turns)
- 11183-3400010-10 with EUR inside rasp 11183-3401223-00
Tightening and adjusting the rack
During the operation of the vehicle, natural wear and tear occurs on the contacting parts, including the PM rack. The presence of such wear can be easily recognized by the characteristic knocking sound of the mechanism at low speeds on uneven roads. This sound also produces a vibration that you can feel through the steering wheel. The initial stage of wear is easy to eliminate; this requires adjustment of the Kalina steering rack, which is easy to do with your own hands.
First of all, you need to loosen the three clamps on the air duct pipe:
- on the mass air flow sensor,
- on the crankcase ventilation pipe,
- on the throttle assembly.
After removing the air duct pipe, a large enough space opens up so that you can stick your hand in with a special wrench to adjust the rack and tighten the nut on the end of the PM crankcase. By turning the adjusting nut a quarter turn clockwise, you can begin installing the disassembled pipe and testing the machine. If the knocking noise has disappeared and when the car is moving, the steering wheel automatically returns from its extreme position, then the adjustment was made correctly. If the steering wheel does not return, you have over-tightened the rack. You will have to perform all the procedures again and loosen it somewhat, and then check again. If the knocking noise does not disappear when the nut is fully screwed in, then replacing the steering rack on Kalina is inevitable.
Tools for work
To make it easier to carry out all repair work, you need to ensure that you have the following tools:
- The key is "10".
- 13" socket and wrench.
- Special key for tightening the rack. (Marking for VAZ 2110 – approx.).
The cost of such a key in stores is about 100-150 rubles
Step-by-step order of preparatory work
If you are not the lucky owner of a garage with a pit or a lift, work on tightening the steering rack can be done on the ground, but before doing this you need to prepare the work area.
- First of all, remove the battery, unscrew the terminals and fasteners of the batteries one by one (if available - approx.).
Remove the battery clamps carefully
By unscrewing these 4 bolts around the perimeter, the pillow can be easily removed
Steering rack tightening
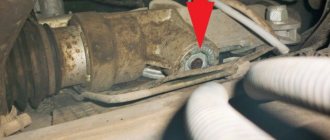
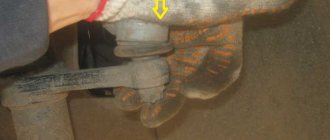
- In the very center of the steering rack, strictly on the opposite side, by touch we look for a rubber cap, which we remove from its place with our hands or with a screwdriver.
Any car enthusiast will enjoy this view from above.
It is on this seat (indicated by the yellow arrow) that the key should be fixed.
Video
This video shows how to repair the steering mechanism on Kalina.
Knock in Kalina steering rack. How to remove.
Installation of Kalina steering rack.
Repair of the steering column gearbox and the RR itself on Priora, Kalina, Grant.
How to install a steering rack from Kalina 2 to Kalina 1.
Steering rack for Lada Kalina Sport with a gear ratio of 3.1 instead of 4.02.
Do-it-yourself repair of the steering rack, but not Kalina, but Daevoo Sens / Daewoo Sens.
0
Author of the publication
offline 1 week
Replacing the steering rack on a VAZ 1117-VAZ 1119
Note! Follow the terms: in the article we will call the rack a steering mechanism, because in front-wheel drive VAZ cars this is the case.
Removal
We recommend removing the front wheels from the car and placing it on blocks or two jacks (Satya will help you remove the wheels correctly: “Replacing wheels on cars”). Then be sure to remove the battery (read “in this article”) and disconnect the steering shaft from the steering rack. To do this, while in the cabin and having two 13mm wrenches, unscrew the bolt nut and remove the bolt (photo 1) that tightens the steering shaft clamp with the steering rack gear. Pry apart the clamp using a strong screwdriver or similar (Photo 2).
Note! Before unscrewing the nut of the tension clamp bolt, be sure to place the wheels level. This will help to avoid installation difficulties and you will not have to rearrange the steering wheel after replacing the rack.
Disconnect the two tie rod ends (on both sides) from the levers (for details, see the article: “Replacing tie rod ends on a VAZ”), then the four steering rack mounting nuts (two on each side). When faced with difficulties, WD-40 will help you: apply and let the lubricant penetrate inside for 5-7 minutes, then unscrew them (photo 1) and two metal clamps (one indicated by a blue arrow) that attach the rail to the body. Carefully remove the rack by hand through the left wheel arch (left side towards the car). Think about whether it is necessary to remove the steering rods? It happens that a new rack comes without rods, in this case, remove it from yours, if they are in good condition, of course, and transfer it to a new one. A flat-head screwdriver will help you do this: pry up the plate and remove it from the bolts securing both rods (photo 2), then apply WD-40 penetrating lubricant to the bolts, they are unscrewed (one bolt secures one rod, photo 3), removed and the rods are disconnected from the rack ( photo 4).
Note! If you did not remove the front wheels, loosen the lug nuts a little, then lift the left side of the car so that the wheel is lifted off the ground and continue unscrewing. We remind you that it is better to remove the wheels.
Installation
The new rack is installed in the reverse order of removal. Make sure that the rack is in a level position (in the position of straight-line vehicle movement, the wheels are straight). Make sure that the marks on the boot and crankcase coincide with each other, make sure that the flat on the gear shaft is on the right, as shown in the photo below. If the mark is knocked down, turn the staff all the way (in any direction), then move the staff in the other direction one full turn until the marks match.
Note! When tightening the rack fastening nuts, lubricate them and the studs with grease: they will not oxidize and rust. After a couple of years, you can easily unscrew the nuts again even without the help of WD-40!
Helpful advice
From the factory, lubricant is put into the rack, but in insufficient quantities, so over time it all dries out quickly and the rack begins to work dry without lubrication, which has a very detrimental effect. Filling the rack with lubricant before installing it will help correct the defect. The factory uses Fiol-1 lubricant (hard to find); Litol is suitable instead, but keep in mind that it is not very resistant to sub-zero temperatures. We do not recommend mixing Fiol-1 with Litol; it is better to wait until the original lubricant has completely dried and fill the rack with Litol.
- First, remove the boot and both tie rods;
- stock up on clamps: they are disposable and will have to be cut;
- cut off the clamps (photo 1) from both ends of the rail;
- remove the plastic bushings from both ends (photo 2);
- remove the rubber pads of the clamps (photo 3);
- cut off another boot mounting clamps;
- remove the boot along the rail (photo 4).
Note! Apply lubricant to the cross shaft and metal parts that move inside the steering rack housing and take part in steering the vehicle. For example, the transverse shaft carries out control, which means it must be lubricated everywhere, from beginning to end. However, the cutout (red arrow) is too small to lubricate without moving it - so move the shaft while lubricating
After the replacement operation, take the car to a wheel alignment: when replacing the rack, the alignment of the wheels is lost and they have to be adjusted.
Additional video
The video shows how to replace the rack on a VAZ 2114 - the operation is completely identical to that carried out on Kalina. Enjoy watching.
Note! The video shows an interesting way to lubricate a car's worm shaft without removing it. If you decide to repeat, make sure that no chips fly inside.
Changing the EUR on Lada Kalina
The electric power steering is mounted on the steering column and is removed along with it. First you need to turn off the power to the car by removing the battery terminal and position the front wheels straight. To dismantle the Kalina steering wheel, remove the lower cross member of the instrument panel, disconnect the wires from the EUR control unit and the switches located on the column, and then lower the steering wheel to the floor.
Now it is convenient to unscrew the nut of the bolt securing the lower universal joint to the steering gear shaft. Then we open the joint connection, use a flat screwdriver to remove the intermediate cardan from the pinion shaft of the RM Kalina and dismantle the column along with the electric power steering. After replacing the EUR with a new one, installation is carried out in the reverse order to that described above.
For safety reasons, replacement of various components and mechanisms should be carried out only with those approved by the Kalina manufacturer. If the vehicle requires repair, it must be carried out immediately, otherwise the risk of creating dangerous situations on the road increases. If damage is detected or there are irreparable faults, the mechanism must be replaced.
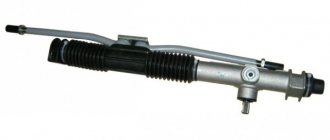
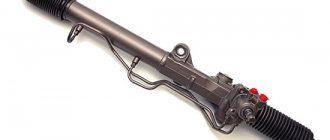
The steering mechanism, or steering rack as it is also called, is one of the most important mechanisms in a modern car. It's no secret that on most Lada cars, the standard mechanisms are not of excellent quality, steering racks are no exception. In search of better quality parts, car enthusiasts, if possible, try to install analogues of the standard one, for example, the SS20 steering rack.
The SS20 steering rack for Kalina and Priora is of higher quality and durability compared to the standard factory one. In addition, steering turns will become clearer and more precise, which will undoubtedly increase maneuverability. You can choose various options:
- if you are a fan of calm, measured driving, conventional SS20 4.1-turn steering racks will suit you
- if you like maneuverability and a more aggressive style, the short-throw SS20 steering rack with 3.1 turns is suitable
Even the most reliable mechanisms wear out over time, and noise appears. In standard racks, a common culprit for rattling and rattling is a device that regulates the gap when the shaft and rack engage - this is a disc spring (washer). The quality of the factory spring leaves much to be desired; the gap often has to be adjusted due to the fact that it settles and loses its shape. As a result of numerous adjustments, when tightened, the steering wheel will be “tight”, and when loosened, the steering wheel will play. The SS20 disc spring does not lose its shape over time, lasts longer and the steering rack does not make noise much longer after adjustment. An ideal option for modifying a factory rack at minimal cost.
Did you replace the stock steering gear with an SS20 steering rack? Participate in the survey and leave your feedback about this product. Let us remind you that the website provides instructions for other modifications to Lada cars, for example, installing steering rod plugs. You can also find advice on the repair and operation of Priora and Kalina, for example, what to do if there is a creaking sound when turning the steering wheel, or how to solve the problem of a knocking steering rack.
A properly functioning steering mechanism is one of the main conditions for ensuring the safety of any vehicle. If the owner of a Lada Kalina detects suspicious signs of failure of any component components of this unit, then he urgently needs to take effective measures to find and eliminate the malfunction. The main characteristic symptom of problems is knocking. It is clearly audible when driving over bumps or when turning the steering wheel while driving. When the owner determines that the steering rack requires steering rack repair, then he has two options: go to the station to the experts or dare to repair the steering rack on his own. You can make the replacement with your own hands; of course, it is not easy and troublesome, but nevertheless it is possible. Especially if you have a repair kit on hand.
Removing old tips
To dismantle the old Kalina steering tips, you need to prepare the car for repair:
- Be sure to place two stops under the rear wheels to prevent the car from rolling away during repairs.
- Loosen the bolts on the wheel that is being repaired.
- Raise the side to be repaired and place the machine on secure supports.
- Remove the cotter pin that secures the nut on the steering joint pin.
- Unscrew the nut using a “17” wrench. It is best to use socket or socket heads.
- After this, you need to loosen the nuts that secure the tip to the steering rack.
- Unscrew the bolt that secures the end of the rod (tension clamp).
Problems can arise with this - the nuts often stick. Therefore, you need to treat them with a penetrating lubricant in advance.
If this still does not help, you will need to completely remove the rods. For this:
- Remove the protective cover by unscrewing the nuts with a 10mm wrench.
- Unbend the locking plate, which is located under the bolts securing the rods to the rack.
- Using a 22mm wrench (it is advisable to use a socket with a ratchet), unscrew the bolts that secure the rod to the steering rack.
- Install a special puller on the tip, rotate its bolt until the pin comes out of the strut knuckle.
- Completely remove the linkage from the car.
To unscrew the nuts securing the tip, you need to thoroughly heat the threads. Without this, it is not always possible to replace Kalina steering tips. You can warm it up on the stove or with a simple gas canister. After you warm up the metal, you need to tap the nuts. After this they will definitely get out. Count how many revolutions the Kalina's steering ends are screwed in.
Installing a 3.1 turn steering rack on a Lada Kalina (sport), cardan and amplifier.
I installed the rail a long time ago, but there was no time to write.
It all started with the fact that I took out a rack from a Kalina Sport, found the necessary lubricant, bought an intermediate steering shaft SS-20 and a disc spring.
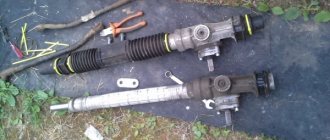
new rack and intermediate shaft SS-20
Everything you need to prepare the rail for installation is written here
A front panel amplifier was also purchased from a technomaster. It is needed so that the rack “walks” less. The effect can be appreciated when turning at high speed.
There is nothing complicated in the replacement itself, the steering cardan is unscrewed from the interior, on one side it connects the rack and on the other the EUR. True, I had to struggle with it to tighten the last bolt, which is closer to the EUR, it’s very inconvenient to climb, I struggled for several hours) I didn’t take a photo, and nothing will be visible there.
Factory intermediate shaft
To replace the rack, first unscrew the cardan from the interior, then remove the steering rods with a puller:
press-out puller
Then we unscrew 4 nuts (2 on both sides), for convenience you need to remove the battery, remove the rack from the studs and take it out through the left (in the direction of travel) opening for the steering rods.
view from under the hood
view from the left steering rod opening
old and new slats on the fret viburnum. New – Lada Kalina Sport
The amplifier is installed very simply; the ears from the amplifier are placed in place of the standard rail mounting ears, then the pipe is screwed to them. It’s just better to do this under the hood, otherwise the rail may simply not fit through.
new rack with amplifier
Then we put everything together in reverse order; we definitely need to do a wheel alignment.
new rack with amplifier view from under the hood
new rack with amplifier view from under the hood
steering rod with old strut
steering rod with new strut. About the suspension on the Lada Kalina Sport here.
Immediately I decided to install rubber protection in the openings of the steering rods:
rubber protection of steering rods
rubber protection for steering rods Lada Kalina
Of course, the advantages are questionable, it is made of very poor quality rubber, as I heard it breaks quickly, it does not fit very well on the left and sticks out a little due to the steering rack. In general, I decided to put it on until it breaks, and then we’ll see.
About the sensations: Driving has become much more comfortable, now you don’t need to grab the steering wheel during a normal turn and turn it back and forth in the parking lot, even 3 turns sometimes seems like a lot and I don’t even want to remember 4) For a long time I couldn’t get used to the fact that I constantly have to turn the steering wheel , even changing quickly from lane to lane was problematic. The effect of the steering cardan and power rack is difficult to describe because I installed everything at once, but in general the steering changed very much for the better, a clear zero appeared, feedback from the road, the steering wheel of course became heavier, but this only made me more comfortable ! Now, for example, all new viburnums and grants are equipped with a 3.1-turn rack and a new EUR. So the steering wheel turns there very easily, but because of this, the information content of the control is lost. Having driven the Grant for a long time, I can say with confidence that my steering is much more informative! Although there were no amplifiers or cardans.
Debugg
The main factor in the occurrence of knocking in the EUR is the presence of play that appears during the use of the Lada Kalina. So, if there is a drumming noise, the bearings are probably loose. Often, the smallest of the 3 electric drive rotor bearings, located at the top of the conical component of the power steering housing, rattles. You should literally tighten the adjusting nut, but do not overdo it. Otherwise, the bearing will fail.
Some modifications of the EUR do not provide an adjusting nut. If the amplifier is disassembled, then adjusting washers can be seen between the gear and bearing. In this situation, it will be possible to reduce the backlash by installing auxiliary washers, selecting them experimentally. Please note: the thicker the gasket, the harder the steering wheel will become. In turn, too small a thickness of the washer will provoke a knocking sound from the electric power steering.
During such modification, the EUR will need to be removed and disassembled. The most difficult thing will be to divide the EUR into 2 halves. During reassembly, be sure to apply lubricant. In addition, you should act carefully so that during the assembly process you do not break off a weak thread.
If you hear a metallic sound when you turn the steering wheel all the way in either direction, you probably hit the end of the rack. No need to worry here. Meanwhile, in some situations it will be necessary to repair the EUR and replace worn parts. A radical method of getting rid of knocking is to get rid of the EUR altogether or replace it with a gearless one.
A knock when turning the steering wheel is not always caused by the electric power steering; sometimes noise appears due to the steering rack or column.
Operating principle and design of rack and pinion steering mechanism
When the steering wheel rotates, torque is transmitted through the column shaft through a helical gear to the rack, which is connected to rods that change the angle of rotation of the wheel hub. The working pair in the rack and pinion mechanism is the helical gear located on the column shaft and the PM rack.
Kalina's steering rack is placed in an aluminum housing (case), which includes a helical gear connected to the column shaft. The helical drive gear meshes with a rack and is supported by two bearings and a bushing on the crankcase. The rack also has an oblique tooth with a variable pitch, with a smaller pitch on the peripheral part. As a result, the driving behavior becomes more natural and comfortable, and the steering wheel angles are reduced. In a car with a variable ratio rack, the steering range of rotation is 720°. In this case, the driver, turning the wheel one revolution, reaches the right or left stop. During linear motion, the gear shaft is in the zone of straight teeth. When cornering or maneuvering, the steering responds more dynamically. In the area of the rack, which has oblique teeth, the gear ratio decreases rapidly as the steering angle increases.
For fans of fast driving, a Kalina Sport steering rack can be installed, which has a gear ratio of 3.1, unlike other models, in which this figure is 4.02. This shortened version allows you to feel the car better, but increases the risk when driving at high speeds.
Product delivery options
Note! Below are the shipping methods available specifically for this product. Payment options may vary depending on the shipping method. Detailed information can be found on the “Delivery and Payment” page.
Parcel by Russian Post
Available payment methods:
- Cash on delivery (payment upon receipt)
- Using cards Sberbank, VTB, Post Bank, Tinkoff
- Yandex money
- QIWI
- ROBOKASSA
Shipping throughout Russia. Delivery time is from 5 to 12 days.
Parcel by Russian Post 1st class
Available payment methods:
- Cash on delivery (payment upon receipt)
- Using cards Sberbank, VTB, Post Bank, Tinkoff
- Yandex money
- QIWI
- ROBOKASSA
Shipping throughout Russia. Delivery time is from 2 to 5 days. More expensive than regular delivery by Russian Post, approximately 50%. Parcel weight up to 2.5 kg
Express Parcel EMS
Available payment methods:
- Cash on delivery (payment upon receipt)
- Using cards Sberbank, VTB, Post Bank, Tinkoff
- Yandex money
- QIWI
- ROBOKASSA
Shipping throughout Russia. Delivery time is from 3 to 7 days. More expensive than regular delivery by Russian Post, approximately 100%.
Transport companies
Available payment methods:
- Using cards Sberbank, VTB, Post Bank, Tinkoff
- Yandex money
- QIWI
- ROBOKASSA
Delivery is possible to any locality where there is a representative office of the transport company. Delivery time is from 2 to 10 days. Sending large parcels is approximately 50% more profitable than by Russian Post.