Primary diagnosis of the steering rack
As a rule, removal or disassembly is not required for initial diagnosis. The main signs of a faulty steering rack appear in the movement of the car. Let's look at the most common of them.
1. Knock when driving over bumps. A knock in the steering rack manifests itself in loud or dull metallic knocks from the front side of the car, which are heard when hitting bumps in the road.
Does not always indicate a fault in the rack. There can be many reasons. For example, ball joint, lug, wheel bearing, strut and so on. Many other parts of the car can make similar sounds.
2. Increased steering play. It is often a consequence of wear in the steering rack. This symptom also manifests itself when there is wear in the tips or ball joints.
Less commonly, this symptom may be a defect in the shank of the steering shaft. This happens when the splines become licked and the seating groove under the wedge in connection with the steering column breaks.
The steering rack play must be eliminated in its infancy, since delaying the repair period will lead to irreparable defects and the purchase of a new assembly.
3. Steering wheel wedge, staggered rotation. When these symptoms appear, in 90% of cases the cause will be in the steering rack.
Most often, such a defect occurs when the anthers are damaged and water and pollutants get inside the housing. The lubricant is partially washed out and partially clogged with dust.
This leads to rapid wear of the steering mechanism, as friction occurs between parts with insufficient quantity and quality of lubricant.
Also, improper adjustment of the steering rack affects the nature of the steering wheel rotation. Tightening the adjusting screw will inevitably affect the smooth movement of the steering wheel, as well as the force that must be applied to it.
4. Vehicle instability at speed. If your car behaves unstably while driving, especially on wavy road surfaces or when hitting a bump, one of the reasons for this behavior of the car on the road may be a problem in the steering rack. As a rule, it is accompanied by play in the steering wheel.
If at least one of these signs is present, it is necessary to conduct a more accurate diagnosis.
You can also check the steering rack by aligning the wheels straight and turning the steering wheel slightly left and right to relieve tension in the steering mechanism. After this, you need to try using your hand to pull the place where the steering rods are attached to the rack up and down. If play is felt, this indicates wear in the bushing or other part of the rack.
Functionality check
From time to time it is necessary to inspect the steering. Where is the best place to start? Be sure to study the condition of the rods, their tightness, and do not forget about the protective cover. Have you noticed cracks or other damage that makes the device leaky? Change it.
You should check whether the steering wheel spoke is in a horizontal plane when the car wheels are in a straight position. If even a slight deviation is observed, it is necessary to identify the cause of the malfunction and eliminate it before it develops into a dangerous problem.
To make sure that the car's steering is working properly, you need to turn the steering wheel all the way clockwise and counterclockwise. In this case, there should be no sounds or jamming. The steering wheel must be firmly and reliably fixed; gaps in the hinges and other parts are unacceptable. Check whether the bolts and nuts of the fastenings are fully tightened.
If something goes wrong when checking the controls, knocking or other problems appear, remove the suspension control rods and check the condition of the steering mechanism again. This will make sure that knocking and malfunctions are caused by malfunctions of the steering wheel, and not by other reasons, of which there may be many.
It is also important to make adjustments. We advise you to use the following rules for proper rack setup.
- When checking the operation of the mechanism, eliminate vertical play in the rods; it should correspond to 15 degrees.
- Steering should be soft and light. Jamming occurs due to improper installation of the steering rack.
- Do not forget to make the next adjustment after 700 kilometers to avoid any serious problems with the steering.
Ball joints are a fragile, fragile part, and they often fail. But there is a very effective way to extend its service life - you sometimes need to pierce the anthers with a syringe and inject one cube of lubricant used for the transmission there. The puncture is small, so there will be no deformation of the part; the hole will immediately be covered with layers of rubber.
The steering rack causes a lot of trouble for owners of front-wheel drive VAZs; often increased play in it is the source of constant knocking and poor vehicle handling. Typical malfunctions of the steering rack without power steering on VAZ cars (2108, 2109, 21099, 2110, 2111, 2112,2113,2114,2115, Kalina, Priora) are:
- knocking noise when driving (mainly on the right side);
- increased play in the steering wheel (as a result, the car wobbles at speed, the inability to set wheel alignment, the car pulls to the side);
- “biting” of the steering shaft (difficulty with control, the likelihood of the steering wheel jamming while driving);
- wear of the internal parts of the rack and so on;
There are several options for fixing the problem with the steering rack:
- adjustment;
- Repair kit replacement;
- replacement of the entire assembly;
The adjustment allows you to eliminate the backlash and restore the rack's functionality for a while. If the internal shafts are heavily worn, the adjustment cannot remove the play (“stiff steering wheel”), and it is necessary to change the belt kit. The entire steering rack is usually replaced when the body is deformed or damaged.
Replacing old rack elements
Place the damping rings on the new base plate so that the thin side of the rubber bands is located in the middle of the plate cutout. It’s almost invisible in the photo, but when you buy a repair kit you will find two necessary rubber bands in it.
Replace the support sleeve. There is a hole in a special recess into which two protrusions on the bushing should fit. After installing it, you need to cut off thin rubber bands with a blade, as in the photo.
Remove the retaining ring from the gear shaft using special pliers, and then remove the bearing.
After this, you need to press out the needle bearing using a special wrench. If you don't have one, you will need a drill and a 1.2-1.5 mm drill bit. Drill a hole so that it fits into the end of the bearing (see photo). Knock out the needle bearing through the hole made.
All that remains is to thoroughly rinse the steering gear housing and insert a new needle bearing, which is included in the repair kit. The hole made can be covered with a mixture of superglue and metal filings. You can also use cold welding. Gear mechanisms should be lubricated with Litol or FIOL lubricant.
Everything needs to be assembled in reverse order. After this, it is necessary to set the gap between the nut and the stop - 0.12 mm.
So, repairing the steering rack yourself will save you a considerable amount of money, since you only need a repair kit and lubricant for the work.
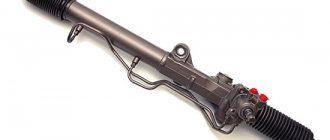
We repair the VAZ 2108 steering rack ourselves
View of the VAZ 2108 steering rack
On a VAZ 2108, repairing the steering rack causes a lot of trouble for its owner. It all starts with the discomfort that the owner feels while driving. After this, flying through stations where you will find problems that you didn’t even suspect about, and maybe that don’t exist at all. This work can be done with your own hands and without resorting to outside help. This is what we will talk about in this article.
How to replace the steering rack on a VAZ 2113-VAZ 2115?
Removal
1) At the beginning of the operation, you will need to hang both front wheels from the car, for this operation you may need either one or two jacks (Just instead of one jack, you can also use logs), after the front part is hung, remove it from both sides of the car's wheel.
2) Now you need to remove the adsorber if you have one, because it takes up quite a lot of space and if you don’t remove it, then there simply won’t be much access to the steering rack.
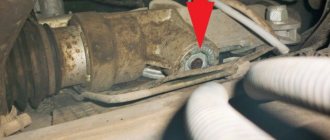
3) Then, in the very central part of the rack, unscrew the two bolts that are also indicated in the diagram above as number 10, which secure the tie rods to the rack, but keep in mind the fact that these bolts are also secured with lock washers, which you will need to bend back (You will see them immediately ), so that they do not interfere with unscrewing these bolts securing the rods to the rack.
4) Next, climb into the cabin under the place where you have pedals installed and there look for the universal joint locking bolt (Indicated by the red arrow), if necessary, bend back part of the carpet (Carpet is what the floor of the car is covered with, before it didn’t exist, people replace it the styles themselves are linoleum, but this is in old cars, in new ones a carpet is used which covers the metal part of the body) if it will cover this bolt, but when you unscrew the bolt, insert a large screwdriver or a chisel into the groove indicated by the blue arrow and widen it so that the rack can be removed from the car.
5) Well, to complete the operation, unscrew the two (on each side) nuts that secure the rack to the car body, these nuts secure it in its outermost part, that is, on the left and, accordingly, on the right, and when they are unscrewed, then you can pull the steering rack towards you (this will remove it from the studs) and then remove it from the car.
6) Let’s add something else, usually new racks are initially sold assembled with steering rods, if you also have these rods for the racks (These rods, if you don’t understand what we’re talking about, are shown in the diagram and indicated by numbers 11 and 6) then in this case, you will have to remove the old rods from the car (the instructions are simply aimed at removing only the rack itself, and therefore we didn’t say anything about removing the rods at the beginning), if you don’t know how to remove them, then in this case, study the article entitled: “Replacing steering rods on VAZ 2109 cars.” (Don’t pay much attention to the VAZ 2109 brand, because the cars of the Samara and Samara 2 families are very similar to each other and therefore the rods are removed identically in both)
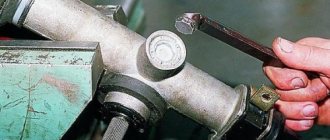
Steering rack adjustment
There is nothing complicated in adjusting it, the most important thing is to know a couple of things, namely, if adjusting the rack does not lead to anything (that is, the rack still knocks after adjustment, although the knocking should disappear or, in extreme cases, be less), then the rack It is recommended to either change it or repair it (For information on how to repair the rack, read the article entitled: “Repairing the steering rack on a VAZ”), but now let’s get back to the adjustments, you will first need a special key (Tell the car shop that you need a key to adjust the rack and if the seller turns out to be competent, he will sell it to you immediately), after you stock up on it, find a special nut (Indicated by a blue arrow in the small photo below, and its location is indicated by a red arrow) and tighten it a little, make sure that the knocking either disappears altogether (If the rack is still in acceptable condition), or it was there but not too strong, otherwise replace the rack with a new one, or, as mentioned earlier, repair it.
Where do the problems start?
Today, like many years ago, the VAZ 2108 is quite popular even though new times have opened the way for numerous interesting import projects. The advantages that keep the model afloat include reliability, durability and low price compared to foreign cars. In such a car, it’s not scary to go to the outback, which is by no means famous for its good roads, and to the country, and it’s not a shame to appear in the city.
Most often in the "eight" the chassis fails
When the car is in good condition, and the traction is good, and the dynamics are not satisfactory, then you enjoy the ride and the speed. But the time of testing comes, and the machine begins to remind you that material things do not last forever. And this is always an unpleasant discovery.
Domestic cars break down more often than foreign cars, the reason lies in both the design technology and the quality of parts. Our people always try to save on everything, even where it is not possible. Speaking about malfunctions of the well-known G8, it is worth remembering such a mechanism as the steering rack, since it is this that breaks down quite often.
At first the problem is not too noticeable, only on difficult sections of the road the steering wheel begins to beat, as if afraid of the problems awaiting the car on the bumpy roads of endless Russia. But soon it begins to pound almost constantly, making the driver feel like an asphalt driller. After such a trip, it’s not easy to get your nerves in order and not shake yourself. In addition, knocking is often heard. These two symptoms signal one thing: the steering rack has failed.
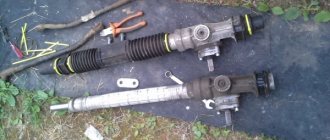
We have two options before us: either go to the nearest auto store and look for a replacement mechanism, or repair the steering rack. The last option is considered the most optimal, economical, but requires a responsible approach.
Steering rack bulkhead
1. Using side cutters or any other suitable tool, cut off the plastic clamps on the sides of the protective casing.
After this, the casing can be easily removed. We inspect it for damage. The presence of tears or cracks is unacceptable, since water and dust enter the rack and pinion mechanism through them.
2. The side protective caps are also secured with plastic clamps. After cutting the clamp, the caps can be easily pulled off. They are visually inspected for damage.
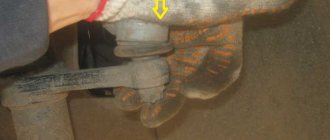
3. It would not be superfluous to check the steering rack for wear in the gear-river pair. To do this, hold the rail with your hand at the place where the rods are attached and try to rotate the mechanism shaft left and right. The presence of play may indicate wear or incorrect adjustment in this unit.
4. For further work you will need a specialized key for VAZ cars. It is usually sold as a dual-use device: on one side there is an octagon for adjusting the rack or unscrewing the adjusting screw, and on the other side for tensioning the timing roller.
If this key is not available, then you can use any suitable octagon.
If the steering rack has not been adjusted or disassembled, it is quite difficult to turn the adjusting screw for the first time. In the factory conditions, after adjustment, this screw is cored.
5. After unscrewing, remove the sealing and retaining rings, the spring and the stop. The stop is one of two points of support for the rack itself in the body. Therefore, the performance of the entire mechanism directly depends on its condition.
The working surface must be smooth, without burrs or other damage. The sealing ring should also not be damaged.
6. To further disassemble the steering rack, it is necessary to remove the steering gear boot. It fits tightly on the body; there are no special fastenings. We also inspect it for cracks or any other damage.
7. Remove the lock washer. Unscrew the bearing nut. To do this you will need a special octagonal key.
- Then remove the O-ring and washer.
- Next, you need to remove the steering shaft. It is not set very tightly, so a little effort is enough.
- The condition of the ball bearing is checked.
- If the bearing is worn, it must be replaced. It fits tightly onto the shaft.
- The old one can be knocked off using a tool or by carefully hitting the outer ring with a hammer.
- Press the new one through a tubular adapter in a vice or on a press.
- It is not recommended to hammer a new bearing, as this will negatively affect its service life.
8. Remove the support needle bearing. To do this, use a screwdriver or an awl to carefully lift it and pull it out of its seat. If it also shows signs of wear, place a new bearing in the groove.
9. Take out the rail itself. After disassembling the steering mechanism and removing the stop, it easily comes out of the housing. Here it needs to be cleaned of any remaining old grease and carefully inspected.
The teeth should not have chips or other damage. There should be no burrs or areas where metal-to-metal friction occurred on the rack shaft itself. If such defects are present, the steering rack needs to be replaced.
There are options for grinding the shaft, but not all car repair shops undertake this. And the economic feasibility of this procedure is questionable.
10. The bushing is dismantled. To remove it, you must first move it from its seat. Using a flat-head screwdriver, hook it onto the edge from one of the edges of the case and apply light pressure until it detaches from the mounting groove.
After this, the bushing can be carefully crumpled in the body and pulled out through the hole for attaching the rods.
The bushing is one of the weakest points in the steering rack design. Plastic material wears out more intensively than metal, and backlashes appear.
11. Replacing the steering rack bushing begins with installing rings on the new bushing. After this, the sleeve is pushed through the side hole into the body until it rests against the locking lip.
Next, use a screwdriver to carefully twist the bushing through the hole for attaching the rods until it is installed in its working position. Most often, the steering rack knocks precisely because of a broken bushing
12. After disassembly, all elements are washed in a solvent or any other liquid composition to wash oily parts.
When using a repair kit, it is better to replace all elements rather than individual parts. Assembly is carried out in reverse order.
New or refurbished?
Among car enthusiasts, the question often arises regarding the steering rack - should I purchase a new one for replacement or restore the “original” one? It is impossible to answer unequivocally here.
If the repair was carried out independently and using a high-quality repair kit, then after restoration the rack can serve for quite a long time.
But if you purchase a restored rack or if it is repaired at a service station, there is a high probability that problems will soon arise. After all, it is unknown who, how and with what help carried out the restoration.
As for new units, there are a lot of defective racks on the market.
In general, it is still better to try to repair the rack first, since it is much cheaper. It is worth purchasing a new mechanism only after you have already become convinced that the restoration did not help.
Adjustment methods
The control rack can be adjusted in 2 ways.
Adjustment method
Peculiarities
If the rack is removed and adjusted, in most cases we are talking about repair, in other words, replacing the unit with a new one. It is recommended to carry out similar settings only in almost all situations
This adjustment method is vital if you need to tighten the rack a little, remove free play, and get rid of knocking. It is possible to do without dismantling work, in other words, set up the mechanism specifically on the car
Do-it-yourself Audi 80 steering rack repair.
Repair
The first thing you will need to carry out your own repairs is a repair kit. They are available at almost any auto parts store. However, we strongly recommend that you buy only high-quality kits so that the result of your DIY repair lasts as long as possible.
What you need for work
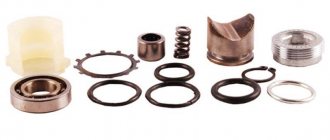
The proposed kits are incomplete and complete. You will definitely need the following kit components:
- Needle bearing;
- A pair of rubber seals for the bushing;
- Support sleeve made of plastic;
- Set of gaskets;
- Spring;
- Retaining rings;
- Support bearing;
- Drive gear;
- Boot cover;
- Rail;
- Set of ties for the boot.
Repair kit Now that the kit is ready, the tools are available, and there is enough free time, you can get to work.
- First, remove the boot, end caps and stops. As you disassemble elements, even the smallest and insignificant at first glance, be sure to evaluate their current condition. If necessary, all worn-out elements will be replaced with new ones taken from the repair kit.
- Using an octagon, unscrew the screw plugs, which will allow you to remove the springs, retaining rings, and thrust bushings.
- Remove the bearing and check if it has any play. The repair kit includes a new bearing, so if the old component is in satisfactory condition, it is better to replace it immediately. It’s not for nothing that you took on such a complex process to get everything done 50%.
- Remove and inspect the drive gear. Next, you can completely remove the rail itself.
- Be sure to replace the support shaft bushing, not forgetting about the rubber bands. They are also included in the kit.
- Take your time to remove the rubber bands from the sleeve. First, insert the element into the crankcase, after which you can cut off the elastic with scissors or a sharp knife.
- The most difficult step is replacing the needle bearing. To remove it, you will need a special key. But you can do without it. In this case, arm yourself with a 1.5 mm drill bit and a drill. Using a drill, make a hole in such a way as to loosen the end of the bearing. Use a punch to knock out the old bearing from the crankcase.
- Before installing the new needle bearing, be sure to thoroughly clean the steering rack housing of accumulated debris and steel shavings from drilling.
- The hole made cannot be left. To eliminate it, you can mix metal filings with superglue. This mixture will harden quickly and give an excellent result.
- Lubricate literally everything that can be lubricated in the steering rack assembly. Experts advise using Litol 24 or other lubricants of similar quality. It wouldn't hurt to lubricate the CV joints.
- Reassemble the unit by following the reverse sequence of dismantling.
If you don’t have a key to remove the needle, repairing the steering rack yourself allows you to significantly save on replacement, plus gain a lot of experience in performing far from the simplest work related to your VAZ 2109. But you can do it easier, without taking any risks, by contacting a trusted car service center.
Unit in a vice
Checking status
Having completed the repair, you should not think that now the steering rack will serve tens of thousands of kilometers and will no longer cause you trouble. Like many other components, the condition of the rack must be periodically monitored.
What to look for
Your actions
Mounting nuts and bolts
These fasteners are subject to vibration after repair as they are used. Therefore, it is recommended to check and tighten them every 250-300 kilometers.
You can check it a little less often, approximately every 500-1000 kilometers, depending on the operating conditions of your car. Due to different quality, some anthers can last quite a long time, while others will require replacement after 10 thousand kilometers. The choice is yours which parts to use
The rack itself should be constantly monitored
Listen to the behavior of the steering mechanism, pay attention to the above signs of malfunction. As part of a scheduled technical inspection, be sure to include a check of the steering racks in the list of activities.
The repair cannot be called complicated, but it takes a lot of time
Plus, it is extremely important to perform all operations as carefully and efficiently as possible. Otherwise, the result will not last long and you will soon have to interfere with the design of the VAZ 2109 steering unit again
Preparation for repair
Since we are talking about intervention in the steering system, suspension, special attention should be paid to preparation.
- If you have a lift or inspection pit, you will be able to perform operations much faster and easier, which is the most important thing.
- Be sure to get a set of sockets and spanners. It is extremely difficult to work without them. In addition to the wrenches, you will need wire cutters, pliers, a hammer, a flat head screwdriver, and a tie rod end remover.
- To remove all fasteners that have been tightened for a long time, a can of WD40 will certainly not hurt. It removes oxidation from nuts and removes rust. In addition to the almighty WD40, buy graphite lubricant or grease. By treating the fasteners with them, you will be able to remove them much easier in the future.
- The presence of rags, a metal brush, fresh gasoline or solvent is welcome.
- Ask your friend to help you with your work. It's much easier to change steering wheels with four hands.
Be sure to remove the negative terminal from the battery in order to de-energize the car. We don't want short circuits or burned out wiring.
Hanging the axle
To safely and independently change the steering rack in your own garage, it is extremely necessary to correctly and securely hang the front axle of the car.
Sometimes this issue is not given due attention, as a result of which the car falls, this leads, at best, to damage to the elements of the car, and at worst, to injuries to the repairer himself.
In order to do everything in accordance with safety standards, you need to:
- Place your VAZ 2109 on a level surface. Typically, garage floors are fairly level;
- Install wheel chocks, shoes, bars or other similar means under the rear wheels. Block each wheel front and rear;
- Pull the handbrake all the way to stop the wheels. Just make sure first that the handbrake works;
- Set the steering wheel in neutral position;
- Slightly loosen the fasteners on the wheels;
- The front of the car needs to be raised. Here it is better to use two reliable jacks at once;
- Near the jacks, additionally place metal stops that are adjustable. If there are no special devices, an ordinary block of wood, boards or some kind of stump will do. The main thing is that when you make contact with the body, when you pull or push it, the car does not tip over;
- Remove the front wheels completely and begin replacing the steering racks.
Optimal working conditions
Dismantling
Before installing a new steering rack, you need to get rid of the old one. For this:
- Get to the place where the rack is attached in the engine compartment. To do this, you will probably have to remove the alarm and gas adsorber, at the same time dismantling the hoses.
- Disconnect the rack from the steering column shaft. Before this, the plastic casing is removed, blocking the path to the spline joints. The rack shaft is released by unscrewing one bolt.
- Next, remove the steering ends from the levers. Here haste can significantly harm you. Gradually brush the threaded connections, tip pin and mounting nut with a metal brush. Then apply WD40 to these areas. Give the product a little time to react. Then you can use pliers and a screwdriver to remove the cotter pin from the connection. Once the solvent has taken effect, the nuts should come off without much effort.
- If the tip is in normal condition, it is recommended to remove this element from the strut lever with a puller. A more barbaric method can lead to damage, so you will have to change the tips.
- Unscrew the rack fasteners using keys. It is better to treat them with WD40 in advance.
- After unscrewing the nuts, pry the steering rack with a flat screwdriver and remove it from the studs.
- Call a partner to work together to remove the element through the opening in the wheel arch.
Assembling a new unit
Since the rail was removed along with the rods and lugs, the structure should be assembled from new parts before the reassembly process.
- Carefully examine the condition of the boot. If the protective cover shows signs of cracks, defects and other damage, the boot must be replaced;
- To replace the rods or boot, unscrew a pair of mounting bolts, first bending the locking plate with a screwdriver or chisel;
- Next, use pliers to remove the clamps that hold the boot in place;
- Remove the rubber support, spacer ring and dismantle the damaged boot;
- New elements are installed in reverse order.
Installation
Reassembling the unit with a new steering rack looks like this:
- Clean the seat, treat the threaded connection with graphite lubricant or grease.
- With the help of a partner, insert the rail into the engine compartment. By rotating the rack along the axis, you can go around all the obstacles you encounter along the way.
- When you place the mechanism on the studs, put on the clamps and attach the mounting nuts along with new washers.
- Don't let your assistant go too far, because without a second pair of hands you won't be able to handle the next step. One should direct the rack shaft into the cabin, and the second should connect the shaft to the column cross. Make sure that the flat on the shaft aligns with the holes on the coupling. This way you can secure the bolt without any problems. After this, clamp and install the plastic column casing.
- Tighten the nuts securing the steering rack in the engine compartment.
- Connect the tie rod ends to the strut arm and tighten the corresponding mounting nuts.
- Do not forget to treat the threaded connection with graphite lubricant or regular grease.
After replacing the steering rack, be sure to check the result of the repair in motion. To do this, just drive out onto the road and see how the car with the new racks will behave.
Typical breakdowns
Torn steering rack boot
There are several most common reasons why a unit may need to be replaced:
- The rail has exhausted its service life;
- The vehicle is regularly driven on uneven roads;
- Having turned the steering wheel to its extreme position, sharp accelerations are often made;
- The presence of mechanical damage due to collisions with potholes, accidents, etc.
Drivers should pay attention to the behavior of their car, which itself may indicate that the steering is out of order. This may manifest itself as follows:
This may manifest itself as follows:
- The rack knocks when turning the steering wheel;
- The steering wheel jams and turns to the sides with some difficulty;
- There is knocking and vibration during travel;
- The play at the steering wheel has increased;
- The wheel alignment is disrupted. This can be determined by uneven wear of the rubber.
Signs of breakdown
By studying the signs of malfunctions in the design of the steering rack, you will be able to promptly identify the breakdown and take appropriate action to eliminate it.
The symptoms below may indicate not only a damaged rack, but also problems with the steering column, ball joints or linkages. Therefore, be careful.
| Symptom of malfunction | Peculiarities |
| Increases free play of the steering wheel | This indicates that the gear sector has worn out due to dirt and dust getting into it. Or the gap between the rack stops and the rack itself has increased. Therefore, the engagement of the rack with the gear decreases. Plus, such a sign may indicate wear on the silent blocks of the rods or weak fastening of the supports in the steering knuckle |
| Noisy or knocking noises near the steering unit | Most likely, a gap has formed between the rack and the stop, or the plastic bushings have worn out. A knock is also a sign of wear on the traction silent blocks, ball joints, or loosening of the gear shaft to the column shaft. |
| Steering wheel turns hard | Here we can talk about possible damage to the steering rack bushing and a violation of the integrity of the gear shaft bearing. But you shouldn’t rule out the possibility of damage to the ball joint or strut bearings. |
Having determined the presence of signs of malfunctions, it is important to understand what exactly caused them to appear. Node diagram
Node diagram
Malfunctions
There are several corresponding defects in the control rack that owners of the VAZ 2109 encounter. In some situations, many get by with a simple adjustment, in others a more detailed intervention in the design of the unit and its components will be necessary.
Failures of the control rack are as follows:
- The control rack fastenings have become loose;
- The rack
itself or its gears have worn out; - The pair engagement is not adjusted as expected;
- The bushings at the junction of the rack and the control rods have worn out.
Read
When should you change your steering rack?
When the play at the steering wheel has increased and when the rack starts to knock, only in this case should you change it, but how can you check all this, you ask? Let's explain! It is best to check the knock on the rack not while the car is stationary, but when driving at speed because it will be more clearly audible, to do this, just find any sharp turn and calmly go through it, if you hear any extraneous sound (Knock), then stop, open the hood of the car and try to turn the steering wheel sharply, you will immediately understand if the rack is knocking, but if you want to clearly see how it can be checked, then in this case, watch the video just below in which everything is clearly shown. (In the video, the Lada Kalina car is taken as an example, but don’t pay much attention to this, and by the way, the rack on this car has already gone through quite a lot of mileage, so it’s already shaking even from the force of your hand)
Installing the steering rack
It is better to install the steering rack on the car with an assistant - one starts the rack from the engine compartment, the other directs the universal joint into the shaft splines from the passenger compartment. The universal joint can be placed in only one position - there is a special casting in the spline joint, which must be aligned with the groove on the mating part. Do not immediately tighten the pinch bolt - the universal joint will take the correct position on the splines after the rack and subframe are finally screwed on.
Install and tighten the steering rack and subframe mounting bolts, then finally tighten the steering shaft universal joint pinch bolt.
Insert the steering pins into the axles and tighten the nuts. Connect the power steering tubes and hoses (or wire connectors for a system with power steering). Pour power steering fluid into the reservoir until about.
Install the wheels and, without removing the car from the stands, begin bleeding the system (for cars with power steering).
How to bleed the power steering system
- Turn the steering wheel several times from lock to lock with a slight delay in the extreme positions.
- Remove the car from the stands, add fluid to the power steering reservoir if the level has dropped.
- Start the engine.
- Turn the steering wheel from lock to lock several times, also with a delay in the extreme positions.
- Make sure that the power steering pump does not make noise, add fluid to the reservoir if the level has dropped and inspect the connections, hoses and power steering tubes for leaks.
Tip: Don't rush to install the heat shield; it will make it more difficult to inspect the rack during the test ride.
After bleeding, check again the tightness of all threaded connections and make a test drive. Steering rack repair can be considered successful if:
- The steering wheel has become lighter and sharper.
- The knocks and noises stopped.
- The fluid level in the power steering reservoir does not drop.
- The rack is not leaking.
- The car handles well and holds the road confidently.
If everything is in order, reinstall the heat shield.
After repairing the steering rack, be sure to check the wheel alignment at a car service center or yourself.
Installation
When installing the steering rack, you must remember the following conditions:
- when installing the steering column, the steering wheel must be in the center and have an equal number of turns in one direction and the other (small deviations are allowed, they will be corrected at the wheel alignment stand);
- screw the rack to the body;
- insert and tighten the tie rod ends;
- put on the wheels and lower the car;
- stabilize the suspension and tighten the steering rods on the silent blocks;
Selecting a replacement unit
The choice of a new unit for the VAZ-2114 should be approached seriously. The main problem is that very often there are defective products on the market that are already faulty or will fail in a very short time.
The best option is to purchase an original unit. The VAZ-2114 uses the same mechanism as the cars of the Samara 1 family (2108, 2109, 21099). Therefore, its catalog number is 2108-3400012, that is, when searching, you can safely ask for a rack for the “Eight” and not worry that it will not fit. The average cost is $100.
You can also buy analogue racks produced by auto parts manufacturers
But here you should pay attention to the manufacturer (it must be well-known), as well as the presence of quality certificates
Among analog products, we recommend paying attention to steering mechanisms from the following manufacturers:
- Weber CG 2108-0012 (its price starts at $80);
- Pilenga SR-P 1141 (costs $100);
- Trialli CR 108 and CR S 708 (the first comes without rods and lugs and costs about $100, the second has an assembled mechanism, which is why it costs twice as much).
For those who want to slightly modify the steering, you can look for tuning racks. The main difference between them is the lower number of revolutions. They are also positioned by manufacturers as reinforced.
Regarding manufacturers, it is worth looking for products from the Italian company Brembo, the Polish company ATF, or the Russian company SS20.
As for the latter manufacturer, it only produces steering racks for the 10th VAZ family, so after acquisition the mechanism will have to be slightly altered.
But we note that tuning slats will cost much more than the original or conventional analogues. So, for a Brembo unit you will have to pay about $250, for ATF - about $200, and SS20 - approximately $210-220.
Which steering racks are suitable for the VAZ 2108 and when to check?
Original steering rack: 2108-3400012-10, average price is about 3873 rubles.
- Pilenga SR-P 1141 will cost about 2510 rubles.
- Trialli CR108, with an average price of 2451 rubles.
- Bautler BTL-0008SG, with an average cost of 2279 rubles.
The frequency of inspection is at every scheduled maintenance. The service life of the rack is 60-80 thousand km.
Unscrew the bolt securing the steering shaft to the rack
Jack up and remove the left wheel
We unscrew and unscrew the bolts securing the mustache to the rail. There is no need to remove steering wheel ends
Using a 13mm wrench, unscrew the 4 nuts securing the rack to the engine shield. First remove the dirt with a wire brush.
More attentive and careful
Remove the nut, retaining ring and spring
From the other side we take out the boot and use another special wrench (which I had to pretty much modify with a file) and unscrew it
Next, we take out all the parts, look for defects, and definitely replace the fluoroplastic sleeve
Reassemble in reverse order, do not skimp on lubrication.
Source
How to remove the rail?
The rack is screwed with four bolts to the car body, and in the cabin it is attached to the steering shaft through a splined connection. First of all, unscrew the steering shaft in the cabin; it is the most difficult to get to. To do this, you will need a 13mm wrench; unscrew the nut and remove the shaft from the spline joint.
The rack itself can be removed with or without tie rods. If you are sure that the rods together with the tips are in excellent condition or you are lucky enough to buy a rack without tie rods (this is also sold) - well, you don’t have to change the rods, but simply remove the rack.
If you do not change the rods with tips
Unscrew the rods from the rack - one bolt for each rod.
Unscrew the rack from the body - two bolts on each side. And take out the rail. It's best to stick it out through the right (passenger) side. To be honest, I couldn’t stick it out any other way.
We completely change the steering
And if you decide to replace the entire steering in one fell swoop, you will have to remove the ends. To do this, we lift the front of the car and remove the wheels, so we can get to the tips.
Remove the stoppers and unscrew the nuts. Then you will need to tap a little with a hammer on the steering knuckle, around the tip pin. He must come out on his own. The hammer won't break anything, the design is quite reliable. If you can’t get the tip out this way, use a puller. After fixing the puller and applying some force to the tip, tap it around your finger - the tip should come out easily. The tip can be removed on both sides in the same way.
In this form we take out the rail.
VAZ 2110: tightening the steering rack with removal
To adjust the steering rack on a VAZ 2110 you will need: a key specialized for the steering rack of the “tens”, and you will also need to remove the steering rack along with the rods.
Removing the steering rack of a VAZ 2110
To carry out this operation you will need: a flat screwdriver, a hammer, a mounting blade, pliers, a 19 mm spanner, as well as 10, 13, 15, 17, 27 sockets. So:
First of all, you need to unscrew the nut in the interior and remove the fastening bolt of the lower cardan joint to the steering rack (steering mechanism) pinion shaft, using a 13-size socket for this procedure. If the bolt turns, you need to hold it with a 13-size open-end wrench.
Removing the steering rack
In the engine compartment:
- Using a 10mm socket, unscrew the nut of the upper fastening of the steering rack boot.
- Then, from the bottom of the car, using a 10mm socket, unscrew the two nuts securing the steering rack boot.
- Remove the unscrewed steering boot.
Removing the steering rack
Raise the front of the car and remove the wheels. To remove the steering rack without tie rods, they will need to be disconnected:
- First of all, you need to remove the locking plate on the tie rod mounts by prying it off with a flat screwdriver. Then unscrew the two bolts securing the steering rod rack.
- Using a 13mm socket, unscrew the nuts securing the steering gear brackets to the front panel.
- Move the steering rack forward, removing the steering gear shaft from the hole in the front panel.
- Remove the VAZ 2110 steering rack together with the rods.
In order to remove the steering rack together with the steering rods, it is necessary to disconnect the steering rod ends from the rotary arms of the shock absorber struts. To do this you will need:
- First of all, using pliers, remove the cotter pin.
- Using a 19mm spanner, do not completely unscrew the ball stud fastening nut.
- Using a 17mm socket, loosen the tie rod end tension bolt.
- At the next stage, we press the ball pin out of the lever by inserting a mounting blade between the tip and the rotary lever, while pressing the tip away from the lever, and striking the end of the rotary lever with a hammer.
- Unscrew the ball stud fastening nut completely.
- Remove the ball pin from the hole in the swing arm.
- Using a screwdriver, you need to loosen the groove of the tie rod end.
- Unscrew the tip, while holding the 27 threaded adjusting sleeve with a wrench. It is necessary to count the number of revolutions in order to screw the tip to the same number of revolutions during installation. At the same time, we maintain the position of the threaded bushing on the steering rod. This will make it possible to maintain approximately the same wheel toe angle.
Steering rack adjustment
On a VAZ 2110 car, the steering rack is adjusted when clamped in a vice. At the same time, it is secured in a vice in such a way that it does not move; for this purpose, the bars are adjusted. So:
- We take the slats (whiskers) by the rods with our hands and, shaking them, it is necessary to determine the amount of play.
- Now, in order to eliminate play in the “tens” steering rack, you need to use a specialized wrench.
- We insert this key and turn it about 10-15 degrees counterclockwise, then shake the rods again with our hands.
Adjusting the steering rack of the VAZ 2110
In each case, the output is different, so there is no specific tightening torque. It should be noted that you should also not overtighten the steering rack, otherwise the steering wheel will be difficult to rotate. After tightening the steering rack on a VAZ 2110 car is completed, it is necessary to tighten the stop nut by tightening the crankcase thread. By the way, this is what the instructions for adjusting the steering rack of a VAZ 2110 car look like from the service manual. Checking the gap between the stop nut and the rack stop:
- Remove the steering mechanism from the car.
- Set the steering rack to the middle position; this position is determined by the size (87±0.25) mm from the end of the rack to the gear axis. Load the rack using a special device with a force of (51±2) kgf or P = (500±20) N, at a distance of 84 mm from the gear axis towards the rack stop.
- The maximum permissible gap between the nut and the stop is 0.2 mm. The permissible maximum movement X of the steering river, measured through the relative movement of the pressure punch 1, should not exceed 0.16 mm.
Tools needed for correct repairs
To carry out repair work or install a new unit, prepare the following tools:
- flat and Phillips screwdrivers;
- a key for unscrewing the stop plug;
- key to 17;
- pliers for installing the retaining ring;
- 2-fingered bearing puller;
- wrench for loosening the bearing nut;
- vice;
- needle nose pliers;
- release puller;
- repair kit with article number: RK2108-3401120/23, 2108-3401120.
Independently restoring the unit’s functionality is quite justified - you save money on repairing or replacing the steering rack of a VAZ 2109, the price of the first operation in car services as of 02/18/2021 is from 2,500 rubles, installation of a new mechanism on average is 2,900 rubles.
Adjustment
So, the situation is such that tightening the steering rack can still give a positive result. Therefore, you need to find out how to tighten the knot and what is required for this.
You can adjust the rack through the bottom of the car, removing the engine protection, or through the top. In the second case, the work will have to be done by touch. So decide for yourself what is more convenient for you.
- To adjust the steering rack, you will need to tighten the adjusting screw. You can find it in the steering mechanism. To be more specific, in the end cap.
- It is optimal to have an overpass or a pit at your disposal in the garage. If there are no such conditions, you can get by by raising the car with a jack. Only in this situation will it be necessary to additionally secure the car in order to avoid it sliding off the jack and the likely consequences.
- Before lifting the body with a jack, be sure to align the front wheels straight.
- You can measure the backlash using a backlash meter. Moreover, they can be old or electronic. The latter are more relevant and convenient to use, but some people don’t have to choose. What you find is what you will use.
- According to current norms and standards, for the VAZ 2109 the steering wheel play should not exceed 10 degrees.
- Find the adjusting screw and begin to tighten it gradually. The operation is carried out slowly. Periodically check the steering wheel movement and any play or knocking in the steering column.
- Use a special key for adjustment. It is available at any auto parts store.
- The key is inserted into the adjusting screw and turned counterclockwise. Scroll a little and check the result.
- The procedure may take a long time. Still, take your time.
- When you feel that the adjustment has reached the desired level, take a test drive in your car, feel how the steering wheel moves, whether the knocking or play has disappeared, how hard the steering wheel rotates.
- If the steering wheel has become too tight, you will have to slightly loosen the tension on the adjusting screw.
Special key
If there is no positive result after the adjustment, you will have to eliminate play and knocking by dismantling, repairing or completely replacing the unit. Now decide for yourself.
You should not rely solely on reiki adjustments as a cure for all its ills. But you shouldn’t rush to conclusions about the need to replace the rack. Try to adjust, and then act according to the situation.
When the rack fails
In order to make timely repairs, it is necessary to identify at the initial stage malfunctions that can lead to irreparable consequences. And they will make the main work easier. After all, if the mechanism is faulty, then the further it goes, the more the parts that interact with it become unusable.
Identifying the problem
To identify a malfunction, you need to know how they manifest themselves. This can be seen through a number of symptoms. So:
- When you hear a knock while driving, which usually comes from the right side;
- There is an increase in steering play. The driver can immediately feel this from the wobbles at speed, and they are not so well controlled. And upon arrival at the station it turns out that the wheel alignment is also poorly done;
- When you eat, you feel difficult to control and the steering wheel is stiff. It's like he's being bitten. This is also a signal to check the rack;
All of the above nuances serve as a reason for inspection and adjustment. It is likely that a complete replacement will be required.
Mechanism design
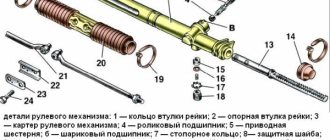
Before making repairs, you need to know the structure and operating principle of the mechanism. Otherwise, nothing may work out. Among the domestic classics, the VAZ 2108 is distinguished by a simpler and more reliable steering system. Let's see what the steering rack consists of:
- Placed in a closed housing of the entire steering mechanism;
- There is a steering gear, which is connected by an elastic coupling to the steering shaft;
- The movement of the rack to the steering rods is transmitted by the connecting plate;
- Brackets for fastening.
These are the main parts of the entire mechanism. In total there are about forty of them. But you should know the basics. The operation of this unit is quite simple. Rotation of the steering wheel transmits force to the gear, which is carried out through an elastic coupling and shaft. In turn, the gear moves the rack using a gear connection. The wheel hubs are rotated using steering rods at an articulated joint.
Troubleshooting options
Before you do the work, you should also know how to troubleshoot the problem. There are several of them:
- Correction by adjustment, which allows you to get rid of the backlash and help restore the functionality of the mechanism for a certain period of time;
- Purchase a repair kit and replace it. This should be done when the shaft is badly worn and simple adjustment cannot help deal with it;
- Complete replacement of the unit, which is usually done when the integrity of the entire housing is compromised.