TOP products in the store
Lada.Online
- about the project
- ·
- Rules
- ·
- Confidential Policy
- ·
- Contacts
- ·
- mobile version
- ·
- LADA concepts
- ·
Lada (“Lada”) is a brand of cars produced by JSC AVTOVAZ.
Previously, it was used only for export cars, and for the domestic market, cars were produced under the Zhiguli brand. In 2004, the management of AVTOVAZ announced the transition to the Latin alphabet for the official spelling of the names of all cars produced by the plant: Lada - instead of "VAZ" and "Lada". Lada.Online is the largest Russian-language automotive resource with a daily audience of thousands, which is dedicated primarily to cars of this brand, the domestic automotive industry and the automotive world in general.
This site is not the official LADA website.
© 2022 Lada.Online. Copying of material is permitted only with a link to the source.
How to change the license plate light bulb on Kalina
What tools will you need:
- flat screwdriver,
- a piece of rag
- new lamps.
The left side of the lampshade is made in such a way that you can place a thin object (in our case, a screwdriver) under it and pry it, releasing the first latch. This requires a little effort. If you are afraid of scratching the plastic, place a prepared rag under the tip of the screwdriver.
Once the left side of the latch has come out, move the lamp itself a little to the left and remove the right side. Pull the lantern out. Now you can either disconnect the wire, or simply turn the lamp a little and remove it from the housing.
The light bulbs in the license plate illumination are the most common ones - W5W. The same ones are in the front side lights. We take out the old incandescent lamps and insert new ones - LED ones. It’s better to immediately check whether you placed them on the wrong side; LED lamps have polarity ! Well, now, with a clear conscience, everything can be put back together. The license plate light bulbs on Kalina have been replaced.
What advantages will we get after replacing the standard license plate light bulbs with LED ones?
- Firstly, they shine much brighter . This is noticeable even to the naked eye. And at the same time they consume much less energy, which leads to at least insignificant savings.
- Second, they don't get so hot . Having removed the old lamps, you may have noticed some melted plastic near their seats. It is not good. This definitely shouldn’t happen with diode lamps.
- Well, the last thing is a beautiful appearance . Agree, the bright, white backlight of the license plate looks much better than the standard one.
Replacing the license plate light bulb on a Chevrolet Niva is carried out as it burns out. You can make the replacement yourself without any difficulty, since the lampshades are held on by two self-tapping screws, and getting to them is easy; all you need is a Phillips screwdriver.
FakeHeader
Comments 21
I encountered the same problem. The hike will also have to take off the bumper. Too labor intensive? Besides unscrewing the bolts, is it difficult to take off and put in place?
About 30 minutes for everything, just don’t break the parking sensor sensor, everything is tight there
Are there all regular heads or are there Torx ones?
I don’t remember, my brain was cold in winter :)))
I don’t understand, is there a twist there?
Yeah, well, so as not to offend Avto VAZ too much, I’ll say this - it’s somehow not right.
For me it stopped burning in 2014 in August)))
it’s scary... how nothing is closed...
this is where it is?! At first the diodes stopped lighting, I took them out, and they were really burned out! I plugged in the factory ones, they work, the fuse is intact, they don’t light! I gave up on all this, and in the evening of the same day everything worked! Now again this bitch doesn’t work... I’ll get confused over the weekend, otherwise even the traffic cop was at home yesterday about this
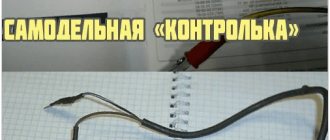
Why does the rear license plate lamp often burn out?
Perhaps due to the increased humidity, the cartridge or antennae have rusted inside. It is necessary to install a new one or clean and replace the conventional incandescent lamp with an LED lamp that is insensitive to moisture.
Long-term shaking, off-road driving, and bumpy roads shorten the service life of standard lamps.
The lighting suffers due to a blown fuse or voltage drops in the car's electrical circuit. The chain may break due to natural wear and tear. These damages can be determined using an ohmometer.
If, after lightly tapping the rear license plate light, the light comes on, it means there was a bad contact or it was dirty, you need to clean it.
There is also a nuance with the number plate illumination. Normally, during the day it lights up if the trunk is open. When opening the car using the key fob, make sure that you do not open it along with the interior doors. Many car enthusiasts complain about the ever-burning license plate light, which does not go out after 5 or 30 minutes until you turn off the car and remove the key from the ignition. It's all about the trunk lock: either the limit switch is stuck, or the car was opened twice with the key fob, or the chip contains a program for opening all the doors and trunk with one click. A constantly glowing lamp often burns out, and the battery also runs out at the most opportune moment.
Messages 10
1 Topic by drummer04 2015-09-12 14:17:30
- drummer04
- New member
- Inactive
- From: St. Petersburg
- Registration: 2015-01-03
- Messages: 78 Thanks : 5
- Car: VAZ 2110 8 valves (2004)
Topic: Resolved: License plate lights do not light up, fuse is intact
The license plate light bulbs do not light up, I took out the old light bulbs, they were black, I replaced them with new ones, they still do not light up, I checked the fuse, it is working. So I guess there is no mass? Where to look for it?
2 Reply from drummer04 2015-09-12 15:03:06
- drummer04
- New member
- Inactive
- From: St. Petersburg
- Registration: 2015-01-03
- Messages: 78 Thanks : 5
- Car: VAZ 2110 8 valves (2004)
Re: Resolved: License plate lights do not light up, fuse is intact
and looked at fuses f1 and f10
3 Reply from Anton 2015-09-12 15:24:07
- Anton
- Local
- Inactive
- Registration: 2014-02-20
- Messages: 2,207 Thanks : 255
Re: Resolved: License plate lights do not light up, fuse is intact
if you are guilty of mass, try feeding the mass directly
4 Reply from Serg 2015-09-12 20:50:47
- Serg
- Lada2111.rf fan
- Inactive
- Registration: 2013-07-29
- Messages: 830 Thanks : 363
- Car: 2111 dwg 2114 year 2008
Re: Resolved: License plate lights do not light up, fuse is intact
Car control helps a lot, I recommend it
5 Reply from sergo9531 2015-09-12 20:58:15
- sergo9531
- Local
- Inactive
- From: Domodedovo
- Registration: 2014-01-12
- Messages: 578 Thanks : 208
- Auto: 21114
Re: Resolved: License plate lights do not light up, fuse is intact
drummer04 , there should be a plug on the right under the trunk trim, once my “dad” flew out there and the number stopped lighting up. Poke it with a tester or control, if there is +12, then the problem is in the trunk (the wire is broken or something else)
Source
Relay block Lada Granta
The relays are located in the same fuse and relay box, which is located to the left of the steering column under the cover.
K1 - heater fan relay
K2 - power window relay . If they do not work, also check fuse F2; if this does not help, then the problem may be in the control unit.
K3 - starter relay . If it does not work (does not turn) and this relay is working, check the battery charge level. It could also be a problem with the retractor or the ignition switch and its contacts.
K4 - ignition switch terminal 15 relay
K5 - turn signal and hazard warning relay . If the turn signals come on and do not turn off, this relay may be shorted. Also check fuse F3 (emergency mode).
K6 - windshield wiper relay . Check also fuse F4.
K7 - high beam relay . Also check fuses F14 and F15 and the lamps themselves.
K8 - horn relay . Also check fuse F20, signal switch contacts on the steering wheel.
K9 - low beam relay . Also check fuses F12 and F13 and the lamps themselves.
K10 - rear window heating relay . If the heating does not work, the problem may be in fuse F8.
K11 - engine control unit relay . Also check fuse F1.
K12 - electric fuel pump relay . Also check fuse F21.
We act in the salon
- The fuse box is located on the left side of the instrument panel. Remove the cover with the outdoor lighting mode switch integrated into it. If the work is carried out on the LADA Granta “Lux” and “Norma” modifications, then do not forget about the need to disable the button used to unlock the trunk lock.
- Armed with the diagram, we determine whether the cigarette lighter fuse or the fuel pump fuse has become unusable, and so on. We look at the integrity of the thread and draw the appropriate conclusion. If the element is unfit, then we replace it with a new analogue by fixing it in the mounting socket. We repeat this action with the entire list of blown fuses.
- We connect the “minus” back to the battery and check the functioning of the electrical unit in which the fuse was replaced.
The process of replacing the specified elements, which contain the fuse block, of the engine compartment of the Lada Granta is implemented in a similar way. The cover on the safety module is removed using a simple action - just pull it up and quietly replace the marked elements.
Debugg
Of the possible malfunctions listed above, the average motorist cannot eliminate all of them. It is unlikely that in the middle of the road you can replace a rotten lampshade with something. Not everyone can repair a damaged wiring harness. Therefore, we will not consider such cases in this article.
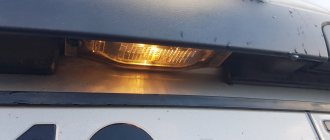
Having discovered a malfunction of the backlight, let's start by removing the lampshade. It is fastened either with self-tapping screws, or with plastic latches, or with a “screw + latch” combination. All these methods have both pros and cons - plastic latches are easy to break, but a soured self-tapping screw with rolled-up slots is by no means a gift.
On a number of cars, you can unscrew the lamp socket from the lampshade from the inside of the trunk lid, for example, on a Priora. This is often preferable to trying to press the plastic clips of the backlight from the outside, although it is less convenient.
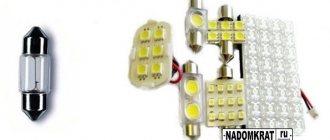
After removing the courtesy light or the backlight bulb socket, first inspect it. A dark bulb or visible damage to the lamp filament is a clear indication for replacement. As a rule, W5W (pictured below) or C5W lamps are used to illuminate the license plate. They do not take up much space in the car, and it is advisable to have them with you just in case.
You can often observe the following situation: a C5W type lamp (cylindrical with end contacts) is installed in the backlight. It may be absolutely fine, but the contacts themselves are oxidized. In this case, it is enough to clean the contacts and bend them slightly to fix the light bulb more securely - sometimes the license plate light does not light up simply because the lamp has jumped out of the spring contacts.
FakeHeader
Comments 21
I encountered the same problem. The hike will also have to take off the bumper. Too labor intensive? Besides unscrewing the bolts, is it difficult to take off and put in place?
About 30 minutes for everything, just don’t break the parking sensor sensor, everything is tight there
Are there all regular heads or are there Torx ones?
I don’t remember, my brain was cold in winter :)))
I don’t understand, is there a twist there?
Yeah, well, so as not to offend Avto VAZ too much, I’ll say this - it’s somehow not right.
For me it stopped burning in 2014 in August)))
it’s scary... how nothing is closed...
this is where it is?! At first the diodes stopped lighting, I took them out, and they were really burned out! I plugged in the factory ones, they work, the fuse is intact, they don’t light! I gave up on all this, and in the evening of the same day everything worked! Now again this bitch doesn’t work... I’ll get confused over the weekend, otherwise even the traffic cop was at home yesterday about this
Options and methods for installing LEDs for license plate lighting
The most popular among car enthusiasts today is LED license plate illumination. And this is not surprising, because it has significant advantages compared to other types of lighting elements. This includes the quality of the luminous flux, low energy consumption, long service life and resistance to various aggressive conditions of use. There are two ways to illuminate your car license plate using LED lighting elements.
The first method involves replacing typical lamps with diode lighting elements. The second method is based on the installation of auxiliary LED devices. Almost every service station provides installation services for lighting fixtures on cars, however, this task can be handled without the help of professionals.
Replacing standard lighting elements with diode ones yourself
To replace typical light bulbs with LED lamps, you need to remove the lampshade and put diode bulbs in their place. To remove the lampshade, use a screwdriver to unscrew the chrome strip from the car bumper, and unscrew the standard light bulbs as carefully as possible to avoid damage to the delicate holders on the body. The lampshade can be disassembled into two parts using a sharp knife. Next you need to degrease the lampshade and install LED products. Everything is assembled in the same way in reverse order.
For high-quality lighting, choose powerful light bulbs, preferably with lenses. Their price is higher than conventional diode ones, however, the quality of their luminous flux is better.
DIY tuning LED license plate lights
Additional illumination of license plates is carried out by car owners when they are insufficiently illuminated by standard devices, or as a way to improve their car with tuning parts.
Most often, LED strip is used for tuning. Let's look further at how to make license plate lighting with your own hands.
The first method is characterized by attaching lighting elements to the car body. Before installation, you need to purchase a diode, preferably a three-matrix strip, which can be directly connected to the on-board network without additional resistors. The required length of the strip is cut with the number of LEDs being a multiple of three. The wires are connected to the LED product by soldering using a soldering iron. Soldering points are isolated in order to protect them from moisture and oxidation. Then you can proceed directly to installing the lighting elements on the body. For fastening, plastic clamps, double-sided tape or professional glue are used at your discretion. Connect the wires, observing the polarity. The minus is displayed on the car body, the plus is connected to the permanent plus in the car.
The second method involves installing an LED strip in a standard lamp to illuminate the room. To do this, it is necessary to construct a diode strip in a similar manner to the previous method. Next, the lantern is removed and all the contents are removed from it. It is advisable to mount LEDs not on protective glass, but on specially prepared pieces of metal or plastic of appropriate sizes. The wires are connected directly to the standard wiring, and the joints are insulated. The operation of the device is checked and the lamp is installed in place.
There is also the option of making your own additional flashlight using plexiglass and foil. In this case, similarly to the previous options, we attach the wires to the diode strip. We select glass of the required size and thickness of about three millimeters, place LEDs on it and cover it with foil, which serves as a reflector. The edges must be filled with sealant, a new LED lamp must be installed and connected. The wires can be connected either directly or to a separate button.
Why does the instrument panel backlight on the Lada Kalina not light up?
During operation of the Lada Kalina, situations may arise when the dashboard backlight disappears. If this happens, then you need to find the cause of the breakdown as soon as possible and eliminate it. There are several reasons for the backlight to disappear, but they are all related to a malfunction of the car's electrical network.
Removing the instrument panel
In most cases, before establishing the reason for the disappearance of the backlight on the Lada Kalina dashboard, you first need to dismantle it.
To remove the instrument panel you will need the following tools:
- a set of keys;
- Phillips and flathead screwdrivers of different lengths.
The procedure for dismantling the instrument panel on the Lada Kalina:
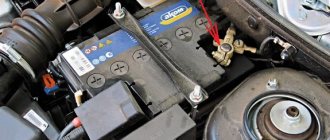
- Turn off the power to the car. To prevent a short circuit during work, you must first disconnect the negative terminal from the battery. If this is not done, there is a possibility of electrical equipment failure.
- Lower the steering column to its lowest position. This will allow you to gain easier access to the instrument panel.
- Unscrew the two screws securing the cover; this will require a short screwdriver. Then it is carefully pulled out, while it is necessary to overcome the resistance of the spring clamps. It is necessary to shake the pad and gradually pull it towards you.
When the dashboard has been dismantled, you can proceed to diagnostics and search for the reasons that caused its malfunction.
Video: removing the instrument panel
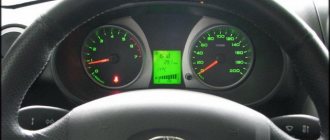
Brightness adjustment lost
One of the very first actions to take when the instrument panel backlight disappears is to check the brightness adjustment. The driver himself or his passenger can change the setting. There is a wheel on the panel with which you can set the brightness of the instrument lighting. If it is turned to minimum, the backlight may glow very weakly or not glow at all. Just turn the wheel and adjust the brightness.
Fuse problems
The next step in troubleshooting is to check the fuses. To do this, you need to use the technical documentation of the car and find where the fuse responsible for the instrument lighting is located. The fuse box is located on the left side under the cover with the light switches.
Also, the purpose of the fuses is written on the cover and if you look closely, you can find where which one is located. It is enough to replace the required fuse and if the problem is there, the instrument lighting will start working. On the cover, the fuse responsible for the instrument lighting and interior lighting is designated F7.
In addition, the socket into which the fuse is inserted may become damaged, or a breakdown may occur inside the unit itself. To diagnose, you will have to completely remove the fuse box. If the mounting block fails, it must be replaced.
Wiring problems
One of the most unpleasant options is a malfunction in the car’s electrical wiring, which leads to failure of the instrument panel backlight. This may occur as a result of a broken wire. To identify it, you need to use a multimeter to check the wires responsible for powering the instrument backlight. They can be identified on the car's electrical diagram. Once the break is found, it is removed and isolated.
In addition, the reason may be oxidized contacts of the mounting block or wire blocks. In this case, disconnect the connector near the fuse box and on the dashboard. After this, inspect and, if necessary, clean the contacts.
Problems with light bulbs
It is possible that the instrument panel lighting has disappeared due to failed light bulbs. There are a total of 5 light bulbs on the Lada Kalina dashboard.
Replacing them yourself is easy:
- The dismantled instrument panel is turned over, since the light bulbs are located at the back.
- Take out the light bulbs and check their functionality using a multimeter. The cartridge is turned counterclockwise. If you have difficulty pulling the light bulb out of the socket by hand, you can use pliers.
Video: replacing light bulbs
The board burned out
In some cases, a problem with the dashboard lighting may be due to a faulty control board. Some craftsmen try to restore it with a soldering iron, but this is a complex process and only professionals can do it. Usually, when such an element fails, it is replaced with a new one.
What you need to know about fuses
Fuses are designed to protect electrical equipment from overvoltage and short circuit.
New fusible protective devices are smaller in size. The following Grant models are equipped with them:
The difference between the schemes in the Standard, Norm or Lux trim levels is insignificant, and is primarily due to the installation of additional equipment.
A total of 32 fuses are installed in the mounting block, which is slightly more than in older versions. Those of them that are located in the cabin are responsible for the operation of various circuits with relatively low power.
The power ones, as previously noted, are placed in the engine compartment. This was done to ensure a greater level of safety and ease of maintenance of the vehicle.
The manufacturer expressly prohibits the use of protective devices during replacement that do not correspond to the nominal ratings of those indicated in the diagram. In particular, exceeding the maximum values leads to overload of the circuit and subsequent failure of the equipment powered by it. All this most often leads to fire.
It is important to remember that if a fuse blows, you should not change it immediately. First of all, you need to find out what exactly led to this. Otherwise, there is a risk of the insert melting on the new one.
If you do not have the knowledge to test electrical systems, you should seek the help of professionals.
Recommendations for replacing license plate lights
By spending a few minutes of your free time, you will protect yourself from fines from traffic police officers. Remember that only those lights that emit a pale yellow or white color can act as backlight lamps for the Lada “Kalina” license plate. Drivers who decide to replace factory lamps with colored bulbs receive a fine of five hundred rubles. According to the law, such machines should not be allowed to operate. If the replacement of lamps was successful and the backlight is on, do not forget to monitor the cleanliness of the rooms.
I have long wanted to replace the license plate light bulbs on my Kalina with LED ones, but I haven’t had the time. And then, finally, it happened - one of the lamps burned out. I bought a couple of LED ones at the market, came home and got to work.
As it turned out, the work is very simple and straightforward; you don’t even need to unscrew any bolts. This example is suitable for owners of Kalina sedan, station wagon and hatchback.
"Hyundai Solaris" - mastering Korean cars
This model of the Korean automaker is no less popular. This foreign car is profitable and prestigious, and also has a wonderful appearance. If you look at how to replace the license plate light bulbs on a Solaris, then at first glance it will become clear that the backlight is implemented using two lamps. It is almost the same as the previous car.
How to change license plate light bulbs on a Solaris is described in more detail below.
To gain access to the wiring located on the trunk lid, you need to dismantle the trim in the right place, namely on the edge where the license plate is located. In order to do this, you must use a wide screwdriver or a metal ruler, insert it into the seam between the iron and the sheathing, and smoothly remove the latches. Do this carefully, do not damage the latches, but if this happens, do not despair, they can easily be found on sale and replaced.
Once we see the wiring harnesses and sockets, we can repeat the steps above: turn the socket counterclockwise, replace the lamp, install the socket back and turn it clockwise.
Recommendations for replacing license plate lights
By spending a few minutes of your free time, you will protect yourself from fines from traffic police officers. Remember that only those lights that emit a pale yellow or white color can act as backlight lamps for the Lada “Kalina” license plate. Drivers who decide to replace factory lamps with colored bulbs receive a fine of five hundred rubles. According to the law, such machines should not be allowed to operate. If the replacement of lamps was successful and the backlight is on, do not forget to monitor the cleanliness of the rooms.
vote
Article rating