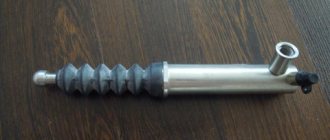
Welcome, friends, to the DIY auto repair website. The braking system of cars consists of a whole group of components, each of which takes on a specific function. In this case, one of the most important elements is the brake master cylinder. Thanks to its action, the force applied to the system takes the form of hydraulic pressure.
Malfunctions of the main brake cylinder
Malfunctions of the master cylinder can lead to a number of negative consequences. For example, the brakes may become less effective or fail. To avoid these problems, every driver should know how to recognize and fix the problem.
How does GTZ work?
The operating principle of the GTZ is based on the ability of a liquid to maintain its “shape” under the influence of a certain pressure. In this case, the devices structurally consist of a 2-section main cylinder, each section of which has its own hydraulic circuit.
Front-wheel drive vehicles consist of circuits that connect the braking systems of the rear and front wheels in a criss-cross pattern. For example, the right rear wheel is connected to the left front, and the left rear is connected to the right front.
Things are different on rear-wheel drive cars, where the contours are formed differently. So, one of the circuits works on the two front wheels, and the second on the rear wheels.
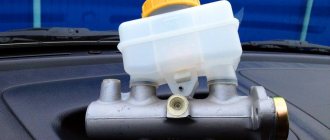
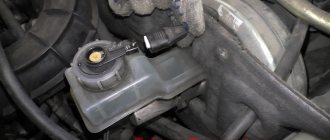
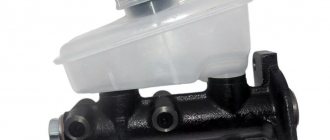
The GTZ is mounted on the housing of the vacuum amplifier. In this case, the working fluid is poured into a 2-section tank located above the main cylinder. The connection of the tank with the GTZ is ensured thanks to special holes.
To simplify maintenance, the walls of the tank were made of translucent plastic, which allows you to visually keep the level of the working fluid under control. As soon as the level drops below the normalized value, the sensor gives a signal to the control panel and the light comes on.
In the GTZ housing itself there are two pistons, which are mounted one after the other. The first has a free location, and the other, on the contrary, is fixed and touches the rod part of the vacuum amplifier.
In order to increase reliability, the pistons are sealed with rubber cuffs. The pistons are returned to their original position using special springs. By the way, they are the ones who hold the pistons in their original position.
As soon as you press the pedal, the vacuum booster is pressed in through the rod. Moving along the cylindrical cavity, the rod closes the hole for compensation. As a result, the pressure in the 1st circuit increases, driving the 2nd piston. The result is an increase in total pressure in the 2nd circuit.
At the moment the pistons move, empty areas are formed, which are filled with the working composition. Brake fluid is supplied through a special hole. The movement of the pistons is carried out until the return spring fulfills its functions.
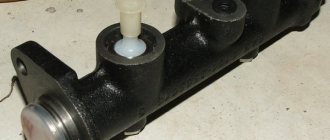
GTZ disassembled
In each of the circuits, the pressure level increases to a maximum, which brings the mechanism into working condition. After the car stops and the pedal is released, the pistons return to their original position. In this case, the pressure level in the circuit is equalized and becomes similar to atmospheric pressure.
The missing air is drawn in through a special hole for compensation. When the piston moves in the opposite direction, the working fluid is squeezed back into the tank.
The advantage of a loop system is that if one loop fails, the other continues to perform its functions. For example, if there is a leak, it will manifest itself as a deeper “sink” of the pedal, but the brake performance will still remain at a high level.
Let's get started
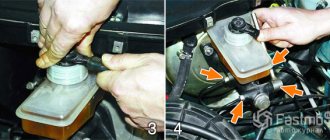
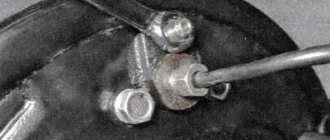
Replacing the master brake cylinder on a VAZ-2110 is complicated by the fact that this mechanism is hidden behind the soundproofing padding of the engine compartment. Therefore, you first need to find its mounting bolts and remove the part outward. For this we need screwdrivers and a little patience. After this, you can begin replacing the master brake cylinder of the VAZ 2110 model. First, disconnect the plug with the wires on the lid of the plastic tank. This is an emergency liquid level indicator. Next, loosen the nuts holding the brake pipes. There are only four of them. Then remove the GTZ from the studs. To do this, you need to completely unscrew the nuts securing the tubes. Be careful - liquid may leak from the cylinder at this time. Therefore, we immediately place some container under the holes.
What do we do next? The next step is to drain the remaining liquid from the tank into an empty reservoir. Then you can safely take it out.
Tools
Regardless of whether you are using a master brake cylinder repair kit or replacing the entire brake cylinder with a new one, to perform the repair operation you need to prepare:
- Set of heads and socket wrenches.
- Screwdrivers and pliers (the latter will be needed when replacing the cuffs).
- Special purpose wrench for “10” brakes.
When replacing the main brake cylinder on a VAZ-2110, we will need new fluid. For the “ten”, “RosDot” of the fourth class is suitable. It is advisable to purchase at least one eggplant.
Replacement
To replace an element, you need to understand the main issue - how to remove the vacuum booster from a VAZ 2110. Directly replacing the old element with a new one will not be difficult, just like the reassembly process.
Therefore, we will tell you about the main thing - dismantling the amplifier. Let's start with the fact that the procedure is not complicated, but it requires accuracy and sequence of steps. If you follow the recommendations, the work will take little time and will not take much effort.
- Disconnect the block with wires, which includes brake fluid level sensors in its design.
- Hold the booster check valve with one hand and carefully disconnect the hose with the other. It is advisable to disconnect the hose with a strong hand, since this will require a lot of force.
- Remove the two bolts connecting the booster and master cylinder.
- Carefully remove the cylinder from the amplifier.
- There is no point in disconnecting the brake lines.
- Give access to the dashboard, which will allow you to unscrew the nuts holding the brake pedal bracket. There should be 4 of them.
- It is recommended to dismantle the bracket and amplifier through the engine compartment, since there is enough free space for such manipulations.
- Remove the pin lock plate. To do this, pry the finger with a screwdriver and squeeze it out.
- Now you can easily disable the brake pedal and booster.
- To disconnect the amplifier and bracket, you will have to unscrew the two nuts on the mount.
- A new one is installed in place of the dismantled old vacuum amplifier, and the reassembly procedure is performed in strict sequence of the dismantling process.
Installing an element
Now we mount the tank with bushings on the new cylinder. If it was not included in the kit, you can take the old one. But it must be free of cracks and other deformations. Then we take out the rubber sealing bushings from the old GTZ. There are two of them. If they are worn out and have cracks, we take new ones from the master brake cylinder repair kit. We put the mechanism back to the “vacuum chamber” and tighten the fastening nuts. Next, place an empty container underneath and fill the tank with new liquid. It is advisable not to mix different classes - buy Series 4 Dot.
Next, you will need an assistant who, at your command, will press the brake pedal in the cabin. At this time, you need to close all four pipe holes in the master cylinder with your fingers. Pressing should be done to the floor and very slowly. We repeat the procedure until liquid flows out of the holes. Next, you can safely connect the tubes that go to the front wheels. After this, ask the assistant to press the pedal again. We make sure that all the air comes out of the holes for the rear wheels.
After this, remove the fingers and screw in the remaining tubes. At this point, the replacement of the "tens" GTZ is almost complete. All that remains is to add liquid to the tank to the required level, connect the sensor and put the soundproof cover in place.
Replacing the cuffs of the main brake cylinder on a VAZ-2110
This operation is performed on the element removed from the car. It is advisable to use a mechanical vice. This will hold the part firmly in place. So, let's get to work.
First, remove the o-ring from the cylinder. Next, use a large “38” head to unscrew the GTZ plug. We take it out with the second sealing ring. Using pliers, remove the stopper. We take out the piston that controls the rear contour by grasping its shank. It should be removed together with the guide sleeve and outer cuff. To dismantle the latter, you will need to unscrew the spring holder screw. Next, we take out the front circuit piston. To do this, push the thread side element with your finger. Using a thin screwdriver, remove the separating cuffs. We wash all elements in gasoline or alcohol. We put the new cuffs in place and complete the final assembly.
Main malfunctions of the turbocharger and brake system
In order to diagnose the breakdown in time and fix it, it is important to know the signs of a malfunction in the master cylinder.
1. Severely worn pads or a leak of working fluid in the brake system can cause a decrease in its level. As a result, operation of the vehicle is prohibited until repair work is completed.
It is important to carefully examine the condition of the brake system pipes, assess the condition of the turbocharger, check the working cylinders, connecting hoses and calipers. If a leak is detected, the damaged unit must be replaced.
2. If the turbocharger becomes jammed or fails, braking efficiency may decrease, and the risk of “softening” the brake is high. This occurs due to a decrease in working fluid in the system or air entering it. The situations described above are also possible when the liquid boils.
Video on the topic
Increased brake pedal travel
1. Leakage of brake fluid from the wheel cylinders
1. Replace failed parts of the wheel cylinders, wash and dry the pads, discs and drums, bleed the hydraulic drive system
2. Air in the brake system
2. Bleed the system
3. Damaged rubber O-rings in the master cylinder
3. Replace the rings and bleed the system
4. Damaged rubber hoses for hydraulic brakes
4. Replace hoses and bleed the system
5. Increased runout of the brake disc (more than 0.15 mm)
5. Sand the disc; if the disc thickness is less than 10.8 mm, replace it
6. Fluid leakage through the O-rings of the pressure regulator pusher
6. Replace O-rings
Insufficient braking performance
1. Oiling the brake pad linings of Lada Samara 2
1. Clean the pads with a wire brush using warm water and detergent. Eliminate the cause of fluid or grease getting on the brake pads
2. Jamming of pistons in wheel cylinders
2. Eliminate the causes of jamming, replace damaged parts, bleed the system
3. Complete wear of the brake pads
3. Replace brake pads
4. Overheating of brake mechanisms
4. Stop immediately and let the brakes cool down.
5. Using pads with mismatched linings
5. Use only pads recommended by the manufacturer
6. Incorrect pressure regulator adjustment
6. Adjust the pressure regulator drive
Diagnostic features
The first thing you need to pay attention to is the readings on the dashboard. As a rule, they react to a malfunction earlier than you are able to diagnose it during operation. So, if there are problems in the brake system, then the corresponding lamp should light up on the dashboard.
When the first signals of a malfunction appear in the brake system, the first thing you need to pay attention to is inspecting the brake cylinder (there should be no obvious signs of leakage on it).
In addition, pay attention to each of the brake circuit outputs, joints, and so on. After an external inspection, check the pressure in the brake system (this can be done using a special pressure gauge).
The pressure obtained during the measurement process is compared with what the car manufacturer recommends. If the measurements show a serious difference, then we can talk about the failure of one of the circuits. It is also worth checking the tightness of the circuit, but this work can only be done with special equipment.
As practice shows, one of the main reasons for the breakdown of the gas turbine engine is its depressurization. This is easy to notice by the appearance of a leak and a characteristic odor. Damage to the housing, failure of the return spring, wear of the cuffs (sealing and inlet) or the assembly mirror - all this is a reason to replace the master cylinder.
Knowing how to identify a faulty brake master cylinder can help you identify the problem early, fix it, and eliminate any risk to life. Good luck on the roads and of course no breakdowns.
Problems that arise with the brakes while traveling are considered critical and must be corrected immediately. The culprit of the malfunction is often the main cylinder, installed in the engine compartment and rigidly connected to the pedal. To find out the cause of the breakdown and repair the unit yourself, you need to know the structure of the brake master cylinder (MBC) and its principle of operation. During the diagnostic process, it is necessary to distinguish and filter out problems with other elements of the system.
Master cylinder device
The principle of operation and design of the brake master cylinder is similar to the clutch master roller, given that in many cars one mechanism performs double duty. But in many cars, there are two pistons located in the brake drum to operate the front and rear or left and right circuits, depending on the make of the car. After disassembling the brake master cylinder, you can see the following main spare parts:
1, 2 — Tank cover with gasket. 3 - Brake master cylinder reservoir. 4 - Bushings for the bypass fitting. 7 - Tank body. 10, 28 — Return springs. 12, 26 — Internal cuffs. 13, 25 - Bypass valves. 14 - Piston that activates the front brakes. 15, 16 — External cuffs of the front drive brakes. 20, 22 — Outer cuffs of the rear brake drive. 24 - Piston responsible for operating the rear brakes.
Car brake master cylinder diagram
In the body of such a cylinder, two pistons (12 and 18) are placed, which are located one after the other. The second piston is freely installed, while the first piston interacts with the brake booster rod, which abuts against it. Rubber cuffs perform the functions of piston seals, which, as is already known, are located in the cylinder body. Return springs (2 pieces “9, 14”) hold and return the pistons.
How does the GTZ function?
The unit consists of the following parts:
- metal housing with holes for supplying brake fluid, pedal rod and connecting the expansion tank;
- 2 pistons with rubber seals;
- 2 return springs;
- guide bushings;
- end plug with gasket.
An expansion tank is attached to the top of the main distributor body, where excess fluid goes through compensation holes. Inside, the element is divided into 2 cylinders with separate pistons standing on the same axis.
The blind end of the housing is closed with a threaded plug; on the other side there is a flange for attaching to the vacuum booster. The brake pedal rod is attached to the first piston. The brake circuit pipes are connected to the lower holes - separately for the front and rear wheels.
The operating principle of the master brake cylinder looks like this:
- When you press the pedal, both pistons simultaneously move forward and push fluid into the circuit tubes. Under its pressure, the wheel cylinders are activated, compressing the pads on the discs.
- Part of the liquid that does not have time to pass into the tubes flows into the expansion tank through special bypass holes.
- When the driver releases the pedal, the springs push the pistons back, returning them to their original position. Liquid from the tubes and reservoir refills the cylinders.
- To compensate for the expansion of the liquid (for example, from heating), another pair of holes is provided leading to the expansion tank.
Vacuum booster
The braking system of a car certainly cannot be called perfect, so it has to be supplemented with devices that help improve efficiency. One of them is a vacuum booster.
Application and purpose
Today, a vacuum amplifier is in great demand because it is highly efficient.
Its tasks are extensive, but the amplifier copes with them all perfectly:
- The degree of resistance of the brake pedal increases;
- Reduces the load on the brake system;
- Acts as a highly efficient auxiliary unit;
- Has a positive effect on the service life of the brake system, etc.
This element has the following components:
- Dense body, for the manufacture of which a high-strength polymer is used;
- The diaphragm, which is also called the collecting node;
- Monitoring or control specialized valve;
- Pusher. It allows you to return the engine elements to their original position when there is no power;
- Main piston rod of the brake system cylinder (main);
- Switch return spring.
The body of this spring has two cellular divisions, which are divided into vacuum and atmospheric. Cells are often called chambers.
- The vacuum chamber is a cell directly connected to the brake master cylinder.
- The atmospheric chamber is a cell located opposite the brake pedal. Its open part of the body rests on the brake pedal.
It is also worth noting the diaphragm, which performs two very important tasks:
- Corrects the position of the piston in space;
- Pumps brake fluid to the main brake cylinders.
Installing a vacuum booster involves a serious change in the sensitivity of the pedal, so it is strongly recommended not to apply a large and sudden force to it in the “first couple”. Pressing should be done carefully and smoothly.
Symptoms of problems
The fluid brake system consists of many parts that can become unusable: pipes, wheel cylinders, calipers, drums and pads. Typical signs of a faulty master cylinder:
- After pressing the pedal, the car stops slowly. The reason is that the cuffs of one or two pistons have lost their tightness - they have cracked or “floated”.
- To slow down, you need to press the brake pedal hard. The phenomenon occurs due to swelling of the rubber of the piston seals.
- The brake pedal travel is too short. The fluid inside the cylinder has nowhere to go because the compensation hole is clogged. Another option is that the passage is blocked by a swollen rubber seal.
- A common symptom is pedal failure, the brakes coming on at the end of the stroke. This indicates complete wear of the cuffs; as a result, liquid penetrates behind the piston and rushes into the expansion tank - the cylinder “bypasses.”
- The pads do not release the brake discs and drums and get very hot when driving. Options: one of the pistons is jammed or the bypass hole is clogged.
The listed symptoms of a GTZ malfunction are similar to malfunctions of other elements. Pedal failure also occurs when a large amount of air enters the tubes or loss of fluid in one of the working cylinders. Sluggish deceleration and increased force on the pedal are often caused by a breakdown of the vacuum booster - a cracked membrane or a lack of tightness at the joints of the hose that takes off engine vacuum.
There are signs that clearly indicate the performance of the main hydraulic cylinder and the malfunction of other elements:
- during braking, the car pulls to the side - the problem lies in a certain circuit or wheel;
- jamming of the brake mechanisms of one wheel;
- creaking and squeaking when braking;
- heating the discs and pads on one wheel.
If you eliminate these symptoms, it will become easier to check the brake master cylinder in a garage. This also includes obvious brake fluid leaks and the knocking sound of worn calipers.
When is it necessary to bleed the brakes?
The first of these is that the drive pipelines are exposed to negative environmental influences.
The rear brake pipelines on VAZs are made of soft metals (copper, brass) and they pass under the bottom of the car. Oxidation processes and possible shock loads during operation can cause cracks or breakdowns in the pipeline. The drive of the front mechanisms is composite, one part of the pipeline is metal, and the second is rubber. Over time, the rubber “ages” and cracks appear on it. The second reason why there may be air in the system is scheduled maintenance of the brake system. The fluid used in the drive has its own resource, so it must be replaced periodically. It is during the replacement process that air gets inside the system. It can also appear in the system after repair of mechanisms, for example, during the replacement of pads. Therefore, it is imperative to bleed the brakes after replacing the pads.
But on VAZ cars it is possible to remove air bubbles by pumping - a process in which air is expelled from the liquid. For this purpose, special fittings are provided for the design of the brake mechanisms.
It is not difficult to identify that the system requires bleeding - the failure of the pedal, the ease of pressing it and a decrease in the effectiveness of the brakes, up to their complete absence, indicate that the system is airy.
But before you start pumping, you should carefully inspect all pipelines and components of the system for leaks, as well as the amount of liquid in the tank. If traces of leakage are detected, the malfunction should be eliminated by repair using repair kits (main and working brake cylinders), replacing the damaged section of the system (pipelines), and after replacement, carry out bleeding. If air has entered the system due to a lack of fluid, it must first be replenished to the level.
Diagnostics and repair
From the signs listed above, it is easy to understand that in most cases there is only one source of problems - rubber products that have become unusable. The cuffs crack and swell, as a result they leak liquid and close the discharge holes. Hence the recommendation: all “rubber bands” of the brake system should be changed at intervals of approximately 100 thousand km, without waiting for critical wear.
Reference. Many auto mechanics express the opinion that after replacing the cuffs, the main hydraulic cylinder will not last long. The statement is true if the car owner purchased cheap, low-quality spare parts or installed new o-rings in the cylinder, where internal wear has formed in the walls.
Before checking the GTZ for operability, make sure there are no other faults:
- Inspect the wheel assemblies from the inside for leakage of brake fluid from the working cylinders.
- Check the integrity of the expansion tank and the fluid level in it.
- Start the engine and at idle speed, press the vacuum take-off pipe to the amplifier. If the engine speed has increased noticeably, there is an air leak and the master cylinder is most likely working.
A clear symptom indicating a breakdown of the main hydraulic cylinder is drops of brake fluid on the body . If you discover a leak, feel free to dismantle the unit and disassemble it to look for the cause. Another common problem - fluid flowing through the seals - is diagnosed as follows:
- Open the cover of the expansion tank and place an assistant in the driver's seat.
- Listening to sounds in the tank, give the command to an assistant to press the pedal.
- If the pedal moves easily and gurgling is heard in the reservoir, liquid is entering there. The reason is that worn cuffs are unable to create pressure in the circuits; liquid seeps through the leaks and enters the container.
Also, problems with the GTZ are indicated by jamming or too little pedal travel. Sit behind the wheel, press it several times, and start the engine while holding the pedal with your foot. If it sinks to the floor or does not budge, disassemble the hydraulic cylinder.
FAQ
When the engine is running, the pedal slowly sinks to the floor with constant force, is it necessary to change the turbocharger?
Smooth subsidence of the pedal is a frequent sign of leaking GTZ seals. In this case, it is possible to repair the part by installing new cuffs from the repair kit.
Brake fluid leaves the reservoir, but then appears, is it the GTZ?
Changes in the level of brake fluid in the reservoir are not necessarily a sign of a breakdown of the turbocharger. The fuel fluid can also either go down or rise due to airing, boiling due to overheating of the pads, or jamming of the actuator cylinders.
Does it make sense to install a repair kit or is it better to replace the GTZ?
It makes sense to install a repair kit when only the rubber parts are worn out. If the piston is severely worn or the housing is damaged, it is better to replace the entire turbocharger.
Symptoms of a GTZ malfunction
When the device fails, the driver may notice the following signs:
- Reduced efficiency when braking.
- Depressurization of the brake system.
- Wear of seals.
You can check the performance of the master cylinder in a simple way - with the engine off, you need to hold down the brake pedal. After this, the VAZ 2114 should be started, leaving your foot on the pedal. If it fails, then the system is working properly. In another case, diagnostics and sometimes restoration of the tightness of the connection are required. Of course, you can use a repair kit, but then the parts will wear unevenly. The best solution would be to completely replace the unit.
IMPORTANT! Malfunctions of the master cylinder can also negatively affect the operation of the power plant. This manifests itself in a decrease in dynamics, fluid leaks, and also in a decrease in acceleration. In this case, experienced motorists clamp the vacuum hose while the engine is running. If after this there are signs, then it is necessary to change the brake booster.
Required tools and materials
Replacing the master cylinder should only begin if the necessary tools and materials are on hand. It's worth starting with the tools:
- Pliers.
- Head on "18".
- Keys for "17", "13" and "10".
- Metal brush.
- Device for removing fittings.
- Tool for tensioning springs.
As for materials, these include only liquid for the system.
Of course, it is worth purchasing a new brake unit. An oilcloth or other clean covering should be laid out near the work area. Parts should be placed there during the process. The unit must be purchased directly for the VAZ 2114, since there are differences with the 2109 and 2111.
A little theory
To transmit force, one of the properties of the fluid is used - its incompressibility. That is, when a force is created on a liquid, its volume does not change, and it acts as a transmitter.
A hydraulic brake drive is more practical than a mechanical or pneumatic one, but it has one drawback - if air gets into the fluid, the transmission of force will be significantly reduced. This is because air, like any gas, is compressible. As a result, the presence of air leads to a change in the volume of the liquid when creating force (due to gas compression). Because of this, the force is no longer transmitted to the actuators, since it is absorbed by the volume change.
It turns out that effective operation of the brakes on a VAZ occurs only until air enters the drive system. And this can happen for several reasons.
The process of replacing the turbocharger and brake fluid
When the tools, new mechanism and fluid are prepared, you can begin dismantling the old VAZ 2114 spare part:
- The first step is to disconnect the negative terminal from the battery. Replacing the master cylinder involves completely removing the old brake fluid - this is best done with a syringe;
Advice! When assembling the system, motorists often confuse brake pipes. To make your work easier, it is recommended to sign them with a marker. This applies to any parts in the VAZ 2114 car.
- Once the threads have been removed, dismantling the main unit can begin. Using the “18” socket, you need to remove the nuts that attach the main cylinder to the amplifier;
The vacuum booster may also need to be replaced. In this case, remove the fitting and turn the main unit to the side. After this, you need to unscrew the hose and go into the interior of the VAZ 2114 car, where the pin locking bracket is located. After removing all the fasteners, you can install a new fluid pressure booster.
Repair kit for master brake cylinder VAZ 2110
Before repairing the GTZ on a VAZ 2110, you need to purchase a repair kit to replace its worn parts and a special key. The key is necessary in order not to tear off the edges of the brake pipe fittings when unscrewing them on the master cylinder body.
Repair kits are divided into complete and incomplete. The complete repair kit includes all cuffs, boot, springs, washers, as well as plastic cones for installing new cuffs on the piston body. An incomplete set usually includes only the master cylinder cuffs themselves.