The rear wheel bearing for the Lada Granta is a very important element. It is important because it ensures proper rotation of the wheel. As a result of its operation, the bearing experiences significant loads, which is why wear-resistant materials are used in its manufacture. However, no matter how durable materials are used, over time the part fails. Due to the high importance of the unit, its replacement is mandatory as soon as the first signs of malfunction appear.
Lada Granta, replacing the rear wheel bearing with your own hands. Photo and video instructions
We have a Lada Granta car under repair, on which the rear wheel bearing needs to be replaced. We will show you detailed photos and video instructions on how to do it yourself.
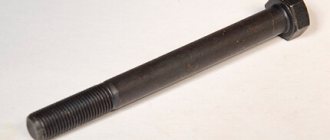
In addition to the usual tool, we will use a puller, which consists of a power screw, a glass and a set of washers.
We carry out the work on the rear left wheel. Use a 7 key to unscrew the guide pins:
To remove the drum, we screw M8 threaded bolts into adjacent holes.
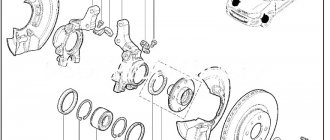
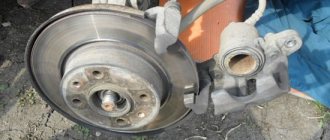
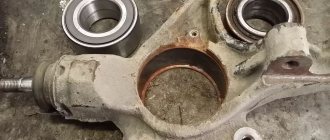
Next, we remove the ABS disc by hand. We remove the protective plastic cap; it has a small groove into which we insert a slotted screwdriver and move it to the side. Use a 30mm socket to unscrew the hub mounting nut:
After removing the nut, we are left with a washer; the most convenient way to get it out is with a magnet. We press the hub assembly, but be careful, there is an ABS sensor in the front part, which can easily be damaged. For work we use a three-legged puller, but you can get by with a two-legged one:
Turn the screw and compress the hub. Usually this procedure goes without any difficulties, the only unpleasant moment that can arise is when one of the rings remains on the shaft. In our case, this is what happened.
In order to remove the half ring that we have left when pressing out the bearing, we use a more compact two-legged puller.
We secure the hub in a vice, we first need to remove the retaining ring, but before we compress it with pliers, we move it a little, since over time it gets stuck and is difficult to compress. To move it, use a strong screwdriver and a hammer, delivering several sharp blows:
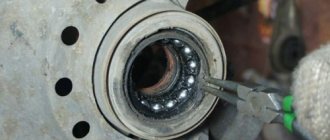
Turn the screw to press out the old wheel bearing. Then we clean the seat and lubricate the working surface with grease. We clean the surface under the retaining ring using this hook:
After this, press in a new bearing:
Reinstall the retaining ring, making sure it is seated in its groove. Having previously lubricated the seating surface, we install the hub in place. First, we insert it with our hands, then hammer it in with not too strong blows through a suitable mandrel:
Place the washer and nut and tighten. We tighten the hub nut, it is recommended to do this using a torque wrench, the tightening torque is in the range from 180 to 220 Hm. We caulk the nut. We put back the protective cap, ABS disc and drum.
Video of replacing the rear wheel bearing in a Lada Granta:
Backup video on how to replace the rear wheel bearing in Lada Granta:
Method No. 1
This method involves checking the condition of an element without dismantling it. Moreover, you don’t have to go on a lift or use specialized equipment. How to check the front wheel bearing? The essence of the method is extremely clear. It is necessary to accelerate the car to 70-80 kilometers per hour and switch to “neutral”. Next, you need to carefully listen to the noise of the suspension. It is important to choose the most flat section of the road so that the suspension moves are minimal. If you hear any humming noise, this indicates a bad bearing.
Replacing the rear wheel hub bearing of Lada Granta
1. Remove the brake drum as described in this article.
2. Using a screwdriver, pry and remove the wheel hub protective cap.
Note:
The rubber O-ring remains on the cap.
3. Using a narrow chisel or screwdriver, straighten the jammed collar of the nut.
4. Using a 30 mm socket, unscrew and remove the hub nut.
5. Using a magnet or thin wire with a bent end, remove the thrust washer from the hub axle.
6. The bearing is mounted on the axle with a transitional fit, so the hub can be removed by hand. If there is difficulty, compress the hub using a universal three-jaw puller.
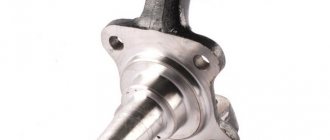
7. Remove the hub and bearing assembly from the axle, in most cases one of the inner races of the bearing will remain on the axle (shown by the arrow).
8. To remove the inner ring of the bearing, two flats are made on the axle for installing a two-jaw puller.
9. Hook the arms of the two-jaw puller onto the inner race of the bearing and press the inner race of the bearing off the axle.
Note:
In practice, there are cases when a two-jaw puller fails to move the inner ring of a bearing. In this case, it is recommended to remove the brake pads and use a chisel to slightly move the ring from the axle.
After this, you can press the inner race of the bearing using a two-jaw puller. After working with a chisel, nicks appear on the hub axis, which are removed with a needle file.
Removing and installing a new wheel bearing
1. Squeeze the retaining ring with pliers and remove it from the hub groove.
2. With the hub on wooden blocks (their height should allow the bearing to come out of the hub), knock out the bearing using a suitable socket or piece of pipe, striking the inner race of the bearing.
3. Apply grease (Litol-24) to the mating surfaces of the bearing and hub.
4. Press the new bearing in a vice, with the pressing force applied to the outer ring of the bearing. This can be done by installing a ring from the old bearing between the new bearing and the vise jaw.
Note:
The new double row ball bearing must be the same size as the old one.
5. Using pliers, install the retaining ring into the hub groove.
6. Carefully, with light blows on the inner ring of the bearing, press the hub with the bearing onto the axle to a depth that allows you to tighten the nut.
7. After installing the thrust washer, install a new nut.
8. Completely press in the hub by tightening the nut to the specified torque.
9. Place the collar of the nut into the groove of the hub axle.
10. Perform final assembly in reverse order.
Let's sum it up
Modern cars very often show problems with the technical part. Many cars even force the owner to visit the station more often than he would like. To avoid problems with the rear suspension, it is necessary to test it in a timely manner and use the maximum range of possibilities for recovery in case of minor problems. It must be recognized that each car has its own set of childhood problems. But in the area of the rear chassis, almost all cars with the same type of equipment have the same problems. So you can diagnose equipment at any good station.
Before you go to the service station, check to see if there are other possible causes of problems with your car's suspension. Sometimes you can find a variety of secondary causes of knocking, which obviously do not require money and time to eliminate. Monitor the condition of your car and carry out quality preventive inspections on time. If a problem is detected, you must fix it, and not expect that the problem will go away on its own. The sooner you repair your suspension, the less damage this trouble will cause. Have you ever encountered unpleasant knocking noises from the rear suspension of your car?
Rear wheel bearing Lada Granta
The rear wheel bearing in the Lada Granta model, as in any other car, is a very important component of the chassis. It is designed to allow the wheel to rotate in the appropriate manner. In operation, the rear hub bearing absorbs increased loads, which requires the use of high-strength materials for its production. Despite this fact, the product still fails over time. The timeliness of replacement is also quite important, as may be indicated by characteristic signs that appear.
What are the signs of a bearing failure?
Incorrect operation of the component we are considering is characterized by the presence of certain symptoms.
Next, let's look at the most common signs.
- Manifestation of vibration on a moving Lada Granta car. This factor can be felt both from the steering wheel and spread around the perimeter of the entire body. This circumstance indicates an urgent need to diagnose the bearing, followed by replacement of the faulty unit.
- A specific “howl” or hum, accompanied by crunching sounds while the Lada Granta is moving. These types of symptoms may indicate the presence of mechanical damage or dangerous partial failure of the bearing.
What are the causes of the malfunction?
Below are two common reasons why a rear wheel bearing may fail.
- The element loses its tightness. The product body contains a certain amount of lubricant, which reduces the friction of mutually contacting parts. The lubricant is retained by means of plastic housings with rubber seals present. These materials tend to degrade over time, causing loss of lubricant.
- Large output due to the impressive mileage of the Lada Grant. In any case, even the most highly durable product in a car becomes unusable over time. Each detail has its own resource. For a bearing, this figure is at around 60 thousand km. Sometimes this chassis component shows signs of malfunction much earlier. This occurs during operating modes that involve driving over potholes and other off-road conditions.
How to replace a bearing in a Lada Grant?
Replacing the rear wheel bearing will require the following tools:
- a special puller designed for hubs;
- chisels paired with a hammer;
- puller for removing retaining rings;
- “30” size heads;
- vice;
- a device that allows you to press out and reinstall the bearing;
- flat-profile screwdriver.
Let's get to work.
- Remove the decorative protective cap from the rear wheel of the Lada Granta.
- Set the transmission lever to the position corresponding to 1st gear.
- We put stops on the front wheels to prevent spontaneous rolling.
- Loosen the nut that secures the hub itself. We use an extended wrench. We also “loose” the wheel bolts.
- Using a jack, we hang up the side of the rear of the car from which the rear wheel bearing is supposed to be replaced.
- We remove the wheel and dismantle the drum belonging to the brake unit of the LADA Granta car.
- We “defeat” the hub nut and remove the thrust ring.
- Armed with a puller, with special care we press the hub from its seat on the axle.
- We clamp the removed hub using a vice. Don't forget to remove the retaining ring (with a puller).
- Now we press the bearing. We clean the inner hub cavity with a brush.
- We press in the new bearing and correctly fix the retaining ring. We control the correct fit of the element in the internal cavity of the hub in order to avoid distortion.
- We install the hub. It is also a good idea to clean the brake assembly components from accumulated dirt and rust. Here we use a metal brush with soft bristles.
- We return the drum to its place and put on the wheel.
- We tighten the wheel fasteners and lower the hanging side of the car until the wheel touches the ground.
- Tighten the central nut. We put on a decorative cap.
- We tighten the wheel fasteners and start the LADA Granta engine. While moving, we check the quality of work. There should be no sound effects characteristic of a faulty bearing. If there are none, then the rear wheel bearing is replaced correctly.
Summarize
Now we can safely state that the replacement process is complete. As it turned out, the work did not cause any difficulties, but it did require stocking up on some special tools. Buy bearings for LADA Granta cars that are of only high quality and from trusted manufacturers in order to have confidence in your safety on the road.
Helpful advice
When purchasing a new bearing, it is important to check that it contains grease. Often unscrupulous manufacturers do not report it to the required level. As a result, the element is constantly subjected to stress and fails.
It is not uncommon for a part to break down after 3,000 km (especially on UAZ vehicles). The best option is to gut out all the existing grease and apply a new one, purchased separately. Fortunately, specialized lubricants are now sold. They are resistant to washout and do not change properties at high temperatures.
Replacing the rear wheel bearing on a Grant
Chassis
The rear wheel bearing for the Lada Granta is a very important element. It is important because it ensures proper rotation of the wheel. As a result of its operation, the bearing experiences significant loads, which is why wear-resistant materials are used in its manufacture. However, no matter how durable materials are used, over time the part fails. Due to the high importance of the unit, its replacement is mandatory as soon as the first signs of malfunction appear.
Signs of a faulty rear wheel bearing on a Grant
In order to replace an element in a timely manner, you need to know the symptoms that indicate its inoperability. Below are some of the most common:
- Vibration during vehicle driving conditions. Vibration can be felt both in the car body and in the steering wheel when driving. If such signs appear, a thorough diagnosis and (or) replacement of the unit is immediately carried out.
- The appearance of a specific hum, crunching noise when moving. Such sounds indicate mechanical damage and destruction of the hub mechanism (spherical elements).
Causes of breakdowns
Below are the 2 most common reasons for element failure:
- Loss of bearing tightness. The fact is that the product body contains a certain amount of lubricant to reduce friction between the internal elements. The lubricant is retained by special protective covers made of rubber or plastic. Accordingly, these materials deteriorate over time, which leads to a gradual loss of lubrication and failure of the hub element.
- Large production resource. No matter how carefully you operate your car, over time most components and elements become unusable. Each part has its own service life. The bearing, whose service life is about 60 thousand kilometers, is no exception. In some cases (regular or periodic driving through potholes, under conditions of increased wear), the element fails much earlier than the above indicators.
How to change the rear wheel bearing of a Lada Granta
So, let's get started, below are 14 detailed stages of the work:
- Remove the plastic protective cap from the rear wheel.
- We move the gearbox lever to the “1st gear” position. To prevent the car from rolling away under the front wheels, we place supports.
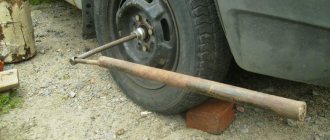
- We loosen the tightening torque for the hub nut (it is most convenient to use a long lever). Unscrew it a little and loosen the bolts holding the wheel.
- Using a reliable jack, we lift the rear side of the car, where the bearing is actually changed.
- Unscrew the nuts and remove the rear wheel from the studs. We dismantle the brake drum.
- Unscrew and remove the hub nut, take out the thrust washer.
- We take the previously prepared puller in our hands and carefully press the hub from the axle.
- Now we take the hub, install it and clamp it with a vice. Remove the retaining ring (use a puller).
- Press the bearing out of the rear hub. Then, using a brush with metal bristles, we clean the inside of the hub from dirt. We press the new product back in. Don't forget to install the special retaining ring correctly.
- Taking advantage of this opportunity, we clean the brake system elements from rust and contaminants.
- We put the hub back on the axle element. We return the brake drum to its place and put the wheel back on.
- Tighten the wheel bolts. Let go of the raised part of the car until the wheel is firmly in contact with the ground.
- Tighten the hub nut securely using a long-lever wrench (or a special hub wrench). We return the protective plastic cap to its place.
- In order to check the results of the work performed, we start the car engine and start driving.
Primary diagnostic option
To confirm the version of bearing failure (CCD), you should perform a simple diagnosis:
- Place the wheel on a jack;
- Unscrew it by hand (pay attention to the appearance of noise);
- If there is a malfunction, rotation is noticeably difficult;
- There is noticeable wheel play.
To pinpoint the problem, you will need to dismantle the unit and remove the hub.
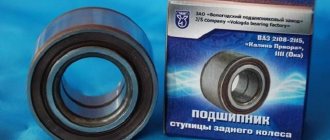
What bearings need to be purchased for replacement?
If you select from the AVTOVAZ catalog, you will need product 21080-3104020.
When selecting according to the markings introduced by the current GOST, you will need 256706 AKE12.
In addition, the required bearing can be selected from analogues recommended by the manufacturer:
- Russian brand VBF – type 2108-3104020;
- Domestic brand SPZ – type 2108-3104020;
- FAG – type 545312A;
- SKF – type VKBA1307.
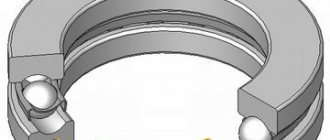
This is a double row angular contact ball bearing, made in a closed design.
Algorithm for replacing a faulty CCD
A significant advantage of the design of this vehicle is the ease of replacement work. No special tools, such as a puller or press, are required.
All upcoming work can be divided into three stages: dismantling the faulty product, installing a new bearing, and reassembling the unit.
Removing a faulty CCD:
- Remove the locknut protective cap. Unbend the rolled lock to prevent unauthorized unwinding.
- Loosen the locknut (most likely you will need a wrench or an extended handle).
- Loosen the wheel bolts.
- Hang it on a jack.
- Unscrew the bolts securing the brake drum.
- Unscrew the hub nut. Remove the latter from the axle shaft.
- Remove the retaining ring from it.
- Using a chisel, remove the protective ring.
- Treat the bearing installation area with WD40.
- Remove the faulty bearing.
To do this, you can use a puller, a hammer and a mandrel, a hydraulic press, a vice (one of the options). When replacing yourself, most often, a vice is used.
- We clamp the structure in a vice and press out the CCD.
- To completely remove the bearing, you will need to install stops (since it rests on the jaw).
- The last 5-10 mm are “achieved” with a hammer through a mandrel.
Installing a new bearing
Clean the mounting surfaces and re-lubricate them and the outer race of the new CCD.
- We place the new product in the mounting hole. We bait (using the old one instead of a mandrel) by about 5-10 mm.
- We clamp the assembly in a vice (to control possible distortion).
- Carefully tighten the clamp until the end rests on the existing inner side.
- Install the retaining ring.
Reassembly
To bring the hub to its original position, the following operations must be performed.
- Before pressing the assembly, lubricate the surface of the axle shaft.
- Fit the knot, screw and tighten the hub nut.
- Finishing broaching is done using a torque wrench.
- The hub nut is locked (chisel, hammer). After that, the brake drum is put on, the wheel is screwed on and mounted.
Similar articles
How to replace the rear wheel bearing of a VAZ 2110
How to replace the rear wheel bearing of a VAZ 2110? This VAZ model is very widespread in Russia. Replacing a wheel bearing is not a common procedure. According to operational date..03/21/2019
How to replace a wheel bearing on a VAZ 2107
How to replace a wheel bearing on a VAZ 2107? The hub is a very important structural element of the front suspension of the VAZ 2107. A serviceable bearing in it guarantees controllability of the car in motion. Ext..03.23.2019
How to replace a VAZ 2109 wheel bearing
How to replace the wheel bearing of a VAZ 2109? The manufacturer recommends replacing the bearing after 60,000-80,000 km. In fact, this is required much earlier. External manifestations of a malfunction, etc..03/23/2019
How to replace a rear wheel bearing
How to replace the rear wheel bearing? The need for periodic replacement of rear wheel bearings (RWB) arises for any car owner. Depending on the make of the car, the work algorithm ..03/30/2019
How to replace a rear bearing
How to replace the rear bearing? Replacing the rear wheel bearing is an operation known to every motorist, regardless of the type of drive of his vehicle. External manifestations of a malfunction..04/01/2019
Bearings by numbers and sizes for domestic cars
Bearings for domestic passenger cars Installation location bearing Bearing number Bearing type Size, mm Number of VAZ 2103, VAZ 2105, VAZ 2106, VAZ 2107 ..05/09/2019Popular Articles
How to determine bearing size?
How to determine bearing size? Sometimes the customer has the following problem. It is necessary to replace one of the bearings in the element with their multi-row installation. That is, it is necessary to have bearings..04/08/2014
How to replace a bearing in an Indesit washing machine
How to replace a bearing in an Indesit washing machine? Most often, the owner of a washing machine from a given manufacturer learns about a problem with the bearings only after they are completely out of service. 03/24/2019
How to replace a bearing in a Zanussi washing machine
How to replace a bearing in a Zanussi washing machine? Changing the drum bearing in this washing machine yourself is quite difficult, since it will require complete disassembly. However, if you have...03/24/2019
How to replace a bearing in an LG washing machine
How to replace a bearing in an LG washing machine? Any equipment, even one as reliable as LG, periodically breaks down. One of the possible malfunctions is bearing failure. External manifestations..03.28.2019
Let's say, to find out what condition the rear wheel bearing of a Lada Grant is in, you need to hang the wheel in a free state and rotate it by hand. Ideally, the wheel should spin evenly and smoothly without knocking or sticking.
But it happens that the car owner hears extraneous noise while driving, like a buzzing or howling, or when shaking a suspended wheel, he notices a rather significant play. In this case, we can say that the support bearing of the rear wheel hub may fail.
If we talk about the durability and reliability of the bearings of the Lada Granta car, then we must admit that many car owners, when operating their car in the first thousand kilometers, noted failure or breakage of the hub.
Perhaps in the future this error will be corrected by the manufacturers of the Lada Granta, but today we will proceed to the independent step-by-step repair and replacement of the bearing on the rear wheel hub of the Lada Granta car.
In the Lada Granta model, the front hub bearing also requires adjustment and replacement from time to time, but here for now we will talk about the rear hub bearing.
The hub is equipped with a double-row ball bearing, which, it should be noted, requires absolutely no maintenance - no lubrication, no adjustment.
Lada Granta wheel tightening torque: how to choose the tightening torque of wheel bolts
Proper use of a torque wrench and precise setting of the torque eliminates under-tightening or over-tightening of wheel elements.
The tightening torque of the Grant wheels is important for traffic safety. Therefore, when installing or replacing these elements, car enthusiasts think about how tightly the bolts need to be tightened. After all, insufficiently tightened bolts can unscrew on the road, and overtightened ones will lead to damage to the thread, drum or hub.
What is tightening torque
The tightening torque of the wheel bolts on the Lada Grant is the force that must be applied when tightening these elements. That is, these parts should be twisted with such force for the desired effect. And this value is determined with a torque wrench.
How to measure tightening torque
The unit of torque or tightening force is Newton per meter (N/m), but for many grantors it is more common to use kilogram per meter (kg/m), that is, the force in kilograms applied to a lever one meter long. The tightening torque for Lada Granta wheels is indicated in the operating manual and is 90-120 N/m or 9-12 kg/m.
To measure the torque or force with which the wheel bolts/nuts are tightened, you need a special tool - a torque wrench.
What does tightening torque affect?
The tightening torque, including the wheels of the Lada Granta, affects the reliability of the fastening. The force should be such that the wheel is well fixed. Maintaining the required torque allows you to avoid over-tightening or under-tightening, which is equally dangerous and bad. In the first case, damage to car parts is possible, and in the second, fixation will be insufficient.
What happens if you overtighten or undertighten wheel nuts or bolts?
If the bolt is tightened with enough force, it will not be able to unscrew on its own. This is very important as it affects safety. Therefore, you should know exactly the tightening torque of the Lada Granta wheel bolts.
Insufficient tightening of fasteners
If over-tightened, there is a high risk of damaging the threads. For wheels - this is the hub, drums. In addition, such a bolt will be difficult to unscrew. But an overtightened bolt can sometimes come loose. The fact is that in this case the sealing belt on the disk may become deformed. The bolt will reach the hub. And the belt will lose its springing effect. As a result, the wheel may become unscrewed while driving. There is a high probability of plastic deformation of the disc, especially if it is too soft.
Is it possible to determine the moment “by eye”
With experience, you can learn to determine the approximate tightening torque of the Grant wheels without any special tools. But it is almost impossible for a novice motorist to do this. Therefore, it is better to use a torque wrench.
When tightening wheels, many experienced car enthusiasts can do it even without this tool; they feel by the force how tightly the threads are tightened.
What exactly is being tightened on wheels?
The wheel bolts and nuts, if any, are tightened on the wheels. Each of them must be tightened with the same and sufficient force. In this case, the procedure is carried out crosswise.
Is there a difference in the tightening torque of wheel bolts and hub nuts?
Tightening the wheel bolts and hub nuts on the Lada Granta, as on other cars, is performed with different torques. But at the same time, the tightening torque of the hub nut of the rear wheel of the Lada Granta and the front wheel are equal.
Tightening wheel bolts and hub nuts on Lada Granta
At what torque should I tighten the bolts or nuts of the Grant wheels?
The values for the tightening torque of the wheel nuts for this car are indicated above. And the tightening torque of the wheel bolts on the Lada Grant is 105-120 Hm. For cars with a liftback body this value is 70-90 Nm. The front and rear wheels of the vehicle should be tightened with the same force. This rule also applies to each of the wheel bolts. For them, the tightening torque of the Grant wheels should not be different.
How to tighten Granta wheels to the required torque
To tighten the Granta wheels to the required torque, you will need a torque wrench. It should only be used with a test tightening. At the beginning of the process, you will need a regular spray bottle.
Before the procedure, the car is placed on a flat, hard surface. To prevent involuntary movement, it must be secured with a hand brake and engaging first gear when the engine is not running. If for some reason the wheels need to be removed, then the car is suspended using a lift or jack and safety stands. The body on the desired side is raised so that the tire comes off the ground. If a pneumatic or electric impact wrench is available, then the fasteners are unscrewed after hanging the car, but if you have to use a wheel wrench, then first break the tightening, and after hanging the bolts or nuts are completely unscrewed.
Tightening is carried out gradually. When the wheel is already tightened sufficiently, you should finally tighten it with a torque wrench to the required torque.
When using the tool, you must follow the rules:
- A torque wrench is used for control tightening. It should not be used as a regular spray gun.
- The key must be selected so that its maximum force is slightly greater than necessary.
- Before broaching, make sure that the exact tightening torque is known. It needs to be set on the instrument.
- Use a wrench to check the tightness of all bolts in a circle.
Proper use of a torque wrench and precise setting of the torque eliminates under-tightening or over-tightening of wheel elements.
What will happen if you don't change
Many car enthusiasts drive with faulty wheel bearings, and even accelerate at 100 kilometers per hour or more - guys, this is very dangerous, remember this is the connecting element of the wheel, which is responsible for its rotation. If it is broken, it can jam at any moment. And this is a sudden stop of one of the front wheels. Now imagine if your speed is 100 km/h - at that speed you will simply fly off to the side of the road, this is the best case scenario, but you can also fly into oncoming traffic, and then you’re not far from an accident. There have been cases when cars overturned. So guys, the hub bearing is very dangerous, if you don’t want to change it, drive at low speeds, up to 40 km/h, otherwise everything can end very badly.
Step-by-step instruction
1. Using a flat-head screwdriver, remove the hub nut cap.
2. Loosen the hub nut using a 30mm socket. The nut is tightened with great force, so you can put a pipe on the knob to pull through a larger lever.
3. Loosen the wheel bolts and jack up the car.
4. Completely unscrew the wheel bolts and remove the wheel.
5. Now you need to remove the brake drum. To do this, unscrew the drum studs using a seven-deep socket. Next, screw the drum studs into the other holes only. This should be done evenly, twisting each pin a little. As you twist, you will see the drum move away.
After the studs have been completely screwed in, unscrew them and remove the drum by hand. If it doesn’t work, you can hit it with a mallet from the back side.
If it is difficult for anyone to imagine how to do this, watch the video.
6. After removing the drum, completely unscrew the hub nut and remove the washer.
7. We put on the puller and pull the hub off the shaft. She doesn't sit very well.
8. Remove the bearing retaining ring.
9. Remove the ring on the hub. We clamp the hub in a vice and knock it down with a blunt chisel.
The ring must be removed for subsequent pressing of the bearing.
10. We select the head according to the size of the bearing, put it in the hub, clamp everything in a vice and squeeze the bearing out. He will reach the jaw of the vice and rest against it. We install spacers, for example, as in the photo below and press them out completely.
11. Clean the bearing seat from dirt and rust.
12. Lubricate the bearing seat with oil.
13. Place the bearing in the hub, clamp it in a vice and press it flush with the hub. Make sure that at the beginning the bearing moves without distortion.
MrPodshipnik
Bearing replacement, repair
Enter the marking or size (for example: 8*22*7) of the product and the country of sale
- Car brands
- Auto components
- Moto
- Velo
- Equipment
- Tool
- Technique
New instructions
- How to make your own repairs and replace the bearing on the steering column in a ZOOM bicycle 10/09/2019
- How to independently, at home, replace a bearing in an electric motor of a Philips food processor 10/05/2019
- We repair a DAB heating circulation pump and change the bearing ourselves 10/04/2019
- How to repair a Shimano fishing reel yourself and replace a faulty bearing 10/03/2019
- We replace the bearing and repair the SBR_ 132_A concrete mixer ourselves 10/02/2019
How to replace the rear wheel bearing on a Lada Granta
Drivers who have a Lada Grante car at their disposal sometimes have to make a decision to replace a failed bearing. Carry out repairs yourself or at a service station (service station)? Choose the first option!
The replacement process is not as complicated as it might seem at first glance. I suggest you replace it in your garage, yourself. Read this article and you can replace the part yourself.
- Determining the suitability of a bearing on a Lada Granta
- Choosing a new bearing for Lada Granta (VAZ 2190)
- Preparing to replace a part
- Step-by-step instructions for dismantling and installing a bearing on a Lada Granta
- Practical advice
- Video: DIY replacement of the rear wheel bearing of a Lada Granta
- Photos on the topic