03 April 2017 Lada.Online 86 239 27
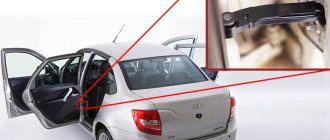
To fix the doors on the Lada Vesta, limiters (latches) are installed. If you notice that they are not performing their duties well and do not hold the door in an intermediate position, replace the stops with new standard ones or alternative ones (for example, from a foreign car).
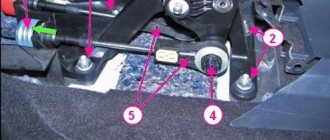
The dimensions of the standard Vesta front door stops are shown in the photo. Instead, you can use rear door stops from Ford Focus 3 (part number 1726441) or Skoda Fabia (front part number 5j0837249c) and Skoda Roomster (rear part number 5j6839249b). The dimensions are almost completely the same (the studs for the nuts on parts from a foreign car are slightly wider).
By the way, in the summer of 2022, AVTOVAZ began installing door stops of a new type on Vesta (part number 8450031788). Now the doors are distinguished by precise operation and fixation of the limiters, they no longer blow away, and the ease and noiselessness of opening and closing the doors themselves has been ensured.
Where can I buy the original?
In our online store (limiters category)
What is the problem?
It lies in insufficient quality of fixation. Vesta limiters have 3 locking modes, but in an intermediate position they cannot reliably hold the door, which is why you have to either open it wide open, which is not always convenient, or constantly hold it with your hand, which quickly gets boring. This problem is especially annoying when the car is parked on a slight slope with the front facing up. In this case, open doors are constantly closed.
There are flaws in the design of the factory limiter of the Lada Vesta.
Electrical equipment
I don't know what kind of Japanese wiring this is. I've been using the car for two years and have no complaints so far. The fuses are from Renault. I live in the north, there are severe frosts in winter, the battery starts the engine normally. I was at TO-5, according to the documents the battery still has 50% of its service life.
One VAZ ignition coil has already worn out, so it’s hard to tell about their service life. It is advisable to monitor the spark plugs and the gap. The more output on the spark plugs, the gap increases, and the load on the coil increases. It is better to maintain 0.9 mm, change spark plugs more often. The roller on the generator is rustling, I bought it and will change it myself.
The radiator does not leak, the antifreeze does not leak, the pipes do not “snot”, everything is securely enough. Lada Vesta is a normal budget car. I wish the price tag was lower. If customs clearance had been cancelled, then in a “luxury” Vesta it would probably cost 500 thousand. Many will start telling me to look at my competitors.
The only complaints against AvtoVAZ are that it takes a long time to complete. Several years pass, but problems remain. I hope I answered the question about the Vesta parts resource. It’s different for everyone, I told you using my car as an example. Changed brake discs, pads, resonator assembly. There was a problem with the electrical equipment - the airbag caught fire. Rubs the paintwork on the door. There were no other problems.
Limiters from Ford Focus 3
First you need to buy these components. You can purchase Ford Focus 3 rear door limiters either in a car store or order them online. The article number for placing an order is 1726441. As for the platforms where you can make a purchase, the most popular ones, as well as their prices, are presented in the list:
- https://www.autodoc.ru/part/ford—525/1726441/ — 1229 rubles;
- https://plentycar.ru/autopart/3962321 – 1520 rubles;
- https://4mycar.ru/parts/FORD/1726441 – 1232 rubles;
- https://www.port3.ru/info/FORD/1726441 – 1435 rubles;
- https://autoprime.pro/ru/goods_info/?brand=FORD&number=1726441 – 1334 rubles.
As you can see, there is no shortage of online stores. However, the price may be an obstacle. It varies depending on the seller and on average the cost of such a component is about 1,300 rubles. This is a lot, and if you consider that 4 units of these are needed, then the cost of the order will exceed 5,000 rubles! Not every owner of a Lada Vesta will decide to pay such a sum for limiters alone.
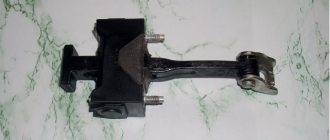
Parameters of Vesta limiters.
The moment of purchasing the Focus 3 rear door limiters is also important, since they are almost the same as those on Vesta. In this case, there are two main criteria:
- The distance between the axes of the studs. On the standard door stops of the Lada Vesta it is 50 mm, while on the elements for the rear doors of the Focus 3 this figure is 52 mm.
- The length of the limiter itself in a fully open state is from the component body to the center of the mounting hole through which the limiter is secured to the body with a Torx T40 bolt. For Lada Vesta it is 115 mm, while for Focus 3 it is 116-117 mm.
Comparison of limiters Lada Vesta and Ford Focus 3.
In addition, both West and Ford limiters have 6 pins and 10 nuts. This allows you to use Ford nuts and interchange them.
Everything is explained in more detail in the following video.
What to do
Refinement of Lada Vesta door limiters is possible in the following ways:
- replacement of standard elements with alternative Ford Focus ones;
- independent modifications by installing a metal ball instead of the inner hemisphere.
Removing the door trim
The first stage of modification is removing the casing. You need to pry the edges of the material in the area of the doors, where they easily come off, then carefully remove the upholstery
If you plan to use the removed materials in the future, you should proceed with the utmost caution.
Removing the limiter
The procedure for removing the limiter for the purpose of its subsequent replacement is as follows:
- Remove the fastening screw that holds the part to the body pillar.
- Unscrew the fastening nuts and remove the replacement head with the knob.
- Install the parts in the reverse order, bending the studs a little if necessary.
To extend the operating time of the door frame limiters and make the opening process simple and silent, you need to lubricate them with locking agent from time to time.
Replacing the retainer ball
The final stage of improvement is the installation of new ball elements. For this:
- Let's disassemble the limiting node.
- We replace the hemisphere with a ball 12 mm in diameter.
- We reassemble in reverse order.
Metal balls
Everything here is not so simple either. Not all balls are suitable for limiters, but only those with a diameter of 12 mm. Vest owners have already noticed experimentally that these are the balls that are found in bearings 8307 (51307). Buying bearings will not be difficult. As with Focus spare parts, they can be ordered online. The most popular sites with prices are indicated in the list:
- https://podshipnik-rf.ru/index.php?route=product/product&product_id=1914 – 280 rubles;
- https://shop.optorg.ru/catalog/?id=209179 – 291 rubles.
As you can see, the price is not particularly high, but before starting work, the balls must be removed from the bearing.
Bearing 8307 (51307).
However, there is a much simpler way. These are copper-plated metal balls that are sold in hunting stores. They are designed for slingshot shooting. The price of a package of such balls ranges from 150-200 rubles, and there are usually 50 of them in a pack.
You can use these balls.
In this case, it is important that the diameter is exactly 12 mm. If it is 12.2 mm, then the balls will no longer fit, as shown below.
However, you can also use a simple nut by placing it, as shown in the photo.
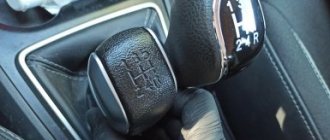
Engine
There are a lot of complaints about the engine. For some reason, the same engine mounts are installed on Logans, and they remain there for the entire service life. No one had any trouble with them. On Vesta, everyone struggles with the same supports, they start knocking. I think there is an error in the design, or the fourth support is missing. When you start it, the engine vibrates.
I'm going to change the timing belt kit in a week. I want to do everything myself. The only thing I don’t like is the TZA pump, there are a lot of complaints about it. At 50 thousand, the impeller breaks, antifreeze leaks, and jams. The Gates belt performs well. AvtoVAZ gives it a guarantee of 180 thousand. But the pump or the roller may jam. I drove 75 thousand, but still decided to change the timing belt and ordered a Gates kit.
Many people complain that the 1.6 liter engine eats up oil and the pistons knock. I did not notice any piston knocking or lubricant consumption. I fill it with Shell Helix Ultra and put the filter on Mann. Perhaps oil consumption is related to driving mode. Many people drive in creeping mode, keep the revs to a minimum, and save fuel. But this spoils the engine, which does not like low speeds. It is advisable to switch to 2500 rather than crawl.
The plant gives an engine life of 220 thousand. It is repairable, the block is cast iron. I can also say that there may be oil leaks from under the valve cover or pan. My engine has already been modernized, but I don’t particularly like the Euro-5 firmware.
Installation of limiters from Ford Focus 3
To work you will need the following tools:
- Collar;
- Torx bit T20;
- Torx bit T40;
- A plastic spatula for dismantling upholstery components - if you don’t have one, you can use a thin screwdriver, first placing a cloth under it so as not to damage the door card components and paintwork.
- Head for 10.
First you need to remove the door cards. First, use a plastic spatula to remove all components that block access to the bolts. You need to work carefully so as not to break the latches. Next, the mounting bolts are unscrewed using a T20 Torx bit. That's all - all that remains is to snap off the card, which is secured along the contour with caps. At the same time, it is important not to break the door opening handle, and also to disconnect the plugs for the electric windows. Then you need to remove the insulating material glued to the door to gain access inside.
The next step is to dismantle the limiter itself. It is screwed to the body with one Torx T40 bolt, and to the door with a pair of bolts, to unscrew which you will need a 10mm socket. When the bolts are unscrewed, all that remains is to remove the limiter, but this must be done carefully, since you can lose the washers on the studs (in the places where the element is attached to door). In addition, after removing the limiter from the Vesta door, you need to make sure that the door does not open further than it should, which is especially important for the front doors. Otherwise, you can crush the edge and damage the paintwork.
The process of removing the upholstery and the door stop itself from the Lada Vesta is clearly demonstrated in the video
Installing limiters from Focus 3 in Vesta is not difficult, but there is one point. During installation, those 2 mm differences between the studs that were mentioned earlier begin to affect. For this reason, the limiter is not installed. There are two ways to solve the problem:
- Working with holes - you need to carefully drill out the seats with a drill or bore them with a file so that the element becomes as needed.
- Adjusting the studs - it involves bending the studs slightly inward so that they fit freely into the holes.
As practice shows, it is still better to squander the seats. Yes, it takes longer, but it is much more reliable. The reason is that the pins on the limiter are hardened, so if you bend them more than necessary, they can break and the limiter will have to be thrown away. In addition, before installation you need to put thick washers or nuts on the studs themselves. This is necessary, since the length of the element pins from Focus is several millimeters longer than those on Vesta.
Place the nuts on the studs.
If this is not done, the functionality of the component will not be affected, but at the end of the stroke it will no longer be a spare part from Ford that will stop the doors, but a factory additional stop. As a result, the paint will peel off very quickly and corrosion will appear at the contact point.
Once the stops are installed, you can reassemble the doors in reverse order.
A limiter from a Ford Focus 3 installed on a Lada Vesta.
Refinement of standard elements
The finished products are dismantled, the doors are first disassembled according to the above scheme. When everything is removed, balls are installed instead of hemispheres. First, it would be better to remove the metal plate - pry it up with a nail and a screwdriver and remove it.
The limiter should be pressed from the side so that the spring does not fly out. When you remove the plate, replace the stopper on the side. Remove the hemisphere, the base of which fits into the spring, by picking it out with a screwdriver. Coat the working ball with lithol, place it inside the limiter hole, insert the spring, apply lubricant to it. Replace the previously removed metal alloy plate.
It is also advisable to change the second hemisphere. In total, 8 balls are needed to complete the work.
Replacement procedure
First you need to unscrew 3 screws from the bottom of the casing, Torx size T20.
Next, you need to remove the plastic plug from the end of the door with a spatula.
There is also a similar screw underneath that needs to be unscrewed. Next, remove the mat from the driver’s door handle (from the pocket) and also unscrew the T20 Torx screw. Next, remove the plastic cover.
You need to pry it up a little with a spatula and lift it up (not towards you). Then you need to remove the power window control unit.
First, pull it towards you until it snaps open. It comes out tightly, so work carefully so as not to break anything. Do not immediately try to remove the door trim from the pistons, as there is still a fastener under the control unit. Disconnect all wire connectors from the power window assembly.
Now you can remove the casing by removing another wire to illuminate the exit point.
To remove the old stops, you will need a 10 mm socket and a T40 Torx. Then you need to reach into the lower niche with your hand, unstick the soft plug, and reach for the limiter.
After removing the old part, immediately install the new one.
Don't forget to seal the torn plug with adhesive sealant.
Install the T40 mounting bolt to the body, as well as 2 stud nuts, and tighten them. After that, you can already try how the new door stops work.
Reassemble the trim and everything else in reverse order. Don't forget to connect all wires. Before starting disassembly, I recommend disconnecting the negative terminal from the battery.
The door opens with a pleasant effort, I really like it, it closes itself, as if with a closer. The provisions are clear. It is better to install such limiters on all 4 doors.
Do not forget to unscrew them, as without this the casing will not be removed. Otherwise there is no difference in operation.
If you have already changed door stops on a Lada Vesta, tell us what difficulties arose and what happened.
Source
Set of new door stops and closers for Lada Vesta 4 pcs.
A set of original door opening limiters for the new Lada Vesta.
New type limiters have been installed on Lada Vesta since 2019.
Compared to the previous release, these door closers have improved smooth operation and a clearer door lock when open.
The set includes 4 limiters for all car doors:
Applicability:
| Basic Attributes | |
| Manufacturer country | Russia |
| Brand | VAZ |
| Part type | Original |
| Type of equipment | A car |
| Model | Vesta |
| Compatibility | Lada Vesta 2015- |
| Spare part code | 8450031788/8450031789 |
| State | New |
RUB 4,290 /set
| Day | Working hours | Break |
| Monday | 10:00 — 17:00 | |
| Tuesday | 10:00 — 17:00 | |
| Wednesday | 10:00 — 17:00 | |
| Thursday | 10:00 — 17:00 | |
| Friday | 10:00 — 17:00 | |
| Saturday | Day off | |
| Sunday | Day off |
* Time specified for the region: Russia, Tolyatti
Return and exchange conditions
The company returns and exchanges this product in accordance with legal requirements.
Return deadlines
Returns are possible within 7 days after receipt (for goods of good quality).
Return delivery of goods is carried out by agreement.
According to current legislation, you can return a product of good quality or exchange it if:
Source
AVTOVAZ has improved the door stops on the Lada Vesta
From the very beginning of sales, owners of Lada Vesta cars complained about poor door stops (latches). The door did not hold well after opening and closed easily on its own in light winds. However, recently the plant began installing modified door stops on the Lada Vesta family, which eliminate the “gate effect”.
Checking the new limiters in action:
Can old limiters be replaced with new ones at the dealer?
AVTOVAZ response:
Later it turned out that it is possible to replace old limiters with new ones (there are owners who replaced them themselves):
Let us remind you that owners of “old” Vestas can solve the problem with their own hands using one of the previously proposed methods.
Keywords: Lada Vesta doors
Share on social networks:
Found an error? Select it and press Ctrl+Enter..
Source
Conclusion
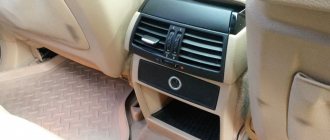
Like any other car model, Lada Vesta has its weak points. Problems with doors, which consist in the absence of a clear fixation of the doors in an intermediate position and the buttons for turning on the lights in the interior that do not work, can be solved independently, without turning to specialists. To do this you need a minimal set of tools and a small amount of time. By paying a little attention to his car, the owner of Vesta can improve the comfort of the car and save himself from minor inconveniences during its use.
How to close the doors without an alarm - the battery is dead
There are situations when you cannot lock the car using the key fob. Often, this happens when the battery in it is low or the battery of the car itself is low. Naturally, in this case, the central locking will not work. Therefore, you will have to close the doors using the ignition key. For this purpose, the manufacturer provides some design features in their locks.
All doors, except the driver's door, have a groove with a lock button in the locks. The ignition key must be inserted into this groove and pressed down. The button should go down. Then the door is slammed, and it should already remain closed. Such actions will have to be repeated with each door except the driver's, which is closed last simply with a key. The lock on it is located to the right of the handle and is covered with a cap, which must be pryed off and removed.
You can use the lock button. To do this, press it for a few seconds with the driver's door open. After clicking, the three doors will close back and forth. The lock indicator should be on. Then the driver's door is locked with the key.
How to remove the rear door door card
You will need the same set as for working with the front ones, plus a 10mm socket wrench. Instead of a flat-head screwdriver, you can use a set of spatulas for working with the interior. The sequence of actions looks like this.
Remove the window handle. To do this, insert a screwdriver or a spatula between its middle mount and the bottom washer, and pull the protrusion on the middle part outward. When the protrusion is pressed out, the middle part is pulled out. Then remove the handle from the slot of the window regulator, the base of the handle, and the round plastic washer. Insert the tool between the door handle and its trim, then remove the trim. There are two bolts screwed under it, which we unscrew with a wrench. At the very bottom of the card, find a self-tapping screw and unscrew it using an asterisk attachment. Now the covering is fixed only on plastic pistons and velvet. The card is pryed up, starting from the bottom, and all the latches along its perimeter are snapped off. Then remove the card from the velvet.
Replacement and modification of door stops on Lada Vesta
To fix the doors on the Lada Vesta, limiters (latches) are installed. If you notice that they are not performing their duties well and do not hold the door in an intermediate position, replace the stops with new standard ones or alternative ones (for example, from a foreign car).
The dimensions of the standard Vesta front door stops are shown in the photo. Instead, you can use rear door stops from Ford Focus 3 (part number 1726441) or Skoda Fabia (front part number 5j0837249c) and Skoda Roomster (rear part number 5j6839249b). The dimensions are almost completely the same (the studs for the nuts on parts from a foreign car are slightly wider).
By the way, in the summer of 2022, AVTOVAZ began installing door stops of a new type on Vesta (part number 8450031788). Now the doors are distinguished by precise operation and fixation of the limiters, they no longer blow away, and the ease and noiselessness of opening and closing the doors themselves has been ensured.
Seals
The seals from the manufacturer fit quite tightly in all places except the gap between the front and rear doors. This can be corrected by installing the RKI-19 seal, article number - 000017504293020.
Before installing it, the trailing edge must be cleaned and degreased. Before installation, it is recommended to warm up the seal for a couple of minutes at a temperature of 40 - 50 degrees. This is done to give it elasticity. Then, in an area of 5 - 7 cm, peel off the protective tape and fix the seal to the upper edge of the door flange. Then, removing the protective tape in areas of 5 - 10 cm, glue it along its entire length, avoiding stretching the material.
Sometimes, for better insulation, the rear part of the tailgate is also modified. To do this, use a universal D-shaped seal. Size 14x12 mm.
Moldings
The installation of moldings on the Lada Vesta was not provided for. During its development, it was believed that their decorative function would be performed by X-shaped stampings, which are also necessary for the recognition of this model. However, manufacturers of automobile accessories have started producing and selling moldings made for installation on this car. Before purchasing and installing them, you need to understand what they are for.
Initially, this is a decorative function. There is no point in disputing the installation of parts to improve the appearance, since it depends on the preferences and taste of the car owner.
The manufacturer claims the protective function of the moldings. It is believed that door moldings installed along the lower edge serve as additional protection for the car's paintwork. The buffer and shock-absorbing function of the moldings is also indicated. If, when opening, the door hits an obstacle, then they will protect the metal from damage and the appearance of dents. However, remember that such protection will work in the event of a minor collision with a low vertical object. A collision at an angle can still damage the door edge. And if the impact is strong enough, the molding and the metal underneath will still be damaged.
Another issue that must be considered before installing moldings is moisture drainage. Since they are hollow inside, condensation begins to accumulate underneath them over time. And although there are small cuts on the back side for its removal, their number and size are clearly not enough for this, which leads to the formation of areas with metal corrosion under the moldings.
If, however, it was decided to install these elements, then you can do it yourself. To do this, the surface of the part is thoroughly washed and dried. Then degreasing is carried out with anti-silicone and the activator, which is included in the delivery set, is applied to the gluing site. Next, remove the protective film from the mounting tape located on the back side. And carefully glue the moldings. If it is necessary to strengthen the fastening, then glass glue or sealant is used for this.