Additional lighting source: ice lighting of the interior of the Lada Vesta car is achieved with LED bulbs. Potential buyers have no idea where the LEDs that provide interior lighting are located. Many people believe that LEDs are built in at the top, on the surface of the ceiling. It's a delusion. In the interior of the Lada Vesta, LED lighting is installed in a recess on the front panel and below, in the area of the feet in front of the driver and passenger. In addition, the manufacturer is trying to keep up with the times and, in addition to standard lighting and standard halogen lamps, supplements cars with LED lighting for certain areas: lighting for rear passengers, license plates, feet. Read the article to the end and you will learn everything about the ice lighting of the machine!
Led interior lighting of the Lada Vesta car includes not only illumination of the interior space.
The vehicle's additional lighting system consists of:
- Lada Vesta number plate illumination;
- dashboard lighting for Lada Vesta;
- lighting in the footwell area of the driver and front passenger.
Illumination of external lighting would come in very handy. This option is only at the development stage; manufacturers are speeding up the implementation process.
If the Lada vesta cross or another model is not equipped with lighting elements, you can equip the car with them yourself.
Checklist for installing a lampshade
- Take the necessary measurements;
- Using the obtained parameters, cut out a stencil from available materials (paper, cardboard);
- Disassemble the lampshade, mark the recesses for the bolts on the model;
- On the ceiling of the cabin, select the place where you would like to install the lamp;
- Fix the stencil on the ceiling where the lamp will be installed with adhesive tape;
- Trace the outlines;
- Attach the lamp, make sure the parameters match;
- You need to cut the sheathing with a tool with a very sharp blade to eliminate uneven, torn edges;
- After cutting, reattach the lampshade and correct the contours;
- Where the screws will be screwed in, attach metal clamps;
- Secure the lampshade.
You can connect the device to a car radio, a standard lighting fixture, or a luggage compartment lamp.
Instructions for using "ERA GLONASS" on Lada Vesta/XRAY (lighting lamp
_x000D_
The manufacturer equips all versions of the Lada Vesta and Lada XRAY with an emergency response system in case of accidents “ERA GLONASS” or (SVEOS). The control unit is built into the navigation light on the ceiling and has several rows of buttons. Let's consider the capabilities of this system in more detail.
_x000D_
Interior lighting
LED lighting of the Lada's interior is represented by lighting in the recess on the front panel, lighting of the driver's foot area and the passenger sitting next to the driver. A special feature of the backlight is its operating mode in light-music mode.
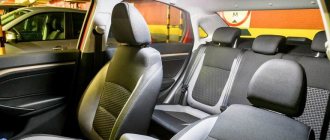
Standard interior lighting is represented by a lampshade, which is located at the top, above the front panel. There are five control keys on the lampshade. With their help, you can turn on the lights on the driver's, passenger's side and fully turn on, turn off, and set the backlight mode when opening the car doors. In addition, the car is equipped with lighting fixtures at the bottom of the door for the driver and the passenger sitting next to him. The backlight lights up every time the door is opened.
Description of the functions of the interior lighting unit (BOS)
_x000D_
_x000D_
1 – microphone location area of the in-vehicle emergency call system; 2 – area where the in-vehicle emergency call system loudspeaker is located; 3 – emergency call key for the in-vehicle emergency call system; 4 – status indicator of the in-vehicle emergency call system (red). Lights up for 5 seconds each time the ignition is turned on and then goes off. The indicator also lights up if there is a malfunction in the SVEOS system; 5 – front passenger seat belt unfastened indicator (red); 6 – indicator of the disabled front passenger airbag (yellow); 7 – key for turning the general interior lighting section into “on” mode; 8 – key for turning on the general interior lighting section in the “on when the door is open” mode; 9 – key for turning on individual lighting of the driver’s seat; 10 – key for turning on the individual lighting of the front passenger seat; 11 – section for individual lighting of the driver’s seat; 12 – section for individual lighting of the front passenger seat; 13 – general lighting section.
_x000D_
When the ignition is turned on, the system status indicator No. 4 lights up red for 5 seconds, then goes out. The indicator also lights up red when any errors are detected in the functioning of the SVEOS. To determine errors, wait 1 minute after turning on the ignition. The table describes the operating modes of the alarm:
_x000D_ _x000D_ _x000D_ _x000D_ _x000D_ _x000D_ _x000D_ _x000D_ _x000D_ _x000D_ _x000D_ _x000D_ _x000D_ _x000D_ _x000D_ _x0 00D_ _x000D_ _x000D_ _x000D_ _x000D_ _x000D_ _x000D_ _x000D_ _x000D_ _x000D_ _x000D_ _x000D_ _x000D_ _x000D_ _x000D_ _x000D_ _x000D_ _x000D_ _x000D_ _x000D_ _x000D_ _x000D_ _x000D_ _x000D_ _x000D_ _x000D_ _x000D_ _x000D_
| Initialization (when ignition is turned on) | White | Lights up for 5 seconds. | |
| Standby mode | White | Does not burn | |
| Dialing | Red, flashing | ||
| Voice communication | Red, lit | ||
| Malfunction of SVEOS components | Standby mode | White | Lit |
| Dialing | Red, flashing | ||
| Voice communication | Red, lit |
_x000D_
Connecting interior lighting
If the Lada Vesta model is not equipped with LED lighting in the niche on the control panel, the car owner can easily install it himself.
To do this you will need wires, a plastic corner, double-sided adhesive tape, and LEDs.
Algorithm of actions
Secure the LED to the plastic corner using double-sided adhesive tape. Secure the corner into the recess on the front panel so that the LED faces the cigarette lighter. Remove the side cover of the recess in the center. To do this, just unscrew one mounting bolt. Connect the LED to the cigarette lighter socket. To replace or install a new interior lamp, first remove the old lamp, then install a new one in its place. The algorithm of actions is identical to the algorithm for installing the lamp in the rear part of the cabin. No additional measurements or stencil making are required.
Where can I buy?
Previously, when standard lamps were not yet supplied as spare parts, car owners had to look for other options. So, lampshades from Priora, GAZelle and various foreign cars were used.
At the moment there is no such problem, and therefore it is strongly recommended to use the factory component, since it not only gives excellent light, but also fits optimally into the interior, harmoniously complementing it. It is supplied under number 8450030708.
The most convenient way to buy a lamp for the second row of seats in Lada Vesta is through one of the online stores. The table shows the most current offers.
| Online store | vendor code | Price, rub.) |
| lada-vesta-shop.ru | 8450030708 | 1 050 |
| avtoazbuka.net | 8450030708 | 1 333 |
| autostol63.ru | 8450031513 | 1 450 |
| avtozap63.ru | 8450030708 | 850 |
| renault-largus.ru | 8450030708 | 1 290 |
| stovesta.ru | 1 600 | |
| stovesta.ru | 730 |
As you can see, purchasing a lamp is not a problem. All that remains is to install it and connect.
Front panel illumination
The front panel backlight is activated when external lighting devices are turned on. Car owners note that they experience some inconvenience when reading indicators when exposed to direct sunlight. Car owners are trying to independently improve the LED lighting of Lada instruments. Car enthusiasts should take into account that any intervention, modification or improvement of lighting fixtures will result in loss of warranty coverage. If the owner nevertheless decides to improve the lighting, it is necessary to adhere to the algorithm of actions.
Sequence of events
Remove the glove container. To do this, open it and press out the latches that hold the lid. Apply a little force, pull the cover towards you, it will come off. Remove the glove box light. Using a small screwdriver, press out the lamp and disconnect the wires. Unscrew the five bolts and remove the glove compartment. To improve lighting, purchase two 600 V LEDs. Unscrew the hook and screw securing the body of the pulp and paper machine. In connector c1 you need to cut the dark blue wire. In connector c2, strip the blue-red wires. Connect two diodes. In the received kit, connect the dark blue wire to the end of the wire of the same color in connector C1. The green wire is connected to the end of the dark blue wire, which is located inside the harness. The red wire is connected to the end of the blue-red wire in connector c2. Next, the steps are performed in reverse order. If all steps are followed, the panel illumination will be improved. Switching on will be done by turning the ignition key.
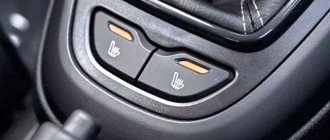
Foot light
If there is no lighting in this area, the driver of the car will be able to install the lighting for the feet independently, if he deems it necessary. To perform such a procedure does not require large expenses. The driver will only need a piece of LED strip. Before purchasing a strip, decide what color and power of light you want.
Stages of implementation
Divide the profile into four parts. Each of them is approximately 25-35 cm in diameter. Degrease the surface of the profile. Attach the LED strip to the parts (use available means - glue, adhesive double-sided tape). Connect the LEDs to the standard lighting lamp, or central lighting unit. If you want to install backlighting for the rear row of seats, it is better to place LEDs under the driver’s and front passenger’s seats.
Guide to using the ERA GLONASS system
_x000D_
The Lada Vesta car is equipped with an in-vehicle emergency call system (SVES). Calling the system operator can occur automatically (in case of an emergency), as well as manually. A microphone and speaker are used to communicate with the operator.
_x000D_
SOS – button to call the operator of the “ERA GLONASS” system. This is a push-button type switch with a non-fixed “on” position. The key press time to initiate an emergency call is 2 seconds.
_x000D_
In standby mode (with the ignition on), the system performs:
_x000D_
- _x000D_
- carrying out self-diagnosis;
- reception of signals from GLONASS and GPS navigation satellite systems;
- constant time calculation;
- constant speed calculation;
- constant calculation of the direction of movement;
- constant calculation of the coordinates of the vehicle's location.
_x000D_
_x000D_
_x000D_
_x000D_
_x000D_
_x000D_
_x000D_
Automatic emergency call
_x000D_
If airbags are deployed at the time of an accident, the system generates a minimum set of data (coordinates, vehicle movement parameters, time, vehicle VIN code and other information) that is necessary for emergency response, and transmits it to the operator of the ERA GLONASS system.
_x000D_
After the data is transferred, the operator is dialed for voice communication (the sound of the radio is muted automatically).
_x000D_
- _x000D_
- During a call, the SOS key backlight flashes red.
- When transmitting a minimum set of data and during voice communication with the operator, the backlight of the “SOS” key lights up continuously in red.
_x000D_
_x000D_
_x000D_
Dialing is carried out only when the ignition is on.
_x000D_
Manual emergency call (SOS key)
_x000D_
Unlike the automatic mode, the manual mode is available not only when the ignition is on, but also for 72 hours after the ignition is turned off. To make an emergency call manually, press the “SOS” button on the interior lighting unit and hold it pressed for at least 2 seconds.
_x000D_
The system operation algorithm for a manual emergency call is similar (see automatic mode). To cancel a call, during a call (while the “SOS” button backlight is flashing red), press the “SOS” button again and hold for at least 2 seconds (the “SOS” button backlight will turn off).
_x000D_
You can see how this happens in the video:
_x000D_
_x000D_
It was also possible to test the ERA-GLONASS system in real conditions. After the Vesta crash test, the system automatically sent an accident signal to the dispatcher with the exact coordinates of the car:
_x000D_ _x000D_
Off mode
_x000D_
If the ignition is turned off and at least 72 hours have passed since it was turned off, the system switches to the “Off” mode. In this mode, the SOS button is not backlit and the system status indicator is off. When you press the “SOS” button, the system does not respond. To turn on the SVEOS, you must turn on the ignition.
_x000D_
Test mode
_x000D_
The testing mode is intended to check the functionality of the SVES components:
_x000D_
- _x000D_
- SVEOS status indicator;
- microphone and speaker in the interior lighting unit;
- backup battery;
- other internal system components.
_x000D_
_x000D_
_x000D_
_x000D_
_x000D_
To start the testing mode yourself you need to:
_x000D_
- _x000D_
- make sure the engine is turned off;
- turn the key in the ignition switch (ЗЗ) to the “Ignition on” position and wait 1 minute;
- From the “Ignition on” position, switch the ignition switch 6 times between the “Ignition on” and “+ ACC” positions according to the algorithm described below for no more than 5 seconds:
_x000D_
_x000D_
_x000D_
_x000D_ _x000D_ _x000D_ _x000D_ _x000D_ _x000D_ _x000D_ _x000D_ _x000D_ _x000D_ _x000D_ _x000D_ _x000D_ _x000D_ _x000D_ _x0 00D_ _x000D_ _x000D_ _x000D_ _x000D_ _x000D_ _x000D_ _x000D_ _x000D_ _x000D_ _x000D_ _x000D_ _x000D_ _x000D_ _x000D_ _x000D_ _x000D_ _x000D_ _x000D_ _x000D_ _x000D_ _x000D_ _x000D_ _x000D_ _x000D_ _x000D_ _x000D_ _x000D_ _x000D_ _x000D_ _x000D_
| № | Initial position of the 3Z | Action to be performed | Final position of the 3Z |
| 1 | Ignition on | Turning on “+ACC” (ignition off) | +ACC |
| 2 | +ACC | Turning on the ignition (1) | Ignition on |
| 3 | Ignition on | Turning on “+ACC” (ignition off) | +ACC |
| 4 | +ACC | Turning on the ignition (2) | Ignition on |
| 5 | Ignition on | Turning on “+ACC” (ignition off) | +ACC |
| 6 | +ACC | Turning on the ignition (3) | Ignition on |
_x000D_
After the 3rd switching on of the ignition (switching ZZ No. 6), the system goes into test mode if the engine did not start during the entry procedure. You should hear "Test procedure started." After the phrase “Say the control phrase,” you will need to say any phrase lasting no more than 5 seconds. Immediately after this, you will hear “Check Phrase Playing,” followed by the phrase you spoke.
_x000D_
The audio prompt “Enter your verification result” will then play. If testing of the microphone and speaker was successful, then it is necessary to switch 33 2 times according to the algorithm described below within no more than 3 seconds:
_x000D_ _x000D_ _x000D_ _x000D_ _x000D_ _x000D_ _x000D_ _x000D_ _x000D_ _x000D_ _x000D_ _x000D_ _x000D_ _x000D_ _x000D_ _x0 00D_ _x000D_ _x000D_ _x000D_ _x000D_ _x000D_ _x000D_
| № | Starting position 33 | Action to be performed | End position 33 |
| 1 | Ignition on | Turning on “+ACC” (turning on the ignition) | +ACC |
| 2 | +ACC | Turning on the ignition | Ignition on |
_x000D_
If there were errors during testing (the spoken phrase was not played back, it was played back too quietly or with distortions, etc.), then after the words “Enter the test result,” no switching 33 needs to be done for 7 seconds. In this case, contact your dealer to resolve the problem.
_x000D_
Backup battery
_x000D_
The SVEOS control unit contains a backup battery, which ensures the system’s functionality in the event of damage to the vehicle’s battery during an accident. When the ignition is turned on, the charge level of the backup battery is monitored, as well as recharging it if necessary. The service life of the backup battery is 3 years. The backup battery can only be replaced at certified service stations.
_x000D_
By the way, the multifunction steering wheel, which is installed on the Lada Vesta from the factory, will help you avoid an accident.
Categories of products that may be of interest to you based on the article “Instructions for using the ERA GLONASS on the Lada Vesta/XRAY (lighting lamp”:
No entries found.
Products from the Dustershop77 range on the topic of the article:
| Image | vendor code | Name | Manufacturer | Price | Availability | Add to cart |
64
Alexander 04/20/2021 at 11:24 am # Reply
The system began to make a lot of noise and creak. What to do?
Room lighting
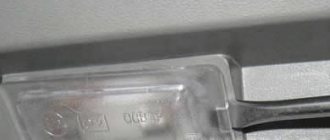
Lighting for the Lada Vesta number is provided by two light bulbs. Lamps often burn out, so drivers must be able to fix this problem themselves and replace the lamps.
The procedure is not complicated and does not require special skills or abilities.
Sequence of events
Use a sharp object to pry the lid of the lantern. Take it out. Remove the lamp and install a new one in its place. A 5V light bulb is built into the lantern. Reinstall the flashlight in reverse order. When removing the flashlight, pry it with a sharp object from the left side.
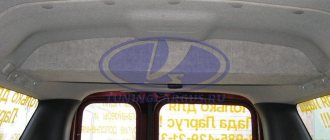
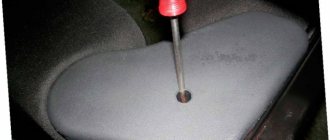
How to remove the ceiling light on Vesta
In order to remove the ceiling light on the Lada Vesta without damage or visible defects, you should act very carefully and consistently:
- We insert a flat-head screwdriver between the upholstery and the block frame and gently press it down.
- After this, we pull the frame towards the glass to remove the rear latches.
- Using a Phillips screwdriver or a torx wrench, unscrew the screws securing the block.
- We insert a flat-head screwdriver into the hole located in the upper part of the case and press the latch.
- Disconnect the block with wiring.
Lada Vesta fuse box with description (interior)
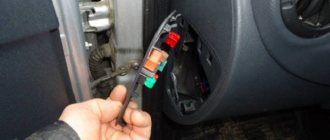
This mounting block is located in a place familiar to drivers - near the left foot. Actually, the space around the trunk opening button and the headlight adjustment control is the cover of the mounting block.
First, remove the plastic clips (nails) that secure the cover to the upholstery. One of them is located on the side of the ignition switch, the other is in the lower left part of the cover (may be absent on some cars). Next, turn the 3 plastic handles at the bottom and pull the lid, releasing all the holders.
Schematic layout
In the interior mounting block you will see the following picture:
Interior mounting block
In the lower right corner there are spare fuses for the Lada Vesta.
Schematically the block looks like this:
Schematic arrangement of fuses It is deciphered as follows: Explanation of spare fuses Explanation of spare fuses Explanation of spare fuses Explanation of spare fuses Explanation of spare fuses Relays that are present in the cabin: Designations of the relay in the cabin
Body connector
Layout of buttons on the steering wheel