The release of the sports version of the Lada Vesta car brought with it a lot of interesting design solutions that were not implemented on the regular versions. One such solution is the intake system, which has been completely redesigned and improved. The main advantage of the sports version's intake system is the air intake; now the air pipe is located near the left headlight of the car. Let us recall that on ordinary cars of the Lada Vesta family, air was taken directly near the radiator, as a result of which the air supplied to the engine was very hot. In this regard, some car enthusiasts decided to modify their intake system by installing an air filter housing from Lada vesta sport. It turned out to be quite easy to do this even with your own hands.
The first step is to purchase the case itself and its components:
- inlet pipe hose assembly - 8450032835 - 990 RUR;
- air intake assembly - 8450032837 - RUB 1,090;
- upper air filter half housing - 8450032859 - 1,200 RUR;
- lower air filter half housing - 8450032858 - 1,400 RUR;
- filter element - 8450032860 - 790 rub.
As you may have already noticed, the air filter housing from the sports version consists of two parts, so you also need to take care of purchasing 7 M6x25 bolts to connect them and tightening clamps to connect the pipes to the filter housing.
Finalization
And now, another way has appeared - a cold intake and a large air filter on the Lada Vesta, the same as the one on the Sport modification. The peculiarity of this method is that it is suitable for both engines of the model - 1.6 and 1.8 liters.
Lada Vesta Sport has an enlarged air filter created specifically for this version. In addition, this modification has a different air intake location - it is located next to the left headlight behind the radiator grille.
What you need to know about the air filter on the Lada Vesta
In order for a combustible mixture to form and completely burn in the engine, the fuel needs air. But moisture, dust and larger particles can enter with the air flow.
To eliminate unfavorable impurities in the combustion chamber, use a special air purifier for the engine. The Lada Vesta air filter contributes to the full and reliable operation of the car engine and prevents it from wearing out too much.
Any clogging of the unit entails a decrease in the performance of the power unit and leads to an increase in the consumption of fuels and lubricants.
If you open the hood of a Vesta car, the filter is located in the upper right corner, behind the power source, in a black plastic box, you can immediately see it. Access to it is completely free from all sides.
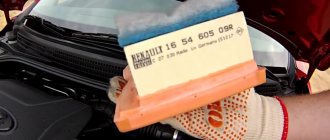
The car is produced with a gasoline engine in two variations: 1.6 and 1.8 liter engine. The Lada Vesta air filter, regardless of the volume of the power unit, has constant dimensions: 270x125x75 mm (length, width, height). The product is supplied by the Renault concern with catalog number 165460509r, which uses this model in its cars.
A certain amount of time passes, and the node begins to clog. The lack of air to ensure the fuel combustion process entails a noticeable increase in gasoline consumption and a decrease in the dynamic characteristics of the engine. Typically, deterioration in the performance of a Lada car is noticeable after 30,000 kilometers in the urban cycle and 15,000 kilometers over rough terrain.
Therefore, it is recommended to constantly inspect the air filter, because it can not only become clogged, but also become deformed. If the volume changes significantly, the part should be immediately replaced with a new filter. Maintenance regulations for Lada Vesta are considered to be once every 30 thousand mileage.
Advice. If engine power has become noticeable and fuel consumption has increased, then the first thing you need to pay attention to is the car’s air filter.
Work to replace the filter must be done while the engine is still warm after another trip. A small drawback of the lid of the box in which the filter is located is the material – plastic, which is fragile when cold and can break. Therefore, when the engine is warm, the plastic latches on the box lid are more pliable.
How to change the air filter on Vesta? The replacement procedure is not difficult; all work can be done with your own hands, without the involvement of an assistant.
[pp_youtube src=»https://www.youtube.com/embed/07mBKC82vmI?feature=oembed» ]
To remove it you need to follow a few simple steps. Replacing the Lada Vesta air filter is performed as follows:
- To begin with, use a flat-head screwdriver to unscrew the 2 latches located on the box lid.
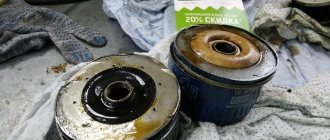
- The cover is removed. From the box, pulling it slightly towards you, take out the cassette with the filter. Special attention is required here: the cassette can be very dusty and it must be removed very carefully so that dust does not fall into the input channel.
- After removing the filter, the walls of the box are cleaned of dust using a household vacuum cleaner.
- Install a new element instead of the old one. The latches should snap into place tightly.
All of the above work can be easily completed in a very short time - 10-15 minutes. They do not require the driver of a vehicle to have special knowledge, skills or special tools.
- When replacing a unit, the rules specified in the technical documentation for the product must be taken into account. Failure to comply with technical regulations can lead to unpleasant consequences in the operation of the car: engine clogging and a decrease in its performance.
- To properly clean the air filter housing, use original cleaning products or products with similar characteristics. This will not affect the performance of the car's engine in any way.
- A failed unit must be disposed of.
- Timely replacement of the air filter on the Lada Vesta allows the engine to maintain good performance over a long period of operation.
- You shouldn’t wait for the car to travel the required kilometers; it’s better to double-check the condition of the air filter in advance.
Advice. After cleaning the box, it is not recommended to put an old air filter in it. A spent element will not bring any benefit.
The cost of the original sample is in the range of 700-900 rubles, depending on the point of sale and the manufacturer. There are analogues whose product price is significantly lower, for example, the Ekofil air filter, article number EK001200 and the Pilenga analogue, article number FAP2180. Both products are representatives in the price category up to 500 rubles.
Purchasing a new air filter for Lada Vesta is not a problem. The unit is freely available at any auto store. It can also be purchased at automobile markets or ordered on the websites of online stores in the city. The price depends on the brand of the new product.
On most of these sites you can leave your comment, which helps other car owners create a general opinion about the product.
The official website of AvtoVAZ operates a feedback system, thanks to which every visitor can ask a question, send a proposal and receive comprehensive information in response.
Components
The entire Lada Vesta Sport air filter kit consists of a number of elements. Their names and articles are presented in the table.
| Air filter half housing (upper) | 8450032859 |
| Filter element | 8450032860 |
| Semi-housing (lower) of the air filter | 8450032858 |
| Bolt | 7703008226 |
| Screw M6x30 | 8450002332 |
| Washer 6x18 | 8450003738 |
| Elastic bushing for fixing the electric fan | 8450001134 |
| Intake pipe hose assembly | 8450032835 |
| Screw clamp assembly | 8450001108 |
| Clamp 16 | 7703083470 |
| Hose (upper) crankcase exhaust ventilation | 8450008594 |
| Connection pipe | 8450101902 |
| Air intake assembly | 8450032837 |
| Screw clamp assembly | 8450001108 |
| Connection pipe | 8450032838 |
| Washer 6x18 | 8450001123 |
| Bolt M6x25 | 8450006008 |
How is the new design better than the old one?
User gagarinec expressed his guesses. He assumes that the case is an old model
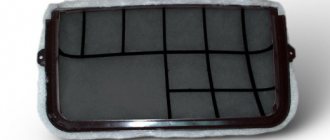
does not allow the filter to fit tightly into place, which causes air leaks, which can be identified by a dark mark on the filter seal:
New air filter housing
plastic amplifiers inside the intake window have been removed. Now the amplifier has been incorporated into the design of the filter element, making it resistant to deformation. As a result, the seal is pressed evenly and tightly, eliminating air leaks. Perhaps this was the root cause of the transition to a new air filter housing design.
At the same time, the plant was redrawn and resonator
. Having compared two resonators (old and new samples), it was revealed that the latches on the resonator nozzle, which secure the resonator in the filter housing, are quite thick and rigid. The snapping into the housing occurs thoroughly, but it is difficult to pull the N/O resonator back out of the housing. The lower latch, being the narrowest, simply breaks at its base, because it lacks elasticity. The s/o resonator was better in this regard. The plastic was thinner and more pliable. The latches were more elastic and it was easy to insert/remove the resonator from the case if necessary. By the way, the old-style resonator could produce extraneous noise.
Air filter comparison
old and new samples (different filtration areas):
Conclusion
: It seems that AVTOVAZ noticed and eliminated shortcomings in the Renault design by developing its own version of the housing and filter element. The financial component cannot be excluded either, because The filter element from BIG is much cheaper on a car factory scale than MANN.
About interchangeability
: the new filter housing is absolutely identical in size to the old one and therefore fits perfectly with the old resonator. We can conclude that the new resonator will also fit the old filter housing.
Where can I buy?
The air filter housing N/O and the resonator N/O are available at the most affordable prices in our online store.
By the way, during the operation of the Lada Vesta Sport, it was also noted that the filter may not fit tightly to the body, a gap is formed, and as a result, air leaks appear. To solve the problem, the intake is being modified.
Keywords: Lada Vesta filters | Lada Vesta engine | Lada Vesta power supply system
0 0 0 0 0 0
Share on social networks:
Alternative
However, one of the owners of Vesta, whose name is Evgeniy and is known on Drive under the nickname gps-nav , found an alternative way to install a large air filter on the Lada Vesta, which is several times cheaper. It involves purchasing components from different cars and their subsequent modification.
Elements:
- filter element - Filtron AP 074/3 is suitable - 330 rubles;
- air filter housing from the Ford Mondeo 3 model – 600 rubles – can be purchased under article number 4609885902;
- air filter pipe from the VAZ 2111 model – 700 rubles;
- sewer pipe 75 mm and sewer bends 90° and 67° – 220 rubles;
- fitting - 30 rubles;
- plastic ties (2 units) and a metal clamp (2 units).
IMPORTANT! Sewer components have not yet demonstrated their reliability. There is an opinion that in the cold they will crack.
After all the listed components have been purchased, you can begin work.
Removing and installing the Lada Vesta engine radiator
We are preparing the car for work. We install the machine on a viewing hole or on an elevator. Disconnect the negative terminal of the battery.
Remove the engine cover.
Remove the front bumper of the car.
Remove beam 1, Figure 1, front bumper.
Press the clamps and disconnect the air intake hose from the deflector 2.
Press the clips and disconnect the ambient temperature sensor 1, Figure 2, from the air deflector 2.
Press the clips and remove the air deflector 2.
Drain the engine cooling system (see article on replacing coolant).
Release the clamps and disconnect:
— supply hose 1, Figure 3, radiator from pipe 3 of the thermostat;
— radiator outlet pipe 4 from the water pump inlet pipe;
— steam outlet pipe 1, Figure 4, from the expansion tank pipe 3 (use pliers).
Cut the clamps on the upper cross member of the radiator frame and the transmission bracket.
Disconnect harness connectors 1, Figure 5, front wires from fan relay box 2, buzzer 3, and radiator fan 4 connectors.
Cut the clamp 5 that secures the front wiring 1 to the fan housing.
For vehicles with air conditioning
Press the clamps, disconnect and remove condenser 1, Figure 6, of the air conditioning system from radiator 2 of the engine cooling system.
Operations for all vehicle configurations
Unscrew and remove from the brackets 1, Figure 7, on the upper cross member of the radiator frame, the clamps 2 securing the radiator 3.
Remove radiator 2, Figure 6, from the support on the lower cross member of the radiator frame and remove the radiator along with the electric fan and pipes.
Press the clips and disconnect the engine cooling fan from the radiator.
Radiator installation
Install the engine cooling fan onto the radiator.
Install radiator 2, Figure 6, of the engine cooling system with the electric fan assembly and pipes into the fastenings of the lower cross member of the radiator frame.
Secure the radiator 3, Figure 7, of the engine cooling system with two clamps 2 on the brackets 1.
Connect the hoses at the inlet, outlet and steam outlet of the radiator of the engine cooling system to the corresponding pipes and secure them with clamps, Figures 3 and 4.
Install new clamps to the upper radiator frame cross member and to the transmission bracket.
For vehicles with air conditioning
Install and secure the air conditioning condenser 1, Figure 6, on the radiator 2.
Operations for all vehicle configurations
Install and secure air deflector 2, fig. 1, on the radiator.
Install sensor 1, Figure 2, of ambient air temperature on air deflector 2.
Connect the air intake hose to the air deflector.
Connect the connectors of harness 1, Figure 5, of the front cables to the connectors of the relay unit 2 of the electric fan, buzzer 3 and electric fan 4 of the radiator.
Install a new clip 5, which secures the front harness 1 to the radiator fan casing.
Install beam 1, Figure 1, front bumper.
Install the front bumper.
Fill the engine cooling system according to the article (Replacing coolant).
Connect the ground wire terminal to the battery.
Start the engine and let it idle for 2-3 minutes to remove any air pockets in the cooling system.
Make sure the heater is working properly.
After turning off the engine, check the coolant level and make sure there are no leaks; if necessary, adjust the coolant level to normal. The coolant level should be between o and “max” on the expansion tank.
Install the engine fender
And spring returns. And again you can do something with the car.
Recently, in principle, there have been no adventures, only problems: - I noticed that the seat heating stopped working, despite the headlights being on; — the right support post was condemned again. They will switch places in pairs again. I'll have a detailed post when the shelves arrive.
Also in the summer I installed an air filter from Vesta Sport.
Tools: — Fixed wrench 10 — Phillips screwdriver — pliers — Torx wrench t30
For details, we needed: - 6 bolts M6 30 for fastening the two halves of the air filter (photos of individual parts taken from the Internet) - 2 terminals d 70-90 - upper semi-trailer - 8450032859
Replacement process 1) Remove the battery, otherwise the original suction system will not survive. 2) Unscrew 2 bolts securing the resonator and 1 bolt of the air filter housing (torx t30)
I’ve only been driving for one day and so far the feelings and impressions are as follows. 1) The vibration at idle has almost completely disappeared. I used to feel confident both through the steering wheel and through the pedals, sometimes it even seemed like the car was being undermined. Now I would say that work has become completely normal. There is a slight, uniform vibration, but this is only a shadow of what happened yesterday. 2) There may already be a “placebo”. The feeling that the ride has become smoother is especially noticeable when moving into an inclined position. It seems like something is missing. 3) It could also be a “placebo”. It is possible that the engine has become quieter, but it is also possible that this is a consequence of strong heating up to 20 degrees and the fact that the engine starts immediately from operating speeds, and not from an increase, as at lower temperatures.
So far, using filters, I have found the following articles: - Lada - 8450032860 (apparently there is a FILTRON inside) - Filter - AP139 / 1 - VAG - 6K0129620B (I ordered it, but the quality turned out to be “so-so”) - MANN - C37132 - hits the basics like an analogue and For some reason there have already been 4 supplier refusals. I'm still waiting and really hoping that there will be something healthier than VAG's.
I would be grateful if someone suggests another analogue, but of acceptable quality (at least with the same fluffy pillow)
Other news: I bought a Lada console lamp for the last row in white (art. 99996350000016). At first it didn't work, but after a few hours of charging it came to life. Shines moderately bright. Enough for rear passengers (and most importantly, they don’t drive often).
UPDATE On xomastorm I also found such a sign on the filters
Work progress
Self-installation of a large air filter on a Lada Vesta begins with modification of the housing itself. First of all, it is necessary to solder the factory hole through which air is taken in.
Next you need to solder the purchased pipe. You can do this in different ways - using epoxy resin, soldering a metal mesh, using a stapler, etc. But in general, soldering using a metal mesh provides the most durable fixation.
Next you need to connect the sewer pipes and outlets.
To prevent the connector from interfering with the installation of the filter housing, it must be recessed and secured with a tie.
All that remains is to put in place the homemade air intake, constructed from sewer components, install it with the desired slope and secure it with a clamp.
Then you need to move the car’s battery to the right and back until it stops, since otherwise it will interfere with the installation of the large air filter housing on the Vesta.
The case itself needs to be tightly fixed, and to do this, place it in such a way that the rear legs rest on the corrugation with wires.
This completes the independent installation of a large air filter on the Lada Vesta.
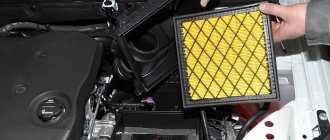
Installing the Sport intake system
We begin the installation of the new intake system by installing the intake pipe; there is a special hole on the car body (next to the battery) (see photo above), this is where our pipe is attached using an ordinary bolt. After the air intake has been installed, we proceed to attaching the pipes:
The pipes are secured using tightening clamps in a few minutes. After installing all the pipes in their regular places, you can proceed to attaching the new air housing. First of all, install the body in the intended place (do not tighten the bolts to the body), connect the pipe coming from the throttle valve, and then proceed to connecting the air intake:
The air intake itself is plastic, so you will have to connect it using a homemade adapter (see photo above) and two tightening clamps.
After the pipe and air intake are attached, you need to screw the filter housing to the car body. After improving the intake system, car owners note the following improvements in car behavior:
- increase in engine power
- slight reduction in consumption
- smoother engine operation
Effect
If you consider the reviews of the owners who went through with this modification, it becomes clear that the effect is quite noticeable. They note that the engine begins to “breathe”, and not only at the bottom, but also works more vigorously after 3,000 rpm.
The engine revs noticeably easier up to 5,000 rpm. Those who often drive in traffic jams claim that the car has stopped shaking in traffic jams.
In general, installing a large air filter on your Lada Vesta yourself is completely worth it, especially if you don’t buy branded products.
Other options
Below are modification options from other West owners, using several other components. All details can be viewed in their logbooks.
Option from Ivan Kiselyov. On Drive under the nickname BAHO and his car Lada Vesta *Blues Sky*
Option from Alexander. On Drive under the nickname MiheyA and his car Lada Vesta sedan 1.8 AMT
On Drive under the nickname WaPJIaTaH and his car Lada Vesta Fantan