May 18, 2020 Lada.Online 45 056 4
According to the maintenance regulations, the cabin air filter on Lada Vesta and XRAY must be replaced once every 15,000 km. For proper operation of the interior ventilation and air conditioning system, the manufacturer recommends promptly changing the filter element. Let's figure out which cabin filter is best to buy.
Where is the cabin filter of Lada Vesta
In Lada Vesta (SV Cross), the cabin filter is installed on the passenger side next to the heater under the instrument panel.
This arrangement optimizes the use of limited interior space, but complicates the process of replacing an element.
The cheapest configurations do not provide for its use; the inlet hole is closed with a special plug.
How to determine that the cabin filter on the West is clogged
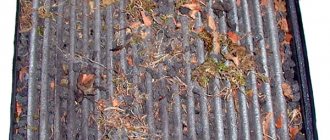
When driving a Lada 2180 in a dusty area, the cabin filter will have to be changed as it gets dirty, without taking into account the mileage. You should look for signs that indicate that further use of the item is useless. The most notable of them:
- Poor operation of the air conditioner, leading to strong heating of the interior in sunny weather;
- Constant unpleasant odor, regardless of the environment;
- In winter, the stove barely heats the interior;
- Active contamination of the front panel of the car and windows;
- The humidity inside the cabin is so high that the windows sweat in any weather.
Replacement frequency
The maintenance schedule for Lada Vesta vehicles recommends changing the cabin filter every 15 thousand kilometers. In fact, this parameter is almost never maintained.
Causes:
- different quality of filters from different manufacturers;
- uneven operating conditions.
Based on the actual clogging values, experienced mechanics advise changing the element when preparing the car for the summer season.
It is better to use a carbon filter if the machine is operated in urban conditions - the air is saturated with smog and various harmful chemical compounds.
If the car is for a village or small settlements, then it is enough to install cheap filters to capture particulate matter.
Design and principle of operation of the part
Which oil filter is best to choose for your favorite car top 10
Sample engines that are used in modern car models include a lot of mechanisms rubbing against each other. Operating in this extreme mode, the mechanisms require high-quality lubricant as motor oil. For the rational operation of the engine and its components, the use of high-quality oil filters and timely replenishment of the oil reservoir with the missing amount of liquid are required.
In order for the car to remain operational for a long time, it is necessary to monitor the condition of the spare part and the level of engine oil. Manufacturers of car parts for Vesta and other models offer a wide range of filters. They may look different, but the products do the same job, they have a single mechanism of action. The part cleans the lubricant, removes dirt and metal particles from engine parts and prevents them from getting back into the operating mechanism.
The filter component of the Lada Vesta car is visually similar to filters of other brands - it looks like a dark glass with a cleaning device in the middle. Despite its apparent simplicity, the part has a complex design.
When should you change?
The frequency recommended by manufacturers does not always “work”; the reasons for this phenomenon will be indicated below in this article.
But there are several practical tips that will help you avoid missing the time to replace the cabin filter.
Signs indicating loss of functionality of an element:
- the intensity of the air flow from the stove decreases when the external air intake is turned on;
- the time it takes to warm up the cabin to a comfortable temperature increases;
- the stove engine runs for a long time and with a critical load;
- the windshield fogs up on the inside or takes a long time to thaw;
- there is a noticeable increase in the amount of dust on the panel elements;
- There are unpleasant odors in the car.
The presence of one of the listed signs indicates that the filter element is clogged and needs to be replaced.
How to understand that the cabin filter is clogged, signs
Therefore, no one changes the cabin filter based on mileage. Of course, you can time the filter replacement to coincide with scheduled maintenance, but you also need to know the obvious signs of a clogged cabin. At least the most basic ones:
- The airflow intensity decreases when air recirculation or heating is turned on. The stove may blow warm air weakly, and the air conditioner will no longer be effective. True, in these cases the filter is not always to blame. It is quite possible that the air intake is clogged, this is especially true for autumn with its eternal fall of leaves and for the snowy winter.
- The windows from inside the cabin often fog up. This again occurs due to a decrease in ventilation intensity.
- There is a constant layer of dust on the front panel, sediment on the front glass. True, if the sediment or deposit is sticky to the touch, it is worth checking whether the heater radiator is leaking.
- Foreign odors in the cabin.
If these symptoms appear, you need to find the time to replace the cabin filter. If this is not done, dust and microparticles of silicon, small particles of rubber, dust from brake pads and clutch friction discs, heavy fractions of diesel engine exhaust, as well as bacteria and microorganisms will freely enter the cabin and, accordingly, into our lungs.
There are also technical issues. Firstly, when the cabin filter is clogged, the throughput of the air ducts deteriorates, and this entails an increased load on the electric motor of the heating system. As a result, it can easily overheat, the winding will short-circuit and the motor will fail, and changing the stove motor is not the most pleasant procedure, both in terms of work and time spent, and in terms of the money spent on replacing it.
Stock cabin filter Lada Vesta
Secondly, dust accumulated on the surface of the air conditioner evaporator absorbs moisture. A warm and humid environment is ideal conditions for the growth of bacteria and the appearance of corrosion on the evaporator itself, which will also not be a pleasant surprise for the owner.
From the factory, Lada Vesta is equipped with a new cabin filter, a regular paper dust filter. Renault catalog number There is a nuance. The Renault filter package actually contains a German Mann CU22011 dust filter! But if you buy both in retail, they are both identical in size and characteristics, since, as you know, Renault-Nissan-Mitsubishi does not produce filters.
There is a whole brood of analogues, and in addition, you can buy a carbon filter. It is more expensive, but for the first few thousand runs it will have an antibacterial and adsorbing effect on the air. After 4-5 thousand, as a rule, the carbon filter already works in the same way as a regular dust filter. There is certainly a difference between them and it is felt immediately. True, they are somewhat different in price.
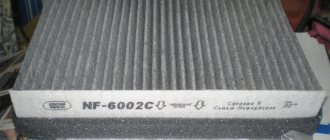
For example, a regular dust filter for Vesta NF6433 costs $3, while its carbon counterpart NF6433 C costs one and a half dollars more.
Here are several replacements for original cabin filters for Lada Vesta:
- AIKO AC0203C;
- AMD AMDFC738C;
- Fortech FS146;
- LYNXauto LAC1925;
- Fortech FS146;
- Bosch 1987 435 011;
- FranceCar FCR21F090.
Another cheap analogue of a Renault filter
And a number of other other manufacturers offer both two- and three-layer dust filters and carbon elements.
Theoretically, to replace the cabin filter, you need to remove the panel to the left of the front passenger on the center console and disassemble the glove compartment. In general, there is not much work, but it also takes some time. Practice has shown that it is possible to change the cabin filter without disassembling the glove compartment.
This is done like this:
- Unscrew the self-tapping screw with a TORX-20 bat at the bottom of the panel.
- Use a thin screwdriver or a plastic mounting spatula to pry up the upper part of the panel...
- ... and remove it, lifting it up and disengaging it from the eyes.
- We look under the glove compartment and find the cabin filter cover closer to the engine shield. It is secured with two plastic latches. You can easily reach them with your fingers.
- Unclip the cover latches and remove it.
- All that remains is to remove the filter, slightly bending it, from the cartridge. The filter is quite soft, although it fits tightly into the cartridge.
Now we carefully clean the inside of the cartridge, preferably with a vacuum cleaner, wipe it and install a new filter, paying attention to the arrow at the end.
The arrow indicates the direction of air movement and should be directed towards the rear of the car. We carry out assembly in reverse order.
Replacing the cabin filter on Lada Vesta cars is one of those operations that can be carried out by the driver himself. It does not require any special knowledge or tools from the car owner and can be completed within 40 - 45 minutes.
Which cabin filter should I install?
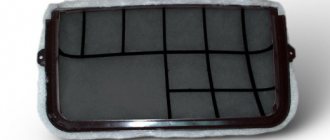
Lada Vesa cars are factory equipped with elements with catalog number 272773016R.
The filter element is made of non-woven fiber and is capable of trapping solid particles with a diameter of ≤ 1 µm.
Original products are manufactured by Renault, the licensed manufacturer is Mann Filter.
Cheaper analogues are produced by the following companies:
- Pilenga (Pilenga FA-P0443);
- BIG FILTER (GB-9978);
- Finwhale (Finwhale AS433 and charcoal variant Finwhale AS433C).
Domestic manufacturers are also engaged in the production of such elements:
- Nevsky filter (NF6433 and carbon NF6433C);
- SibTEK (AC 43003 and AC 0443003 coal version);
- TSN Citron (coal TSN 97888K and dust TSN 97888).
The problem with domestic products is the discrepancy between the declared indicators and the actual values. The reason is low labor discipline and outdated technologies.
The final choice depends on the desires of car owners, but experienced mechanics strongly recommend not using cheap unlicensed substitutes.
A production license is issued by the original company after a rigorous check of all technological processes and materials used for compliance with current requirements; not everyone can obtain it.
The difference in cost is not worth the lost time and deterioration in air quality in the cabin. You should also remember that the lower the quality, the more often you have to make a replacement.
Repair sequence
Lada xray and vesta: first kilometers on new AvtoVAZ models
To perform proper vehicle maintenance, you will need to follow a sequence of steps. It is noteworthy that replacing the cabin filter of the Lada Vesta SV Cross is carried out according to a similar scheme, without changes.
Prepare the necessary tools and consumables. Place the machine in a stable position and apply the handbrake. The filter element itself is located under the dashboard on the left side of the glove box. The filter is hidden inside plastic linings and covered with protective inserts that ensure tightness. To remove the filter, you will need to use a T20 Torx wrench and unscrew the fastening screws on the right side of the gearbox lining.
Next, you will need to use a flat screwdriver or a special spatula to pry off the three fastening clips
When dismantling, extreme care must be taken - the plastic latches are very fragile and careless movement can damage them. If the clips break, you will have to buy a new part or “collectively farm” new clips
For clarity, the fastening points are indicated in the figure with red arrows.
Similarly, pry up and dismantle the right side of the glove box lining. The screwdriver is driven into the slot and the latches are released using rocking movements.
Next, the glove compartment opens and Torx is taken. In the lower left corner there is the fixing screw itself. It will need to be unscrewed.
It is noteworthy that in different years of production and depending on the assembly, the fixing elements - bolts - can be of different configurations: for Torx, hex, screwdriver or socket wrench.
Consequently, the user may require a much wider range of tools. On numerous videos where the cabin filter of the Lada Vesta is replaced, the video does not talk about this moment.
- Then you need to sequentially unscrew the remaining screws securing the glove box.
- Next, carefully remove the small cargo box.
- After the glove compartment is moved, you will need to disconnect the power terminal for the compartment illumination. After turning off the backlight, you need to disconnect the wiring harness to the dashboard. To do this, the white retainer is disassembled.
- After this, you can completely remove the magazine rack from the machine. Next, it must be carefully placed on a previously prepared rag or special surface. Such actions are justified by the sensitivity of the casing to mechanical damage - the glove compartment is easily scratched.
- Now you have free access to the filter itself. In many videos that show replacing the cabin filter of the Lada Vesta Cross, the video does not convey the details - many elements are not shown. The filter element cover is located right next to the bulkhead between the passenger compartment and the engine compartment.
- To dismantle the element, unclip the plastic clips and remove it strictly to the right. It is not recommended to pull the cover in other directions - the lower part of the part moves along the guide rails.
- The final step is to replace the filter itself. The white insert simply plugs into the socket and is just as easy to remove.
- After the channels have fully opened, experts recommend cleaning the air channels from dirt, leaves and other debris. For cleaning, you can use a compressor or, if you don’t have one, a household vacuum cleaner. The nozzle is inserted into the air intake and debris is blown out of the system. After the procedure, you will need to clean the interior - all the dust will fly onto the panels, windows and dashboard.
- Installing a new filter is done in reverse order. In this case, the insert itself should be removed from the factory package only immediately before installation. If liquid, dirt or foreign debris gets on the paper, this will significantly reduce its service life.
There are also some nuances during installation. There is an arrow on the top of the filter, it should be directed towards the rear of the machine.
The next nuance is installation. When installing, the part needs to be slightly crumpled, the seat is 10mm less in height. In this case, after installation the filter will straighten out and everything will be fine.
Filter characteristics
The linear dimensions of the Lada Vesta cabin filter correspond to the seat: height 35 mm, length 216 mm, width 200 mm.
Important. The filter has a rectangular shape, it must be installed taking this parameter into account.
The folds are vertical, with the exception of FILTRON K1321 with horizontal corrugation. This design feature has changed the location of the rigid slats; they are vertical rather than horizontal.
Let's consider the process of replacing the filter element without removing and with removing the glove compartment.
What parameters indicate that the cabin filter is dirty?
The original Lada Vesta filter or its high-quality analogue ensures air purification for about 20,000 kilometers of the vehicle. Durability depends on which roads are primarily used for traffic.
When operating a vehicle exclusively in an urban environment, the filter resource may be enough for 30,000 t.km, as the manufacturer claims. But if you often drive on country roads and dirt roads, the filter becomes dirty much faster.
Therefore, replacing the filter based on the mileage of the car cannot be performed. Of course, you can change the cabin filter during routine maintenance, but you also need to know exactly what signs indicate that the filter is already clogged and needs to be changed:
- The intensity of the air flow decreases noticeably when the recirculation or interior heating mode is turned on. If the filter is clogged, the heating or air conditioning process takes much longer. This is due to the fact that the volume of air entering the heater or air conditioner is not correct.
- A decrease in the volume of air supplied to the cabin and a decrease in ventilation intensity leads to fogging of the inner surface of the windows.
- Dust accumulates on the front panel and front windows.
- Extraneous unpleasant odors and dampness begin to be felt in the cabin.
If you begin to notice at least one of the above signs of a clogged filter, and especially an odor in the cabin, take the time to replace it. Otherwise, external dust, microparticles of rubber, brake linings, clutch discs, exhaust gases and other harmful substances and microorganisms will enter the car interior. All these suspended particles can be easily inhaled by people, which will lead to poor health and even illness.
Replacement with glove box removal
This method takes a little more time, but allows you to better control your actions and the position of the element.
It is recommended for beginners who have no experience in performing such activities and cannot determine by force whether the filter is installed correctly.
Before replacing the element, the right floor covering and glove compartment must be removed.
The process consists of several operations.
- The screw securing the tunnel lining to the floor is unscrewed (T-20 key). To make work easier, it is sometimes necessary to clean the splines from dirt.
- The facing panel is removed. It is held in place by three latches; you need to find their location, press the latches and carefully pry the panel into the slot. You should work carefully, especially on old cars - plastic's intermolecular bonds weaken over time, it loses its plasticity and can easily break off. This is a problem, rattling will appear, you will have to come up with new methods of fastening. There are three latches on the panel; if desired, you can slightly reduce the height of the hooks to facilitate repeated dismantling, but this must be done wisely. It is better to use a heated metal object and constantly check the grip. This method allows, if necessary, to return the original geometry of the elements.
- In the same way, carefully remove the side of the dashboard on the right side. Use a slotted screwdriver or a knife to locate the clamps and press the protruding teeth one by one.
- The glove compartment is removed; to do this, unscrew the holding screws with a T-20 bat. It is necessary to remove the lower left and right screws and the three upper ones.
1 of 4— +
1.
2.
3.
4.
- The backlight is disconnected. The box is moved back a little and the connector is removed.
- The filter cover is removed. It is secured with two plastic clips; the lower part of the element slides in grooves along the housing guides and is removed.
- The air filter is removed. If it is tight, then to facilitate the process you need to perform oscillatory movements, and if necessary, compress it a little at the top. It is advisable to pay attention to the condition of the filter, taking into account the operating conditions of the vehicle. This will help you more accurately determine the time of the next element replacement.
- The location of the filter is thoroughly cleaned of dust using a vacuum cleaner.
The installation process is done in reverse order. Before starting work, you need to check the dimensions of the element and pay attention to the position of the arrow. It indicates the direction of air movement and should face the cabin.
Stages of replacing the filter element Lada Vesta
Compared to most other cars, replacing the cabin filter in the Lada Vesta, as well as in the Cross version, is relatively simple. Relatively, because the filter is not located in the most convenient place for replacement. Simple - because no special preparation is required for this operation. All you need is the new filter element itself.
It is pointless to dispute the benefits of salon tea, especially when it comes to coal ones. Therefore, it is not surprising that self-installation of filters on cars has become common. This is a routine and fairly simple procedure for periodic maintenance, there is nothing complicated about it
According to the regulations, replacement of the cabin filter is provided every 30,000 km, that is, every 2nd scheduled maintenance. However, depending on the operating conditions of the vehicle, the replacement period can be reduced to 10-15 t.km. mileage The more often you change the filter in the cabin, the cleaner the air will be and the better the air conditioner or heater will work.
Where is
Like most other cars, the cabin filter of the Lada Vesta is located in the passenger compartment on the passenger side. The filter housing is located under the dashboard, so getting it out requires a little fiddling. At a car service center they will charge you about 700 rubles for a replacement, which is quite a lot for a 15-minute procedure.
The cabin filter makes the ride comfortable, so if a plug is installed, it is recommended to remove it and install a cleaning element. Much less dust will accumulate in the cabin. If you use carbon filtration, the air quality inside the car will become even noticeably better.
Removing and installing a new filter element
First, you need to make a reservation that you can use the official instructions for replacement by removing the glove compartment. But this makes no sense other than wasting time. This method is less convenient, but very fast.
Replacing the cabin filter of Lada Vesta is a routine and fairly simple periodic maintenance procedure. There is nothing complicated about it, so replacing it yourself is quite simple. To make the operation easier, you can move the front passenger seat all the way back.
The filter plug can be seen behind the center console when viewed from the glove compartment, and to remove the filter it is enough to:
- Remove the decorative panel. To do this, you need to unscrew the Torx T20 key screw. Next, using a flat-head screwdriver, unclip the latches that secure the panel in 3 places (Fig. 1). Latches often break, so you need to be extremely careful.
Fig.1 Self-tapping screw for Torx T20 - The filter plug is now accessible. To remove the plug, you need to squeeze the protrusions shown in the photo. The effort required for this is small, they give in easily. After this, simply pull the lid towards you (Fig. 2).
Fig.2 Compressing the protrusions - Pull the filter by the lower part, moving upwards, so that the upper part of the filter disengages. The filter element itself is larger than the hole where it should be inserted. Therefore, it is pulled out according to the accordion principle (Fig. 3).
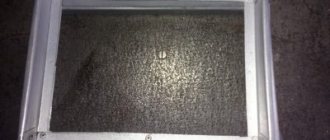
Fig.3 Pull it out by the bottom part - When the installation cavity is empty, it is advisable to clean it of dust and various contaminants. If you can use a vacuum cleaner with a narrow attachment, this would be the best option. There is a more radical method, turn on the airflow to full. In this case, the inside will be clean, but you will have to remove dust from the interior (Fig. 4).
Fig.4 Niche for installation - Next, install the new cabin filter in the reverse order. First, fully insert the upper part of the filter, and then push the lower part. It seems a little confusing, but the installation process makes it easy.
Fig.5 New filter element - Now all that remains is to install the cover in its place until it clicks. By the way, for some users the latches on the plug break off. In this case, it can be secured with 2 self-tapping screws, for which there are already holes.
When installing, pay attention to the arrows shown on one side of the filter element. They show the direction of air movement, and installation must be done according to them. The arrow should be in the direction from the engine to the passenger compartment.
When removing the filter, as a rule, a large amount of debris spills onto the mat. It is worth vacuuming the inside of the stove body itself - the size of the slot for the filter makes it quite easy to operate with the narrow nozzle of the vacuum cleaner.
On cars with air conditioning, replacing the cabin filter should be combined with cleaning it. On sale you can find many aerosol compositions for cleaning and disinfecting honeycombs. A flexible nozzle is inserted through the filter installation hole.
The composition is evenly sprayed over the entire surface of the air conditioner radiator, after which it quietly flows through the drain. You need to wait about 10 minutes and replace the filter.
If the latches are broken
If, when replacing the cabin filter, the latches on the decorative plug of the central tunnel of the Lada Vesta are broken, then there is a way out:
- We glue Velcro onto the plug itself using double-sided tape (Image 1).
Image 1 Velcro on the plug - We symmetrically glue the other part of the Velcro on the central tunnel, at the attachment point (Image 2).
Image 2 Velcro on the tunnel
In this way, we will not only restore the fastening and tight fit, but also facilitate subsequent removals.
Solving the problem of large accumulation of debris in the filter
Very often, when replacing the interior, you can find tree leaves and other large debris. Which not only spills onto the floor of the Lada Vesta cabin when replaced. But it also prevents normal air circulation.
The culprit is the air intake hole, which is located under the hood, behind the air intake box, or in common parlance, a frill. It is practically not covered by anything. All large particles enter through it. Covering it with a fine mesh will solve the problem.
Let's figure out how to do this:
- For this purpose, special meshes with a fine mesh are available for sale. They are attached using strong neodymium magnets (Photo 1).
Photo 1 Fine mesh mesh - Raise the hood and use Torx T20 to unscrew the 3 fastening screws. We remove the wiper mounting plug and use a 16 key to dismantle the wiper itself. We do all the same on the other side (Photo 2). Please note that the screws on the windshield side are slightly longer, so do not mix them up when assembling.
Photo 2 Places for unscrewing fasteners - To avoid confusion with the location of the wipers when replacing the wipers, it is recommended to make marks with a marker (Photo 3).
Photo 3 Making marks - Now that all the fasteners have been disconnected, you can pull out the frill. This is done by moving from the windshield and up.
- When everything is dismantled, we see in the center a view of an air intake with a huge cell, which needs to be closed (Photo 4).
Photo 4 Original air intake - We insert our purchased mesh and close the standard hole with it. Now large debris will not enter the cabin, and as a result, the cabin filter will become less clogged (Photo 5).
Photo 5 We rejoice at the modification
We are happy with the modification and put everything back together in reverse order.
Functions that a high-quality cabin filter should perform
This list includes:
- remove the smallest solid particles;
- prevent allergenic plant pollen from entering the cabin;
- captures chemical compounds of exhaust gases (oxides of nitrogen, carbon, sulfur, compounds of heavy metals, etc.);
- minimizes the harmful effects of low-quality washer fluids (solvent vapors, alcohols).
But you shouldn’t think that cabin filters only improve the microclimate in the cabin; their use solves several other important problems.
- Reduces the number of interior cleanings. While removing dust from plastic and leather interior elements is not difficult, cleaning fabric elements is a rather complex and time-consuming procedure.
- Increases the reliability of all rotating pairs. This refers to electric motors that drive heating, air conditioning, and other units located in the cabin. Dust has abrasive properties and significantly increases the wear of rubbing parts.
The capabilities of filters depend on their design. The simplest and cheapest ones purify the air only from solid particles. The most effective ones for complex cleaning have, in addition to paper elements, activated carbon fillers.
Self-installation of a large air filter on Lada Vesta
Which cabin filter is better, carbon or regular?
our comparison Attempts by LADA Vesta owners to increase engine power and make its operation more flexible do not stop. Particularly valued are methods that do not require significant processing and costs, not to mention chip tuning, to which the attitude is ambiguous.
Finalization
And now, another way has appeared - a cold intake and a large air filter on the Lada Vesta, the same as the one on the Sport modification. The peculiarity of this method is that it is suitable for both engines of the model - 1.6 and 1.8 liters.
Lada Vesta Sport has an enlarged air filter created specifically for this version. In addition, this modification has a different air intake location - it is located next to the left headlight behind the radiator grille.
Components
The entire Lada Vesta Sport air filter kit consists of a number of elements. Their names and articles are presented in the table.
| Air filter half housing (upper) | 8450032859 |
| Filter element | 8450032860 |
| Semi-housing (lower) of the air filter | 8450032858 |
| Bolt | 7703008226 |
| Screw M6x30 | 8450002332 |
| Washer 6x18 | 8450003738 |
| Elastic bushing for fixing the electric fan | 8450001134 |
| Intake pipe hose assembly | 8450032835 |
| Screw clamp assembly | 8450001108 |
| Clamp 16 | 7703083470 |
| Hose (upper) crankcase exhaust ventilation | 8450008594 |
| Connection pipe | 8450101902 |
| Air intake assembly | 8450032837 |
| Screw clamp assembly | 8450001108 |
| Connection pipe | 8450032838 |
| Washer 6x18 | 8450001123 |
| Bolt M6x25 | 8450006008 |
Alternative
However, one of the owners of Vesta, whose name is Evgeniy and is known on Drive under the nickname gps-nav, found an alternative way of installing a large air filter on the Lada Vesta, which is several times cheaper. It involves purchasing components from different cars and their subsequent modification.
Elements:
- filter element - Filtron AP 074/3 is suitable - 330 rubles;
- air filter housing from the Ford Mondeo 3 model – 600 rubles – can be purchased under article number 4609885902;
- air filter pipe from the VAZ 2111 model – 700 rubles;
- sewer pipe 75 mm and sewer bends 90° and 67° – 220 rubles;
- fitting - 30 rubles;
- plastic ties (2 units) and a metal clamp (2 units).
After all the listed components have been purchased, you can begin work.
Work progress
Self-installation of a large air filter on a Lada Vesta begins with modification of the housing itself. First of all, it is necessary to solder the factory hole through which air is taken in.
Next you need to solder the purchased pipe. You can do this in different ways - using epoxy resin, soldering a metal mesh, using a stapler, etc. But in general, soldering using a metal mesh provides the most durable fixation.
Next you need to connect the sewer pipes and outlets.
To prevent the connector from interfering with the installation of the filter housing, it must be recessed and secured with a tie.
Then you need to move the car’s battery to the right and back until it stops, since otherwise it will interfere with the installation of the large air filter housing on the Vesta.
The case itself needs to be tightly fixed, and to do this, place it in such a way that the rear legs rest on the corrugation with wires.
This completes the independent installation of a large air filter on the Lada Vesta.
Effect
If you consider the reviews of the owners who went through with this modification, it becomes clear that the effect is quite noticeable. They note that the engine begins to “breathe”, and not only at the bottom, but also works more vigorously after 3,000 rpm.
The engine revs noticeably easier up to 5,000 rpm. Those who often drive in traffic jams claim that the car has stopped shaking in traffic jams.
In general, installing a large air filter on your Lada Vesta yourself is completely worth it, especially if you don’t buy branded products.
Other options
Below are modification options from other West owners, using several other components. All details can be viewed in their logbooks.
Option from Ivan Kiselyov. On Drive under the nickname BAHO and his car Lada Vesta *Blues Sky*
Option from Alexander. On Drive under the nickname MiheyA and his car Lada Vesta sedan 1.8 AMT
On Drive under the nickname WaPJIaTaH and his car Lada Vesta Fantan
Regulatory requirements for the characteristics of the cabin filter Lada Vesta
To ensure high-quality and safe operation, the cabin filter of Lada Vesta and other cars must meet the following characteristics:
- trap at least 99% of solid particles of specified sizes;
- not to deform or change linear dimensions under the influence of moisture;
- do not support open combustion;
- have a large filtration area with the smallest possible dimensions;
- securely fixed in place.
During product testing, the following parameters are monitored:
- dust retention ability;
- efficiency up to maximum pressure drop;
- dust holding capacity;
- frontal air flow speed;
- diameter of passing particles;
- secondary entrainment of dust.
Some irresponsible companies do not pay enough attention to monitoring technical parameters, which has a negative impact on the quality of air in the cabin.
How to choose the right cabin filter
Autoreview experts tested 10 cabin filters in the Lefortovo tunnel and laboratory. They recommend following the following rules when choosing a cabin filter:
- Buy a cabin filter only with the original article number.
- The less the filter deforms in your hands, the better: the lower the likelihood of incorrect installation.
- The filter material must have a laminated coating on the side facing the fan so that fluff from the filter does not enter the ventilation system.
- The filter must be marked with the direction of air flow.
- The carbon filter does not necessarily have to be sealed in polyethylene: activated carbon “works” only with air circulation, which is virtually excluded inside the box lying in a warehouse or store.
- When the size of the box is much larger than the filter itself, this is not evidence of a fake. Many manufacturers prefer to save on packaging in this way: due to a smaller number of standard box sizes.
- The carbon filter must be selected by weight: a heavier one should be preferred - it contains more activated carbon.
Test results of ten cabin filters
:
| Some test results for cabin filters according to ISO/TS 11155-1 | ||||
| Filter | Flow velocity from deflectors, m/s | Flow resistance, Pa | Filtration efficiency, % | Dust capacity, g |
| TSN | 4,09 | 14 | 61,7 | 18,3 |
| Bosch | 4,13 | 26 | 79,7 | 42,6 |
| Delphi | 3,96 | 28 | 78,9 | 37,3 |
| Filtron | 4,12 | 27 | 78,9 | 27 |
| Mahle | 4,05 | 32 | 79,9 | 47,2 |
| Mann | 4,15 | 33 | 79,9 | 46,8 |
| RAF | 3,97 | 18 | 48,7 | 21,5 |
| Valeo | 4 | 25 | 58,3 | 27,5 |
| Volkswagen (coal) | 3,99 | 27 | 79,3 | 40,7 |
| Volkswagen (dust) | 4,09 | 18 | 79,3 | 27 |
| Some test results of cabin filters in the Lefortovo tunnel | ||||
| Filter | Filter weight, g | Hydrocarbons (methane-hexane), mg/m³ | Nitrogen dioxide, mg/m³ | Alcohols (isopropanol), mg/m³ |
| TSN | 98,2 | 2,95 | 0,111 | 1350 |
| Bosch | 308,7 | 1,42 | 0,001 | 424 |
| Delphi | 226,6 | 1,45 | 0,036 | 952 |
| Filtron | 146,7 | 3,03 | 0,059 | 800 |
| Mahle | 290,6 | 1,57 | 0,004 | 340 |
| Mann | 306,2 | 1,61 | 0,004 | 532 |
| RAF | 164,4 | 3,19 | 0,087 | 1143 |
| Valeo | 157,7 | 1,43 | 0,035 | 630 |
| Volkswagen (coal) | 263,7 | 1,41 | 0,008 | 763 |
| Volkswagen (dust) | 81,9 | 3,04 | 0,1 | 1300 |
| Used filter (Mann) | 328,4 | 3,13 | 0,019 | 704 |
| Without a filter | 0 | 3,21 | 0,134 | 1378 |
Bold
The filters that turned out to be better than others are highlighted.
As a result, experts came to the conclusion
that a regular (dust filter) filter saves on your own health. But activated carbon can soften the blow to your health from inhaling nitrogen dioxide and unburned hydrocarbons.
Which cabin filter for Vesta and XRAY did you choose? We determine the best cabin filter by voting. Leave your reviews in the comments.
Where can I buy?
In our online store (Category Vesta/XRAY filters).
Keywords: Lada Vesta filters | lada xray filters | air conditioner lada xray | air conditioner Lada Vesta | stove Lada Vesta | Lada Xray stove
1 0 0 0 0 0
Share on social networks:
Replacement procedure
Motorists themselves, like craftsmen, use 2 main replacement methods when working with Lada Vesta. The only difference between them is the need to remove the glove compartment. That is, one method allows you to do without removal, but then it is not so convenient to work, and the second involves dismantling. The procedure takes a little more time, but removing and inserting a new consumable is much more convenient. The choice is for car owners who decide to take on replacing the cabin filter with their own hands.
The instructions can be combined for 2 methods.
- The first to be removed is the plastic trim on the left leg of the front passenger in the lower side part of the center console. To remove the panel you will need a size 20 Torx wrench. This is a standard star screwdriver that is in the tool kit of almost every motorist.
- Unscrew one single screw, then pry the panel with your hands to remove it from the latches. It's best to use a small spatula or flathead screwdriver. Then the panel is much easier to pry off. Remove it and put it aside for now.
- Next, you can stop at the dismantling work done and begin replacing the filter itself. It is located behind the panel under a plastic cover held in place by clips.
- The latches are pressed out manually. They should be unfastened from the bottom and top of the vertically located cabin filter housing.
- Having removed the cover, the filter is compressed like an accordion and pulled out. Usually you can get there by hand.
- Next, it is recommended to blow out the socket under the consumable using a compressor with compressed air, or use a vacuum cleaner. Otherwise, the dust accumulated over a long period of operation will immediately settle on the new filter, and its service life will be reduced by at least several thousand kilometers.
- In the same way, the new filter is folded like an accordion and pushed into the seat. This is where some difficulties arise. By squeezing the element too hard, it can be damaged and you will have to buy a new one.
- If you are not in a hurry and want to do everything carefully and correctly, it is better to choose the second option and additionally remove the glove box. He's a glove compartment.
- To remove the glove compartment, you need to unscrew 5 fasteners. A torx screwdriver of the same size 20 (T20) is also used here.
- When unscrewing the fasteners, pay attention to their length and thread. These indicators differ, so it is important to remember the sequence and location of fasteners. Reassembly should be done in exactly the same way when reinstalling.
- You will find 3 screws at the top of the glove compartment, and 2 more at the bottom.
- Using a flathead screwdriver, remove the right side console trim to the side.
- Carefully remove the glove box. Don't forget to disconnect the connector from the backlight. It's on the left side of the box. The latch contracts and disengages.
- Since you have previously removed the side panel along the left leg of the front passenger, and also dismantled the glove compartment, access to the cabin filter housing is open.
- Release the filter cover latches and pull the element to the right. This way the cover is completely removed from its place.
- Carefully use a vacuum cleaner to go over the seat of the cabin filter in your Lada Vesta, and then insert a new consumable.
- It is worth noting that the new filter will literally be 2-3 millimeters larger than the width of the housing opening for the consumables. It is because of this that when using the first method it is not always possible to easily insert a new filter. It's not that easy even with the second method.
- Squeeze the element slightly and insert it into the socket. Already inside it will completely restore its shape and correctly occupy the place intended for it.
- During reassembly, secure the cabin filter cover and return the glove box to its place. Moreover, the backlight is connected first, then the right side trim is moved. If the glove compartment is installed correctly, the trim itself will be exactly in its rightful place.
- Without confusing the location, tighten all 5 screws securing the glove compartment.
- At the final stage, the left trim of the center console is returned to its place.
When the motorist has completed all the procedures, it is worth starting the ventilation system on his Vesta. This will ensure that any problems associated with the worn filter have gone away.
Timely replacement of the cabin air filter provides undeniable benefits to the driver and his passengers in terms of comfort, the functioning of climate control equipment, and also prevents the occurrence of health problems, primarily affecting the respiratory system.
There is nothing difficult about changing standard consumables on a domestic Lada Vesta car. Therefore, even those who have only recently been behind the wheel and do not have extensive experience in independently servicing vehicles can safely take on this task. This is an excellent option for starting to develop the skills and abilities to operate a machine. After all, it's not just the ability to drive.
Selecting consumables
There is an opinion that different modifications of the Lada Vesta, which is equipped with 1.6 and 1.8 liter engines, require different cabin air filters. This is a misconception that does not correspond to reality.
The current original consumable for the Lada Vesta model is a product manufactured by Mann with the index or catalog number CU22011. Such a filter will cost the motorist at least 850 rubles. Moreover, this is exactly what they will ask for for a regular paper filter based on synthetic fibers.
There is another filter, which is also considered the original. It is in many ways similar to the previous one, and the difference between them is minimal. Although the price is almost 2 times less. This is also a consumable from Mann with number 272773016R. It costs from 400 rubles and is suitable for Vesta and the X-Ray model.
But it is not at all necessary to buy the original, as almost every car enthusiast knows very well. Among the cheapest analogues, we can note the salon GB9978 from Big Filter or FAP0443 from the Pilenga brand. Big Filter has a carbon analogue of the named model, where the sign C is added at the end of the index.
Maintenance of Lada X-RAY > Remont-Avtovaz.ru
Like any car, the new crossover from AvtoVAZ called Lada X-Ray requires periodic maintenance. These measures are aimed at maintaining the car in working condition and eliminating minor faults.
Which AIR FILTER is better to choose for VAZ/LADA VESTA, X RAY. Replacing the Vesta,XRAY air filter
The automaker has drawn up a schedule for maintenance and repair of the Lada X-Ray, which includes all types of work to maintain the car in good condition. The first maintenance of the Lada X-Ray should take place after 15 thousand km, all subsequent ones – after the same mileage.
THAT. What and when to do
The list of maintenance work for the Lada X-Ray is quite extensive. But most of this work can be described as “tug, listen, check.”
That is, such routine maintenance can include such items as checking the level of technical fluids, diagnosing the suspension, checking play, tire pressure, lubrication of hinges and locks, etc.
But in the first maintenance there is also work related to the replacement of some working fluids and consumables. So, during this service the following are subject to replacement:
- Oil and filter element;
- Air filter element of the power plant;
- Cabin filter;
It is also necessary to check the level of other technical fluids (and replenish them if necessary) and the condition of the brake pads.
During TO-2, which is done after 30 thousand km, the service center performs the entire list of TO-1 work, and also replaces the spark plugs. According to the list of works, TO-3 fully corresponds to TO-1, but in addition the brake fluid is replaced.
All maintenance work is repeated up to TO-6. When hitting 90 thousand km. In addition, the accessory drive belt along with the tension roller, as well as the coolant, require replacement.
As for technical fluids, except oil, they should also be changed every 3 years if the car’s mileage has not reached the required level.
Let's summarize. Every one must be replaced:
- 15 thousand km - oil and filter, if necessary - pads;
- 30 thousand km - spark plugs;
- 45 thousand km – brake fluid;
- 90 thousand km – drive belts with tension rollers (timing and attachments);
These are the main types of work, and they must be performed. All other maintenance is mostly carried out during operation.
Nuances and features of maintenance
As you can see, the list of basic types of maintenance is not that significant, so servicing and repairing the Lada X-Ray with your own hands is a completely feasible task, especially since you can save money on it. The official service only charges from 5,000 to 10,000 rubles for services. (depending on the list of works), but you still need to buy replacement materials.
Of course, some of the other maintenance work on the Lada X-Ray cannot be done on your own. This concerns adjustments to the chassis, diagnostics of electronic components, etc. But in this case, it is not necessary to go to an official service center, because any normal service station can also perform the specified work and it will cost less.
Next, we will review what and where to look for when servicing the X-Ray yourself, because the car is relatively new and non-car enthusiasts know the design features of the power plant.
Replacing the LADA Vesta air filter
The car is produced with petrol engines of 1.6 and 1.8 liters. Air filters in LADA Vesta are similar to those used on foreign-made cars. This was done in order to facilitate self-service. Any owner of a LADA Vesta should know how to replace the air filter. If he lacks knowledge and skills, then he can turn to specialized literature that describes in detail the operation of the engine. Despite the fact that the manufacturer prescribes changing the filter every 15 - 30 thousand km, it must be regularly inspected for contamination.
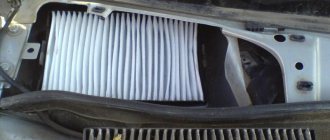
You can find the filter on the LADA Vesta to the right of the engine, in a black plastic box. To open the air filter cover, you need to pry the fasteners with a thin screwdriver and remove the cleaning element along with the cover.
Care must be taken not to break the fragile fasteners. If the filter is heavily soiled or has changed its shape, it must be replaced urgently.
You should not try to extend its service life by blowing it with a compressor or vacuum cleaner.