- How to solve a problem
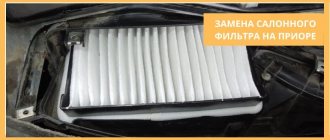
- Signs for replacement
- Installation
The task of the cabin filter is to clean the incoming air from all kinds of contaminants, dust, and odors.
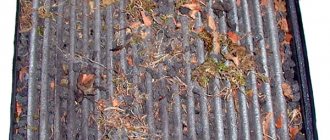
Every modern car is equipped with a similar component. But the VAZ 2109 is deprived of a filter at the factory. In VAZ 2109 cars, air enters through the air supply box into the heater fan. Because of this, the heater is regularly contaminated with leaves and all kinds of debris, of which there is more than enough on the road. Small particles fall directly into the cabin. And this is what the driver and passengers have to breathe.
How to solve a problem
Obviously, polluted air inside the VAZ 2109 is a serious problem for car owners. In such a situation, it is impossible to leave everything as it is. Measures must be taken to eliminate this deficiency.
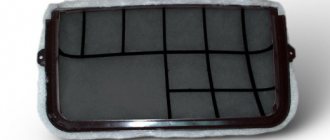
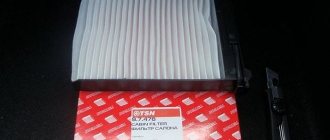
An adapter was developed especially for nines - this is an analogue of a cabin filter, presented in the form of a plastic grille with filter elements attached to it. Installation is carried out on the heater fan casing in the area where air is taken in.
Many people believe that installing an adapter is a complete replacement for a standard cabin filter. But how can you completely replace something that is not in the car?! This is a kind of modification that will lead to a narrowing of the air flows coming from the stove deflectors. This measure will protect against large debris, that is, we get an anti-dust component.
The positive qualities of the adapter include its accessibility, effective resistance to dust, and protection against the accumulation of deposits on the dashboard, upholstery, and glass.
Step-by-step instructions for making a cabin adapter
- So, before you start working with metal, you should make templates for parts from paper. We print out drawings of the parts of the structure and glue them together. Here's what we got:
Printed from Compass 3D V12 1:1
- After this, we take the resulting stencils, metal scissors and cut out the galvanized parts.
- Next, we bend the parts in a large vice, using a wooden mallet so as not to spoil them.
- Then we drill holes with a drill, metal drill bit 3.
- We fasten the parts with M3 bolts.
- Next, you can install our craft. First, the part for the motor. Then on top is the part with the frame for the filter.
- To make installation easier, the plastic grille to protect against leaves was removed.
- We treat the adapter itself with glass sealant, carefully coating all the cracks and joints so as not to siphon, otherwise the whole point of the installation will be lost.
- We also treat the places where the adapter comes into contact with the car body with auto sealant (silicone will not work)
- The final touch is a rubber seal on the top of the adapter to protect the hood trim.
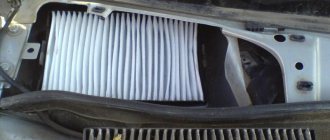
- Now you can install a cabin filter of the new tenth sample.
Bottom line: if you wish, you can also paint the resulting upgrade and begin to fully enjoy the clean air of the cabin!
VAZ-21099 cars are still very popular in Russia. These are inexpensive, fairly reliable and durable machines, well adapted to our operating conditions. At the same time, we are talking about a product from AvtoVAZ, with which few people are fully satisfied due to its shortcomings. The disadvantages of model 21099 can be safely attributed to the fact that there is no full-fledged cabin filter. The first cars produced at the AvtoVAZ plant did not even have a conventional filter element. Only after some time they began to install designs on these cars that are somewhat reminiscent of cabin air purifiers, but in reality are just a parody of the filter. Therefore, car owners had to take everything into their own hands. The most effective solution was to install an adapter for the cabin filter. Finding it is not difficult, and the installation itself does not cause any problems.
Signs for replacement
If the filter becomes dirty or clogged, it will no longer be able to protect against dust, dirt, and unpleasant odors inside the car. Plus, a worn filter element negatively affects the heater fan motor; it wears out faster.
All this indicates the need for timely replacement of the device. If this is not done, you risk developing an allergy, as well as soon spending money on repairing other components that directly depend on the condition of the cabin filter.
If, after replacing the filter, unpleasant odors still continue to appear inside the cabin, you can use chemical compounds that are poured into the system and forcefully remove dirt. If this does not help, you will have to completely disassemble the system, manually clean it and put it back together.
Impregnated with activated carbon
Installation
In fact, installing a cabin filter adapter on a VAZ 2109 is quite simple. The most important thing here is to get an adapter. Some people make it themselves, while others purchase it from auto stores or online. Decide for yourself what is more convenient for you to do.
- The adapter is installed in place of the standard stove motor casing. To mount the device, the existing holes for fasteners are suitable.
- The design of the adapter includes two components, which allows you to install the unit in confined spaces without much discomfort.
- It is not at all necessary to remove the cabin fan when installing the adapter.
- Lift the hood, unscrew the screws that hold the frill.
- Carefully remove the side of the frill from the visor.
- Remove the rubber seal. It is located on the partition separating the engine compartment from the air supply box.
- Remove all screws holding the factory heater fan shroud on.
- Remove the cover. You won't need it anymore.
- Install the back of the adapter structure first. The fasteners remain the same.
- Next, the front part of the device is installed.
- Using fastening brackets, the structure is connected together.
- Return the side of the frill to its place.
- Secure the adapter using self-tapping screws to the existing mounting holes.
- Place a rubber seal on the side.
- Insert into the installed filter adapter.
All that remains is to check how the new air purification system in the cabin will work. To do this, you need to drive several kilometers, feel new smells, or rather their absence in the car.
Installing the adapter and replacing the filter
The finished cabin filter adapter must be completely dry. The sealant will harden instantly, but it is better to let the product sit for several hours in the garage. During this time, you can make sure that you have a new stove filter on hand. You need to choose carefully; reviews from other motorists will help with this.
Now on the market you can find reusable options that can be cleaned. Advice: it is better to take a disposable one, as it has a long resource, but the price is much lower when compared with the reusable option.
Before installing the adapter and the new cleaning element in the VAZ 2114, you need to remove the old one and clean the cavity from dust and dirt. Replacement sequence:
- You need to open the hood and remove the rubber seal. It must have locking devices.
- Next, the screws are unscrewed and secured with nuts.
- There will be plastic plugs in front of the frill - they should also be pulled out.
- The frill is detached.
- It has a plastic mesh that needs to be pulled out - it is attached with self-tapping screws.
- Now access to the stove filter is open. You need to take it out and use a regular vacuum cleaner to blow out all the dust from there.
- An adapter is placed in the cavity, and a new cabin filter is placed in it.
- The final step is to reassemble all the parts in reverse order.
VAZ-2109 - cabin filter
To filter and clean the air inside the car from foreign objects, impurities, and odors, the design of most cars includes a cabin filter. However, the VAZ-2109 car is deprived of it. Here, dirty street air directly enters the stove from an external air supply device, so leaves and poplar fluff often fly from the heater. Dust constantly accumulates on the instrument panel and seats.
Now on sale there is something resembling a cabin filter - a plastic frame on which the filter element is attached. All this is installed at the air intake point on the fan casing. At best, such a filter protects against the ingress of large particles. At the same time, the force of air flow from the stove is significantly reduced, so installing this device will not solve the problem of air cleanliness in the cabin.
In this regard, the folk craftsmen of our country came up with a solution: install a cabin filter from a VAZ-2110 on a VAZ-2109 car. For this they developed a special adapter.
Its installation is carried out using old mounting holes in place of the stove motor casing. It is specially made of two parts for ease and convenience of installation in the narrow space of the air supply box. Then, a cabin filter from a VAZ-2110 car is placed in the already installed adapter. By enlarging the air intake hole, the force of air flow from the stove will not decrease.
This adapter is sold ready-made. It's also quite easy to make it yourself. How to do it? There are many instructions and video tutorials on how to make it on the Internet. You can also find a finished drawing there.
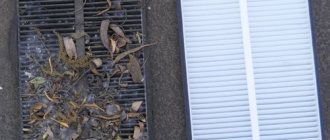
It is advisable to clean the entire heater system of debris and dust before installing the adapter with the cabin filter. If you have not had any filtration system before, you will be surprised by the amount of dirt found. Debris is removed from the depths of the stove using a conventional vacuum cleaner. To do this, you need to remove the stove motor and insert the unit tube into the hole that appears.
After installation, it is necessary to monitor the cleanliness of the cabin filter, since all debris will now get stuck in it. The main sign of blockage is a decrease in air flow from the stove. It is not at all necessary to immediately change it to a new one, just clean it with a vacuum cleaner and brush or rinse it with water.
The Lada Granta cabin filter must be replaced every 5,000–7,000 km, since its role is to protect the interior from dirt and dust, and it becomes clogged with it. Replacing the cabin filter with your own hands is very simple.
— TORX T20 screwdriver
— new cabin filter Lada Granta catalog number 1118-8122010-01 or filter from Lada Kalina catalog number 11180-8122010-82.
Let's start replacing the cabin filter of the Lada Granta
1. Unscrew the five screws located in the frill area using a TORX T20 screwdriver
2. Take a Phillips screwdriver in your hands and unscrew the two self-tapping screws of the plastic casing of the cabin filter.
3. We take out the old filter and replace it with a new one.
4. Reassemble everything in reverse order.
This completes the replacement of the Lada Granta cabin filter. Have a nice trip!
Adapter
Alas, the quality and efficiency of the standard cabin filter provided for the VAZ 2114 leaves much to be desired.
Essentially, it is a strip of filter material that is located between two plastic grilles. The effectiveness of this design is insignificant, which forces car owners to take certain measures.
The best measure is to install a filter adapter. Making it yourself is not difficult, although there are other ways to obtain this design.
Adapter drawing example
Thanks to the adapter, it becomes possible to install a truly effective air purifier for the cabin, which retains the smallest particles and does not allow the driver and passengers to breathe dust.
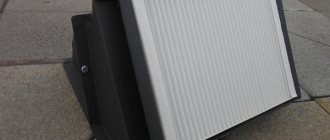
Externally, the adapter is an improved housing for the interior ventilation system with a filter built into it. The design consists of two elements - the rear and the front. A filter is inserted into the rear component, and the joints between the adapter parts are sealed with rubber gaskets. This ensures the necessary tightness. The design nuances will allow you to avoid moisture penetration even when washing the car.
When planning the installation of the adapter, experts strongly recommend using a pleated cabin filter borrowed from the VAZ 2110.
The simplicity of the adapter design makes it possible to replace the filter with your own hands in the shortest possible time. And during installation you do not have to remove the heater. So this is an ideal solution to significantly improve the ventilation system of your VAZ 2114.
Options for obtaining an adapter
If you have made the right decision that you want to get an adapter for your VAZ 2114, you need to decide how exactly you will get it.
There are three main options for this.
Option
Advantages
Flaws
Buy a device in the online store
You get a high quality device, made of thick metal and powder coated
The high cost of the product itself, plus equally expensive delivery
Order from those who make them with their own hands
The purchase will be much cheaper compared to an online store
If desired, you can make such a device yourself, spending only on consumables. Quality may be poor
Do it yourself
Significant financial savings, the ability to produce a truly high-quality adapter. You will know what it is made of and how
You will have to spend a lot of time and effort on manufacturing
You should start making your own adapter only if you are completely confident in your own abilities. Spend the money you save on purchasing a high-quality carbon filter from a VAZ 2110.
Making the adapter
The instructions for creating an adapter with your own hands are quite simple. Another question is how accurately you can implement your plans.
- Find diagrams to create an adapter. Now there are many of them on the Internet. Just keep in mind that you need an adapter specifically for the VAZ 2114.
- Make a layout out of paper so that you understand exactly where each part goes and how they are connected to each other.
- Stock up on the required amount of stainless or galvanized steel. Some people use plastic, but it is a little more difficult to work with, plus it can cause problems when getting bends.
- Cut out the necessary adapter elements from the material, guided by the drawing and layout.
- Use a vice and mallet to make bends. The walls will be thin, so do not use a metal hammer. It is better to take a wooden or rubber mallet.
- The parts are connected using M3 bolts or rivets.
- The advantage of rivets is that you do not need to drill holes in the metal. But they also have a drawback - a high probability of damage to a thin sheet of metal.
- At the last stage, carefully treat all joints, connections and holes with sealant. This will allow the structure not to make unnecessary noise while driving.
Finished design
The manufacturing process will take at least 6 hours. Plus, you will additionally have to spend time studying diagrams, drawings and creating a layout. So be patient.
How to clean the air inside a VAZ 2109 car
A device resembling a cabin filter is built into the VAZ 2109 car. This is a plastic grille with filter elements attached to it. It is put on the heater fan casing in the place where it takes in air. Such filters are installed standard on the VAZ 2114, VAZ 2115 models. But it cannot be said that such a device is a complete replacement for the cabin filter on the VAZ 2109. In this case, the air flow from the heater deflectors is greatly narrowed, and it only protects from large particles. In fact, the device is an anti-dust filter. Replacing the cabin filter on a VAZ 2109 with an adapter from a VAZ 2110 car has become the most acceptable solution to the issue of cleaning the air in the cabin. The adapter can be purchased from the manufacturer or made by yourself. The device retains dust well and prevents its deposition on the control panel, the inner surface of the glass, and the upholstery. And most importantly, the driver and passengers will breathe clean air, free of dust and odor.
Peculiarities
The cabin filter cleans the air entering the car from dirt, dust, and unpleasant odors. All modern technical equipment are equipped with it. But VAZ 2109 cars from the factory are deprived of such a “cleaner”. The air in these vehicles enters the heater fan through the air intake box. It is for this reason that the heater often does not work due to contamination with all kinds of debris, of which there is more than enough on the road. The smallest particles enter the car interior, forcing the driver and passengers to breathe dust.
Way to solve the problem
Of course, you can’t drive such a car for a long time, especially with the windows closed, as you can get pneumonia or other respiratory diseases. Nevertheless, resourceful developers still found a way out of such an unpleasant situation by inventing a cabin filter adapter, which is a grille on which filter elements are attached. The unit is installed on the fan casing in the place where the air intake occurs.
Advantages and disadvantages of the adapter
Since the factory did not initially intend to use such a component, it is therefore not at all surprising that after installing the adapter, the level of air entering the car interior will decrease significantly. The advantages include effective resistance to dirt and dust, as well as protection from dust accumulation on the upholstery, panels, and windows of the car. The main advantage of this filter material lies in the ability to ensure clean air in the cabin, allowing the driver and passengers to breathe deeply.
How often should you change the cabin filter?
A dirty and clogged filter not only contributes to the formation of an unpleasant odor in the cabin, but also reduces the service life of the heater fan motor. Therefore, replacing the cabin filter of the VAZ 2109 must be done on time. The filter installed inside the cabin well protects the inside of the car from plant pollen, and this reduces the likelihood of an accident. This is due to an allergic reaction of dust to a driver suffering from such a disease. When you sneeze, you lose control of the car, which can lead to an accident. The filter instructions indicate signs of product replacement:
- The air flow is greatly reduced, which leads to poor interior cooling in summer and unsatisfactory heating and fogging of the windshield in winter.
- The cabin filter usually has the shape of a rectangle, and is located in a frame or without it.
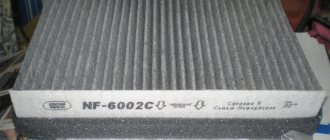
Tip: The color of the filter is most often snow-white, but some are impregnated with activated carbon, after which they acquire a gray tint. Therefore, when choosing a product, you should not pay attention to its color.
- You need to change the cabin filter when it gets dirty, but several times throughout the year.
Tip: If, after installing a new cabin filter, unpleasant odors have not disappeared, you need to pour chemicals into the air ducts that will force the dirt out. If the result is unsatisfactory, it is necessary to choose a mechanical method - complete disassembly of the system and manual cleaning.
How to replace the cabin filter of a VAZ 2109 can be seen in the video. Timely replacement of the element will create comfortable conditions for the movement of passengers and the driver in a VAZ 2109 car. The price of human health is not compatible with the price of any device in the car.
Why do you need an adapter, how to make it yourself and install it
A solution was found: this is a cabin filter adapter from a VAZ 2110 for a VAZ 2109. This adapter can either be ordered online from the manufacturer, or you can design it yourself. For those who want to save money, here you can get drawings and patterns for making an adapter with your own hands.
Installing the adapter is simple: it is installed instead of the standard stove motor casing using standard mounting holes. It consists of two parts for ease of installation in limited space in the air supply box. A VAZ 2110 cabin filter is installed in the installed adapter. The area of the hole through which air is drawn into the cabin is larger for such an adapter than for the standard casing, and therefore the weakening of the air flow going into the cabin, if noticeable, will be very small .
Before installing a purchased or home-made cabin filter adapter, it is advisable to clean the entire heater of debris: if you did not have any protection on the standard casing, there may be quite a lot of it there. You can remove accumulated debris from the bottom of the stove body using a home vacuum cleaner by removing the stove motor and inserting the vacuum cleaner pipe into the opened air intake hole. Then you should install a filter or replace the existing one.
If you have a type “B” heater (see figure), in order to reach the bottom of the stove, you need to move the central damper to the “hot air” position. It would also be a good idea to clean the heater radiator - if the radiator is clogged and there is a cabin filter, the windows in the car may fog up.
Video about replacing the cabin filter and installing a new one in the adapter unit
Loading …
- Author: Roman
Rate this article: (3 votes, average: 5 out of 5)