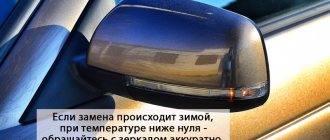
Currently, Lada Priora is equipped with electric drive and heated exterior mirrors. One of the popular modifications is the installation of side mirrors of the new SE model (with heating, electric drive and turn signal indicators). We'll tell you how to replace old-style mirrors with new ones with your own hands.
Required
: Electrically controlled external mirrors with turn indicator (article: 2170-8201050-75 and 2170-8201051-75, price about 3,500 rubles), turn signal caps SE.
Reasons for the need for replacement: all the pros and cons
If there are doubts about replacing the side mirrors on a Priora, then all positive and negative arguments should be given. Let's start with the advantages that mirrors from Priora SE really have a lot of, and they are very significant. These include:
- The process of replacing a mechanical part is technically extremely easy, and there is no need to drill, file or cut anything.
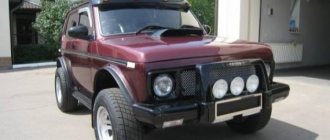
- Design - a car with new mirrors definitely looks better, which you can actually see for yourself by looking at the photo below.
- Increased level of safety - achieved through large mirrors with very good visibility without blind spots.
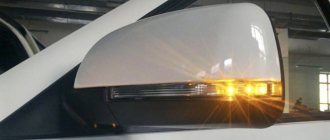
- A turn signal not only makes the car more attractive, but also has a positive effect on safety.
Now let's move on to familiarize ourselves with the negative sides. They really exist, and before you decide to replace the standard mirrors, you should familiarize yourself with them. These include:
- Price - new mirrors are more expensive. Their cost ranges from 3,000 thousand rubles. Of course, such a price hits the pocket hard, so not everyone can afford such a purchase. Even taking into account the fact that old mirrors can be sold (although the demand for them is very small), the price for many car owners is very high.
- The need to redo the connection diagram. This is one of the important disadvantages after the price, due to which not many people decide to replace it themselves and turn to specialists. The article describes in detail the process of connecting the new type of side mirrors on the Priora, and you can make sure that there is nothing complicated about it.
If you still decide to install new-style mirrors on the Priora, then first we’ll consider the process of dismantling the old elements.
Connecting turn signals on Priora mirrors
Good day!
I’ll say right away that this recording
is not for electrical gurus
, but to help beginners) I’ll consider, I think, a pressing issue today, connecting SE mirrors, what goes where and how.
So, let's begin. Firstly
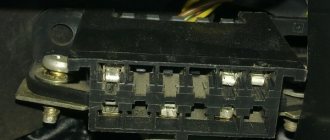
, as many already know, the pads on SE mirrors are different, 6-pin, unfortunately I didn’t find these for sale in St. Petersburg, and as I understand from conversations, there are no such pads anywhere, so you’ll have to get a couple more pads for 6 or 7 contacts , I chose 7, they are paradoxically smaller. And 2 meters of wire.
Now about the transfer, in principle the wires match in the order in which they are placed in the blocks, and for some even in color. There should be no difficulties with this either. It’s better to check how you connected it right away, so as not to change everything again later. Next comes probably one of the most frequently asked questions : “What about the turn signal?! Where, how and where?”
The simplest and I think the correct way is to pull it out of the wing, pull it out, cut off the terminal, go into the interior again, unscrew the sill covers, bend the carpet and felt and reach for the engine shield. A black wire will immediately rush up to the rubber valve, this is it , take it and boldly pull it out.
One issue has been resolved. Second question
.There is wire 1 from the turn signal mirror, and 2 from the wing.
Using a tester, or empirically, we look for which of these 2 wires is “+”.
Currently, Lada Priora is equipped with electric drive and heated exterior mirrors. One of the popular modifications is the installation of side mirrors of the new SE model (with heating, electric drive and turn signal indicators). We'll tell you how to replace old-style mirrors with new ones with your own hands.
Required
: Electrically controlled external mirrors with turn indicator (article: 2170-8201050-75 and 2170-8201051-75, price about 3,500 rubles), turn signal caps SE.
Removing side mirrors on a Priora in order to replace them
The process of dismantling mirrors on Priora is not complicated and takes no more than 5 minutes. It is implemented as follows:
- The decorative trim is pryed off from the interior side and dismantled.
- The three fasteners are unscrewed with a Phillips screwdriver.
- When unscrewing the last third fastener, it is necessary to support the mirror so that it does not fall to the ground, which in 100% of cases will lead to its deformation.
- Disconnect the electrical connections. This action can be performed either after unscrewing the fastening bolts, or beforehand (after removing the decorative trim).
- Remove the mirror. The mirror on the other door is removed in a similar manner. The manufacturer's instructions are as follows.
Assembly is performed in the reverse order of removal. At this point, the dismantling process is completed, and you can immediately begin replacing products. The need to remove mirrors arises not only for the purpose of replacing them, but also for repair, modernization or restoration of appearance.
The photo below shows the serial numbers of the side mirrors that were installed on Priors.
How the process of dismantling mirrors on a Priora and their subsequent disassembly for the purpose of repairing or replacing failed parts is carried out is shown in detail in the video clip.
Connection
Old style mirrors (without direction indicators) have two connectors (3 and 2 wires):
The mirrors of the new SE model have 1 block of 6 wires:
We cut off the wires from the SE mirror block and solder it according to the diagram:
The process of installing and connecting mirrors of the new SE model is also shown in the video:
Found an error? Select it and press Ctrl+Enter..
Mirrors on the Priora SE and the old model, what is the difference?
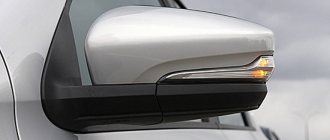
1) The presence of turn signals on the mirrors. SE has them, old ones don't.
2) Visibility, it is greater on the SE mirrors.
3) Mirror mounting triangle. On the SE mirrors it fits better without any gaps.
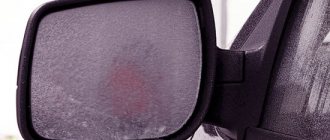
4) Protection from rain. SE mirror housings provide less protection from rain and snow.
5) The external differences of the mirrors can be seen in the following photos:
At the moment, the price of SE mirrors on Lada Priora is about 3,300 rubles.
Installing SE mirrors on Priora
How to remove a mirror on a Priora. We follow these instructions, dismantle the old-style mirrors and install the SE mirrors in the reverse order.
Types of mirrors on Priora
It would not be fair to analyze the mirrors on the Priora and not mention what variants of these products the car was produced with. There are five types of mirrors for Priora:
- Autocomponent (Nizhny Novgorod plant) - mirrors that were installed on the first Prioras, transferred from the VAZ-2110. They have an electric drive, as well as a removable cover that can be removed for painting into the car body.
- The Dimitrovgrad plant is the next type of mirror that was installed on the Priora. They are distinguished by their simple design (they do not have a removable cover, so they are not intended for painting), as well as their heavy weight. Options were offered, both with electric drive and with cable drive.
- The third version of mirrors is from, which are equipped not only with electric drive, but also with heating. They have two connection blocks to the electrical circuit, and it is these options that are most often found on the restyled Priors of the “Standard” and “Norma” versions.
- The fourth option is with cable-driven adjustment. Installed on basic versions of the pre-restyling Prior. They are extremely rare.
- The fifth option is heated mirrors, electrically adjustable and a turn signal. It is these options that have become very popular. They were installed from the factory only on Prioras of the Luxury version (SE), but many car owners installed them on their cars of the budget “Standard” and “Norma” trim levels.
All of the above types of mirrors on Priora were installed from the factory. Today there are about 5 different versions of mirrors, so-called copies, which are produced by different companies, including Chinese ones. These are mainly modifications with turn signal indicators, which are in great demand and are popular among car owners.
How to disassemble a mirror (left and right) on a Priora car - removal and installation
Replacing a device that is installed on a car of the “Norma” or “Standard” trim levels with the SE version becomes a good way of tuning. In order to disassemble these devices, you will have to disassemble the interior trim. Carry out the work as follows:
- Remove the screws that secure the A-pillar trim.
- Pull part of the trim towards you.
- The part is held in place by three bolts. First, lower the glass, then slowly unscrew the bolts, taking the reflective element with your other hand.
- Do not jerk the device. First, disconnect the wires - there should be two terminals going through them. The first is for heating, the second is for position adjustment.
- Place the new part in place of the old one and secure it with bolts.
Options for mirrors on the new Priora model for replacement
On Priora you can install new mirrors from two manufacturers:
- Automotive component or ATP. They are factory marked “2170-8201051-75”. The quality of this manufacturer's products is inferior to those of the next brand.
- SALINA from - products are characterized by high quality workmanship, and these are the options that should be chosen to replace the standard options.
If you want to get really high-quality mirrors with turn signals for a Priora, then these products are the best option.
You can choose suitable mirror models on the website solina-avto.ru, where products are presented in different designs and at affordable prices. The site also presents all the necessary elements for replacement, for example, a new type of plug, fender covers instead of standard repeaters.
Mirrors on the Priora SE and the old model, what is the difference?
1) The presence of turn signals on the mirrors. SE has them, old ones don't.
2) Visibility, it is greater on the SE mirrors.
3) Mirror mounting triangle. On the SE mirrors it fits better without any gaps.
4) Protection from rain. SE mirror housings provide less protection from rain and snow.
5) The external differences of the mirrors can be seen in the following photos:
At the moment, the price of SE mirrors on Lada Priora is about 3,300 rubles.
Connecting SE mirrors on Priora: diagram and detailed description
Let's consider connecting new-style mirrors to the Priora, where old-style products were installed, but heated and adjustable. There are options where the Priors do not have heated mirrors or have a mechanical (cable) corrector installed. However, in this case, installing mirrors of a new type is more difficult and costly, since you will need to buy additional equipment. The rationality of this method depends on how much comfort you need and how much you are willing to pay for it. That is why below is a description of the process of connecting the new model mirrors to the Priora.
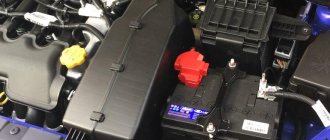
Important! When carrying out work on the electrical part, be sure to first remove the negative terminal from the battery.
To begin with, it is worth noting that if a car is equipped with mirrors of a new type, but without repeaters, then there is no need to change the entire product. To do this, you can buy repeaters with overlays in the color of the car, and simply install them. Of course, you will definitely need to connect them, but this is described in detail below. The cost of Lexus type repeaters with overlays in the color of the car will cost about 2,000 rubles.
How repeaters are installed on new mirrors is shown in the video below.
After the technical installation of the new model mirror on the door, we move on to the process of connecting it, that is, the electrical part. To do this, you need to know that the block on it has 6 outputs, that is, 6-pin. Below is a diagram of its pinout by color.
On a Priora with heated mirrors and corrector, two pads are used.
To combine them with a mirror, the following options are offered:
- Cut the wires and connect directly. However, this is a barbaric method that is only suitable as a last resort.
- Buy a plug for mirrors. It costs about 200 rubles, but you can only buy it on the Internet. It is important to understand that in this case you will have to cut the standard wires in the car in order to remove the old pads. Below is a photo of the block itself and a link to the website where you can order it.
- Cut off the plug on the mirror and install the standard two pads in its place. In this case, one wire will have to be connected through “male-female”. However, this option is not advisable either, since the mirrors will be under warranty, and if they soon fail, no one will replace them. Oh, and besides, old mirrors without plugs will be harder to resell.
- Replace wiring. The most expensive, but the most correct way. You can see how to implement it in the video below.
Actually, there are many options, but they all have their drawbacks, so you should decide for yourself. However, the best way is to buy a block for a new mirror and do everything more or less carefully.
Below is a wiring diagram for the new model mirror block with standard wiring in color.
Priora SE mirror block pinout
Then only the connection is made. There are no difficulties with heated mirrors, corrector and mass. The wire for powering the dimensions should be taken from the standard turn signal, which is installed on the wing. The wire should be tightened into the interior, having first disconnected it from the ceiling lamp (read the section below for how to dismantle the turn signal lamp on the Priora wing). To do this, you need to remove the rubber plug and tighten the wire. After this, cut off the chip and insert the wire into the door niche (naturally, its length is not enough, so we increase it).
You can use this wire if you plan to dismantle the repeaters in the wing, or make an insert into it. Likewise for the other mirror. As a result, after connecting, you will get something like the following picture, as in the photo below.
It is important to note one point that if you plan to connect a turn signal and marker, then the connection technique will be different. Possible ways to implement such functionality are discussed below.
Connection
Old style mirrors (without direction indicators) have two connectors (3 and 2 wires):
The mirrors of the new SE model have 1 block of 6 wires:
We cut off the wires from the SE mirror block and solder it according to the diagram:
The process of installing and connecting mirrors of the new SE model is also shown in the video:
Connection diagram for turn signals and side markers in Priora mirrors: method 1
First, let's look at a simple way to connect turn signal indicators (RF) in Priora mirrors. To implement it, you will need two five-pin relays, as well as 3 meters of wire and heat shrink. The implementation diagram of this method is shown in the photo below.
Connection diagram for turns and dimensions on Priora
The photo shows a diagram of connecting turn signal indicators for one mirror. For the second one it is done in the same way. If you plan to implement a connection using this scheme, then you need to know that both dimensions and repeaters will work. However, repeaters will function by breaking the dimensional chain. To put it simply, the mirror LED will be supplied with power from the dimensions. When turning on the rotation, the power supply circuit of the LED will be interrupted, which will cause it to blink. However, it will not flash synchronously with the turns, but will light up at the time when the turns go out. This is not entirely correct operation of repeaters, however, it is quite appropriate, and especially does not require major modifications. It's very easy to implement.
The principle of implementing such a scheme is very simple. First, you will need to take a five-pin relay (it is important that it is five-pin, not four), and buy a terminal block for it. Next, based on the diagram above, make the connection. A wire from the mirror is supplied to contact “87A” of the relay, which is responsible for supplying power to the turn signal. This is a white-red wire on a chip from the mirror. To power it, you will need to run a single-core wire from the passenger compartment into the door niche, where it will be connected to the chip.
Contact “30” on the relay must be connected to any wire or contact that receives power when the dimensions are turned on. This could be the LCM (light control module), wiring in the sills, or a contact on the glove compartment light. However, it is important to understand here that when you connect this wire to the power supply of the dimensions, the repeater will work when the dimensions on the car are turned on
. If you want the repeaters to work when the ignition is turned on (in this case, the dimensions on the mirrors will work), you need to connect this wire (from the “30” relay contact) to the positive of the ignition switch.
It is important to know! Since today many people drive almost constantly on the dimensions, it is better to connect the wire from contact “30” of the relay to the power supply of the dimensions.
The further connection process involves connecting pin “86” on the relay with the wire from the side turn signal. Usually the repeater light on the wing is dismantled and a chrome “SE” trim is attached in its place, the cost of which is about 100 rubles. The positive wire from the repeater must be connected to contact “86”, and the negative wire to contact “85” of the relay (it is possible and vice versa, there is no difference here). At this point, the circuit is considered assembled, and is carried out similarly for the second mirror. It is recommended to insulate all connections with heat shrink (better than electrical tape).
The most interesting thing is how it all works. Everything is very simple. When the headlights are turned on, power will be supplied to the mirror LED. When the corresponding turn is turned on (the “guitar” lever is moved up or down), power will be intermittently supplied to the relay coil. As a result, the contact on relays “30” and “87A” will be broken, which will cause the LED to blink.
The video below shows how this method is implemented and how the marker/repeater will function.
Basic faults
- The fasteners have become loose. Each part is held in place by several fasteners at different points. They may become so loose that tightening them will be useless. Everything will depend on the severity of the damage. In some cases, replacing the fasteners will be sufficient.
- The heating does not work. Check the connection of the wire blocks. Perhaps it is enough to strengthen the wire connections so that they no longer come loose.
- The electric drive does not work. Adjusting the position of mirror devices while sitting in your seat is much more convenient than doing it manually. Check the wiring.
- Turn signal repeater. If the repeater does not work, it means the signal is not reaching it. The problem, again, is the wiring.
- Broken mirror element. It will be enough to replace it with a new part, but during the replacement you should be extremely careful. It is important to prevent splinters from getting under the cover.
Connection diagram for turn signals and side markers on Priora: method 2
The second method is more effective, as it will ensure synchronous operation of the repeaters with the main turns. However, its implementation requires a lot of time, effort and money. Below is a diagram for its implementation.
Connection diagram for Priora left mirror repeater
Connection diagram for Priora right mirror repeater
Important! Install a jumper between relay contacts “87A” and “87A”.
The method of implementing this scheme is more complicated than the previous one, but it is more popular. After all, its main advantage is that the turn signals in the mirrors will work synchronously with the main turn signals on the car. In addition, repeaters will work regardless of whether the dimensions are turned on or not. Using the diagram it is not difficult to understand the connection features, but for clarification some information:
- Contact “30” from the relay to the mirror repeater. This is a white-red wire (but may vary from manufacturer to manufacturer).
- Contacts “87” on the relay go to the right and left turns, that is, the positive contacts from those repeaters that are located in the wings. If they are dismantled, then the wires (positive) are connected to the relay, and the negative wires are simply “muffled”.
- Contact “87A” is connected to the dimensions contact. It can be taken from the driver's side on the MUS (light module, pin “58”).
- On the passenger side in the glove compartment illumination.
- Contact “86” is connected to the steering column switch. It is needed so that power is supplied to the relay coil when the corresponding turn is turned on. It is important to understand that the wire from the passenger door must be routed to the steering column switch. The main thing is not to mix up the wires so that the right turn works on the left door, and the left turn works on the left door.
- At “85” the contact is supplied by “+” from the ignition switch.
The scheme works as follows: when the dimensions are turned on, the LEDs in the mirrors will light up, indicating the size of the car at night. This is clearly visible from the relay contacts “87a” and “30”. When the turn on the “guitar” is turned on, regardless of whether the dimensions are on or not, the repeaters will blink. This is accomplished due to the fact that there will be intermittent voltage at the coil contacts “85” and “86”. In this case, the coil will open contact “87a”, turning off the marker, and close contact “87” to turn.
Based on the diagram described above, you can assemble it yourself. At the same time, it is very important to insulate all connections with heat shrink so that everything looks civilized and moisture does not get into the contacts. Otherwise, you will soon need to disassemble the entire circuit again and clean the connections.
Connecting rear view mirrors Priora (SE)
Old style mirrors have 2 connectors with wires:
Block No. 1: mirror control:
Block No. 2: heated mirrors:
SE mirrors have 3 connectors with wires (an additional plus (6th wire) is for the turn signal). Connecting new mirrors is carried out in the same way, all colors are the same, except for one - +12V mirror heating, brown is used instead of Gray.
Block No. 1: mirror control:
- red connects to red-blue.
- blue with blue-black.
- green with green-black.
Block No. 2: heated mirrors:
- Instead of gray there is brown, we combine it with blue-red (black-red).
- black with black (used for heating and for turn signals).
Block No. 3: direction indicators:
For those who haven’t figured it out, here’s a diagram for connecting the SE side mirrors on a Lada Priora:
The main thing is not to confuse the red-blue and blue-red wires. They are almost the same, so before connecting it is better to check them with a tester (multimeter or + 12V light bulb), connecting the minus of the tester to the body, and the (+) to the wire. If the lamp lights up after turning on the heated mirrors, then this is the correct wire that needs to be connected to the brown mirror wire.
Connecting the SE mirror turn signals: You can take the plus for the turn signals from the direction indicators in the car's wing.
- Left wing - blue-black and black wires.
- Right wing - blue and black.
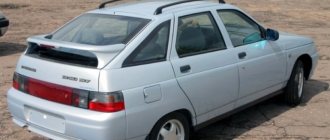
By the way, for the VAZ 2172 the VAZ 2112 Coupe also borrows some body elements, for example, a spoiler.
Connection diagram for turn signals and side markers on a Priora: method 3
If you have the skills to use a soldering iron, then you can make some modifications to the relay, which will ensure the operation of the turn signals and markers in the exterior mirrors. Below is a diagram, the implementation of which will help ensure the operation of the backlight on the mirrors in the repeater and dimensions mode.
To implement the circuit you will need two diodes...
and two capacitors with a capacity of 4700 uF and a voltage of 35 V.
These semiconductor elements are soldered to the relay chip, as shown in the photo below.
This circuit uses a diode and a capacitor. If you compare it with the previous circuit, you can see the difference in the connection, whereby semiconductor elements are actually needed. They have a corresponding purpose, and if you decide to use this option, then consider the principle of operation of the circuit itself:
- When the dimensions are turned on, current will flow through the relay contacts “88” (aka 87A) and “30” to the LED elements of the mirror. As a result, the mirrors will work in size mode.
- When the turn signals are turned on, current will begin to flow through contacts “87” and “86” simultaneously. The positive wire of the wire is connected to these relay contacts, which powers the turn signals on the wing (it is important to connect the positive wire, not ground).
- Current is supplied to pin “86” through a diode, that is, in one direction. Next you will learn why a diode is needed. Since the second contact “85” of the relay coil is shorted to ground, it is activated. As a result, contacts “87” and “30” are closed, and the current flows directly to the LED element of the mirror. As a result, it works in turn repeater mode. Contact “88” (87A) on the relay opens while the turn signals are operating.
- It would seem that everything is simple, but why do we need a capacitor and a diode in the circuit? A capacitor is included in the circuit parallel to the coil. Its task is to prevent the coil from switching contact “88” to the operation of the dimensions while the rotation is in progress. The “86” relay contact is supplied with power from rotation. This is a positive wire through which current flows intermittently, which makes it possible for the turns to operate in the appropriate flashing mode. If you remove the capacitor from the circuit, then when turning on the turns, contacts “88” and “87” will alternately switch, which will ultimately lead to incorrect operation of the repeaters in the mirrors.
- It is precisely so that when turning on the turns, contacts “30” and “87” are closed, and do not open when the current disappears at contact “86”, a capacitor is included in the circuit. While the circuit is operating in the turning mode, it energizes the coil, which remains in the on position.
- In the circuit, a diode is needed to limit the flow of residual current generated by the capacitor back into the vehicle's electrical circuit.
Actually, this is how this scheme works, which is suitable for DIY implementation.
After this, assembly is carried out according to the above scheme, which will not be difficult. The video below shows how the repeaters and dimensions in the mirrors on a Priora function according to the diagram assembled above.
Reviews Running turn signal buy in Vologda
Runled turn signals are a revolutionary European tuning of premium quality that will help you stand out from the gray stream of boring cars. They can be installed in a few minutes and will delight the car owner for many years! Reviews Running turn signal buy in Vologda
I can speak positively about the RunLed running LED turn signal. This is a truly useful device for your car, which can be easily adapted to any domestic or foreign model. The installation of the equipment does not cause any complaints, and the utility and safety factor of the driver and his passengers increases significantly.
I will share my real review about the Running turn signal to buy in Vologda. If you are a true connoisseur of truly useful gadgets for the car, then you will undoubtedly like the next development, called the RunLed running LED turn signal. It must be said that thanks to this innovative invention you will become even more visible in the dark. Modern tuning has already become an adornment for thousands of cars in Europe, and is now available for installation in Russia. The simplest way to install the product, where even the most novice can cope with the task. Each original package contains high-quality 120 cm glue. The entire engineering structure is easily secured to the rear of the machine. All you have to do is correctly connect the contact wires to the electronics and enjoy the result achieved.
More links where you can learn about Running turn signal buy in Vologda: Running turn signal chevrolet cobalt
Running turn signal buy in Vologda
Running turn signal honda odyssey
, Running turn signal honda odyssey
Running turn signal buy in Vologda
,Rolling turn signal mitsubishi outlander xl, Running turn signal ssang yong musso How to install a running turn signal Running turn signal mercedes sl class.
Connection diagram for turn signals and side markers on Priora: method 4
There is another way to connect turns and dimensions in the mirrors on a Priora. This method is proposed by a person who has knowledge of electronics and assembles a circuit from semiconductor elements. The diagram is presented below. Its main advantage over those described above is the absence of relay clicks when the turn signals operate.
Connection diagram for “American” in Priora mirrors
How functional it is can only be judged by the experience of its developer. However, if you want to try it out, you can contact its developer. Here is a link to the page: https://www.drive2.ru/l/531074287772107628/, which also describes in detail the process of connecting and manufacturing the board. The video below shows how repeaters work in mirrors using special boards based on semiconductor elements.
If you connect mirrors on which Lexus repeaters are installed (when the light moves step by step), then there is no need to implement the above steps. The situation is similar for those who want only repeaters without dimensions to work on mirrors. In this case, you just need to connect the positive wire from the turn to the contact of the repeater chip on the mirror (it is best to use the one that goes to the repeater on the wing).
Finally, SE decorative elements are installed instead of turn signals in the mirrors. There is nothing complicated here, and you just need to thoroughly clean the place where the standard turn signal indicators were located on the wing, then degrease and glue.
This completes the process of replacing mirrors without turn signal indicators with new products. All that remains is to admire the result.
It definitely looks beautiful both during the day and at night. At the same time, visibility in the new elements is much better, and there are practically no “blind spots”.
Standard side mirrors - article number and price
For the Lada Priora car, standard parts with electric drive have catalog number 2170-8201017. Price – about 3,100 rubles per set.
Compared to the SE version, they have one design disadvantage. The surface area does not completely cover the mirror, which can also be “usefully” occupied. This shortcoming was corrected with the SE, where the mirror elements were actually made larger.
Heated mirrors on the Priora received a larger mirror element. Thanks to this, the driver does not have to lower them when reversing – even this difficult-to-reach area is visible. For the SE version, repeaters were added to the mirrors. Priora with electric drive, repeater and heating (catalog number 2170-8201021, price - about 3,800 rubles per set) was much more expensive than conventional versions.
Please note that kits are often sold unpainted or painted to match the body color. If necessary, paint the body of the mirror device before installation. Painting it yourself will turn out much better. Some stores offer painting only the upper parts of the body, but you can choose any painting method yourself. Speaking about the rear-view mirror of a Priora car, you can notice that it is ordinary, as simple as two rubles, attached to a holder that is secured under the trim.
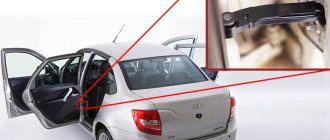
Features of removing turn signal indicators on Priora
The wings of the Priora in the “Standard” and “Norma” configurations are equipped with turn signal indicators, which cause difficulties if they need to be dismantled.
The need to remove them arises if the light bulb burns out, and also if you plan to dismantle the device completely when installing repeaters in the mirrors, replacing it with the “SE” label. The process of removing the repeater on the Priora wing is very simple, and to implement it you only need a plastic card.
To remove the turn signal on the Priora's wing, you should carefully insert the card under the lampshade and press until the bracket disengages from the car body. After this, the lampshade will snap off, and all that remains is to remove it from its seat.
How this process is suggested to be performed by the manufacturer is indicated in the instructions below.
This process is shown in detail in the video below.
It remains to summarize and say that the process of replacing mirrors may seem simple at first, but in reality you will need to take a responsible approach to its implementation. And be that as it may, you should not install additional lights and other electrical appliances that will shorten the life of your generator, battery and other devices. In general, is it necessary to install new mirrors on the Priora? If this is possible with minimal cost and rework, then why not.
How to connect repeaters on Priora mirrors
Good day!
I’ll say right away that this recording
is not for electrical gurus
, but to help beginners) I’ll consider, I think, a pressing issue today, connecting SE mirrors, what goes where and how.
So, let's begin. Firstly
, as many already know, the pads on SE mirrors are different, 6-pin, unfortunately I didn’t find these for sale in St. Petersburg, and as I understand from conversations, there are no such pads anywhere, so you’ll have to get a couple more pads for 6 or 7 contacts , I chose 7, they are paradoxically smaller. And 2 meters of wire.
Now about the transfer, in principle the wires match in the order in which they are placed in the blocks, and for some even in color. There should be no difficulties with this either. It’s better to check how you connected it right away, so as not to change everything again later. Next comes probably one of the most frequently asked questions : “What about the turn signal?! Where, how and where?”
The simplest and I think the correct way is to pull it out of the wing, pull it out, cut off the terminal, go into the interior again, unscrew the sill covers, bend the carpet and felt and reach for the engine shield. A black wire will immediately rush up to the rubber valve, this is it , take it and boldly pull it out.
Product categories
You can make purchases in our store without mandatory registration. But by registering, you will be able to do it faster and more conveniently, in addition, you will be able to monitor the fulfillment of orders and view the history of your orders. After registration, you will not have to enter your data each subsequent time for delivery of the purchased goods; it will be enough to simply log into the store using your personal data.
LLC "S-Auto" Dimitrovgrad, st. Pobeda, 9-47 TIN 7302036687 OGRN 1077302000929
Call us: 8-909-360-09-33 Mon-Sat 8:00-18:00 (Moscow time)
How to change the rear view mirror on a Kalina?
Tool:
- Medium flat screwdriver
- Medium Phillips screwdriver
- Pliers
Parts and consumables:
Note:
The work is shown on the left outside mirror. Removing the right mirror is similar.
1. Use a flat-head screwdriver to pry off the exterior mirror trim.
2. Remove the lining.
3. Using pliers, remove the locking bracket of the ball joint housing of the handle rod.
4. Using a Phillips screwdriver, unscrew the three screws securing the mirror.
5. Remove the mirror along with the cables and the ball joint.
6. Install the outside mirror in the reverse order.
The article is missing:
- Photo of the instrument
- Photos of parts and consumables
- High-quality photos of repairs
If suddenly, due to unsuccessful parking or, God forbid, your Kalina’s exterior mirrors were damaged during an accident, then the instructions below will be quite useful for replacing these parts yourself. I tried to describe everything in the most accessible language, and the process itself is very simple, so you should not have any difficulties when performing this work.
Removing and installing exterior rear view mirrors on Lada Kalina
- We will need the following tools: a flathead and Phillips screwdriver, pliers.
- First of all, from the inside, from the passenger compartment, you need to remove the plastic trim, the so-called decorative casing. It is very easy to remove; just pry it off with a flat screwdriver and, overcoming the resistance of the latches, pull it towards you.
Now that the cover has been removed, we proceed to remove the metal retainer plate. To do this, take pliers and, holding the edge of the plate, pull it to the side, as shown in the photo below:
Next, use a Phillips screwdriver to unscrew the three bolts securing Kalina’s exterior mirror, and when you unscrew the last bolt, hold the mirror on the back side, since nothing else will hold it.
And holding it, carefully remove the mirror from the outside, as shown in the picture:
We carry out the replacement in the reverse order and most importantly, do not forget to insert the fixing plate back.
The instructions were given using the example of the right mirror, the driver's side is removed in the same way, there is no difference.
Mirror for viburnum
The viburnum mirror often requires replacement. This is due to the difficulties of the first years of driving and the desire to install a more beautiful part. Replacing a side mirror is not a complicated process; the main thing is to be careful and follow a certain algorithm.