Some car enthusiasts love their favorite car so much that they cannot live a day without it. And considering that many people live in huge cities, it takes a lot of time just to get to work and back. If you add traffic jams, you can spend almost half your life in a car. It’s good that at least the Lada Largus has modern acoustics at its disposal. This feature allows you to brighten up a little downtime in long lines, when your last nerves give out.
Head unit
But it also happens that we have a standard Lada Largus radio, but understanding all its functions is not an easy task.
The main advantages of the Largus car radio over analogues from other manufacturers
The device operates on cutting-edge Android 8.1 software and has a Russified interface, the operation of which is similar to using a regular smartphone. Applications here are conveniently downloaded via Google Play Market and are easy to install. In addition, this operating system will not require updating for a long time.
The powerful 4-core TX A9 processor from Cortex guarantees fast command execution and high performance. A separate chip manufactured by Samsung is responsible for audio playback in the Largus car radio. It provides high-quality sound and increases the overall reliability of the device.
The 2 din radio for Largus has a 12-month warranty, and new service centers exist and are constantly opening in Russia.
Internet access in Largus
The built-in Wi-Fi module will accept the Internet from your smartphone as a distribution point. In addition, the radio receives the Internet from a 3G modem, for which it is equipped with two USB ports. Removable hard drives and other storage media are also connected here.
The radio in the Lada Largus has a seven-inch touch-sensitive screen with an IPS matrix. The large display makes it easy to manage and view various video files. Easily display images from front and rear view cameras, as well as a video recorder.
The Largus car radio has a built-in memory of 16 GB, allowing you to create collections of your favorite songs and other content in its storage. In addition, its FM tuner makes it possible to listen to all known radio stations. In addition, listen to music via Bluetooth connection.
The device is characterized by excellent compatibility with any applications. For example, after downloading a navigation program from Google or Yandex, a driver using a GPS module will receive on the screen information about traffic jams and other information about the route of travel that interests him.
Exterior of standard car radio
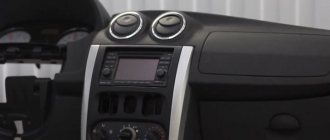
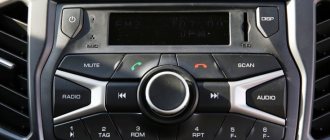
To paraphrase a well-known saying, it should immediately be noted that in terms of taste and color characteristics you will not find two identical people. This also applies to the radio in the Lada Largus. Some owners will zealously prove its superiority, elevating it to the rank of ingenious devices, while others, on the contrary, will sarcastically criticize it, wanting to find more shortcomings. In general terms, we will say that the device harmoniously combines with the design of the panel and does not cause a feeling of rejection. Its functionality is convenient, and all elements (buttons) are located in optimal places, which allows you to make switches and other manipulations on an intuitive level. There are no backlashes, squeaks or other negative factors here. The fit is excellent.
Sound via Bluetooth
A standard car radio in combination with dynamic speakers “reads” music programs equally well, “digesting” any genre without much difficulty. The manufacturer has addressed radio lovers with a powerful antenna device that allows them to pick up a signal of even minimal power. The radio allows you to memorize 6 stations in each frequency range.
Renault Sandero wiper blades
Compare Renault Captur and Hyundai Creta
Listening to music is available via CD drives or flash devices. Also for the same purposes, switching using Bluetooth is possible.
- "CD" and "MP3";
- "AAC" and "WMA", as well as "WAV".
With a wireless connection, it is possible to rewind not only between music programs, but also directly within a track.
The display clearly displays the charge level indication (if “Bluetooth”), as well as the “RDS” line. There is a Russified font in “IDTag”.
Other methods of connecting to this device are the “Jack” and “USB” sockets.
Some owners are not satisfied with the lack of a removable decorative panel for the radio. We consider this point to be unimportant, since it is not able to protect against fraudsters.
Let's sum it up
In our opinion, the standard car radio present in the practical Lada Largus station wagon is very worthy in terms of its functionality and sound. This can be confirmed by many owners of this practical car, because there are a lot of positive reviews on this topic on the Internet. In addition, a convenient manual is included, through which “making friends” with the radio will not be difficult and will not require much time.
| FM, Am ant OK | The radio module is working properly. |
| Microphone OK | The microphone is working. |
| VT-Module OK | Bluetooth works fine. |
| CD OK | The disc player operates normally. |
| Fascia Button OK | The keys work properly. |
| Power IC OK | The on/off button works. |
How to install
Some cars come from the factory with a 1 DIN car radio with CD player. Basic versions are equipped only with audio preparation; a plastic plug is mounted instead of the head unit.
To install the radio on Largus with your own hands, you need to:
- After removing the plug, place guide slides with locks in the instrument panel.
- Secure the mounting assembly using the tabs located around the perimeter of the part. Bending is done with a screwdriver; the installed shaft should not vibrate or make any extraneous sounds.
- Connect the ISO connectors located on the standard wiring to the head unit.
- Connect the antenna plug to the socket on the radio. If the sizes and shapes of connectors and plugs do not match, appropriate adapters are used.
- Insert the audio device into the shaft and push it until it clicks, indicating that the latches engage.
- Install a decorative frame around the radio panel.
Some owners install 2 DIN size radios on their Lada Largus. To place the head unit, it is necessary to replace the front plastic trim on the instrument panel, since it is impossible to accurately modify the original one.
The front panel with an extended window requires modification - it is necessary to install control buttons for additional equipment on it, borrowed from the Renault Logan sedan; original elements from Largus cannot be placed. This is due to the fact that the panel is designed for oval-shaped keys, which were never used on Largus.
In the instrument panel, it is necessary to remove the horizontal jumpers located near the socket of the standard radio and climate control controls. Dismantling is carried out with a hacksaw and wire cutters, the remaining elements are cut off with a construction knife
All manipulations are carried out with caution, since there is a risk of damage to the standard electrical wiring. Then you need to reinstall the center console to assess the contact density of the elements
Read also: Natural sheepskin for car seats
Since the original wiring has cables with colored insulation that does not comply with the ISO standard, it will be necessary to compare the assignments of each element on the car and the radio. An adapter is used for connection; wire switching is allowed by twisting the necessary cables. It is recommended to reinforce the joints with tin-lead solder or a metal connecting sleeve. The connection point is covered from above with a heat-shrinkable tube, which provides protection from moisture and short circuits.
how to install, with your own hands, 2 and 4 speakers
Lada Largus cars are available in several modifications, which differ in equipment. Basic versions do not have air conditioning and a standard head unit. Connecting a radio to a Lada Largus does not require the owner to have knowledge of electrical engineering or car design and can be done independently.
How to install
Some cars come from the factory with a 1 DIN car radio with CD player. Basic versions are equipped only with audio preparation; a plastic plug is mounted instead of the head unit.
To install the radio on Largus with your own hands, you need to:
- After removing the plug, place guide slides with locks in the instrument panel.
- Secure the mounting assembly using the tabs located around the perimeter of the part. Bending is done with a screwdriver; the installed shaft should not vibrate or make any extraneous sounds.
- Connect the ISO connectors located on the standard wiring to the head unit.
- Connect the antenna plug to the socket on the radio. If the sizes and shapes of connectors and plugs do not match, appropriate adapters are used.
- Insert the audio device into the shaft and push it until it clicks, indicating that the latches engage.
- Install a decorative frame around the radio panel.
Some owners install 2 DIN size radios on their Lada Largus. To place the head unit, it is necessary to replace the front plastic trim on the instrument panel, since it is impossible to accurately modify the original one.
The front panel with an extended window requires modification - it is necessary to install control buttons for additional equipment on it, borrowed from the Renault Logan sedan; original elements from Largus cannot be placed. This is due to the fact that the panel is designed for oval-shaped keys, which were never used on Largus.
In the instrument panel, it is necessary to remove the horizontal jumpers located near the socket of the standard radio and climate control controls. Dismantling is carried out with a hacksaw and wire cutters, the remaining elements are cut off with a construction knife
All manipulations are carried out with caution, since there is a risk of damage to the standard electrical wiring. Then you need to reinstall the center console to assess the contact density of the elements
Since the original wiring has cables with colored insulation that does not comply with the ISO standard, it will be necessary to compare the assignments of each element on the car and the radio. An adapter is used for connection; wire switching is allowed by twisting the necessary cables. It is recommended to reinforce the joints with tin-lead solder or a metal connecting sleeve. The connection point is covered from above with a heat-shrinkable tube, which provides protection from moisture and short circuits.
How to connect a radio
Connecting the head unit depends on the vehicle modification. When installing the radio, you need to firmly snap the ISO plugs in place, and then reinstall the antenna connector.
If the product is equipped with a wired remote control, it is located on the steering column or the front of the instrument panel. The wire is laid inside the panel along the standard lines of the electrical harnesses.
With 2 speakers
The 2-speaker circuit is used only on cargo vans; the loudspeakers are located in the doors under the plastic panels.
The radio is ready for use immediately after connecting to the standard connectors. The car owner can install additional speakers in the cabin by laying separate speaker wires to them.
With 4 speakers
On passenger versions, 4 speakers are used, which improves the sound quality in the cabin. The wiring has a separate harness leading to the speakers in the rear doors.
The connection does not require any additional modifications to the vehicle wiring.
No speakers
The layout without speakers is found on the basic configuration. The car has connectors for connecting the radio and front speakers, as well as an antenna output. After switching the radio, you need to disassemble the door trims, which will allow you to mount the speakers in their standard places.
Loudspeakers are attached to factory mounting points, and wooden adapter rings may be used. After installing the elements, it is necessary to return the removed parts to their place.
autotuning.expert
Head unit in Lada Largus
Many people spend a lot of time in their car.
This is especially true for residents of megacities, because in order to get to work and back, they often have to sit in traffic jams. The Lada Largus car is equipped with a modern audio system that allows you to brighten up your time on the road. Let's take a closer look at what capabilities the standard radio in Largus has. The radio installed in the car comes with a user manual, so it won’t be difficult to figure out how and what works. Schematically, the instructions indicate two devices: a double-din version and a standard one. The difference between them is mainly in the form of buttons and the inscriptions on them. Four speakers allow you to reproduce clear and high-quality sound.
The radio provides good sound through four speakers
The most useful and necessary characteristic of the radio is the ability to connect it via a wireless Bluetooth connection to a mobile phone. This is not only convenient and comfortable, but also safe, because now you can talk on the phone without using your hands. And the quality of such communication is quite decent, the interlocutor hears perfectly, and there is no need to shout.
How to install
Some cars come from the factory with a 1 DIN car radio with CD player. Basic versions are equipped only with audio preparation; a plastic plug is mounted instead of the head unit.
To install the radio on Largus with your own hands, you need to:
- After removing the plug, place guide slides with locks in the instrument panel.
- Secure the mounting assembly using the tabs located around the perimeter of the part. Bending is done with a screwdriver; the installed shaft should not vibrate or make any extraneous sounds.
- Connect the ISO connectors located on the standard wiring to the head unit.
- Connect the antenna plug to the socket on the radio. If the sizes and shapes of connectors and plugs do not match, appropriate adapters are used.
- Insert the audio device into the shaft and push it until it clicks, indicating that the latches engage.
- Install a decorative frame around the radio panel.
Some owners install 2 DIN size radios on their Lada Largus. To place the head unit, it is necessary to replace the front plastic trim on the instrument panel, since it is impossible to accurately modify the original one.
The original panel is secured with latches, which can be removed manually or with a plastic screwdriver inserted into the gap between the parts.
The front panel with an extended window requires modification - it is necessary to install control buttons for additional equipment on it, borrowed from the Renault Logan sedan; original elements from Largus cannot be placed. This is due to the fact that the panel is designed for oval-shaped keys, which were never used on Largus.
At the same time, the mounting sockets for installing mounting clips are being finalized.
In the instrument panel, it is necessary to remove the horizontal jumpers located near the socket of the standard radio and climate control controls. Dismantling is carried out with a hacksaw and wire cutters, the remaining elements are cut off with a construction knife
All manipulations are carried out with caution, since there is a risk of damage to the standard electrical wiring. Then you need to reinstall the center console to assess the contact density of the elements
Since the original wiring has cables with colored insulation that does not comply with the ISO standard, it will be necessary to compare the assignments of each element on the car and the radio. An adapter is used for connection; wire switching is allowed by twisting the necessary cables. It is recommended to reinforce the joints with tin-lead solder or a metal connecting sleeve. The connection point is covered from above with a heat-shrinkable tube, which provides protection from moisture and short circuits.
How to install
Some cars come from the factory with a 1 DIN car radio with CD player. Basic versions are equipped only with audio preparation; a plastic plug is mounted instead of the head unit.
To install the radio on Largus with your own hands, you need to:
- After removing the plug, place guide slides with locks in the instrument panel.
- Secure the mounting assembly using the tabs located around the perimeter of the part. Bending is done with a screwdriver; the installed shaft should not vibrate or make any extraneous sounds.
- Connect the ISO connectors located on the standard wiring to the head unit.
- Connect the antenna plug to the socket on the radio. If the sizes and shapes of connectors and plugs do not match, appropriate adapters are used.
- Insert the audio device into the shaft and push it until it clicks, indicating that the latches engage.
- Install a decorative frame around the radio panel.
Some owners install 2 DIN size radios on their Lada Largus. To place the head unit, it is necessary to replace the front plastic trim on the instrument panel, since it is impossible to accurately modify the original one.
The front panel with an extended window requires modification - it is necessary to install control buttons for additional equipment on it, borrowed from the Renault Logan sedan; original elements from Largus cannot be placed. This is due to the fact that the panel is designed for oval-shaped keys, which were never used on Largus.
In the instrument panel, it is necessary to remove the horizontal jumpers located near the socket of the standard radio and climate control controls. Dismantling is carried out with a hacksaw and wire cutters, the remaining elements are cut off with a construction knife
All manipulations are carried out with caution, since there is a risk of damage to the standard electrical wiring. Then you need to reinstall the center console to assess the contact density of the elements. Since the original wiring has cables with colored insulation that does not comply with the ISO standard, it will be necessary to compare the assignments of each element on the car and the radio
An adapter is used for connection; wire switching is allowed by twisting the necessary cables. It is recommended to reinforce the joints with tin-lead solder or a metal connecting sleeve. The connection point is covered with a heat-shrinkable tube at the top, providing protection against moisture and short circuits.
Since the original wiring has cables with colored insulation that does not comply with the ISO standard, it will be necessary to compare the assignments of each element on the car and the radio. An adapter is used for connection; wire switching is allowed by twisting the necessary cables. It is recommended to reinforce the joints with tin-lead solder or a metal connecting sleeve. The connection point is covered from above with a heat-shrinkable tube, which provides protection from moisture and short circuits.
How to remove the Lada Largus standard radio and enter the code
- Files
- Engine
When removing the battery or for other reasons, the Lada Largus head unit requires entering a 4-digit code.
The code is usually written in the service book, but anything can happen - they lost the book, changed the radio, etc.
The radio code can be restored using our Renault and Lada Largus standard radio code generator
To do this, we need to find out the so-called PRE-CODE , which is contained in the information on the radio itself; to find it out, we remove the radio.
How to remove the standard radio of Lada Largus
The standard radio on the Lada Largus is removed in the same way as removing the standard radio on many Renault models, for example: Megane
For removal there is an original tool from Renault, code - 7711381821
But there is no need to buy it; 4 or even 2 regular ballpoint pen refills are suitable for removal.
The principle of operation of the radio
You can't please all people. Some people like the original standard audio system that comes with a new car, while others want a more advanced option. So what is it like - the original Lada Largus radio? The appearance harmonizes very well with the interior design. Convenient control buttons help you quickly figure out what to press or scroll where. The radio tape recorder fits into its proper place tightly and without unnecessary play. The sound is also good, music for every taste sounds excellent and clear. The radio picks up the signal well, even if the reception is so-so.
How to build a garage door
You can play music from discs or via the Bluetooth connection of your smartphone. It should be noted that the quality does not suffer. Yes, and tuned radio stations can be recorded so that they do not disappear. In addition to disks, you can also use a USB connector, to which you can easily connect a flash drive and play music from it. The device reads basic formats perfectly.
You can rewind and pause even in the middle of a song without having to start over every time. The display shows information about connected devices if a song is playing, that is, the title and artist. In general, connecting devices and operating them is a simple task.
If necessary, you can connect to it, in addition to the above, also headphones via the Jack connector. Some people don’t really like that the outer panel is non-removable, like the previous options. But to think that this is not a problem at all, because if someone wants to steal it, then the absence of an external socket is unlikely to stop the attacker. And he didn’t come for her, but for the radio.
So, the Lada Largus factory head unit has a good set of functions. As soon as the thought arises that something is missing, you need to take the instructions and read them carefully. It is possible that we simply do not know about some possibilities.
Instructions
Storage
Usually a user manual is included with the radio. There are detailed characteristics of how it is used, what to press and when, and most importantly, why.
According to the diagram in the instructions, two versions of the radio are indicated:
- double din (2 din);
- standard.
There is nothing complicated about the first category, it’s just the name that is incomprehensible. These two versions differ only in different buttons and what is written on them. The most useful and practical feature is the ability to pair with some wireless devices via Bluetooth, such as connecting to a mobile phone. In this case, the standard radio on the Lada Largus will provide you with the opportunity to talk on the phone even without using your hands, thereby not violating traffic rules. If you think that you will have to talk very loudly or shout so that the interlocutor can hear clearly, then nothing like that. A normal tone of voice will be sufficient.
Firmware for audio device on Lada Largus
The standard head unit on cars of this model does not look very presentable, but at the same time the functionality is complemented by a large number of possibilities. Unfortunately, despite the decent quality of the technical part, the manufacturers did not pay enough attention to the software. It's no secret that modern audio systems have a full-fledged electronic control unit, which is a kind of computer. There is a processor, devices for reading removable media, various connectors and other functionality. In addition, the standard radio is combined with the on-board computer.
On the other hand, the more complex the audio system, the greater the likelihood of failures and malfunctions. The radio installed on the Lada Largus is no exception to the rule. The software has not been properly tested, so malfunctions are not uncommon. The most common problems are the inability to recognize the file format, reproduce high-quality sound, or identify the removable storage device. Also on Largus, incorrect display of Russian fonts on the display is often encountered. As a result, instead of the usual Cyrillic alphabet, the driver sees incomprehensible symbols. It is in these cases that updating the device firmware will help solve the problem.
Where to download and how to install
You can find out the firmware version directly on the device case, on the back side. The manufacturer regularly releases updated, i.e. improved firmware. You can find them either on the official website of the developer or on specialized thematic forums. If necessary, please contact your authorized dealer.
Preparation for the procedure
A firmware update may not be necessary if you try to reset the current settings to factory settings. The procedure is simple, but in most cases ineffective. If you update the firmware to a new version, you can expect a significant improvement in device performance. Typically, an official update is released rarely and always turns out better as testing is done and bugs are fixed.
The updated version V2030 was released in 2015. To install, you will need a flash drive or adapter with other removable media. Before you begin the procedure, you should prepare the media and find the appropriate firmware. You can download the firmware on the official AvtoVAZ website or on thematic official forums for Renault cars.
The file with the firmware is in the archive, so you need to first unpack it into a separate folder on your PC. The unpacked firmware provides a special archive that does not need to be unpacked further. The flash drive must be clean and formatted in FAT format. The unpacked CAB firmware archive is placed on it.
Update process
Now you can connect the media to the radio in your car.
- Before starting the procedure, be sure to turn on the ignition. Otherwise, the radio will automatically turn off and the firmware process will be interrupted, which may lead to device failure.
- When reading information on the media, the radio will determine that the contents on the drive are material for flashing. After analyzing the information, the device will offer to update the software. You should select "Yes" to refuse to click "No".
- Confirm the information by clicking the “OK” button.
Unlock
You will need to follow the procedure.
- Simultaneously press and hold buttons 1 and 6 for 5 seconds.
- After this, the message pre code xxxx will light up on the display. The last four digits are the precode required to obtain the secret password combination for activating the radio. The code itself is formed from one letter and three numbers.
- If the user has forgotten the password or the program has crashed, you will have to remove the radio from the standard mount. To do this, you need to use special pullers and devices that allow you to remove the device from the shaft.
- Next, you need to turn the back of the radio and read the same precode on the sticker.
- After this, go to the speaker system manufacturer’s website and enter the required data in the dialog box. Next, we act according to the prompts on the service.
- If everything is done correctly, the system will issue a password, which will need to be entered into the radio using the instructions given above in the article.
Useful tips
The dimensions of the double-din system are 178x100 mm. Installing a radio will require modifications to the interior space. If you purchase a device 178x120x100 mm, this can be avoided.
To install a simple car radio, the size should not exceed 178x50 mm. To install, use a plastic spatula or screwdriver. The kit includes adapters.
To install 2 DIN, you need to take another console trim and pliers. Additionally, you will need a frame for the head unit and a metal blade. The latter will be required to finalize the installation site.
The replacement of standard acoustics with analogue ones deserves special attention. Even if the device has identical dimensions, a new frame will be required. Otherwise there will be gaps in the panel.
