Engine compartment lighting on Aveo
We continue to talk about installing LED lighting on a Chevrolet Aveo (read the articles on the topic “Installing footwell lighting in an Aveo”, “Trunk lighting” and “Illuminating the bottom of doors”). Therefore, we present for your consideration instructions on how to install engine compartment lighting .
Why there? It's simple. Every motorist has to look under the hood, and this is not always done during daylight hours. And it is very inconvenient when the engine compartment is not equipped with lighting.
The need for illumination of the engine compartment becomes especially acute with the arrival of the cold season, when the length of daylight hours is reduced.
Using a flashlight while repairing an engine is inconvenient.
Underhood lighting: quick and easy
The presence of light under the hood is difficult to overestimate. Even the lighting in the garage is not enough to clearly see the bolts located deep, but here you can at least use an electric flashlight. On the highway the situation is much more complicated, even a small thing at dusk can cause a lot of trouble. The only way out is a mobile phone flashlight. The problem with the car immediately fades into the background, and the first priority is to get the phone that has fallen down onto the engine protective tray. Common situation? It is better to take care of such little things in advance.
VAZ 2110 engine compartment description
Dear visitors of the “Cars” website! We will be very grateful for your comments on the video clip “VAZ 2110 engine compartment description”; registration is not required for this. We also ask you to let us know if you have any problems playing the video.
Great
But why is it not possible to pull out the whole bunch? My car stalled and wouldn’t start, 21114 124, the state first showed 0328, then it disappeared and started showing 1602, 0338, 0340. I wanted to pull the whole bunch, but there it was. What should I do? I'm guilty of damage at the bottom, where the beam enters the torpedo, I can't reach it with my hands
Don't interfere with the machine's work
very informative. Keep stopping them from working. This is the most interesting thing. Stop something from working
how can I contact you I need your advice if possible call me from me subscribe 79780067322 my name is Evgeniy
Great job, accessible and understandable. We still have a lot of people repairing their iron bunks on their own. A good addition to the repair manual on your channel. Thank you.
romanysh has whatsapp
Thank you so much, thank you so HUGEly Cool video This is exactly the topic I needed, All that’s left is to find a warm garage so that it would be normal to work with electrical tape Romanych, well done, thanks again
Temporary backlight
The simplest option that suits everyone is self-adhesive LED lamps. Motorists actively use such devices in the trunk and interior of their cars. They operate on AA batteries. Main advantages:
- compact, convenient;
- good light, most of them are equipped with 3-5 white diodes, the light power is comparable to a room night light;
- are inexpensive;
- easy to use.
There are also a couple of disadvantages:
- The batteries need to be changed - although if you do not plan to do daily repairs on the highway at night, then three ordinary inexpensive batteries will last a long time.
- Self-adhesive fasteners are unreliable for stationary fixation; the flashlight can fall apart during shaking in motion and get into a running engine. To secure it “completely”, you should take care of reliable fasteners, for example, screw the back cover onto self-tapping screws, and secure the top part (it is removable for replacing batteries) with tape. But it’s better to just remove it, leaving only the cover under the hood, and attach a flashlight when needed.
Stationary light
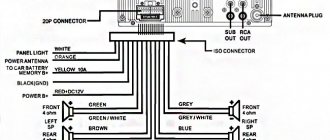
For technically trained and self-confident craftsmen, there are methods for permanently installing lighting powered by a car battery. This will require not only basic knowledge of physics, but also some spare parts. To connect to the side lights you will need:
- lamp, it is best to use LED strips for running lights;
- two-core wire, thin 2 pcs. different colors, 2m each. every;
- thin corrugation for wires;
- insulating tape.
To connect an autonomous light directly to the battery, you will additionally need:
- 5 ampere fuse with housing on the positive wire;
- key switch or latching button.
First you need to decide where the lamp will be located for maximum illumination, and how best to route the wires.
You can hide the wires under the sound insulation on the hood cover, but to do this you will have to remove it. If the sound insulation has been preserved in its factory form, then it is not advisable to disturb it; it is better to run the wires through it, fixing it with plastic clamps or running it along the edge of the sound insulation layer. If there are hollow stiffeners on the cover, the wires are inserted into them.
The negative wire is fed to the body, it should be connected to the limit switch (the button that fixes the position of the hood), the positive wire is connected to one of the front side lights. A fuse is not needed if a car headlight bulb or running LEDs are used. When the lights are on and the hood is opened, the lamp lights up; when the lid is closed, the limit switch breaks the circuit and the lamp goes out automatically.
In order for the light in the engine compartment to be completely autonomous and to be able to turn on when the side lights are turned off, you need to connect the positive wire to the corresponding battery terminal, but through a 5 amp fuse. A switch is also connected to the positive wire. Corrugation is used to protect exposed sections of wires.
Life is unpredictable, and when it comes to roads, it’s doubly so. It doesn’t matter which method of lighting the engine compartment you choose. It is important to take care of this in advance. And even if a person himself does not understand anything about the structure of a car, an open illuminated hood will attract drivers who are not indifferent to the grief of others and are ready to help. Fortunately, these are sometimes found on our roads.
Source of the article: https://tehnopanorama.ru/avto/osveschenie-podkapotnogo-prostranstva-bystro-i-prosto.html
Machine contour lighting
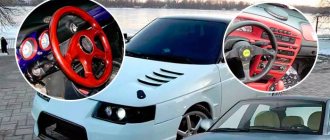
Contour lighting is one of the most expensive options when purchasing a new car. This type of lighting has a purely decorative effect. The appearance of the front panel, instrument panel and other interior elements, illuminated along the lines of the ribs and plane transitions, is very attractive and favorably emphasizes the interior trim. Luminous lines divide the interior into zones, separating sections of the dashboard, door trim, gearshift unit and other departments.
There are kits that can be installed in any brand of car. They are produced in the countries of Southeast Asia, so their price is affordable for any car owner. The standard kit consists of the following components:
- powerful LED;
- power driver;
- set of connecting wires;
- light guide
The LED is inserted into the end of the light guide, which fits into the joint lines of the dashboard panels or other interior trim elements. The driver power is connected to the side lights. Installation is not particularly difficult. In addition, you can choose the most preferred color of the LEDs, there are about 10 options in total. The cost of the kit depends on the length of the light guide (2-5 m), the presence of a wireless remote control and other design features. In any case, independent tuning will cost several times less than the standard option with which the car is equipped at the factory.
Light under the hood
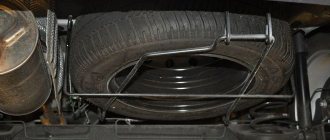
It is almost impossible to create lighting in the situation described above. Unless you have an LED strip and 2 meter wires at hand. Using these materials you can make lighting.
To do this, you need to connect the wires to the LED contacts. Then you should attach the tape to the hood so that it is horizontal.
IMPORTANT. If you place the tape vertically, it will be very blinding during operation.
Then one wire is connected to the plus mark, and the second wire is connected to the minus mark. Such a device cannot be considered safe, because such connections can be short-circuited without any insulation.
This is a more complex option, but there is an easier way to create temporary lighting under the hood.
To do this you will need a phone with a flashlight or a flashlight and wire. A wire is inserted into the hole on the hood, and a flashlight is attached to it.
It’s better not to engage in such improvisation, but to spend time and make high-quality lighting.
DIY lighting
To do this you will need the following materials:
- One meter of LED strip.
- Two wires.
- Insulating tape.
- Button.
- Knife.
- Warm room.
Stages of work:
- First you need to decide on the placement of the LED strip. The entire installation process will depend on this. From this it will be clear where the button will be located and how long the wires should be;
- Once the location of the light source is known, the wires can be measured. And then you should pull them through the stiffening ribs on the hood.
IMPORTANT. It is worth paying attention that the insulation is not damaged, otherwise it will lead to disastrous consequences, because the wires will cling to the battery.
After this, the wires are connected to the LED strip. IMPORTANT. All places where wires are twisted should be wrapped with electrical tape.
Then a switch is installed and also connected to the wires.
IMPORTANT. It is necessary to choose the location of the switch correctly, otherwise, when closing the hood, it may turn on, which will affect the performance of the battery and LED strip.
The last connection required is between the battery and switch terminals.
Underbody lighting – flight effect
Among all the options for additional external lighting of a car, the most common is underbody lighting using LEDs. It’s worth saying right away that this is a very expensive pleasure, but on the other hand, this is exactly the case when money is spent on creating a car that is recognizable from afar. Thoughtful placement of LEDs on the bottom can create the effect of a car flying above the road surface, and this is very impressive and beautiful.
The work of creating underbody lighting involves a number of difficulties that are associated with the constant mechanical impact of the environment (sand, stones, debris, chemicals, water) on this area of the machine
So it is necessary to pay increased attention to the quality and professionalism of installation. The condition of the entire car depends on this, because damaged wiring can lead to a fire.
What kind of lighting to make a car
Let's start with the fact that there are more than enough types of lighting for cars. This can be a fairly simple illumination of the interior or feet of the driver and passengers, or a more complex illumination of the car’s rims and the space under the car. Which of these types of lighting to choose and begin to implement is entirely a matter of your taste, because there is no particular difficulty or difference between installing the lighting on car doors and on rims. The main thing is to understand the basic principles and carefully carry out all stages of the work, and then you can get lighting for your car much cheaper than you could do it at a car dealership.
Materials
Before work, you need to buy all the necessary materials. This list includes:
- Fuse (flat) 5A.
- Fuse (suspended).
- 2-core wire with a cross-section of 1 mm - 5 meters.
- Corrugation for wire.
- 12V lighting source - as a rule, an LED module or LED strip is used for this, which can be bought in many stores or ordered from China through Aliexpress, Jum and other portals.
- Switch.
- Fasteners, for example, plastic clamps.
The cost of this entire set is about 300 rubles, which means that installing lighting under the hood of the Lada Vesta and X Rey will definitely not hurt your budget.
More information about materials and tools
Recently, more and more LED strips have been sold.
Naturally, the cost of an LED strip may be of great importance to you, but we strongly do not recommend that you buy cheap LED strips, since they not only often fail and burn out, but also do not provide the intensity of light that is needed for high-quality car illumination . If you have not yet decided on the color of the future backlight, we advise you to buy an RGB strip, which will give you the opportunity to switch the colors of the LED backlight when you want to change the color. This is exactly why you need a controller with a remote control. There are no special requirements for the wire, since they all perform the same task, and the wire itself will most likely be hidden either under the upholstery if you are illuminating the doors or legs, or it will be hidden and insulated in a corrugated pipe if you You will highlight the underbody of the car, license plate or its rims. In this case, you will protect your electronics from water ingress and corrosion at solder joints and in those places where the factory wire braiding may have been damaged.
In addition, you may need connectors. These can be regular “crocodiles” for test connection of the backlight and permanent connectors that are screwed in with a screwdriver and provide reliable contact throughout the entire system. They are needed not only for convenience when connecting the backlight, but also when you need to replace some part of the wiring in case of damage, or part of the LED strip for repair. If you use connectors, you will not have to completely change the backlight wiring, but will only be able to replace the damaged section of the circuit.
Glowing rims
Making rims glow today is not that difficult. This is done using a special composition applied to the discs, or they are illuminated with LEDs. In the first case, the composition is applied with a spray bottle directly to the rims or wheel caps. This coating consists of substances that first absorb light energy and then release it, providing a glow. The luminous pigment of the paint contains strontium aluminate, which, unlike phosphorus, is harmless and has a glow time many times greater (50 times) than it.
The backlight looks very stylish
LED illumination of wheel rims is a new milestone in the world of auto tuning
Today, illuminated rims are considered a great expression of individuality, and such a car is guaranteed to attract attention. This tuning solution is a multi-color wheel lighting system that is controlled remotely
Using the remote control, the driver can adjust the color as desired, as well as set any of the disc lighting modes.
The glowing discs are easy to operate. You can set the following using the remote control:
- direct static lighting;
- backlight brightness;
- choice of backlight color;
- dynamic modes.
On sale you can find special sets of LED backlighting for disks, which, in addition to being attractive, are of high quality. Bright LED strips glow evenly. They are impact-resistant and have good moisture resistance, which allows their use in any weather. The safety margin of LED strips allows you not to worry about small stones that get inside the disk at speed.
VAZ-2109 engine knocking under the hood
Main content points of the article
At the very beginning, when the new nine appeared, a VAZ-2109 engine was installed under its hood. Little was known about the injector at that time. Therefore, a carburetor was installed on the engine. The volume of the engine itself was 1.3 liters. The power of the VAZ-2109 engine reached 64 hp. A car, having such parameters, is capable of reaching 100 km/h in 16 seconds. The maximum speed reached 148 km/h.
Specifications
For a long time, all nines were equipped with this engine, until they were replaced by new models. In Soviet times, it was the most affordable engine with a reliable block. The technical characteristics were dynamic and accessible. The main features are:
1. To create a 1.3-liter engine volume, four cylinders with a diameter of 82 mm were installed.
2. The block had eight valves.
3. The cylinders worked according to the classic “1-3-4-2” scheme.
4. Engine displacement reached 1499 cubic meters. see. This figure forced car enthusiasts to trust this unit.
5. Compression ratio is 9.9 times.
6. Standard power, when the crankshaft rotated at 5600 rpm, was 50.8 hp. During movement it increased to 69.
7. The minimum number of crankshaft revolutions was 800 per minute.
8. The engine piston stroke was 71 mm.
9. When the crankshaft produced 3400 revolutions, the torque of the car reached 100 Nm. The maximum number reached 106.4 Nm.
10. The VAZ 2109 engine was powered by a carburetor.
For its time, such a car was considered one of the best. After all, its aerodynamic characteristics made it possible to reach a speed of 100 km per hour in 14 seconds.
The heart of any car is its engine. Therefore, it is necessary to constantly monitor its condition and listen to how it works. If there is a knock, then there is some kind of problem. Urgent repairs may be needed.
When there is a constant knocking sound in the engine, urgent engine diagnostics are required to detect problems. The unit may need to be removed. This work can be done at a service station, or repairs can be carried out in your own garage.
Connecting rod knock: features
In most cases, almost all car enthusiasts believe that the knocking noise that appears is due to poor valve settings. The fact is that the sound spreads throughout the entire block, and it is heard mainly from above. Therefore, it seems that the valves have started knocking.
Characteristic signs when the engine knocks are:
1. There is an excessive knock in the system and the oil pressure has decreased.
2. At idle, the system operates without failure, but the oil pressure does not increase. Therefore, the engine knocked recently.
3. As the gas supply increases, the knocking increases and a dull sound is heard, which means the engine is knocking. If this happened on the road, then you can continue driving. You need to drive with tension, without allowing a knock to appear.
4. If you can clearly hear a knocking sound at idle, then it is strictly forbidden to continue driving. We'll have to wait for a tug.
There are several known reasons for the formation of low lubricant pressure. For example, there was a lot of wear on the crankshaft journal, the wrong oil was used, the block had a completely different lubricant. For example, mineral oil was poured into the engine. Semi-synthetic oil was poured in as a replacement. The pressure will immediately decrease.
Future lighting project
Any work to improve a car should start with a project.
Naturally, at this stage we need to decide where we will install the backlight and we can say exactly how many wires, LED strips and connectors we will need for this. We make a rough plan of the location of objects inside your car and mark the places where we will carry out the wiring. This is quite simple, since most of the wiring can be hidden either under the trim or placed under the bottom of the car. However, in this case, you should definitely purchase and use a corrugated tube to insulate the wire. Let's look at the wiring diagram for the car interior lighting and use its example to understand the process. Now it’s worth inspecting your car in those places where you will attach the LED strip itself. The ideal option for LED backlighting is when the light source is not visible and only the bright backlight of the car is visible. What's more, if you install the light in a hard-to-reach area, the strip is less likely to be damaged while driving or transporting people. Accurate measurements and cutting of LED strip
If you have not yet armed yourself with a tape measure and have not accurately measured the length of the objects to which the LED strip will be attached, now is the time to do so. After this, we take the tape in our hands and cut it, but we do it very carefully. The fact is that the LED strip cannot be cut anywhere. There are special places for this, located every 3 LEDs. And remember that it is better to make the tape a little shorter than necessary, because if the tape is not fixed evenly, but with sagging, the illumination intensity will be uneven, and this should not be allowed.
Soldering and testing
We arm ourselves with a soldering iron and solder the ends of a four-core wire to the places where the LED strip is cut. Try to observe the color of the wires at all connection points to make it easier for you to navigate when making repairs or if errors are detected. We recommend that before insulating the soldering area, check the glow as shown in the figure. If everything is in order, you can repeat this operation for the remaining sections of the LED strip. Prepare the required number of connectors in order to easily connect the resulting LED strips at the installation site and also observe the color of the wires.
We isolate the soldering points
If you are sure that the pieces of LED strip work as they should and you haven’t made a mistake anywhere, it’s time to pick up regular silicone glue or a gun that melts silicone and fill the soldering areas with it. This will not only protect the LED strip from moisture or accidental shorting of contacts at the soldering points, but will also help you seal the joint. This is quite enough for reliable fixation, so you can refuse to use insulating tape.
Gluing the LED strip
Everything is ready to install and connect the lighting in the interior of your car. To the surface you have chosen. You can either use a few drops of silicone glue or attach the tape with plastic ties - it doesn't really matter. Both options are quite reliable and durable.
If it is impossible to glue the backlight, as is often the case when installing the backlight on disks, you should use a hanging frame made of a thin profile, on which we will place the tape using plastic ties, but more on that a little later.
We connect the backlight through connectors
While accurately observing the color of the wires and connecting the wiring according to our plan, you should pay attention to how you will hide the wires. If you have the opportunity to run them under the interior trim, try to do it as discreetly as possible so that the wire does not stick out. And in the event that you will run wiring under the bottom of the car, first put insulating corrugated tubes on the wires, the ends of which should either be filled with silicone or wrapped with electrical tape. It is best to hide the connectors in the same place where the LED strip itself is located, because in this case you will have access to them at any time.
After all the lighting elements of your car are connected and you have hidden the wiring, we connect the wires according to the diagram with the controller and you can proceed to organizing the power supply for the lighting.
Under the car
Underbody lighting is probably the most common lighting tuning option. Of course, this is a very expensive way to stand out, but the result can make a person forget about all the costs of such improvements. If the light sources are installed correctly and the vehicle's ground clearance is not too high, then the underbody lighting creates the effect of a flying car
An optical illusion is created; a person does not see the wheels of the car, since all attention is focused on the scattered light under the bottom. The most important thing when installing such lighting is to hide the light sources, since if they are visible, the entire effect will be lost
Light under the hood
It is almost impossible to create lighting in the situation described above. Unless you have an LED strip and 2 meter wires at hand. Using these materials you can make lighting.
To do this, you need to connect the wires to the LED contacts. Then you should attach the tape to the hood so that it is horizontal.
IMPORTANT. If you place the tape vertically, it will be very blinding during operation.
Then one wire is connected to the plus mark, and the second wire is connected to the minus mark. Such a device cannot be considered safe, because such connections can be short-circuited without any insulation.
This is a more complex option, but there is an easier way to create temporary lighting under the hood.
To do this you will need a phone with a flashlight or a flashlight and wire. A wire is inserted into the hole on the hood, and a flashlight is attached to it.
It’s better not to engage in such improvisation, but to spend time and make high-quality lighting.
Power supply for car lighting
You can power the backlight in different ways. Someone uses a door panel for this, and in this case the lighting will not only be a decorative element, but also a reminder that the door is not closed, because it will only light up when the doors are opened. However, this method is not suitable for illuminating the rims and the underbody of the car, because there the backlight should always be on when we want it.
Which feeding method should you choose?
The simplest power connection option for a car is the cigarette lighter. It just produces 12 V, so this power is quite enough for us to connect all the lighting of our car. To do this, you can simply remake the charger for a mobile phone and connect the wires in a circuit to a stabilizer, which lowers the voltage to 4 V. To do this, just disassemble the charger for a mobile phone, which works from the cigarette lighter and solder one wire to ground, and the other – in front of the stabilizer. This will be enough to ensure the lighting works, and if necessary, the charger is simply pulled out of the cigarette lighter.
Features of installing lighting on rims and on the bottom of the car
Please note that car lighting is a system that must be constantly connected to a power source, otherwise it will not work. If you want to illuminate the underbody or rims of the car, the basic principles of work do not change, but an additional step is added.
If you backlight the rims, the wheel will definitely need to be removed, and the rims themselves will need to be cleaned of dirt and rust. After this, it will be necessary to assemble a structure of the required diameter from an aluminum profile in order to place the backlight on it. This structure is tightly fixed to the stationary part and connected to the wires using a connector, which in this case will also need to be either insulated or taken out into the car interior.
Please note that the wires and the tape itself must be securely glued or pulled to the structure attached to the car's rim. In the case of illuminating the underbody of a car, everything is somewhat simpler, but it may also happen that there is simply nowhere to attach the LED strip. In this case, we can also use a small metal profile, which will not need to be screwed to the inside of the car body and the LED strip already glued to it. The only difficulty in this process is that the LED strip for rims and for the underbody of the car must be chosen either sealed or sealed with silicone or other transparent materials, otherwise it will simply burn out if moisture gets in.
Assembly and first ride on the illuminated car.
If you backlit the wheels, return the wheels to their place and make sure that the wires do not interfere with the rotation of the wheel, and that the LED strip remains motionless during rotation. If you worked in a salon and illuminated the legs or doors of a car, tuck the wires and put the remote control in a place convenient for you. Check again that the backlight is working and you can get ready for your first trip to the city.
Before driving a car for the first time with new interior lighting, many experienced drivers advise sitting in the car for a few minutes with the backlight on to allow your eyes to adapt. At first, the backlight may distract from driving, but over time you will get used to it and will only enjoy the bright colors in the interior or on the rims of your car!
Neon lights and the law
Let us immediately make a reservation that Russian legislation has a very ambiguous interpretation of this issue. According to the Appendix to the Traffic Regulations, among the vehicle malfunctions for which its operation is prohibited, clause 3.1 is indicated. “The number, type, color, location and mode of operation of external lighting devices does not meet the design requirements of the vehicle.”
You can get a fine for changing the design of a car without the appropriate documents.
However, GOST R 51709-2001 does not indicate “underbody lighting” or something similar among the types of external lighting devices. You can receive a fine for changing the design of a car without the appropriate documents. Since you are unlikely to be able to obtain permission for such innovations, in this case you are violating Art. 12.5 part 1 of the Administrative Code. As a punishment, a warning or a fine of 500 rubles is possible. and equipment seizure.
ADVICE! Follow two simple rules, and it will be more difficult for traffic police inspectors to issue you tickets:
- Do not direct the light under the bottom to the sides, only down.
- Do not install blue and red lights in the radiator grille and bumper, or white neon in the rear. The red and white colors of the illumination should not extend beyond the front and back of the vehicle, respectively.
Direct the light under the bottom only downwards
Naturally, it will be much more difficult for the valiant law enforcement officers to find fault with the neon interior lighting.
Easy tuning of a car hood
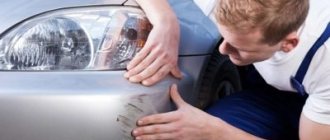
The simplest options for tuning a hood with your own hands, which even a beginner can handle, are pasting it with special materials, installing additional emblems or a spoiler on the vehicle.
Pasting with vinyl film
If the hood of your car has defects and scratches, or you just want to make it original, you can tune it using special adhesive films. It will be much cheaper than painting the part. This upgrade will give your hood an original look.
There are special vinyl films that can be purchased on the market or at any car store. They come in different types: matte, glossy, carbon fiber, plain or with different patterns. Everyone can choose a product according to their own color and taste.
It is advisable to use two people to paste the film. Before starting work, you must thoroughly wash and degrease the hood using a solvent. To begin, fix the film in the center of the product. One person heats the film with a hairdryer, the other carefully stretches it and straightens it from the center to the sides using a spatula with a soft tip. Thus, you will receive a new tuned body element without defects or scratches.
Tuning using a deflector
Deflectors are especially popular when tuning the hood. You can install them yourself by purchasing them in the store. It is very easy to install a deflector or spoiler on a car according to the instructions and special fasteners that come with the kit. There are also deflectors that are made of soft plastic and are installed by gluing.
The deflector, on the one hand, decorates the car and makes it original, on the other hand, it performs protective functions. It protects the vehicle windows and hood from damage from small stones. The deflector is also popularly called a fly swatter, since, in addition to stones, it also reflects insects flying towards it.
Experts recommend purchasing hood deflectors from VIP tuning, which are of good quality and reliability. By installing a deflector on your car, you will protect the hood and windshield from dirt and corrosion as much as possible, and also add brightness and originality to your car.
Hood locks as a tuning element
Often, as a tuning element, car owners use sports hood locks, which give the vehicle an aggressive and predatory look. They are most often used on sports cars that participate in racing and rallies, however, they can be installed on any car model.
Sports locks are both a decorative element and a protective device against opening the hood while the car is moving. You can install the locks yourself using step-by-step instructions for them.
To install the hood locks, you need to drill several holes in the hood cover and frame. Therefore, before starting work, read the installation instructions very carefully and check the markings several times to ensure that the body part is not damaged. Before installing the lock, cover the surface near the hole with masking tape so as not to damage the car’s paintwork during operation. The locks are secured using specific fasteners that are included in the kit.
Source of the article: https://avto-lover.ru/drugoe/podsvetka-podkapotnogo-prostranstva-svoimi-rukami.html
Types of backlight
Currently, mainly two types of lighting are used to illuminate various parts of the car: LED and neon. Each light source, of course, has its pros and cons. In order to make the right choice before purchasing any backlight, you need to study their properties and technical characteristics. It is also useful to compare desires with financial capabilities.
Neon
Many people probably watched the famous movie “Fast and Furious,” where neon lighting was installed on the cars. This backlight is a gas-discharge lamp enclosed in a special protective shell. Such lamps consume little electricity and practically do not heat up, but in order for such illumination to start glowing, a special ignition unit is required. Since the lamps are in a special tube, the risk of damage to the backlight from stones flying from under the wheels is minimal.
Neon car lighting emits a fairly bright and at the same time soft light. The price for such lamps is quite reasonable. But of course, this light source also has disadvantages. The main disadvantage is the rather short service life; usually a neon lighting kit lasts a maximum of two seasons. Despite the protective coating, the lamps are quite fragile and there are cases of premature lamp failure.
Neon lighting is good in cases where it is installed only for one season and a large budget is not provided for this event. But not everything is as bad as it seems at first glance; at their cost, neon lamps do an excellent job.
LED based
Such lighting is more expensive than neon lighting, but its resource is much greater. The design of the backlight is similar to the analogue, except that the protective tube contains not lamps, but LEDs. The light source, based on LEDs, does not have any fragile parts in its design, so this lighting is not at all afraid of stones.
Another feature of the LED is a huge selection of shades of light. The LED lamp can work either in single color mode or change the shade using a special unit. It is worth noting that the control unit is only needed to adjust the light, and you can even light the LED lamp using a battery.
In terms of brightness, LED lighting outperforms neon, but the glow of the diodes is directional, and not diffused like neon. Many are not satisfied with this fact, and such people purchase cheaper and less durable neon lighting.