This is a window closer, and there are 4 of them. It only works with a standard key fob, I’ll find out if it can be attached to the alarm system. Principle of operation. If the window/windows are down, press the close button and hold it, the machine itself closes and the windows/windows go up. first the front ones and then the rear ones. The same principle applies to opening.
On the suites it costs . To adjust the pause you need to: swing the brushes without fixing the lever, wait until the glass is clogged to the desired degree and turn the brushes to the first position. It will wave with the pause that you set. A very convenient feature, it completely replaces a rain sensor, so there is no need to buy additional sensors like DD2, etc. Waste of money.
The function is relevant for the dark time of day. By blinking far away, the light turns on for 30 seconds so you can walk to the house/entrance and turns off, at the same time you can arm it. In my case, it’s a factory key fob; The function is only activated when the driver's door is open! Even if the key in the ignition still works, only the door must be open!
By default there was a two-step unlocking (the first press opens the driver's, the second press opens the rest), there was no self-closing as some people write, then I changed the mode to simultaneously open all doors with the first press, and a nice addition appeared as self-closing of the doors after starting to move somewhere after 15km/h. This option turned out to be more convenient for me, so choose. switching modes, see manual page 8 (“Changing the unlocking mode is carried out by the following procedure: – turn on the ignition with the key with the remote control; – simultaneously press the door lock and unlock buttons on the remote control and hold for about 5 seconds; – after the buzzer sounds, release the buttons. If one buzzer sounded, then the simultaneous door unlocking mode was set, if two buzzer signals sounded, then the stepwise door unlocking mode was set. With each procedure for changing the unlocking mode, it changes to the opposite one set earlier."
For those who do not wear a seat belt and it is not convenient to fasten the belt behind the seat, since it gets dirty by passengers, you can programmatically turn off the vile squealing of the buzzer. To turn it off: while pressing the button on the instrument panel, for 10 seconds, you need to fasten and unfasten the belt 2 times. To turn it on: the same procedure, only you need to fasten and unbuckle the belt 3 times.
Sixth: Polite Light
When you remove the standard warning light (the doors are closed) - the lamp lights up - I drove by... turned off the engine - it lights up (the doors are closed) when the engine is running, the light goes out smoothly as soon as you close the door, and when it’s not on, it stays on for about half a minute. And if you leave the light on and don’t slam the doors, then (without ignition) it will go out in about 10 minutes.
These are the nice bonuses that AVTOVAZ gave us, if there is anything else, write it down in the comments, I will be grateful!)
Winter operation of Granta continues. The car always starts, the car is warm and cozy. By the way, even in severe frosts I didn’t turn the stove on above the second position.
I read that with large minuses, if there is not a lot of gasoline in the tank, then gasoline vapors can crystallize and precipitate, gradually disabling the fuel system. Therefore, I try to keep the gas tank filled from 60% to 100%. In winter, the car is used daily, but not very actively, while 95% is in the city. Therefore, I periodically take it out onto the track and rev the engine at 5000 rpm. Useful, sort of.
And that’s why I decided to write this addition. I came across a couple of interesting hidden features of the Lada Granta on the Internet, which are not documented, but may be useful to someone.
Adjusting the windshield wiper pause.
If the Lada Granta is not equipped with a rain sensor, then the speed of the wipers can be adjusted as desired. For this:
1. Turn off the wipers.
2. Turn on the wipers to the first fixed position and, when they start moving, turn them off again.
3. We wait until the glass is sufficiently dirty and turn the doors back on to the first fixed position.
The new pause interval has been set. To change it, all steps must be done again.
Disabling the seat belt chime.
1. Place the car on a level surface (so as not to roll), turn off the handbrake.
2. Turn on the ignition and briefly press the daily mileage reset button to switch to total mileage. Turn off the ignition.
3. Wait 15 seconds.
4. Pull the driver's belt out long enough to snap into place, but do not snap into place yet. Hold the belt in this position with your left hand, since you will need your right hand now.
5. Turn on the ignition with your right hand. Make sure that the seat belt indicator is illuminated on the instrument panel. Grasp the belt in your right hand.
6. With your left hand, press and hold the daily mileage reset button until the end of the operation.
7. Fasten your seat belt, wait a second, unfasten your seat belt, wait a second.
8. Fasten the seat belt again, wait a second, unfasten the seat belt, wait a second.
9. Turn off the ignition.
If everything is done correctly, the horn will no longer work, but the seat belt light on the dashboard will continue to work as before.
I am for road safety, I always wear a seat belt, there are simply situations when it makes no sense to wear a seat belt, for example, when driving around a yard or in a parking lot at low speeds, when you need to move the car several tens of meters. There is no point in wearing a seat belt, and the squeak is annoying. Turning off the seat belt warning does not mean that you do not need to fasten it after that.
In order to get started, you must first link your phone to the radio. To do this, turn on bluetooth on your phone and turn on device search. We are interested in a device named “granta”. After this device is found, select it and, if necessary, enter the code. The default is 0000 (four zeros). An inscription about the successful connection of the phone to it should appear on the display of the radio.
When the phone is connected, you can work with it through the radio.
So. Receiving an incoming call or confirming an outgoing number is done using the button with a green handset. Resetting an incoming call or ending a conversation is done using a button with a red tube. The call volume is adjusted in the same way as the audio playback volume - with a round joystick.
Now about how to work with contacts.
The last incoming (outgoing) call is stored in the memory of the head unit. If for any reason the connection is interrupted and you need to contact the subscriber again, to do this, simply press the button with the green handset twice. After which the last number you contacted will be called.
The radio allows you to save 6 favorite numbers in its memory. These numbers are stored on six radio buttons (with numbers). Only one number can be stored on each of these buttons!
This is done as follows. While talking on the phone, you need to press one of these buttons on which you want to record that number. The button must be pressed for a long time. You can understand that the number has been successfully recorded as follows.
During a conversation, the phone number of the person you are talking to is displayed at the bottom of the radio display. And, if after pressing and holding the button, the number from the bottom of the display moves to its center, then the number is successfully written to the pressed button.
Calling your favorite number is done like this. Switch the radio to telephone mode (press the button with the green handset once), then press the button on which your favorite number is written, and press the button with the green handset again.
Working with the phone book.
The radio allows you to view lists of contacts stored on the SIM card or in the phone memory.
In order to accomplish this you need the following. Enter phone mode. After that, use the “forward” and “back” buttons to select the appropriate section in the menu. And, using the round joystick, find the desired contact. Then, to make a call, press the button with the green handset.
But there is one caveat. Contacts on the radio screen will not be displayed in the same order as they are displayed on the phone, but randomly. Which can, at first, make it difficult to find the right contact.
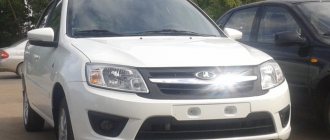
Another model from AvtoVAZ, and one that replaced the Classic, is a historical event. In the near future, a significant part of our country will be driving it. Or it won't. In order to find out this, and at the same time answer questions from readers of Zarulem.RF, we went to Togliatti - the homeland of the Lada Granta.
Basic functions of the device
On-board vehicles for the Lada Granta have high information memory and a small monitor, except for the “State” model, which only has a digital display. This makes it easier for people with poor eyesight and those who are unfamiliar with the nuances of engine operation to monitor all the processes that accompany its stable operation. BC will help the car owner by pointing out the following parameters:
- total travel time;
- detailed fuel consumption at different speeds;
- average speed indicators and excessive fuel consumption;
- remaining fuel in the gas tank;
- speed of start of movement;
- engine temperature;
- malfunctions of components and mechanisms;
- temperature inside and outside the car;
- on-board network voltage;
- crankshaft rotation speed (engine speed).
The on-board computer has a volatile memory and the ability to control the anti-theft system - the Lada Granta immobilizer. The on-board vehicle has a built-in supervisor, a fault indicator, and a “afterburner” function - the ability to reset the memory after starting the engine.
The functionality of even the simplest on-board computer is much broader than the standard one installed on the Grant. The discrepancy between the readings of the factory and alternative devices can reach more than 30%.
Some on-board drivers can additionally control lighting, stove operation, clock, calendar and alarm clock, and automatic window closers. You can plan your trip route based on the BC readings. It also allows you to use various navigation installation options and can warn you about low fuel levels or exceeding the permissible speed limit.
Most devices allow you to independently diagnose the operation of different car systems. The device can read ECU error codes without using any equipment. The explanation is presented in the accompanying documentation for each device. Such functionality will allow you not only to save on a trip to a specialized center, but also to identify problems, preventing serious malfunctions from occurring.
Choosing an on-board computer for the Lada Granta
As an alternative to the weak standard BC, car enthusiasts install multifunctional on-board monitors that will show not only the engine temperature, but also many other parameters. Today, manufacturers can offer three main devices suitable for the VAZ 2190-91: “Multitronics”, “Orion”, “State”.
"Multitronics"
The device is a universal one, since the manufacturer does not produce them exclusively for Grants. Judging by the documentation and instructions included with the device, installation of Multitronics is quite possible on earlier VAZ cars: first-generation Kalina and Priora. Finding a place to install the device is the concern of the car owner.
"Orion"
The computer of this brand is also universal and is used not only for Grants. The installation site may have to be modified independently.
This company produces on-board computers exclusively for domestically produced cars. The devices are not created for universal use, but specifically for each car model.
"Stat" is based in Togliatti and tests all its developments on AvtoVAZ cars. Installed instead of a plug for additional buttons. This device is modest in size, but has additional useful functions:
- spark plug warm-up mode – relevant in winter;
- “Tropic” mode, which allows you to independently set the desired temperature for the engine cooling fan to operate;
- diagnostics of system errors.
The “State” X1 M is inexpensive, which makes it noticeably superior to its competitors. But if you need a full-fledged on-board computer with a display and an intuitive interface, you should take a closer look at universal devices.
Installing a BC can pay for itself after the first replacement of a sensor, because the car owner will be able to carry out diagnostics on his own.
Pinout diagrams for radios of various Lada models
Pinout of Lada head unit
Among Lada drivers there is a special type of driver who constantly improves and refines the car’s audio system. Changing, often in a circle, a bunch of head units, eventually arriving at the point where the standard radio is put in place. If you belong to this type, or simply, for some other reason, removed the radio from its original place, and now want to return it, then our material today is for you! The pinout of the standard Lada radio does not hide anything particularly complicated; anyone with growing hands can handle it. Well, at least from somewhere. To begin with, we will have to deal with the wires, namely their color. Which wire will be responsible for some component of the car's audio system, and it would be advisable not to confuse them. Although in this case there will be nothing terrible and it is not forbidden to search at random. But there’s no need for you and me to wander around; we’ll figure out the color marking of the Lada wires right away. So let's get started.
Let's look at the color scheme of the wires for cars of the Lada family of the following models: Vesta, Priora, Grenade, X-Ray, Largus, Kalina, Niva 4×4, Chevrolet Niva
Pinout diagrams for radios of various Lada models:
Color scheme used on new Lada cars
It is worth saying that connecting any third-party radio to a Lada car is not difficult, since the standard connectors on these cars are made according to ISO European standards - plugs.
Now let's look at the pinout diagrams of different models:
Lada X-ray Media NAV pinout
Pinout of Lada Largus (by analogy with the x-ray diagram)
+ Pinout of radio Lada CD-5151RMP
From the above diagrams it is clear that connecting a radio to a Lada family car is as easy as shelling pears! These cars not only have great potential for tuning audio systems and are easily soundproofed, but also have easy access to wiring and a standard ISO connector, allowing you to easily connect almost any GU (head unit, radio). I hope it won’t be difficult for you to understand the diagrams presented above. I wish you good luck in pinouting your Lada radios! Staff and non-staff. May the force be with you! Meet us on the pages of the site inmu3.ru!
Source
Options for installing BC in Lada Granta
Any of the existing onboard devices can be installed and connected independently, regardless of the modification of the car. The exception is computer models in the “Lux” configuration - they are initially installed at the factory with a multimedia system, navigator, and audio system. The “State” X1 M device can be added to the “Standard” and “Norma” configurations.
An important advantage of the “State” X1 M is its compact size. The device is installed instead of a button cover. The kit includes the device, wires and instructions. Installation will not cause much difficulty. You need to take out the plug, place the computer in it, connecting it to the connector. Then, in accordance with the pinout, connect the second end of the wiring with the block to the diagnostic connector located on the bottom left side of the panel. In addition to the State X1 M, Multitronics are often installed on Lada Granta. You can attach it wherever it is convenient for the driver - on the dashboard, on the rearview mirror. The main difficulty is connecting the wiring, since it needs to be hidden. If you install the device on a panel, you will first have to remove its front side and make a hole for the wires, for example, using a heated knife. Then the BC visor is glued to “liquid nails” type glue.
Interior of Lada Granta in the “Lux” version
Lada Granta will be produced in three body types: sedan, station wagon and hatchback. Moreover, Grant’s sedan will “kill” a similar body from Kalina, since the client gets more cars for less money. A test assembly is currently underway, but the estimated capacity is 150 thousand copies per year.
In addition to the price, the two budget phones have quite significant differences in their details. Despite the fact that Granta is built on the basis of Kalina, approximately 400 components were developed specifically for the new product. Granta has its own trunk, hood, front and rear fenders, bumpers and optics, and the doors and roof are Kalinov’s. Despite the increased overhangs, geometric cross-country ability was not affected.
On-board computer firmware Grants
You can update the software yourself. To do this, you will need a USB-K-Line cable, the firmware itself, a diagram of the Lada Granta ECU, an installation program and a driver for connecting to the adapter.
BC connection diagram for firmware
Schema collection algorithm:
- Take 3 wires.
- Switch T1 is closed as required by the program.
- The computer serves as the power source; just connect to Molex. For the on-board device, you can use the terminal block from the cooler.
- Connect the adapter to the USB port and install the driver. Next, you need to remember the port number you are using.
The firmware process looks like this:
- The program starts and the firmware is selected.
- The desired port is selected.
- Click on the lightning icon, after the “Turn on power” message appears, you need to press any button and start the firmware protocol, this will take several minutes.
To download all the software necessary for flashing the firmware, just go to the official website of the manufacturer of the Lada Granta on-board computer. You can also find all the necessary drivers there.
Pinout of a standard Euro connector
What does a car owner need to know about the pinout of the Euro connector? Let's look at the notation using output 10478 as an example.
Upper power connector "A"
As already reported, this output is intended for connecting power supplies to the electrical circuit of the vehicle.
| 1 | Not involved |
| 2 | Not involved |
| 3 | Not involved |
| 4 | Regular meals |
| 5 | To connect the antenna |
| 6 | To connect the backlight |
| 7 | To connect the ignition |
| 8 | Vehicle weight |
And although the device is equipped with eight contacts, all of them can not be used to connect the head unit. But these contacts would not exist if they did not perform certain functions. The first three outputs, as well as the sixth, are rarely used, especially for connecting budget device options. Typically, their use is due to the need to connect additional functionality, and we are talking about more advanced car radios. Please note that contact colors may vary.
If we talk about additional options, we mean:
- ANT output. This pin is used if the vehicle is equipped with a retractable antenna.
- Remote function, thanks to which external amplifiers can be connected to the head unit. This will increase the number of connected speakers. This is relevant for music lovers and owners of vehicles with a large interior, which, with proper installation of the speakers, will increase the sound quality.
- Illumination function. This option allows you to automatically change the brightness and color settings of the head unit display. If the car is moving at high speed, the screen brightness will drop so that the system does not distract the driver from driving the car. When the vehicle stops, the radio will return to the initial settings.
- Mute function. Today, many head units have this option. But this option can be activated either by clicking on the corresponding button or automatically. In particular, if an impulse from a mobile device passes through the head unit receiver, the system will automatically lower the volume so that the driver can talk on the phone without being distracted from driving.
Connectors for radios from different brands
The fourth contact is responsible for powering the vehicle's audio system. The wire from it must be connected to the ignition switch terminal and powered from the battery, but for this you should also use a fuse. This method of connecting the wiring will protect the battery from discharge, since activation of the head unit is possible after the key is turned in the ignition.
The fifth contact is for connecting the antenna wire. As for the seventh contact, it is important because it is responsible for powering the volatile memory of the head unit. That is, if it accidentally turns off, this will reset all settings of the car radio. It’s unlikely that anyone will like losing all the parameters after setting it up.
It is necessary that each of the power cables be protected by a fuse for safety purposes. If malfunctions sometimes occur in the operation of the audio system, it is advisable to install a capacitor between the seventh and eighth outputs. As for the capacitor capacity, this parameter must be selected individually. The capacitor performs a filtering function, that is, the element is designed to smooth out various fluctuations in the on-board network.
Setting up and unlocking
You can unlock the onboard vehicle using the same firmware. Setting up the device is a simple task if you follow the instructions included with the device. You can also find out the answer to your question on the manufacturer’s official website or watch training videos.
Using the instructions, you can not only quickly set up the device, but also find out the codes of all possible errors. This will help to diagnose the malfunction in time and take measures to eliminate it.
In comparison with the standard BC on the Granta dashboard, any other on-board vehicle will be distinguished by its expanded functionality. You can do without them, but in this case, if you need to diagnose the car, you will have to contact a service center. By installing an on-board computer, the owner of the Grant can independently monitor all engine operation processes, diagnose malfunctions and activate some parameters.
Additionally, those owners of Lada cars who are not satisfied with the minimal information content of its built-in instrument panel do not miss the opportunity to buy a route on-board computer on the Grant. All the subtleties when purchasing lie in what kind of car router is needed, since the supply of models on the market is small. Nevertheless, they are enough for the right choice and independent installation of the on-board computer on the Grant.
Functionality on board the vehicle
The manufactured models of onboard vehicles for the Lada Granta have a wide information memory and are equipped with a monitor. This significant advantage is beneficial even for drivers with poor vision and women who are not very confident in the functioning of the car. In this regard, the on-board computer can help the car owner. He points to:
- travel time;
- fuel consumption at different speeds and driving rates, up to a liter;
- average speed levels and gasoline costs per trip;
- residual quantity in the fuel tank;
- speed when starting the car;
- speed when driving until the engine is completely warmed up;
- engine heating level to avoid overheating;
- various problems with Lada mechanisms;
- timely heating and drying of candles;
- temperature in the cabin and outside.
In addition to these functions, the on-board computer on the Lada Granta has volatile memory, a malfunction indicator, a supervisor (warning about unplanned vehicle movement, unswitched headlights and direction indicators) and afterburner. The latter resets the memory when switching to the gas pedal when accelerating the Lada to its original settings when using gasoline no lower than 95.
The standard on-board computer of the Lada Grant, namely the State X1 M (Multi-Set) model, is considered the highest priority on-board computer for the Lada family. Compact dimensions allow it to be built into the instrument panel in the recess of the button cover. If a car owner wants to buy a State on-board computer, then, in addition to the device, the kit will include instructions and wiring.
The filling of the State X1 M model consists of a built-in trip computer, in which all the necessary information on the operation and diagnosis of Lada mechanisms will be processed.
A diagnostic tester can provide a lot of information about the car's condition.
The on-board computer diagnostic tester is equipped with a plasma, digital tachometer and speedometer. Using the tester, it is easy to clarify the position of the throttle valve and the state of the electrical network on board, which will help prevent possible damage and fire to the vehicle's electrical wiring.
On-board unit installation
If you buy a State device for a Lada Granta after purchasing the car itself, you can install it yourself. At the same time, you do not need to worry about the supposed “failure” of the warranty of the purchased car, since the Lada panel has a corresponding connector for such an on-board device. When installing it, the panel will not be disturbed or damaged.
The on-board computer is installed by releasing the recess in the panel from under the button cover. The State on-board computer with the wiring already connected to it is inserted into the freed niche. The end of the wiring is brought out and connected to the diagnostic block below, near the passenger seat, where the passenger's foot is usually located.
Not too high a price, compactness, ease of use, ease of installation - these are significant factors for buying a State on-board computer for a Lada and making the operation of the car completely convenient and safe. A video on how to operate the on-board computer will help you get acquainted with the device in more detail.
However, the VAZ 2190 car can be equipped with other similar computer installations, for example, Multitronics routers. Their various modifications are considered universal, since they allow the driver to attach and install them in places where it is convenient for the car owner (on the windshield, inside, on the panel, etc.).
During installation, you will need to remove the dashboard to cut the appropriate hole.
Installing the Multitronics on-board computer on Granta in the Din-place (in the panel) will be complicated by the fact that here you will have to very carefully route the wiring to the diagnostic block. In this case, it will be necessary to remove the dashboard and make holes for the wires. In this case, it is convenient to use a heated knife to minimize the deformation of the panel. The wires must be secured in the panel itself to avoid the noise they make when the car is moving. It is better to secure the on-board computer to the panel with liquid nails.
After the on-board connector is connected to the diagnostic block, it is necessary for the computer to identify all on-board settings. If this does not happen within a certain time, it is necessary to change the computer firmware so that it supports the CAN protocol. Therefore, this will require reflashing the Multitronics, and this is already a significant disadvantage.
Markings and types of connectors
Today, all car radio connectors comply with the ISO standard, and two connectors are used. Each is a plug with eight pins, sometimes the manufacturer can combine them into a single housing. Energy consumption sources are connected to one of them; it is marked with the letter A. As for the second, acoustics, that is, speakers, are connected to it. The connector designation is marked with the letter B.
Adapters for car radio connectors
Head units with three outputs can be found on sale, but they are rare and usually represent an exception.
Even if the connected sockets do not correspond to each other, the car owner has several connection options:
- You buy a special adapter for the radio, which can be connected to the outputs of the speaker system.
- The second method is considered “collective farm” among car enthusiasts. Its essence is to cut off the non-standard output and wind the necessary wires to it. But we do not recommend using this option, because eventually the wires will begin to unwind, so the “collective farm” procedure will have to be repeated. In addition, the cost of adapters is not so high to use this method.
Versatile alternative
Of course, thanks to their various mounting locations, Multitronics on-board routers can compete with the States. Powered by a 32-bit processor, multitronics are precise and fast in operation. If a car enthusiast has the opportunity to buy such an on-board computer, then the car will be under excellent control thanks to functions such as:
- a large number of diagnostic protocols, including extended ones;
- transfer and save all driving statistics to a personal computer;
- voice accompaniment;
- parking radars, etc.
All of the above functions of the State on-board vehicle have been added to the multitronics. In addition, the latter have easy setup for operation and a convenient user interface. But due to all this, the price will be much higher than that of a compact and more suitable State Grant.
Initially, it was possible to buy on-board computers for the Lada Granta only from the official one. Since sales of this car started at the end of 2011, for some time the unavailability of additional equipment for the Lada made it not very popular among car enthusiasts. However, it is now possible to buy on-board computers for Grants from official dealers and various suppliers of automotive products and equipment.
The dashboard is always the object of increased attention from the driver. In the process of starting the engine, when moving, stopping, the owner systematically pays attention to indicator readings, color signals, and speed meters. Fortunately, technology has stepped far forward and now electrical devices are used instead of mechanical ones, which significantly increases accuracy and service life, reduces cost, and simplifies repairs.
Symbols on the Lada Granta dashboard
Information panel Grants liftback in the “Standard” and “Norma” configurations:
- Tachometer needle: indicates the crankshaft speed in online mode. The green zone indicates the permissible speed, the red zone indicates exceeding the recommended range;
- engine breakdown: many are familiar with the “Check Engine” sign. The orange indicator goes out immediately after the engine starts, otherwise correct the problem. As soon as the indicator lights up while driving or does not go out after starting, immediately stop the power unit, carry out diagnostics, and repair the breakdown;
- left direction indicator (green color indicator);
- low engine oil level in the system (red): after starting the engine, the indicator should go out within the first five seconds;
- activation of the anti-lock braking system ABS: yellow indicator;
- immobilizer: yellow indicator color, displays the security mode of the equipment;
- critical temperature of the cooling system: red diode. When reaching 115 C, the indication is accompanied by a sound signal;
- emergency condition of the brake system: red indicator. The problem must be resolved quickly, as there is a high probability of the brake calipers blocking. Most often, the reason is insufficient brake fluid in the expansion tank of the master cylinder. It is installed in the engine compartment;
- right turn signal;
- battery status: red indicator. Common breakdowns: lack of charge, mechanical damage, impact;
- electronic speedometer needle;
- exchange rate stability system (ESC): when the engine starts, it operates in one of three modes: on, off, emergency;
- upshift: only with pre-installed automatic transmission;
- activation of high beam headlights;
- activation of PTF, running lights;
- low beam activation;
- cancellation of odometer readings: daily mileage;
- monochrome LCD display - on-board computer;
- car door open alarm;
- indicator of reserve fuel remaining in the fuel tank;
- low tire pressure indicator;
- electric power steering status indicator;
- airbag status indicator.
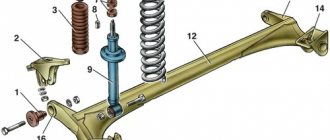
Grant relay diagram
Relay location in the main mounting block located in the engine compartment:
- 1 – drive of the cooler of the cooling system;
- 2 – central locking protection;
- 3 – secondary starter relay;
- 4 – additional part of the relay;
- 5 – turn signal and emergency signal breaker relay;
- 6 – wiper drive protection;
- 7/9 – insertion of high/low headlight modes;
- 8 – horn protection element;
- 10 – heated aft windshield;
- 11 – main relay block;
- 12 – fuel pump relay.
On-board computer capabilities
The LCD display accumulates data from a number of programmed sensors. They send information online for decryption and subsequent output.
- daily mileage data;
- remaining fuel;
- current time;
- current transmission;
- temperature outside.
*configuration may vary depending on the technical characteristics and modification of the vehicle.
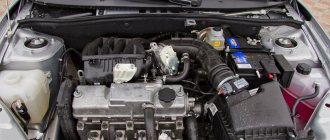
Filters and exhaust system
And first of all, this is the installation of high-quality and expensive filter elements. They, like no other design element, affect the power, efficiency, and service life of the Granta engine. Installing a good zero-resistance filter will give the engine up to 10% additional oxygen, which will have a positive effect on the combustion process. The mixture will burn faster, without residues, and as a result, engine power will increase by several percent.
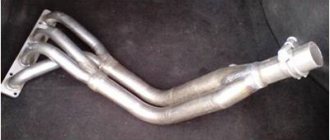
Tuning the exhaust system will also add a few percent of power to the engine. However, in the case of the exhaust manifold, you need to be careful and choose among the offers those companies that have already proven themselves. There is good quality steel, anti-corrosion treatment and successful exhaust routing schemes. 4-2-1 is an excellent manifold, especially well made and without the effect of parasitic swirl, it can simplify the exit of exhaust gases, and as a result, improve the purging of the cylinders at high engine speeds. We are not yet talking about refining the muffler itself, which can be either fancy or quite modest, but effective.
Typical malfunctions of the Granta liftback dashboard
- mechanical damage, which contributed to the failure of the contact board and terminals;
- exceeding the permissible voltage in the network, short circuit;
- failure of one / several sensors, which resulted in the transmission of incorrect, incomplete information to the on-board computer;
- ingress of moisture or aggressive chemical liquid, which resulted in failure;
- manufacturing defects;
- violation of installation technology;
- purchase of non-original products.
Sequence of actions when dismantling the dashboard
The reasons for disassembling and replacing the Grantback liftback dashboard are very varied: damage, installation of a new diode, etc.
- We unscrew the three mounting bolts around the perimeter. Carefully remove the assembled unit so as not to damage the contact boards, electrical wiring, and terminals;
- Remove the instrument panel mount for the Lada Granta liftback;
- To replace the tachometer/speedometer needles, you need to move the lever up a little and turn it counterclockwise.
After the final replacement and maintenance, we reassemble the structure. Self-repair of the front panel of the Grant liftback is completed.
Where does tuning begin?
Before upgrading your car, you should make a clear plan. After drawing it up, you need to start planning your budget. Without clear planning, car tuning may stall halfway, or the cost bill may increase significantly.
It is also worth saying that there are several types of tuning. Without going into details, these types are:
- cosmetic or stylistic tuning,
- constructive tuning.
Stylistic tuning can include any change in the appearance of a car. Whether it's painting wheels or installing new bumpers, almost all manipulations with the exterior will be considered cosmetic tuning.
Constructive modernization of a car implies direct intervention in the design of the vehicle. For example, pumping the power unit or improving the chassis.
It’s also worth saying that cosmetic tuning can be done yourself. It is better to entrust constructive modernization to professionals. Any operations that interfere with the structure of the car must be carried out with special attention.
Refinement of the Granta liftback dashboard
The basic equipment of the dashboard of the Lada Grant “Norma”, “Standard” is quite simple and uninformative. The defect was promptly corrected by manufacturing a new panel sample. It is installed exclusively on the “Lux” modification. An alternative option outside the factory version is provided. In order to increase the information content, a new instrument layout and external design are used:
- the borders of the instruments are separated by a chrome insert;
- more space is allocated for a computer monitor;
- the owner can independently choose the color design of the backlight in order to reduce eye strain;
- basic (important) information is now displayed at the top of the display.
Information about the Lada Granta instrument panel software
- turn off the ignition;
- press and hold the mileage reset button in pause mode;
- activate the ignition;
- release the pressed button.
Information about the software version and hardware model will appear on the monitor. The data must be used when purchasing a new shield.
Reviews from Lada Granta owners about the functionality of the dashboard
| № | Positive |
| 1. | Nikolay, 39 years old: in general, I am satisfied with the information content of the console, the display is bright. True, it shines a little in the sun, but this is not so significant. |
| 2. | Konstantin, 41 years old: I bought Grant a year ago in the “Lux” configuration with a new dashboard. I'm 100% satisfied. |
| 3. | Vitaly, 44 years old: I bought a Granta in 2013, the old instrument panel was good, but it was deformed after an accident, I replaced it with a new version from the “Lux” version. Identical in fastenings. |
| 4. | Dmitry, 37 years old: during a side collision with Renault, the dashboard and dashboard were damaged. I didn’t upgrade to a luxury one, I bought my original one. |
| 5. | Vladimir, 39 years old: he will buy Grant second-hand, he is happy with everything, the panel is good and informative. True, at night it is too bright, sometimes it strains the eyesight. |
| 6. | Kirill, 45 years old: I work as a taxi driver, I drive all the time, I’m happy with the panel, it’s informative. The on-board computer quickly displays all the necessary data. |
| 7. | Vladislav, 34 years old: after a major overhaul, friends recommended installing a new panel from the Luxury configuration, but he left the old one and is happy with everything. |
| Negative | |
| 1. | Vladlen, 44 years old: the old instrument panel is not very informative, often displays information and speedometer readings incorrectly. Installed from Lux configuration. Now there are no complaints. |
| 2. | Sergey, 33 years old: after the accident, I replaced the front console, including the panel, since the old version was unfinished and damp. |
| 3. | Vyacheslav, 39 years old: I drove the original device for a month and replaced it with a luxury version, it is much better and more informative. |
Owners' opinions on the functionality of the dashboard were divided, as expected. If we objectively compare the two panel models, then the winner is the “Lux” package. Regarding the duration of operation, efficiency of data output, and accuracy of readings, they are identical. The internal filling is the same, with the exception of the external design.