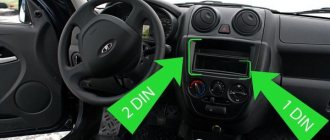
If you purchased a Lada Vesta in the “Classic” configuration, then you immediately think about installing music in the car (unless, of course, the dealer sells you “something” at exorbitant prices). Although if your Vesta is in the “Comfort” configuration, then the sound of the “audio preparation” with a standard, simple diskless player cannot be called high-quality and pleasant. And if in the first “classic” case there is a quick option to take out the pocket on the central panel and install any 1-din CD player, then in the “comfortable” version you can either accept “what” you have or try to buy a standard luxury player (price from 25,000 rubles). We've all seen luxury Vestas with a large standard 2 din mafon and enjoyed its 7-inch touch screen, navigator, rear view camera and other delights. Considering the convenient location of the standard radio (at the very top and in the center of the panel), good visibility for both the driver and the front passenger (the rear one is also a little visible), there is a natural and irresistible desire to put a large 2 din radio with a 7-inch screen in your Vesta. When you find out the current prices for 2 din radios (from 7,000 rubles), this desire also becomes easy to fulfill. But how to install a 2 din mafon, given the “special” shape of the standard seat? Today LadaTuningshop offers an adapter frame for installing a 2 din radio in the Lada Vesta.
This adapter frame is of high quality, it is cast, and is attached to the same places as the standard radio. The frame color is dark gray and matches the material of the Lada Vesta center console. Using this frame it is very easy to install any 2 din radio in the Lada Vesta, regardless of the configuration. The installation process requires a little time and care, but it is simple and straightforward. 1. Remove the decorative panel plug or tape recorder (if included). For ease of operation, you can carefully remove the side air deflectors. 2. The factory-installed central panel is removed. 3. Try on a new frame for installing a 2 din radio. 4. Cut off the plastic that gets into the opening of the frame: at the bottom of the frame and in the depth of the instrument panel (this will make it easier to route the wires), otherwise the tape recorder basket and the tape recorder itself will not fit in depth.
5. Try on the metal basket of the 2 din radio. If necessary, repeat step 4. 6. Insert and secure the transition frame for installing a 2 din radio, as well as the decorative central panel with air deflectors. 7. Install the metal radio basket. Check all wiring for the new 2 din radio (power, speaker wires, linear wires to amplifiers, antenna wire)
8. Install a 2 din radio. We remember that the mafon itself does not play music and it requires speakers, and, if possible, amplifiers for these speakers. We check the operation of the entire system.
9. Install a decorative rectangular frame of the 2 din radio, for which there is a special recess in the transition frame.
10. Turn on your favorite music and enjoy the sound!
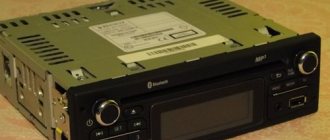
Almost all modern cars come from the factory with multimedia systems with a display that are multifunctional and easy to use. You can additionally connect a rear view camera to such MMCs, watch videos, and use the navigation system. In simple configurations, such an option is most often absent, so the standard Lada Vesta radio comes without a display. However, for comfortable listening to music and radio it will be quite enough.
The radio is located in the center of the front panel and fits harmoniously into the overall design of the cabin. Even the radio itself is made using an X-ray design, as evidenced by the X-shaped aluminum-look inserts around the RADIO and AUDIO buttons. I'm glad that the designers worked on even such minor details.
Basic functions and capabilities of the head unit
- Playing music files, radio;
- the ability to connect third-party accessories to play songs via AUX, SD card, other file drives, USB;
- displaying the current time and date on the display, both in active and inactive states;
- Hands Free option allows you to talk on the phone without being distracted from the controls;
- ability to connect third-party gadgets, functional equipment: rear view camera, tablet, navigation system.
Budget versions of MMC do not have a display, so interested car enthusiasts additionally purchase accessories for listening to music. The MMC is located in the center of the torpedo, harmoniously integrated into the overall design.
How to connect your phone to Pioneer
The presented type of car radio does not meet all the requirements of its owners. For example, it is not possible to connect a phone to it without carrying out a number of actions. Let us dwell on this in more detail, since the presented topic has not lost its relevance.
To carry out such a procedure, you will first need to make a so-called linear input. The presence of such an analog input will allow you to connect a number of devices to the radio, including a telephone. Let's look at the most common method of installing a linear input.
Lada Granta 2022
The Lada Granta car has been familiar to everyone since 2011, because it is a budget model that has gained wide popularity not only in Russia, but also abroad. The main reasons for the great popularity of Grants are their modern appearance, comfort and affordable price. Great demand for cars is a success that the auto company reinforces not only with modernization, but also with the release of new generation models.
It is known about the Lada Granta 2020-2021 that the car will receive global changes. The reason for their implementation is the transition to the Global Access or B0 platform from the Renault-Nissan concern. The potential for the use of the B0 base by the Russian auto industry is obvious, and it can be assessed using the Lada Xray model. Although the platform is considered budget, its use for assembling Grants has a negative side, which is reflected in an increase in the cost of the car.
What will the new Grant 2020-2021 be like - interior and exterior
The appearance of the new Grant will definitely be different, because the platform provides for an increase in dimensions, which means that the designers face a difficult task. On the one hand, the exterior will have to be redesigned, which will have to fit into the new platform, and on the other hand, it will be necessary to maintain the class of the car, which belongs to the budget segment. Forecasts and information from first sources indicate that the new Grant will have a more expressive and stylish appearance.
The interior is expected to undergo a redesign of the front panel, which will only have a rich appearance from the outside. For finishing it is planned to use the same inexpensive woven materials and plastic.
What's under the hood of the new Grant 2020-2021
Perhaps Granta fans will be disappointed, but there can be no talk of changing the technical content. The same 1.6-liter units with a power reserve of 87, 98 and 106 hp will be installed under the hood. The car will be based on a 5-speed manual transmission, but for automatic transmission fans, it is planned to produce models with a 5-speed robot.
The Lada Granta 2022 model year is offered in 7 trim levels; this is one of the most affordable new cars in Russia, so prices for it start at 483,900 rubles. We offer it in 3 modifications: 1.6 87 hp MT, 1.6 106 hp AMT and 1.6 98 hp.
It is not yet known when the new generation of Lada Granta will be released, but the manufacturer has set the deadline for the implementation of its plans as 2021. Specialists from France and Romania are actively working on developing the design of the new product, and it is expected that the first photos will soon be shown to the general public.
Speaker installation
All Lada Vesta configurations have audio preparation, which simplifies the task of installing equipment, because there is no need to run the necessary cables and wires.
The required minimum is present in all Vesta configurations, which allows you to effortlessly install both the head unit and dynamic heads with your own hands.
Installation of speakers does not require additional tools, so the work can be carried out without special training.
Before installing the speakers, you must carefully remove the insulation material in the places where the acoustics will be located.
Also, to seal the fasteners, you will need gaskets made of felt or similar material, which you can cut out yourself.
The installation area is equipped with only three fasteners, so to fix it with 4 fasteners you will need to install special stands. These stands can be made independently or purchased in advance at an automotive equipment store.
Then unscrew the screws at the bottom of the casing, bend the linings and push the spacers into this space. There is no need to secure them additionally; they will sit tightly in the prepared niche.
The installation area must be soundproofed. It is possible to improve the sound quality when playing audio.
The wires for the audio system are already in the cabin, but their connectors may not be standard. Therefore, it is better to purchase adapters in advance so as not to cut off the standard connectors, because this may affect the vehicle's warranty service.
This sequence of simple steps will allow you to install good-sounding speakers quickly and without the cost of installation by outside specialists
You need to act carefully, slowly, so as not to damage the trim and plastic in the cabin.
Installing speakers in front and rear doors
We remove the door trims and remove the sound insulation from the places where the speakers will be located. AvtoVAZ decided to borrow a solution from Renault Logan. The place where the speakers should be placed has three mounting holes, not four. Therefore, to install speakers (without cutting metal you can place speakers up to 16 cm in size) you will have to make special spacers for the front and rear doors (author). We select the thickness of the rings and the inner diameter individually (check that the speakers do not rest against the back).
The Vesta doors already have wiring for connecting speakers, but the connector for connecting the speakers is non-standard and came from Renault or Nissan. If you cut the block, you will lose the warranty. It is recommended to connect via an adapter (ZRS-AG-22 or CT55-17).
There is already a mesh in the door trims, so we simply perform the assembly in reverse order. By the way, dealers may require a certificate of qualified installation of an audio system, be prepared for this!
Video example of installing 16.5 cm speakers in the front doors of a Lada Vesta:
Correct adjustment and configuration of equipment
An instrument called an oscilloscope is best suited for this purpose. However, it is practically inaccessible to the average car owner. In this case, you can use a simple method:
- Turn off the input pulses coming from the amplifier.
- Set the regulators to the minimum level.
- After turning on the music, select a volume of about 90% and a medium tone.
- Give a signal to one channel, and then distort the signal and slightly reduce it in the opposite direction.
- Turn off the signal. Repeat this with other sources.
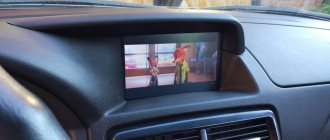
Screen/Display Description
1 – folder number indicator; 2 – track number indicator; 3 – playback window; 4 – “Radio” mode indicator; 5 – SD memory card playback mode indicator; 6 – USB flash drive playback mode indicator; 7 – indicator connection to the device radio via Bluetooth;8 – radio station scanning mode indicator;9 – random track playback mode indicator;10 – repeat mode indicator of the track being played;11 – equalizer mode indicator;12 – stereo mode indicator;13 – mode operation indicator loudness;14 – silent mode indicator;15 – indicator of the mode for displaying stations by genre or receiving text information transmitted by FM radio stations;16 – indicator for transmitting information about the general state of road traffic;17 – indicator of the mode for displaying the names of some stations;18 – indicator of the reception mode of regional radio stations; 19 – indicator of the search mode for alternative frequencies.
The first reviews from owners about the standard Lada Vesta radio are only positive. The radio is quite functional with a friendly interface, nothing superfluous. The sound of the music is good. For an ideal case, the only thing missing is the buttons on the steering wheel. You can learn more about the audio device from this video:
Support for files on external media is exactly the same as on a more expensive multimedia system. For owners of Lada Vesta, we are posting a user manual for the radio, in which you can find a detailed description. To download files, you need to log in to the website, password ladaonline.
Review of the radio from the magazine “Behind the Wheel”:
Special thanks for the large control keys. Nowadays, almost everyone has standard double-din audio systems, but for some reason this does not always mean successful ergonomics. Often, creators prioritize the beauty of a large display, which is absolutely useless in the absence of navigation or a rear view camera. Vesta’s priorities are correct: it’s easy to get to the right button without looking, and two lines on the screen are more than enough to display the necessary data.
Some may regret the lack of a CD player, but let's be objective: this format is becoming a thing of the past. It is more convenient to use SD cards and USB flash drives. It’s much easier to record and re-record music on them, they don’t take up any space at all, and they hold so much data that you won’t be able to listen to everything in every “long-distance” trip.
Take the survey. Help us evaluate the stock radio by leaving reviews about it. Let us remind you that other operating instructions for Lada Vesta can be found in this section.
Key words: cassette player Lada Vesta
Reviews
| № | Positive |
| 1. | Sergey Ivanovich , 44 years old (otzovik.com): I use the standard radio, the quality is good, the functionality is sufficient. |
| 2. | Fedor Stepanovich , 40 years old (www.zr.ru): my comrades are all agitating me to install a 2-DIMM stereo system. I haven’t decided yet, because the price is steep, but the offer is good. |
| 3. | Vitaly , 22 years old (autobann.su): the quality of the standard MMC is not great, but it will last for several years, and then I’ll buy an imported one. |
| 4. | Daniil , 33 years old (lada-vesta.net): The factory stereo system is not bad, functional, no complaints. |
| 5. | Vitaly Semenovich , 43 years old (otzovik.com): for me, sound quality is not important, so MMS suits me, no comments. |
| 6. | Stepanovich , 44 years old (www.zr.ru): Three years have passed since the purchase of the car, all components are working properly, the condition is as if from the factory. |
| 7. | Vasilyevich , 20 years old (autobann.su): my positive review of domestic transport and assembly. A worthy car, a rival to many European brands. |
| 8. | Tolik , 43 years old (lada-vesta.net): I’m not a music lover, for me the quality and purity of sound are not particularly important. The phone is always on in the car. |
| 9. | Stepan Nikolaevich , 39 years old (otzovik.com): it has been working properly for two years, no special comments. |
| 10. | Konstantin , 43 years old (www.zr.ru): I’m happy with the purchase of the car, the interior is quiet, the acoustics are good. |
| 11. | Anton , 35 years old (autobann.su): after three years of operation, I can’t say anything bad about the MMC. |
| Negative | |
| 12. | Dmitry Viktorovich , 44 years old (www.zr.ru): constant problems with the firmware, glitches periodically. |
| 13. | Sasha , 37 years old (otzovik.com): in six months I’ve already been to a service station twice, with an electrician, changing relays and switches. |
| 14. | Nikolai Vasilyevich , 46 years old (autobann.su): replace the standard radio with an imported one, the sooner the better. |
Related link:
Cruise control on a Lada Vesta car
OEM radio controls
In the left corner there is a function key for activating/deactivating the radio. To the right there is a built-in microphone for conversations via Hands Free, and there is also a reset button to factory settings.
To the right is a monochrome display that displays basic information about tracks and radio frequencies.
Below is a slot for a storage card. It is mainly used for inserting a card and flashing the module, but if necessary, it can be used to read music tracks.
Below the perimeter there are preset buttons:
- MUTE – mute sound;
- Key to accept and reject calls (red and green);
- SCAN - multifunctional key for surfing the navigation menu;
- RADIO and AUDIO for switching playback modes from storage media;
- In the center of the structure there is a washer - a regulator for selecting functions, listing, changing the volume;
- At the very bottom there is a block with mechanical keys (6 in total) for quickly jumping to saved radio stations.
Vesta's standard MMS
All versions of Vesta, with the exception of the basic one, have MMS installed. The minimum configuration of the car is equipped only with an audio system. The main functions of the MMC are playing audio files from removable media, receiving radio signals, navigation, parking assistance with video playback from the rear view camera.
- processor CSR S3681 B036BK K609B CPU SiRFatlas VI 800mhz Cortex A9;
- RAM Micron D9PSK 2X 256MB DDR3-1600 Clock Rate 800 MHz MT41K128M16JT-125 IT:K;
- internal memory 2 GB Micron NQ283 NAND FLASH 2gb MT29F2G08ABAEAH4-IT;
- internal memory 8 GB SDMMC 8GB SAMSUNG KLM8G1WEMB-B031;
- bluetooth CSR 8311 Bluetooth v4.1 BlueCore CSR8311 QFN Automotive;
- WI FI CSR 6030 Wi-Fi IEEE 802.11b/g and n;
- digital video decoder AKM8859 DIGITAL VIDEO DECODER PAL/SECAM/NTNC AK8859VN;
- audio AK7757VQ Audio DSP with 24bit 3ch ADC + 4ch DAC + MIC Amp;
- power controller MPS MP4570 Automotive Power Systems;
- TPS65150 Low Input Voltage, Compact LCD Bias IC With VCOM Buffer;
- TJA1042 high-speed CAN transceiver;
- CAN and K-Line controller Freescale S9S12G96F0CLF;
- controller Fujitsu 32-bit ARMTM CortexTM-M3 based Microcontroller.
The following elements are used to manage and play files:
- seven-inch touch screen;
- “Mode” key – select modes;
- “MUTE” – mutes all sounds;
- Volume control – pressing once turns the device on or off;
- microphone for the ability to talk on the phone without hands - Handsfree;
- “Reset” – button to reboot the device;
- slot for reading a removable SD card;
- connector for reading information from removable USB media and connecting various gadgets;
- AUX connector for connecting headphones or external audio devices.
Additional control
In addition to the buttons near the touch screen, MMS functions on the Lada Vesta are controlled using duplicate buttons located on the steering wheel:
- volume control;
- selection of file and radio playback modes;
- turning off all sounds;
- button for navigating through folders and tracks on removable media; in another mode, the buttons are responsible for accepting/ending an incoming call.
Photo 2 (Additional controls on the steering wheel)
Such equipment first appeared on AvtoVAZ cars. Previously, a standard audio system and MMC without duplication on the steering wheel were offered. Thanks to this, Vesta can compete with budget foreign cars of the same class in approximately the same price segment.
Key Features
The system combines several different devices that should be in every modern car. The main one is the audio system, consisting of a 7-inch touch screen. Its peculiarity is its resistive base and the need to press with a stylus or other similar object. The input method is not the most progressive, but in weather conditions with sudden temperature changes, the resistive screen works without failure. The sound is reproduced through six speakers to create surround sound.
The system recognizes most SD and USB drives, but with a limitation - the media should not contain more than 1024 files and 256 folders. The flash drive must be formatted to FAT 16 or 32 with a maximum number of partitions - 4. Cards supported by MMC Lada Vesta:
- SDHC no more than 32 gigabytes;
- SD no more than 4 gigabytes;
- USB 2.0 and 3.0 no more than 64 GB.
The user is warned by the instructions that the download speed depends on the number of files on the drive. The optimal solution would be a medium that contains only audio and video files.
Files supported by MMC:
- WMA audio codec, bitrate no more than 128 kbps, sampling 44100 Hz;
- video codec WMV3 with a frame rate of 25, bitrate 750 kbps.
Before use, it is recommended to convert all files to the required parameters. For these purposes, the manufacturer recommends the free Freemake Video Converter program. When playing back, keep in mind that the files will be played in the order they were recorded.
Recommendations for removing the casing
It is impossible to install a sound system in a Lada Vesta car without removing the door trim. When dismantling the cladding, be extremely careful not to scratch the plastic. Under no circumstances should you use a screwdriver; we only use a plastic card.
To dismantle the plug at the end of the door, pry it off with a card; there are special recesses at the bottom. In the same way, the window lift buttons are dismantled using a card; the fastening antennae are located at the back and on the sides in front of the MUS.
The casing itself is attached, in addition to self-tapping screws, to 4 more “hedgehogs”. They will definitely break if you do not use a special removal tool. The Lada Vesta has hedgehogs from Nissan or Renault, but if you modify the grand ones, which are much stronger and cost several times less, you can save money.
Thus, the trim from the left door is removed. Removing the trim on the right side has its own characteristics. There is no need to remove the power window buttons and look for the secret screw plug. Simply remove the handle cover. To do this, you need to pry the plugs from the bottom; there is a special groove in it, using a plastic card. Then you need to unscrew two 10 mm screws, the next step is to remove the trim, as with the left door.
Audio mode
The audio player window is intuitive. All audio files are played on 6 speakers, the sound of the acoustics is at a decent level. You can adjust the sound using the equalizer (there are 6 pre-programmed settings for Jazz, Rock, Voice, etc.).
It is possible to listen to music via Bluetooth from your phone. One drawback worth noting here is that information about the file being played is not displayed on the MMC screen.
Requirements for MP3 files with constant or variable bitrate:
- 32-320 kbit/s at sampling rates of 32000 Hz, 44100 Hz and 48000 Hz for MPEG-1 Layer 3;
- 16-160 kbit/s at sampling rates of 16000 Hz, 22050 Hz and 24000 Hz for MPEG-2 Layer 3;
- 8-160 kbit/s at sampling rates 8000 Hz and 11025 Hz for MPEG-2.5 Layer 3.
Requirements for WMA files with constant bitrate and bit rate:
10-320 kbps, with variable bitrate and bit rate 32-192 kbps, and sampling rates 8/11.025/16/22.050/32/44.1/48 kHz.
Requirements for WAV files:
8/16/24 bit resolution with 44.1 kHz sampling rate.
Requirements for FLAC files:
with a sampling rate of 44.1 kHz.
Lada XRAY Cross Instinct model 2022
In March 2022, an updated version of the XRAY family from AvtoVAZ was presented - Lada XRAY Cross Instinct. This model is a Lada X-Ray Cross in the maximum configuration, which is called Instinct. A characteristic feature of the new product is the roof and mirrors, which are painted black. On the roof there is a black antenna in the shape of a shark fin. Alloy wheels have a double color, emphasizing the crossover style.
The car is equipped with a number of the following options:
- climate control;
- multifunction steering wheel;
- heated windshield, steering wheel and all seats;
- window lifters.
At the head of the dashboard is an 8-inch multimedia display with a rear view camera. The multimedia system includes Yandex.Auto options, the Alice voice assistant, a 4G modem, as well as various services and browsers. Today you can see not only photos of models of the updated Lada X-Ray, but also see the new product in person. The first cars are already arriving at official dealers at a starting price of 1 million 33 thousand rubles.
The car is available with two versions of power plants. The first is a VAZ 122-horsepower unit with a 5-speed manual transmission, and the second is a 113-horsepower engine from Renault-Nissan, combined with a CVT.
Screen
Another wave of outrage hit one of the modules of the Lada Vesta multimedia system, namely the touch screen. The resistive type of sensor was not to the liking of many car owners. And this is not only in Vesta - such panels have long been used in foreign cars and the latest VAZ models. The resistive type of sensor can rightfully be considered the most successful option for use in a car, since it has a number of advantages. It does not respond to changes in temperature and atmospheric conditions.
Pressing can be done with any (but not sharp) object, which is certainly convenient, since when moving it is not always possible to pay attention only to the radio. For example, you just got into a car in thirty-degree frost
They started it up and turned on the stove, but somehow they were reluctant to take off their gloves. And you want to listen to the latest news broadcast on the radio or the weather forecast. This is where the resistive type of screen shows its best side. You can safely click your finger on the screen without taking off your gloves.
Adviсe
Technically, installing music yourself in Lada Vesta is not difficult. By adhering to a few simple rules, any motorist can handle the work. Consider these rules:
- All work must be done very carefully to avoid damage to the plastic upholstery;
- The car already has audio preparation; you only need to install harnesses to connect the front speakers;
- You cannot cut off standard connectors, but you need to buy and use adapters;
- Before installing audio, it is recommended to soundproof the Lada Vesta doors to obtain improved sound characteristics;
- Install the speakers on the spacers.
MMC malfunctions and methods for their elimination
Obviously, the standard radio is one of the first developments of the AvtoVAZ concern; there are defects and shortcomings. For example, the display does not load the “LADA” logo:
- We remove the digital storage medium from the connector.
- Disconnect the power terminal from the battery for 10 seconds.
- On the laptop, format the SD card in FAT 32 format, create an empty file “explorer.txt” in the root directory.
- We connect the battery terminals and restart the audio system.
If this method does not help, then problems with the software code of the electronic control unit are obvious. You need to reflash your digital gadget.
The second, no less common malfunction is “cannot find satellites.”
The solution to the problem is quite simple:
- Remove the power terminals from the battery.
- Reset the device to factory settings.
- We restart the gadget again.
Vesta Info - Teyes
The popularity of the sedan from the Russian manufacturer could not escape the famous Chinese developer of radio tape recorders. And the Chinese engineers have not forgotten about the love of our compatriots for all kinds of customization and the fact that the standard MMC of the West works on the ancient Windows CE. , a separate shell was born for working with the CAN-BUS decoder of the Lada Vesta .
Be careful! On a Lada Vesta car, the CAN wiring is routed to the radio only on maximum trim levels. For all others, you will have to independently lay the wiring from the VSM unit to the radio.
But it didn’t appear right away - there are two versions of the box.
Lada 4×4 model 2022
For a long time there have been debates about whether AvtoVAZ will continue to update the legendary Niva 4x4? The last modernization of Niva or VAZ-2121 cars took place in 2006. After this period of time, the model nevertheless underwent another restyling, and today the new product has already gone on sale. It is produced, as before, in three modifications:
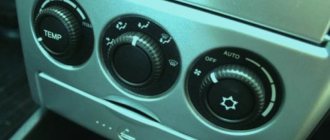
The updated version of Lada 4x4 is characterized by the following innovations:
- a new front panel with a climate control control unit, consisting of three puck-shaped regulators;
- the size of the ventilation deflectors has been increased, and the damper controls have been equipped with electric drives;
- a new dashboard scale with a modern design;
- the appearance of a digital display of the on-board computer on the parting panel;
- interior equipped with 2 sockets, a large glove box and cup holders.
The manufacturer did not forget about comfort, which was increased by installing new seats. The mechanism for folding seat backs on three-door versions has been improved. It was possible to reduce the level of vibration from the motor by installing new motor mounts. The technical part has not been modernized, nor has the appearance. However, there is an opinion that German specialists will develop engines for the export Niva.
Easy connection
Required
: 12V battery, Arduino jumpers.
We connect the instrument panel to the battery
:
- No. 7 is a plus that appears when the ignition switch is turned on.
- No. 8 (K) - constant minus.
- No. 9 - plus permanent.
No. 5, 6 - work relative to the minus (the steering column switch of the on-board computer is “up and down”, needed for testing the dashboard). See Vesta shield pinout.
To do an autotest of the Vesta dashboard, you need to simulate pressing the “up” button of the BC (short pin No. 5 to minus) and turning on the ignition switch (pin No. 7 to plus).
Radio Receiver Capabilities
- “Radio” mode (manual and automatic search for radio stations)
- “Audio” mode (listening to audio files from an SD card, USB flash drive or phone via bluetooth)
- AUX mode (To play audio from an external source)
- Hands-free Bluetooth mode
Setting up audio parameters (short press on encoder No. 7 in the main menu):
- Switching and changing the radio settings is carried out by rotating the encoder (position 7) in the following order: Equalizer, Bass tone, Treble tone, Balance, Front/rear balance, Loudness, Output.
- There is an equalizer, the settings of which are carried out in the following order: EQ JAZZ, EQ POP, EQ CLASSICAL, EQ VOCAL, EQ USER.
System settings (long press of encoder No. 7 in the main menu) allow you to:
- set the time display format (Clock mode);
- manually set the current time (Setting hours/minutes);
- on off. function of adjusting the current time using RDS signals (RDS CT);
- on off. function of automatic switching to an alternative broadcasting frequency (RDS AF);
- on off. search function for radio stations by a given program type (RDS PTY);
- on off. function for receiving regional radio stations (RDS REG);
- on off. CB band (AM band);
- on off. Bluetooth function (phone connection);
- on off. button press confirmation signal (signal);
- on off. noise reduction function (noise reduction). Affects only operation in “Radio” mode;
- reset the radio settings to factory settings (factory settings). After resetting, the radio settings are set in accordance with Table 2 (clause 1.2 “Description of controls”).
Version 1.1
The second - 1.1 - version, with which the Chinese seem to show us a special concern for the Russian market, releasing a separate implementation of the CAN module with a personal software shell for it.
A clear difference can be seen in the picture:
Download Vesta Info shell for version 1.1
The shell is installed in the same way as any other application for the Android OS. Download the file lada_vesta_1.1.apk to a USB flash drive or directly to the radio by opening this site. Then go to the all applications menu:
And find the file manager:
Open a program called Files . Using it, we find the pre-downloaded lada_vesta_1.1.apk and click on it to install it.
If everything is done correctly, Vesta Info . Open it and make sure it works. Good luck!
Replacing the standard audio system
- 7010B and 7023B. Radio tape recorder made in China. The cheapest option will cost about 3 thousand rubles. Equipped with a 7-inch screen with a resolution of up to 800x480 and 1 GB memory. Runs under Windows CE OS.
- 7021G. Operated by Windows CE 6 OS. Seven-inch screen with a resolution of 800x480, F1C500TM processor. Estimated price – 4-5 thousand rubles.
- RK-A701. Chinese radio, 7-inch screen with a resolution of 1028x600, 4-core RK3188 processor, 1 GB of memory, OS – Android 5. Price – up to 8 thousand rubles.
- AD-UNI707. Manufacturer – China, OS – Android 6, seven-inch touch screen resolution – 1024×600, 2 GB of memory, processor – AllWinner Quad Core T3. Cost – up to 13 thousand rubles.
- Prology DNU-2630. The 6.2-inch screen with a resolution of 800x480 has high operating speed and excellent sound. The average price is no more than 13 thousand rubles.
- MEKEDE MKD. Radio tape recorder on the Android operating system, eight-inch touch screen with a resolution of 1024x600, memory capacity - 2 GB, cost - 16 thousand rubles.
- NaviPilot DROID4. 8-inch touch screen, resolution – 1024x600, memory – 2 GB, cost – 28 thousand rubles.
DVM 2117IQ. Equipped with a solid ARM11 600MHz processor, 8-inch touch screen and Windows operating system. At a price of more than 30 thousand rubles - only 256 MB of memory, screen resolution - 800x400.
To install any radio on the Lada Vesta, you will need an adapter frame for a 2DIN radio. You can buy it at any auto store.
Installing a standard radio
The depth of the standard seat for the MMC is 150 mm. If the dimensions of the new radio exceed this figure, then using a hacksaw blade or any other similar tool you will need to cut down the mount in the dashboard. The manufacturer has prepared all the wire blocks for connection in advance.
To install the multimedia system, you need to remove the plastic blanking strip from the dashboard. Immediately behind it are the ISO, USB, AUX connectors, as well as Fakra – connecting the radio antenna. Next, a standard MMC or any 1DIN radio is inserted into the hole. Things are more complicated with the installation of 2DIN media systems - you cannot do without modifications.
Installing an alternative MMC
First you need to carefully inspect the seat. In most cases, the installation of a 2DIN radio on the Lada Vesta will be prevented by a plastic partition in the depth. This partition must be removed.
To do this, you can use a file and sandpaper to level the surface. From the standard plug you may only need a frame with which to adjust the width. For connection, a standard ISO connector is used, which is available on all Vesta trim levels. Next, you need to turn on the radio and check the operation of the modes. In addition to the new audio system, it is recommended to install speakers in the door cards. The process will not take much time.
Selection of speaker systems
For high-quality sound of the played soundtracks, it is recommended to purchase a 2-component system, which contains separate tweeters and mid-bass midrange/bass speakers. In this way, a high-quality sound stage can be formed.
That is why it is recommended to place them in front. The role of the subwoofer is played by cheaper coaxial speakers, which are installed in the rear of the car. To install tweeters and connect them to the radio, you need to install additional wires.
HF speakers are installed in the triangles of the Lada Vesta mirrors. If you need a budget option, then you should buy coaxial system speakers. You will not get the effect of frequency diversity to obtain a sound stage, but the musical sound of the broadcast programs will be good. No additional system configuration is required.
Lada XCode model 2022
The most anticipated new product from AvtoVAZ is the Lada XCode crossover, news of its release is breaking all search query records. The concept car was first presented to the general public back in 2016. The new product is expected to go on sale in 2020-2021. The exact date is not known, as is the cost. The configurations and prices of the Lada XCode can be found out closer to the arrival of the cars at official dealers.
Today we can say about XKode that it is one of the most anticipated cars on the Russian market. It will be produced in the body of a crossover, although compared to the XRay, the model is significantly inferior in size. This is not surprising, since the car is aimed primarily at the youth audience.
With the release of HKode, AvtoVAZ plans to reach a new level of development. The expected crossover has a completely new body, designed in the already well-known X-Face style. Under the hood it is planned to place 1.6-liter engines, which are used to assemble Lada X-Ray cars. It is possible that diesel versions of these crossovers will also appear later.
Nothing is known yet about the possibility of equipping the crossover with an all-wheel drive system, but it is possible that such a version will be presented in the maximum configuration. Based on preliminary conclusions, we can conclude that the price of the minimum configuration of the Lada XKod will be from 900 thousand rubles.
After reviewing the list of new products from Lada for 2020-2021, we can make a preliminary conclusion that, despite skeptical forecasts, the auto company has every chance not only to take a leading position in terms of sales in Russia, but also to achieve great success in the European market.
Comments
TOP materials of the week
TOP products in the store (more)
Your review of the sound insulation of the Lada Vesta:
Lada.Online
Lada (“Lada”) is a brand of cars produced by JSC AVTOVAZ. Previously, it was used only for export cars, and for the domestic market, cars were produced under the Zhiguli brand. In 2004, the management of AVTOVAZ announced the transition to the Latin alphabet for the official spelling of the names of all cars produced by the plant: Lada - instead of "VAZ" and "Lada".
Lada.Online is the largest Russian-language automotive resource with a daily audience of thousands, which is dedicated primarily to cars of this brand, the domestic automotive industry and the automotive world in general.
Lada Vesta SW Sport 2022
The AvtoVAZ company plans to expand the Lada Vesta model range. The new Lada Vesta SW Sport will be available for sale no earlier than mid-2022 (closer to August). Today you can already stand in line to buy a car from official dealers. The release of the sports station wagon version is carried out in small batches, and by the beginning of 2022 it is planned to prepare up to 300 units of equipment.
Last year, AvtoVAZ released the Vesta Sport - the sedan received a boosted 1.8 engine with 145 hp, a manual transmission and a redesigned suspension. The interior and exterior have also been updated; there are now many elements everywhere hinting at the sports version of the model. Frankly speaking, a car with a power of 145 horsepower and a weight of 1,300 kg, well, cannot be called truly sporty, but just a good car with a well-tuned chassis. Prices for Vesta Sport start from 1,080,900 rubles.
Judging by the photo of the model that appeared online, we can conclude that the new product will have minor differences compared to the standard version. In the front part, the front bumper and part of the body will be modified (sills and wide fenders like a sports sedan). At the rear, modifications to the trunk lid, bumper and bifurcated exhaust system are expected. 17-inch alloy wheels are borrowed from the sports sedan.
Under the hood of the new product, 145-horsepower gasoline engines with a volume of 1.8 liters will be used, combined with a 5-speed manual gearbox. Compared to the sedan, the sports version of the Vesta station wagon has had its ground clearance reduced by 30 mm. Now the ground clearance is 162 mm, and an increase in track by 18 mm will have a positive effect on the quality of driving.
Can-bus connection
- laptop or smartphone.
- DDT4ALL program (works with Microsoft .NET Framework)
- ELM327 Bluetooth (see Products for LADA from Ali).
- connectors from the PC power supply with heat shrink.
We supply power to the ELM327 and the instrument panel.
- select COM port
- Bluetooth
- adapter speed
- accept the terms
- checking ELM 327
- test result (if we fail the test and you are sure that you have ELM327 1.5 and other programs say that everything is fine, then we are looking for a problem in the Bluetooth drivers)
- let's connect
Other articles about the Vesta instrument cluster
:
Share on social networks:
Found an error? Select it and press Ctrl+Enter..
Setting up the radio receiver
This module in the radio in the LADA Vesta car receives programs in three standard ranges (LW, MW, and VHF) and two modulation modes (FM and the little-used AM). To make searching for stations quite convenient, the car radio has six special buttons on the front panel. Using these keys, you can memorize stations, after which the transition to them will be carried out by simply pressing. In the FM band, the user can “remember” up to 18 fixed stations. A normal search for transmitting centers is also possible without resorting to the memory option. Also, many car owners are interested in the question: how to connect the phone to the radio?
Mounting speakers
There is no need for special training when installing speakers. It will be enough to remove the insulating material located in the places where the speakers will be mounted.
We will need special gaskets that can be cut from felt material.
If 16-centimeter loudspeakers are mounted in the front door cards, then this procedure has a number of features. The standard set of fasteners involves fixing the speaker with three screws. In our case, we will need to install special spacers, whose dimensions depend on the size of the dynamic heads.
Using this technology, speakers are installed in the rear door panels of LADA Vesta.
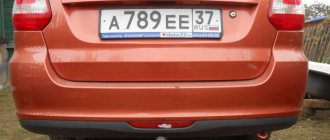
Installation of 2 DIN radio on Lada Vesta
We have already touched on the audio features of the new AvtoVAZ model. During the review, we talked about an unpleasant point, which is that you cannot install a 2 DIN radio on Vesta without modifications. In this report we will show a concrete example of how this can be done.
First, remove the standard radio (if there is one) and inspect the seat. Installing a 2 DIN radio (in our case Pioneer AVH-X4700DVD) is hindered by two points:
- The plastic partition inside the panel prevents the 2 DIN radio from being inserted completely;
- Standard radio plug.
As you might have guessed, the modification consists of removing the first and adjusting the second. Now in more detail.
1. Saw off the inner plastic part of the panel with a file and sand the edges.
2. From the plug we leave only the frame, the dimensions of which are adjusted to the width of the 2 DIN radio, using a saw and a file.
Connection does not cause problems, because All Vesta configurations have a universal ISO connector inside the panel. We insert the 2 DIN radio into place and check its operation.
MMS revision process
We remove the radio and unscrew the cover, turning the screws out into view. Next, we take out the audio system board and find on it the amplifier chip (circled in red) and the amplifier power capacitor (circled in yellow), which is located nearby.
1. Solder the microcircuit by first removing the metal casing and bending the lower ears. It is more convenient to do this using a hair dryer (25 legs in total, which are soldered with lead-free, refractory solder). Next, we clean the holes in the board and solder the purchased microcircuit and install the metal casing. Apply thermal paste.
2. Solder the capacitor (don’t forget that it is polar). We install the new one in a lying position, because its dimensions are much larger than the standard one. We solder a film capacitor on the back of the board.
Additionally : We change preamplifiers in a similar way.
As a result, the radio/MMC has a huge power reserve. Now you can listen to music at higher volume levels with virtually no distortion. In addition, the sound became cleaner.
Let us remind you that there is an easier way to improve the sound quality of music, for example, install an amplifier or flash MMC with a different version of the menu and equalizer.