Hi all! The demand for budget class cars in Russia is very high. But even such cars may require a towbar. When choosing a Lada Granta towbar, the trailer hitch is mainly necessary for the subsequent transportation of trailers.
That is, the plan is to transport fairly heavy or voluminous cargo. Considering the overall characteristics of the Lada Granta, you can hardly expect that all your luggage will fit in the luggage compartment.
I’ll say right away that buying a tow bar for Granta won’t be too difficult. The price is quite low, while the quality is at a good average level.
Lada Granta MAGMA › Logbook › Installing a tow bar on a Granta (TSU)
Hello dear subscribers!
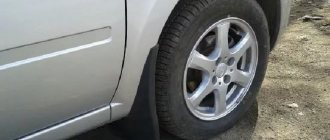
I decided to install a tow bar on my magma. The trailer has already been purchased. I'll tell you about him a little later, in the next blog. I need all this for work, but I’ll tell you about the household too, very useful things. The cargo, which is planned to be transported from time to time, is light in weight. It is light, but dimensional. So a trailer is an ideal solution for such problems. Well, now I’ll tell you directly about choosing a manufacturer. The selection at our local market is small. I found only a tow bar in stock. In principle, the company, according to reviews on the internet, makes good and reliable towbars. But there was a regular welded one-piece towbar available, but I wanted a model with a removable ball. In the end, I still found this model on the market, BUT at an expensive price! In our “Cossack” market they are very good at making money on people who are intently looking for something. In 10 minutes. searches, the entire market already knows what you are looking for. And accordingly, the price rises at every counter. Anyone who knows about similar market schemes (the so-called runners) will understand what I mean... Well, okay, in general, I found what I was looking for. This is what it looks like: Now a little about installing it on a car. On our Grant, oddly enough, the factory provides standard mounts for the tow bar, located in the rear side members. This is very pleasing, because you don’t have to drill anything. The same is provided for Kalina, in a sedan body. Well, those who have a Kalina hatchback are a little less fortunate. There, the towbar has a completely different shape and design, and for it it is necessary to make two holes in the spare wheel niche. The tow bar itself is secured at 6 points with M10 bolts. Layout of threaded holes in the side members:
When I first looked under the bottom, I was terribly upset. The fact is that I found only two threaded holes. They were behind the rear bumper. But there were none on the side spars. I was already prepared for the fact that I would have to drill, somehow grab the nuts, etc.))) But then, in the hope of a miracle))), I decided to carefully examine the bottom again. I took a closer look and discovered that in the supposed places where the tow bar would be attached, under the factory layer of anti-gravel, some square gaps were visible. It turned out that these were exactly the same threaded holes, they were simply sealed with square pieces of film and masked on top with anti-gravel. Underneath the film was a pristine carving. It’s nice that AvtoVAZ cares about such little things.))) I figured out the tow bar in place and tightened the 6 bolts included in the kit. All the holes in the towbar matched the threaded holes in the body.
It is very difficult to tighten the bolt that is screwed in behind the rear bumper on the right side of the car. It is very difficult to get to it; the spare wheel niche is in the way. I managed to tighten it with a ratchet with two extensions and two cardan shafts. After the towbar was bolted to the body, I began running the wiring for the connector. I passed the wires through the standard rubber seal located on the left side under the bumper. Moreover, I decided not to make holes in this rubber band, but rather to insert the wires along with the standard ones. I had to get pretty fucked up! In the end, this is what happened:
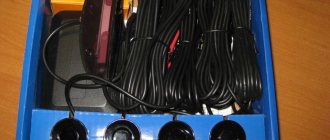
I won’t specifically describe the connection to the standard wiring. The towbar comes with a detailed diagram with pinout of the connector. Well, in standard wiring, everything is simply checked with a multimeter. Photos after connection:
Tips for choosing a towbar
As for the data related to trailers, the Kalina-2 hatchback is no different from the station wagon:
- The total weight of towed devices not equipped with brakes must not exceed 450 kg;
- The maximum trailer weight, if equipped with a brake system, can be 900 kg.
Based on these numbers, you need to choose a new towbar. For most devices on the market and suitable for Kalina-2, the rated value is 900 kg. Here we are talking about the traction load, that is, the force applied in the horizontal plane. There is another important parameter - the load on the ball. Typically, for devices that can withstand 1000 kg of traction load, the ball load value is 75 kg. The force with which a trailer can push against a towbar is limited, and 75 kg is approximately 750 Newton.
Traction load and ball load are not the same thing
Let’s say that one person can connect the trailer to the car. In this case, the vertical load can hardly exceed 50 kg. Conclusion: there is no need to buy coupling equipment if it is not even designed for the specified load (50 kg).
The question is often asked what category of license is needed to drive a car with a trailer. The mass of the station wagon is 950 kg, and the trailer, as mentioned above, can weigh no more. Plus, the mass of the “hitch” will not exceed 3.6 tons. All together this will entail the following: the driver driving such a “hitch” only needs to have a category B license. This is true even if the trailer weighs 900 kg.
Towbars for LADA GRANTA
from 2004 to 2016
Kalina, 1117, station wagon since 2007 Kalina, 1118, sedan from 2007 Granta, 2190, sedan from 2012 Granta, 2191, liftback since 2014
Kalina, 1117, station wagon. Kalina, 1118, sedan. Granta, 2190, sedan. Granta, 2191, liftback. Kalina 2, 2194, station wagon. Kalina Cross, 2194, station wagon (incl. Kalina Cross 2)
sedan/liftback, from 2016 in Granta 2, sedan/hatchback, from 2018
sedan, since 2012 liftback, since 2014
Granta 2, station wagon, from 2022
Kalina, 1117, station wagon. Kalina, 1118, sedan. Granta, 2190, sedan (incl. Sport) Granta, 2191, liftback. Kalina 2, 2194, station wagon. Kalina Cross, 2194, station wagon (incl. Kalina Cross 2)
sedan, from 2012 to 2016 in liftback, from 2014 to 2016
from 2011 to 2022
Kalina, 1117, station wagon. Kalina, 1118, sedan. Granta, 2190, sedan (incl. Sport) Granta, 2191, liftback. Kalina 2, 2194, station wagon. Kalina Cross, 2194, station wagon (incl. Kalina Cross 2) Granta 2, station wagon, from 2022 onwards. Granta Cross, from 2022
sedan, from 2012 to 2016 in liftback, from 2014 to 2016
sedan, from 2011 to 2022, from 2022 liftback, from 2014 to 2018, from 2022 station wagon, from 2022
station wagon, from 2022 Cross from 2022
sedan/liftback, from 2012 to 2016
sedan/liftback, from 2012 to 2016
Kalina, 1117, station wagon since 2007 Kalina, 1118, sedan from 2007 Granta, 2190, sedan from 2012 Granta, 2191, liftback since 2014 Kalina Cross, since 2013
Kalina, 1117, station wagon, since 2016 Kalina, 1118, sedan, from 2016 Granta, 2190, sedan, from 2016 Granta, 2191, liftback, since 2016 Kalina 2, 2194, station wagon, from 2016 Kalina Cross, 2194, station wagon, from 2016 (incl. Kalina Cross 2)
What do you need to know before buying a towbar for Lada Granta?
The towbar ball does not always have to be installed on the vehicle; it can be removed if necessary.
Several types of balls are suitable for your car:
- Conditionally removable – fastened with 2 bolts, installed or dismantled with a wrench;
- American insert for a 50x50 square, quickly installed and removed, secured with a cotter pin;
- Fixed welded ball.
All trailer hitches are certified and powder coated.
There is no need to remove the bumper for mounting; if necessary, trimming the lower skirt is required. The installation goes to the standard amplifier mounting locations. If necessary, they will need to be drilled out to strengthen the structure with bushings.
Lada owners prefer towbars from Leader Plus. Also, the manufacturer Autos is popular.
Please note that when connecting electrics you will need a Smart Connect matching unit. It connects to the machine's wiring and optimizes the performance of the electrical system. Eliminates overheating of wires going to the car's standard optics.
Unlike a conventional electrical kit, when connecting Smart Connect, only the signal is removed from the rear light wires, and the module itself and the trailer are powered by the battery via a power cable. In the event of a short circuit or immersion of the lighting equipment of towed equipment in water, only the fuse located in an easily accessible place will need to be replaced.
If you are interested in original equipment recommended by the Lada manufacturer, then pay attention to the standard wiring. It is installed in standard connectors, in most cases does not require cutting/soldering, and, if necessary, is activated through the diagnostic connector.
Reviews
| № | Positive |
| 1. | Kirill , 41 years old: before buying a trailer, I purchased a tow bar from Leader-Plus (101030). Despite the budget price of the product, the quality is good, the welds are even, the socket fits tightly to the metal base. My recommendations. |
| 2. | Konstantin , 36 years old: I bought a trailer for trips to the dacha, a necessary thing on the farm. The previous owner installed a towbar on the car. It is in good condition, no corrosion, although the paint is a little cracked. I didn’t change it; Leader-Plus is happy with it. |
| 3. | Vyacheslav , 44 years old: after an accident, the trailer hitch had to be replaced in the rear bumper. I didn’t invent anything, I bought Leader-Plus by analogy. |
| 4. | Gleb , 33 years old: as befits a novice entrepreneur, he bought a trailer. The only thing left is the tow bar. The store recommended several models, I settled on Leader-Plus. I don’t need particularly sophisticated ones; I won’t transport large loads. |
| 5. | Alexander , 40 years old: the previous owner sold Grant together with a towbar and trailer. Condition is good, no corrosion. For objectivity, I took it to a service station to diagnose the bottom, no comments. My garage mates advised installing a more powerful tow bar, but I’m happy with the standard one. |
| 6. | Gennady , 37 years old: I’ve had Granta since 2011, I made cosmetic repairs, tinted it a little, treated it with anti-corrosion agent. Due to frequent transportation of goods, the bottom is heavily damaged by gravel, stone, and rust in some places. At the service center they said that it was still ok, the tow bar was normal and didn’t need to be changed. |
| 7. | Vladimir , 29 years old: bought a trailer for the Granta, all that remains is to buy a trailed one. The store recommended Leader-Plus, Bosal, Baltex. I wanted to take Bosal, but the price was prohibitive, so I settled on Leader-Plus. Despite the cheapness, it turned out to be quite good. No complaints, I'm happy. |
| Negative | |
| 1. | Alexey , 34 years old: I was looking for a trailer hitch in a store, I immediately refused the budget Leader-Plus, I heard a lot of negative things. I didn’t check it, I bought Bosal. 1000 more expensive, but the quality is obvious. |
| 2. | Victor , 39 years old: I bought a trailer for commercial purposes, the only thing left is the tow bar. Various modifications were offered on the car market, I immediately refused the budget version and opted for VFM (844947MS). |
| 3. | Igor , 35 years old: the previous owner of Granta installed a trailer hitch from Leader-Plus. Since I heard negative reviews, I replaced it with a new one from Bosal. The cost is more expensive, but the quality is above average. |
Conclusion As for the choice of towbar for the Lada Granta, it is necessary to proceed from the size of the allocated budget and the weight of the goods being transported. If we are talking about large numbers, it is obvious that there is no need to save. Buy more expensive models, for example, Bosal Baltex. Weight does not exceed 500 - 600 kg in total - a budget solution from Leader - Plus is enough. Subject to moderate use, the service life of each modification is approximately equal. The process of installing a towbar on a Granta liftback is not at all complicated, it is intuitive.
Related link:
Description of the dashboards of the Lada Granta liftback. Choice differences
How to install a tow bar on Lada Granta and Lada Kalina
As an additional equipment, LADA vehicles can be equipped with a towing device (trailer hitch or towbar). The towing device is designed for articulated coupling of a vehicle with a towed trailer. The design of LADA vehicles provides for the possibility of installing a trailer hitch without additional mechanical influences (drilling holes, welding) on the vehicle body. The following are instructions for installing and connecting a standard towbar on cars of the Lada Granta and Lada Kalina family.
For each LADA car model, several trailer hitch options are offered for installation, differing in design, but identical in the method of attachment to the car body.
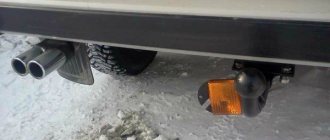
The trailer hitch, regardless of the model and design of the device itself, is attached to the rear power elements (side members) of the car body.
Tightening torques for threaded connections
:
- M6 – 9.8 Nm (0.98 kgf/m);
- M8 – 24.0 Nm (2.4 kgf/m);
- M10 – 47.0 Nm (4.7 kgf/m);
- M12 – 81.0 Nm (8.1 kgf/m).
Article numbers of standard tow bar depending on body type
:
- sedan 99999219007216
- liftback 99999219007216
- station wagon 99999219407216
- hatchback 99999219207216
Preparing a car for painting with your own hands: secrets of professionals
- Ball type. This has already been sorted out. Therefore we move on;
- Type of trailer hitch. These are mainly conditionally removable models. But you can find welded and quick-release ones. I am both for the last option;
- Load. It can be vertical or horizontal. For vertical it is better to take at least 900 kg, and for vertical from 50. But it is better to take 75 or even 100 kg;
- Manufacturer. In terms of brands, the choice is not as great as we would like. Among the favorites I would like to mention the company Leader Plus, the manufacturer of the trailer hitch, as well as the joint venture Bosal Autoflex. It’s worth reading about Bosal separately;
- Body type. For different body types, different trailer hitch models can be provided;
- Trimming the bumper. I have never heard of the need to trim the bumper on any domestic manufacturer's trailer hitch model.
It’s natural to find out how much such a purchase will cost.
Below, I present several options at prices current for 2020.
LADA GRANTA (2190, 2191)
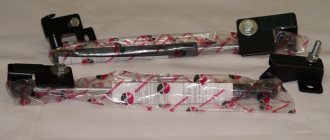
Figure 2-10 shows the main version of the trailer hitch installed on the LADA GRANTA.
Figure 2-10 – Design and delivery set of LADA GRANTA trailer hitch (2190, 2191): 1 – rod assembly with brackets; 2 – socket box; 3 – hook
On the inside of the cross member 2, Figure 2-11, the floor of the rear, right 1 and left 3 rear side members, clean the embedded threaded holes 4 (flat-head screwdriver) from the PShM layer.
Note: The design of the rear suspension of the main muffler for vehicles produced before 2022 allows the trailer hitch bar bracket to be attached to the left side member of the body in two places if there is an additional mounting hole on the bar bracket.
LADA KALINA, GRANTA (1117, 1118, 2194)
Figure 2-13 shows the main version of the trailer hitch installed on the LADA KALINA, LADA GRANTA.
Figure 2-13 – Design and delivery set of trailer hitch LADA KALINA, GRANTA (1117, 1118, 2194): 1 – rod assembly with brackets; 2 – socket box; 3 – hook
Remove the rear bumper in accordance with the requirements of section 1 TI 3100.25100.20475 for car 1117, section 2 TI 3100.25100.20469 for car 1118 and TI 3100.25100.20568 for car 2194.
The installation of the trailer hitch on the LADA KALINA vehicle must be carried out in accordance with the requirements for installation on the LADA GRANTA vehicle specified above.
Note: The design of the rear suspension of the main muffler of cars allows the trailer hitch bar bracket to be attached to the left side member of the body in two places if there is an additional mounting hole on the bar bracket.
Install and connect the electrical equipment of the trailer hitch.
Install the rear bumper.
Connecting wires
Sockets made of plastic and duralumin are available on the market. Experts consider the 2nd option more reliable than the 1st. The rubber cap for the socket may not match the dimensions of the bracket holes. In this case, additional trimming work may be required.
At the first stage of connecting the wiring when installing a towbar on a Lada Granta, you need to turn the block by 10-15 degrees. counterclockwise and pull it out, lifting the tendril that secures the block. The ends of the cables that are inserted into the clamps are soldered. The resulting circuit is checked by a tester. The next step involves connecting the socket to the towbar bracket.
At the second stage, the wires need to be firmly secured by laying them at the bottom of the trunk. At the 3rd stage, it is recommended to check the socket block with all light signals with a tester. The trailer plug is then connected. The structure is ready for use.
To do such tuning yourself, you will need to buy a book on the operation and repair of the Lada Grant.
Otherwise, installing the towbar and connecting its socket is done with the help of professionals in a car service center.
LADA KALINA, GRANTA (1119, 2192)
Figure 2-14 shows the main version of the trailer hitch installed on the LADA KALINA (hatchback).
Figure 2-14 – Design and delivery set of trailer hitch LADA KALINA, GRANTA (1119, 2192): 1 – left trailer hitch bracket; 2 – rod; 3 – right trailer hitch bracket; 4 – socket box; 5 – hook
Remove the rear bumper in accordance with the requirements of section 1 TI 3100.25100.20470 for car 1119 and section 2 TI 3100.25100.20568 for car 2192.
On the inside of the cross member 2, see Figure 2-11, the floor of the rear, right 1 and left 3 rear side members, clean the embedded threaded holes 4 from the PShM layer, two on each body element, including on the left side member (flat-head screwdriver) .
Install bracket 1 on the left side member, see Figure 2-14, on the right side side member bracket 3 and secure the brackets with the bolts supplied, without tightening.
Install the rear rod 2 on the floor cross member and secure it with the bolts supplied, without tightening.
Connect the brackets to the rod using the bolts supplied, without tightening.
Tighten the bolts securing the rod to the rear floor cross member, then the brackets to the body side members and to the rod (replaceable head 17, 19, knob).
Install hook 5 and socket 4 on the rod (spanner 19, replaceable head 19, knob).
Install and connect the electrical equipment of the trailer hitch.
Install the rear bumper.