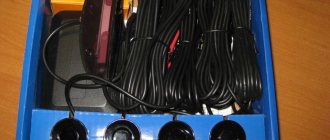
We lay a block with wires and connect them to the sockets. We assemble the structure.
Wiring diagram for mirrors on Grant Liftback
There are six pins in total, of which:
- No. 1 – horizontal adjustment;
No. 2 – —/— vertically;
Connection diagram by wiring color
- blue – left side;
- white – side lights;
- blue – right side;
- white – black – “plus”;
- black – “minus”;
- green – common on both sides of the mirrors;
- red – general.
Wiring diagram for Lada Granta Liftback mirrors on the control unit
- gray - black and blue - black - control unit on the driver's side;
- black - “minus”;
- white-black - “plus”;
- pin No. 7 - not used. Connect third-party contacts;
- white - dimensions;
- green, orange - control unit on the passenger side.
If you want to connect Grant Liftback mirrors to a VAZ, purchase a control unit from a Lada Kalina or a VAZ Niva. The standard unit is not intended for installation on other VAZ models. The pinout of the terminals occurs according to the following diagram:
- blue – left and right side;
- black – “minus”;
- yellow – common on both sides;
- red is a plus.
Reviews
| № | Positive |
| 1. | Vitaly: There were no problems connecting the reflector. I installed it myself, the scheme is quite simple and intuitive. |
| 2. | Kirill: in winter the mirror on the left side cracked, I replaced it myself with a new one. There were no difficulties with disassembly, the design is quite simple, the connection diagram consists of two blocks. |
| 3. |
Conclusion The process of independently replacing side-view mirrors on the Lada Grante Liftback is not at all difficult.
The design is fixed with three screws, connection to the power circuit is carried out by two blocks with wires. Following the recommendations given in this manual, replacing a new mirror will take no more than 10 minutes.
Negative reviews from some owners are unfounded and are caused by violation of the operating conditions of the technical equipment and failure to comply with maintenance schedules.
Installation and connection of heated rear view mirrors on Lada Granta
Hi all. Today at VAZ Repair we will talk about how to install and connect heated rear view mirrors on a Lada Granta at home. The article will be supported by informative photos, as well as step-by-step instructions, which will allow you, dear readers, to carry out such tuning yourself on your car.
To work you need to have:
- Heated mirror kit. In my case, these are heating elements made by Salina;
- Copper wire 0.75-1 mm long 8-10 m;
- Small female terminal (2 pcs.);
- Terminal-ring “ground for screw” (2 pcs.);
- Clamp terminal (1 pc.);
- Fuse holder (1 piece);
- Soldering iron, probe, several screwdrivers, needle file;
- Heat shrink, electrical tape.
Note: The above components may differ depending on the connection scheme you choose. In my case, the connection will be made by connecting the heated mirrors to the heated rear window. Below I will provide three alternative connection methods that can also be used.
To enlarge the image click on it!
Procedure
Now you can begin installing the heater. First, remove the holder with the mirror from the case. On most cars, it is enough to pry it with a screwdriver or something flat from below and pull it towards you.
Based on the characteristics of the holder, we choose the method of fastening the wire. If the inner surface of the holder is smooth (as in the photo), then stick double-sided tape on it.
Then we lay a piece of wire on this surface. This can be done arbitrarily, for example, in a zigzag or something else. The main thing is to place it so that the thread covers as much of the surface of the holder as possible. In this case, the wire should not intersect anywhere. Scotch tape will hold the nichrome thread well.
If the inner surface of the holder has any protrusions or fastening elements, then it will not be possible to stick the tape. In this case, a soldering iron will help to secure the wire. Everything is simple here - we apply a nichrome thread to the surface and press it with a heated soldering iron. The plastic will begin to melt and the wire will sink into it. Once cooled, the plastic will become hard and will hold the thread. But here it is important not to overdo it with heating the plastic, so as not to “push” it to the mirror. It is enough just to “drown” the wire in it a little and that’s it.
In this way, we fasten the wire along the accessible surface of the holder without touching the fasteners.
When laying the wire, its ends should be placed towards the side of the holder that is closer to the door, and so that they do not touch each other. To these ends we solder terminals for connecting to the wiring or simply the ends of prepared wires. Then the resulting connections need to be insulated.
All that remains is to provide insulation. If the wire was secured with tape, then to insulate it you can simply stick several more layers of regular adhesive tape on top. This will provide thermal insulation and prevent the wire from peeling off and shorting.
As for the holder where the wire is secured with a soldering iron, you can simply fill the entire surface where the thread passes with sealant and wait until it dries. In this case, the fastening elements will not be affected, which will ensure ease of fastening, and the wire itself will be insulated.
Before installing the holder in place, we pull the wiring through the mirror body into the door, the wiring for powering the heaters. Only after this we assemble the mirror.
Heated mirror grant button
A special feature of the Lada Granta Liftback is a new modification of the side-view mirrors. By default, they are included as standard, unlike the Lada Granta Sedan, Priora, VAZ 2109, 2108, 21099.
Due to various reasons, such as an accident, collision, impact, reflectors are damaged. The replacement process is not at all complicated; every car enthusiast can do it.
In order to provide methodological assistance to inexperienced owners of the Lada Granta Liftback, we recommend following the instructions below.
Checking the presence of standard heating
The presence of a heated rear view mirror cannot always be detected at first glance. The fact is that there is often no separate button to turn it on, and many car owners wonder how the heated exterior mirrors are turned on. The function is activated automatically when the rear window heating is turned on. To check if the mirror heater is present:
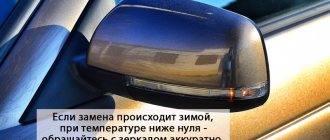
When the heating is running, the water drops dry within 1-2 minutes; when you breathe, the mirror does not fog up, and it is warm to the touch. In the cold season, you can verify the presence of heating by simply observing how long it takes for the mirror to thaw after being parked overnight. If a heating element is located underneath, the defrosting process takes only a few minutes.
Sequence of actions when replacing a side view mirror yourself
- We place the car on a level platform and provide unobstructed access to the front door from the side where the replacement will be.
- We unscrew the two screws that secure the door card trim and pry the plastic clips around the perimeter.
- From the back side, disconnect the block with wires from the electric drive control unit, disconnect the speaker terminals, and remove the card.
- Using a Phillips-head screwdriver, unscrew the three screws and remove the side-view mirror from its seat.
- We replace the block with a new one and screw it into place. We lay the block with wires and connect them to the sockets. We assemble the structure.
Wiring diagram for mirrors on Grant Liftback
There are six pins in total, of which:
- No. 1 – horizontal adjustment;
- No. 2 – —/— vertically;
- No. 3 – weight of the control unit;
- No. 4 – heating;
- No. 5 – turn signal repeater;
- No. 6 – general “minus”.
Connection diagram by wiring color
- blue – left side;
- white – side lights;
- blue – right side;
- white – black – “plus”;
- black – “minus”;
- green – common on both sides of the mirrors;
- red – general.
Wiring diagram for Lada Granta Liftback mirrors on the control unit
- gray - black and blue - black - control unit on the driver's side;
- black - “minus”;
- white-black - “plus”;
- pin No. 7 - not used. Connect third-party contacts;
- white - dimensions;
- green, orange - control unit on the passenger side.
If you want to connect Grant Liftback mirrors to a VAZ, purchase a control unit from a Lada Kalina or a VAZ Niva. The standard unit is not intended for installation on other VAZ models. The pinout of the terminals occurs according to the following diagram:
- blue – left and right side;
- black – “minus”;
- yellow – common on both sides;
- red is a plus.
Required
| Name | vendor code | Price, r |
| Heated, electrically adjustable exterior mirrors with turn signals (LED) | 4 500 | |
| Joystick/control unit from Lada Kalina (with central locking) | 11180-3709810 | 850 |
| Connector – electric mirror block (female) | CB-00090291 | 150 |
| Block for power window control unit 1118 | CB-00039007 | 50 |
| Connection block to power window button | CB-00033485 | 50 |
| 10 PIN connector with contacts for mirror control | 170 | |
| Wing turn signal plug | 21700-8212104 | 150 |
| Door card blank | 83191 3K030 | 30 |
Reviews
| № | Positive |
| 1. | Vitaly: There were no problems connecting the reflector. I installed it myself, the scheme is quite simple and intuitive. |
| 2. | Kirill: in winter the mirror on the left side cracked, I replaced it myself with a new one. There were no difficulties with disassembly, the design is quite simple, the connection diagram consists of two blocks. |
| 3. | Vasily: after a side impact, the right side mirror cracked. I had plenty of free time, so I installed the new one myself. At the same time, I replaced the rubber seal; it was deformed and moisture penetrated inside. |
| 4. | Alexander: after two years of operation of the Lada Granta Liftback, the insulation in the doorway on the wiring was worn out. Replaced the entire block with wires. Now the line is completely new. |
| 5. | Konstantin: when the reflector burst, I didn’t contact the experts, I installed a new one myself. The procedure is simple, the case is held on by three screws, the block with wires is connected to the standard connector. |
| 6. | Victor: the housing on the left mirror was cracked, I bought a new one at the car market. I transferred the filling myself, it turned out to be very simple. I didn’t contact the specialists at the service station, I did everything with my own hands and I advise you. |
| 7. | Gennady: the right turn signal suddenly stopped working, so I disassembled the reflector myself. The reason was poor contact at the terminal. I pressed it with pliers and everything works fine. |
| Negative | |
| 1. | Ignat: the design of the side reflectors is not perfect; they do not fit tightly, despite the presence of a rubber seal. I decided to buy a reflector block from Renault Logan, it has an identical mount. |
| 2. | Vasily: the quality of the wire insulation is poor; after two years of use, Granta replaced it with new wiring. Insulation cannot withstand freezing temperatures. |
| 3. | Sergey: I changed the left side mirror adjustment cables for the second time in a year. Low quality components. |
Conclusion The process of independently replacing side-view mirrors on the Lada Grante Liftback is not at all difficult. The design is fixed with three screws, connection to the power circuit is carried out by two blocks with wires. Following the recommendations given in this manual, replacing a new mirror will take no more than 10 minutes. Negative reviews from some owners are unfounded and are caused by violation of the operating conditions of the technical equipment and failure to comply with maintenance schedules.
To work you need to have:
- Heated mirror kit. In my case, these are heating elements made by Salina;
- Copper wire 0.75-1 mm long 8-10 m;
- Small female terminal (2 pcs.);
- Terminal-ring “ground for screw” (2 pcs.);
- Clamp terminal (1 pc.);
- Fuse holder (1 piece);
- Soldering iron, probe, several screwdrivers, needle file;
- Heat shrink, electrical tape.
Note: The above components may differ depending on the connection scheme you choose. In my case, the connection will be made by connecting the heated mirrors to the heated rear window. Below I will provide three alternative connection methods that can also be used.
To enlarge the image click on it!
Types of heating
The need for this function became clear quite a long time ago. Just a few decades ago, some cars were equipped with simple devices designed to defrost viewing structures.
Installation involved installing incandescent lamps inside, which heated the part from the inside and the ice melted. In modern devices, the heating method has changed, but the function remains the same.
The procedure for independently connecting mirrors on the Lada Granta Liftback
A special feature of the Lada Granta Liftback is a new modification of the side-view mirrors. By default, they are included as standard, unlike the Lada Granta Sedan, Priora, VAZ 2109, 2108, 21099.
Due to various reasons, such as an accident, collision, impact, reflectors are damaged. The replacement process is not at all complicated; every car enthusiast can do it.
In order to provide methodological assistance to inexperienced owners of the Lada Granta Liftback, we recommend following the instructions below.
Sequence of actions when replacing a side view mirror yourself
- We place the car on a level platform and provide unobstructed access to the front door from the side where the replacement will be.
- We unscrew the two screws that secure the door card trim and pry the plastic clips around the perimeter.
- From the back side, disconnect the block with wires from the electric drive control unit, disconnect the speaker terminals, and remove the card.
- Using a Phillips-head screwdriver, unscrew the three screws and remove the side-view mirror from its seat.
- We replace the block with a new one and screw it into place. We lay the block with wires and connect them to the sockets. We assemble the structure.
Installation
Remove the door trims and dismantle the old exterior mirrors (by removing the mounting screws). Mirrors of the new SE model are installed in place of the old ones without modifications.
To install the joystick, make a hole in the door trim using a file or a utility knife. Sample:
To stretch the wires from the interior to the doors (see connection below), you will need to drill a hole in the door rosette with a drill (or find a suitable female-male connector).
Wiring diagram for mirrors on Grant Liftback
There are six pins in total, of which:
- No. 1 – horizontal adjustment;
- No. 2 – —/— vertically;
- No. 3 – weight of the control unit;
- No. 4 – heating;
- No. 5 – turn signal repeater;
- No. 6 – general “minus”.
Connection diagram by wiring color
- blue – left side;
- white – side lights;
- blue – right side;
- white – black – “plus”;
- black – “minus”;
- green – common on both sides of the mirrors;
- red – general.
Wiring diagram for Lada Granta Liftback mirrors on the control unit
- gray - black and blue - black - control unit on the driver's side;
- black - “minus”;
- white-black - “plus”;
- pin No. 7 - not used. Connect third-party contacts;
- white - dimensions;
- green, orange - control unit on the passenger side.
If you want to connect Grant Liftback mirrors to a VAZ, purchase a control unit from a Lada Kalina or a VAZ Niva. The standard unit is not intended for installation on other VAZ models. The pinout of the terminals occurs according to the following diagram:
- blue – left and right side;
- black – “minus”;
- yellow – common on both sides;
- red is a plus.
Connection
Connecting the central lock
. We use a circuit of two relays so as not to go under the panel to the central locking unit:
Connecting heated mirrors
(to the wiring harness under the driver's threshold)
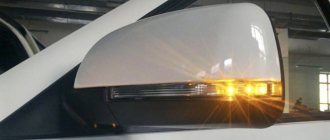
Connecting mirror turn signals
:
- Option 1: Pull the wire from the direction indicator on the fender.
- Option 2: To the wiring harness under the driver's threshold (blue - left turn signal; blue-white - right).
We transfer the wires from the power windows from the standard buttons to a new block with a joystick.
For Lada Kalina and Granta with heated and electric side mirrors (without direction indicators):
- The new mirror has a chip with six wires, but the old one has only five. We pull the sixth contact, which is used to operate the turn signals.
The process of installing exterior mirrors from a liftback on a Lada Granta sedan is also shown in the video:
Are you considering replacing old mirrors with new ones with turn signals?
Reviews
| № | Positive |
| 1. | Vitaly: There were no problems connecting the reflector. I installed it myself, the scheme is quite simple and intuitive. |
| 2. | Kirill: in winter the mirror on the left side cracked, I replaced it myself with a new one. There were no difficulties with disassembly, the design is quite simple, the connection diagram consists of two blocks. |
| 3. | Vasily: after a side impact, the right side mirror cracked. I had plenty of free time, so I installed the new one myself. At the same time, I replaced the rubber seal; it was deformed and moisture penetrated inside. |
| 4. | Alexander: after two years of operation of the Lada Granta Liftback, the insulation in the doorway on the wiring was worn out. Replaced the entire block with wires. Now the line is completely new. |
| 5. | Konstantin: when the reflector burst, I didn’t contact the experts, I installed a new one myself. The procedure is simple, the case is held on by three screws, the block with wires is connected to the standard connector. |
| 6. | Victor: the housing on the left mirror was cracked, I bought a new one at the car market. I transferred the filling myself, it turned out to be very simple. I didn’t contact the specialists at the service station, I did everything with my own hands and I advise you. |
| 7. | Gennady: the right turn signal suddenly stopped working, so I disassembled the reflector myself. The reason was poor contact at the terminal. I pressed it with pliers and everything works fine. |
| Negative | |
| 1. | Ignat: the design of the side reflectors is not perfect; they do not fit tightly, despite the presence of a rubber seal. I decided to buy a reflector block from Renault Logan, it has an identical mount. |
| 2. | Vasily: the quality of the wire insulation is poor; after two years of use, Granta replaced it with new wiring. Insulation cannot withstand freezing temperatures. |
| 3. | Sergey: I changed the left side mirror adjustment cables for the second time in a year. Low quality components. |
Conclusion The process of independently replacing side-view mirrors on the Lada Grante Liftback is not at all difficult. The design is fixed with three screws, connection to the power circuit is carried out by two blocks with wires. Following the recommendations given in this manual, replacing a new mirror will take no more than 10 minutes. Negative reviews from some owners are unfounded and are caused by violation of the operating conditions of the technical equipment and failure to comply with maintenance schedules.