Removing the gear shift mechanism drive may be necessary when replacing faulty parts (for example, to replace a torn drive rod boot, damaged drive rod). The sequence and number of operations indicated below can be changed depending on the purpose of the work.
To complete the work, you will need an assistant, as well as an inspection ditch or overpass.
Removal and disassembly
1. We prepare the car for work.
2. Clean the threads of the clamp bolt with a wire brush. We treat the junction of the rod with the hinge and the bolt with penetrating lubricant.
3. 13 mm wrench , loosen the tightening of the clamp bolt nut.
4. Unclench the clamp with a screwdriver and move it along the rod. Unclench the rod with a screwdriver.
5. After wiping the junction of the rod with the hinge with a rag, we mark the relative position of the drive rod and the hinge.
6. Disconnect the rod from the hinge.
7. Disconnect the torque rod from the base of the ball joint of the gear shift lever.
8. Inside the car, use a thin slotted screwdriver to remove the plug from the gear shift lever handle.
9. 13 mm socket wrench , unscrew the nut securing the handle bolt and remove the handle from the gear shift lever.
10. Using a screwdriver, we remove the cover from the floor tunnel lining and turn the cover inside out.
11. Disconnect the wiring harness from the reverse lock solenoid switch.
Loosen or cut the plastic clamp.
12. Remove the switch from the gear shift lever.
13. Remove the floor tunnel lining.
If necessary, you can unscrew the four bolts securing the gearshift lever support to the body (see below) and remove the drive assembly.
14. 13 mm wrench , unscrew the nut of the bolt securing the linkage to the lever, holding the bolt from turning with a second wrench of the same size.
15. Remove the bolt from the lever. We remove the lever from the traction fork. We remove the metal and plastic washers, take out the metal spacer sleeve.
16. To compress the drive rod, lubricate it with soapy water and remove it from the hole in the cover.
17. 13 mm socket , unscrew the three bolts securing the bracket to the body.
We unscrew the fourth bolt securing the bracket with a spanner of the same size (access to it from above is blocked by the air duct).
18. Remove the bracket and drive rod cover. We replace the torn cover.
19. We remove the gear shift lever support from the hole in the floor tunnel.
20. Use a puller to compress the locking ring of the ball joint of the lever and remove it from the base of the support.
21. Remove the lever from the base of the support.
22. Using a screwdriver, remove the top sealing ring.
23. Remove the support from the lever.
Assembly and installation
We assemble and install the drive in the reverse order. Before tightening the gearshift mechanism drive rod clamp, adjust the drive (see below).
Adjustment
1. We loosen the tightening of the drive rod clamp of the gear shift mechanism (see paragraphs 2-4 above).
2. We lift the lower part of the gear shift lever cover (see point 10 above).
3. We move the gear shift lever so that its lower part is perpendicular to the floor surface, and the lever handle is located from the right seat cushion at a distance approximately equal to 1/3 of the distance between the front seats and hold it in this position. In this case, the assistant, moving the clamp 2-3 mm from the end of the rod, tightens the clamp nut.
4. We install the cover in place and, by trying to engage the gears, make sure that the gear shift mechanism drive is working.
ROPE DRIVE
The single-rod gear shift drive was replaced by a cable.
The unpleasant vibrations on the lever are gone, there is less play, and shifting is clearer. Lightweight aluminum German gear forks are equipped with anti-wear shoes made of plastic. Previous parts were cast from steel, and to reduce wear, a bronze layer was applied to individual parts, which wore off over time and tinted the oil with golden powder.
VAZ-2181 is the first AVTOVAZ gearbox for which a computer calculation of all parts subject to loads was performed: crankcases, forks, levers, etc. Thus, the design was not only optimized, but also made more reliable.
1 — gear selector levers;
3 — selector grid;
5 - central three-dimensional plate.
Thank you for your help in preparing the material.
Mikhail Votinov, Vladimir Petunin,
Adjusting the rocker on a VAZ (Lada Kalina).
Sources
- https://ladakalinablog.ru/ustranenie-drebezzhaniya-rychaga-kpp/
- https://vaz-remont.ru/pochemu-ne-vklyuchaetsya-zadnyaya-peredacha-na-lada-kalina-diagnostika-i-remont-svoimi-rukami/
- https://www.zr.ru/content/articles/504079-novaja_korobka_peredach_granty_i_kaliny_taga_k_trosu/
Gearbox device
General view of the gearbox
How to remove the gearshift mechanism
Before proceeding directly to the process of replacing the oil seal, it is necessary to consider the structure of one of the main elements of the car - the gearbox. So, what parts does the unit consist of:
Transmission device diagram
Gearbox: 1 – clutch release bearing; 2 – guide sleeve; 3 – input shaft; 4 – roller bearing of the secondary shaft; 5 – secondary shaft; 6 – retaining ring; 7 – satellite axis; 8 – speedometer drive drive gear; 9 – transport plug; 10 – wheel drive oil seal; 11 – tapered roller bearing of the differential; 12 – axle gear; 13 – satellite; 14 – differential box; 15 – clutch housing; 16 – driven gear of the main gear; 17 – drain plug; 18 – adjusting ring; 19 – driven gear of the 1st gear of the secondary shaft; 20 – synchronizer for 1st and 2nd gears; 21 – driven gear of the second gear of the secondary shaft; 22 – retaining ring; 23 – persistent half ring; 24 – driven gear of the third gear of the secondary shaft; 25 – synchronizer for 3rd and 4th gears; 26 – driven gear of the fourth gear of the secondary shaft; 27 – needle bearing of the secondary shaft gears; 28 – ball bearing of the secondary shaft; 29 – thrust plate; 30 – driven gear V of the secondary shaft transmission; 31 – 5th gear synchronizer assembly; 32 – nut; 33 – thrust washer; 34 – drive gear V of the input shaft; 35 – rear cover of the gearbox housing; 36 – ball bearing of the input shaft; 37 – gearbox housing; 38 – roller bearing of the input shaft; 39 – breather; 40 – input shaft oil seal
Oil seal replacement process
When the design, as well as the principle of operation of the gearbox, has become clear, you can move on to the process of replacing the gearbox drive oil seal. So. Let's look at the step-by-step process:
Part selection
2108-1703042
– original catalog number of the gear selector oil seal manufactured by AvtoVAZ. The average cost of a spare part is up to 50
rubles
Backstage oil seal of different prices
The cost of such a product will not differ significantly from the original. So the quality of such products is approximately the same.
Reasons for failure
Now that the issues of replacement and product selection have been considered, we can study the issue of the causes of failure.
Gearbox VAZ 2106, VAZ 2101
Box drive oil seal and the drive itself
So, let's look at what affects the condition of the oil seal:
A few simple ways to temporarily fix the problem
The best solution is to eliminate the causes of the problem, rather than deal with temporary measures. The repair must be complete (for example, you can change the repair kit or the lever holder). But sometimes the situation forces motorists to take temporary measures.
Temporary measures include installing plastic washers on the gearshift lever axle. This is a fairly reliable method. To do this, you will need soft plastic (it can be successfully replaced by a jar lid) and tools: 10 and 13 mm wrenches, scissors, a screwdriver and a file.
The first step is to remove the gearshift knob cover. To do this, just lift it. The gearshift knob remains in place. After this, you need to unscrew the nut (its size is 13 mm). In this case, you should remember one rule: the tighter this nut is subsequently tightened, the harder it will be to shift the gear knob on Kalina.
After this step you will need a Phillips screwdriver. Use it to unscrew the screw. Then two 10 mm nuts are unscrewed. Release the bolt, bushings and nuts. Lubricate everything with a special lubricant, for example lithol.
A washer is cut out of plastic or a plastic cover, which must be installed on the gearbox lever axis. This is not an easy task, since the gap is small. Rubber rings are put on the axle on both sides of the bushing. To make the process easier, you can lubricate them a little. The clamped axle will stop rattling for a long time. This simple repair will even help smooth out gear shifting slightly.
Another way is to make a new gear knob pin. Any polyurethane turner can do this. Before installation, all rubbing parts are lubricated, which prevents extraneous sounds from appearing from the gearshift knob. This simple repair is a temporary measure. It’s better to fix everything for real and forget about extraneous noise while driving for a long time.
Replacing the Ball Joint Clip for the Kalina Gearbox Lever ~ VIVAUTO.RU
Societies › VAZ: Repair and Modification › Blog › Changing the ball
gearbox lever supports Kalina car 1.6 8kL There is a joke that AvtoVAZ engineers will not die by their own death. More and more, when I take on repairs, this joke becomes that it remains to make our client a stronger former.
Self-replacement of the gearshift lever of a VAZ 2107
It started for our client with an iron dull knock in the engine area on bumps. At first I thought maybe there was something to do with the protection. However, that was not the case here. I drove into the pit. And there p?ts. The gearshift lever rod rests on the muffler. Oh how! It turns out the lever
The gearbox is held on a holder, which is rubber and in two places is very narrow for such loads. Pull the gearshift lever up and pull out the entire mechanism. There is a boot between the iron platform and the holder. Because my clip fell into two parts, it wasn’t particularly difficult for me to disassemble the entire assembly. Do not remove the boot from the wing, it will not come off. HOW?! I have no idea how it came out in his image. My shift took about 2 hours.
Let's start the substitution. We will need: A new ball joint for the gearshift lever (570 rubles) A key for 10, 13. A Phillips screwdriver. Pliers with thin ends, or tweezers. If, of course, there is a ratchet, it will make the work much easier. Have some patience. The absence of minors nearby, because the repair of viburnum greatly develops the imagination in the direction of obscenity. The car must be driven into a pit or onto a lift. Some of the work happens from underneath the car. You need to remove the muffler, unfortunately not all of it. For this purpose, we remove the clamp near the rear wheel. Be careful when the muffler is disassembled, a lot of rust and dirt spills out. Next, remove the muffler from the rubber bands and move it in any direction. Next, unscrew the two 13mm bolts that secure the cage to the rod. Below is what remains for our client to do. Alas, I needed to tighten the handbrake again. We remove the protection and tighten it. There's basically nothing complicated there. To pull up, you need two 13mm wrenches.
There is no photo below, I was very busy with the process.
Next we go to the salon. The bestseller begins with this question. I don’t know how, but VAZ engineers manage to make everything possible very awkward for analysis.
Similar news
The lever twitches
gear changes, rattles on viburnum
Subscribe to the channel and watch new episodes.
Lada Kalina gearbox lever failed
Gear lever
dropped by 10 cm. Loud knocking sound when starting from a stop in 2nd and 4th gears. After renovation. First you need to remove the plastic around the gearshift lever. Remove the plastic from the handbrake platform. There are three screws. Later we unscrew the handbrake button and take it out.
The handbrake button and a self-tapping screw, which is why it needs to be removed. Unscrew the self-tapping screw through the gap. What kind of imagination does it take to place it there? Next we remove the plastic from the airflow into the driver and passenger feet. There is one screw on each side. There are two plastic screws here that hold the plastic panel around the gearbox. Let's raise this panel. Remove the gearbox cover. We see an iron plate held in place by four bolts.
Similar news
It is very awkward to unscrew them without a ratchet. I have not it. I had to suffer. Here, moreover, the engineers showed resourcefulness. The far left bolt is located under the rear footwell heating pipe. So even if you have a ratchet, you will have to suffer indifferently. Next, we unscrew the bolt and nut that connect the lever and the piece of hardware that leads into the gearbox and changes gears. I don’t know what it’s called, probably the backstage, maybe not, but that’s what we’ll call it. Remember the procedure for disassembling this mechanism, because we have to assemble it. There are 5 parts.
Let's move on. This is how a week of waiting for repairs and driving with the understanding that something was wrong with the car began. I read on the web about repairs. There are few articles on this matter. One person wrote that the shift took 20 minutes. Tested by personal experience. Next we dry out the clip hinge. Here we will need pliers or tweezers. We take out the lever and take out the clip.
I tried to remove the old hinge from the lever. There wasn’t enough strength, in other words, imagination. I decided to give up the old one, because it looks like it should work for a long time.
Later we collect what remains to be done by our client in reverse order, alas, it seemed to me that it was easier at first to fix the clip using our own skill in place with a boot and an iron platform. It will be awkward for our client to collect the weight. Then we dry it and collect it for our client to take to its destination.
After assembly, we only remember to go down under the car in the cabin and see what remains for our client to assemble.
Similar news
vivauto.ru
Installation process
Let's analyze the installation of the Priora short-stroke rocker with our own hands step by step.
First you need to pull the knob and cover off the box lever. The knob on the lever is not fixed, so it is enough to apply a certain force to remove it.
Using a key set to “13”, loosen the clamp and separate the gearbox lever rod from the cardan.
To release the lever, we release the ball from the spring mechanism, which is necessary to activate the reverse gear with locking. To do this, remove the locking ring.
It is strictly forbidden to sharply pull the lever upward when trying to release it.
Slowly, carefully remove the retaining ring.
We take out the spring and then the lever with the ball inserted into the plastic frame, as well as the locking ring.
The plastic mandrel includes two parts: the lower one, located on the right and the upper one, located on the left, cylindrical in shape. There is a slit at the top. This component fits onto the gearshift lever. At the bottom there is a lever ball. The upper part wraps around the lower part so that the grooves match.
We take out the lever and rod from the interior. For convenience, you can separate the lever from the rod, although this is not at all necessary.
Using a “10” wrench, unscrew the left bolt on the cardan and pull off the rubber boot.
The driveshaft from the Priora differs in length from the driveshaft of the Viburnum. It is necessary to shorten the stem of the viburnum, depending on its type.
We insert the cardan from the viburnum. Lightly lubricate it with lithol from the inside. When screwing in the bolt, you do not need to tighten it.
We insert the rod through the interior. It is advisable to do this not alone, but to take someone as an assistant. Let one hold the elastic band in the cabin, through which the thrust passes, while the second gradually stretches the thrust.
Next we assemble the lever:
— We put the rod back on the cardan shaft. — We equip the spring mechanism again (we also lubricate the ball with lithol). — We center the lever (we fix it in a comfortable position). — Tighten the clamp on the rod.
It is quite possible that the lever will not immediately center itself as it should. In this case, perform steps 3-4 again.
Please note that if you first assemble the spring mechanism, then due to the greater length of the rod it will be impossible to put the rod on the cardan (the problem can be solved if the cardan is shortened)
Don't forget to put the boot on the driveshaft
After completing the above steps, we will be able to correctly install the short-throw rocker on the Priora.
It will also be necessary to adjust the mechanism that blocks reverse gear engagement. Due to the fact that we customize the Priora short-stroke rocker to suit ourselves, the following problem may arise. The locking mechanism does not align with the plate it engages. We solve the problem by removing the plate and carefully adjusting the engagement.
In the end, all that remains is to put the knob and cover on the gearshift lever. Keep in mind that after assembly the gearshift lever will be tilted to the right.
Changing gears on a VAZ 2109
The “nine” is equipped with a five-speed manual gearbox (Gearbox). The connection between the gear selection control lever and the gearbox actuators is purely mechanical. For this purpose, a steel rod is used, the lower end of which is fixed to a ball joint in the housing of the gear selection mechanism, and the upper end is equipped with a knob that fits comfortably in the driver’s hand. This lever, not entirely justifiably, is popularly called the “slide”.
In a classic backstage, the levers are connected using a slider that can move along it. It looks especially impressive when driving the drive wheels of a mainline steam locomotive. In an automobile rocker, the elements have a certain freedom; they are connected by a hinge, but the articulation point cannot move along the rocker. Nevertheless, the name stuck.
The gear change lever of the “nine” has two degrees of freedom with three positions in each: “forward - neutral - back” and “left - neutral - right”. This gives 9 selector position options, of which two (rear left and rear right) are not used. The remaining seven correspond to five forward gears, one reverse gear and neutral.
The standard VAZ 2109 rocker is called long-stroke because the attachment point of the rod leading to the gearbox is located quite close to the ball joint. The distance to the attachment point is approximately 4 cm. With a total length of the lever with a knob of 30 cm, in order to move the gearbox rod by only 2 cm, the gearbox handle must be moved by 15 cm. Plus the play - it turns out to be a very long-stroke option, and it cannot be configured otherwise.
The Kalina wing on the VAZ 2109 also improves the situation.
What is a backstage
There is no clear definition of a rocker even among experienced drivers and mechanics. After all, this term refers to different parts of the device connecting the lever and the gearbox:
- interior gear selection mechanism (SMMS);
- rod connecting the lever and gearbox (on boxes 1118, 2180);
- jet thrust (on boxes 1118, 2180);
- drive cables (gearbox 2181);
- gear selection mechanism (GSM), located at the gearbox;
- gear shift mechanism (GSM) inside the box.
Therefore, we will talk about the maintenance and replacement of each of the devices to which this term is applied, and also show what it is to check and replace the Kalina gearbox linkage.
SYNCHRONIZER
The first samples were equipped with a three-cone synchronizer. But calculations have shown that double-cone, cheaper ones, can withstand the required torque with a margin (see pictures). Among other advantages, they made it possible to get rid of the problematic cone on the gears of the first and second gears, which is in contact with the synchronizer ring and requires high precision in manufacturing. The ring set now creates two friction surfaces for smooth and efficient synchronization. In addition, the German manufacturer (Ho¨rbiger) applies an additional coating to the intermediate ring, which reduces wear and ensures stable operating parameters, including the required coefficient of friction.
Signs of a malfunctioning rocker
Defects in the gear selection and shifting mechanism are said to be:
- unclear switching of speeds;
- switching on speeds at different positions of the gearshift lever;
- vertical or horizontal play of the lever;
- loud rattling noise in the cabin.
Here are possible malfunctions that lead to unclear gear shifting:
- wear of parts of the gear selection lever mechanism located in the body (on vehicles with gearbox 1118, 2180);
- loosening the clamp securing the cardan in the rod (on vehicles with gearbox 1118, 2180);
- wear or stretching of cables (on vehicles with gearbox 2181);
- breakdown or wear of parts of the gear selection mechanism located at the gearbox;
- defects in the gear shift mechanism inside the gearbox.
Possible reasons for the inclusion of speeds at different positions of the gearshift lever, as well as its vertical or horizontal play:
- wear or damage to the plastic and rubber parts of the SMVP, including the holder (on vehicles with gearbox 1118, 2180);
- wear or stretching of cables (on vehicles with gearbox 2181);
- weak tightening of the clamp securing the cardan in the rod (on vehicles with gearbox 1118, 2180);
- improper fastening of the Kalina gearbox linkage or its individual parts.
Possible causes of loud rattling noise in the cabin:
- wear or damage to the plastic and rubber parts of the SMVP, including the holder (on vehicles with gearbox 1118, 2180);
- incorrect adjustment of one of the rods, that is, the reaction rod or drive (on vehicles with gearbox 1118, 2180);
- insufficient fixation of the cables to the car body (on cars with gearbox 2181).
All elements of the backstage are interconnected and form a single system. Therefore, the malfunction of any part affects the operation of the entire mechanism.
Technical features of the gearbox
The drive gear block is engaged by the input shaft
This is important to consider when repairing a gearbox. As for the input shaft itself, a constant clutch is created for it with the front gear elements that perform similar functions
When repairing the secondary shaft, we must remember that it has a hollow structure. It is thanks to this that the oil reaches the driven gears without any problems.
The design of the gearbox is such that repairs cannot be done without the use of special circuits. In this case, the radial clearance on the roller bearings is no more than 0.07 millimeters.
Repairing the gearbox is also a rather complicated process. Especially considering that 0.04 millimeters should not exceed the same figure, but for ball analogues.
Location of the checkpoint backstage on the Lada Kalina.
The oil sump is responsible for supplying oil. It is located in the area of the front bearing, fixed behind the output shaft. Major repairs often affect such details. If you select the desired thickness of the rings, it will be possible to adjust the tension indicator. The dimensions of the seals are easy to find in the instructions; these parts can be replaced without problems, even at home.
When repairing the gearshift knob, you must remember that the driven gear of the gearbox on this machine is attached to the differential flange. Through the saloon, the atmosphere is combined with the box itself, located at the top of the structure we are considering.
Lever repair is not the only operation that needs to be carried out from time to time. Sometimes it is necessary to replace bearings; this is done when extraneous noise appears. A gearbox repair kit must be purchased if excess noise becomes noticeable when pressing or releasing the clutch pedal.
All control drive elements of the Lada Kalina gearbox.
The repair manual says that the box is controlled using a drive, which consists of several elements:
- Switch rod.
- Spherical bearing.
- Lever arm.
According to the manual, cable structures are always equipped with jet traction, then the gears do not turn off on their own. One of the ends of the rod is connected to the lever, and the other to the motor. If the seals of the internal joints are faulty, it is necessary to carry out independent repair of the gearbox. But before replacing them, you need to completely change the oil. The front wheel drive is completely disconnected.
Three axes are present on the shift system. One axis is equipped with a three-arm lever for selecting and disengaging gears. There is no gearbox on the second axle, but there are brackets that block rotation. After every 75 thousand kilometers, this design is completely changed. Gearbox lever play should also alert you, as should failure of other parts.
Also check out
- How to replace the cabin filter of a Lada Priora with your own hands
- Algorithm for replacing the front brake pads of Lada Kalina at home
- Installation of new front struts on Lada Priora cars
- Install the Kalinovsky cardan by applying lithol to its inner surface. Since the bolt is cone-shaped, screwing in is not difficult.
VAZ short-stroke rocker
- The thrust should be installed through the interior. It's good if you have an assistant nearby. He will hold it by the elastic band in the cabin, at this time you need to stretch the traction.
Installing a short-stroke rocker with your own hands
Assembly is performed in reverse order
- First, we put the rod on the cardan shaft.
- Then you can begin assembling the reverse gear locking mechanism. Lubricate the spring ball.
- Adjust the gearshift lever.
- Tighten the clamp on the rod.
Why does the gearshift lever rattle on Kalina?
The main reason for this problem lies in the very design of the attachment of the lever to the rod. To put it mildly, it is not perfect, but it can be corrected at minimal cost and in just a few minutes of time.
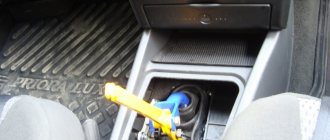
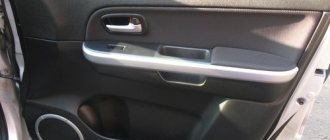
So, first you need to lift up the lever casing, and then unscrew the fastening nut, which is already shown in the photo below almost completed:
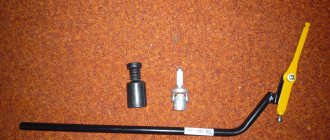
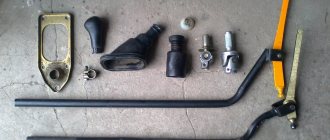
When the bolt is removed, we also remove all the washers and the metal sleeve. And this whole damn thing looks like this in parts:
So, the reason for the rattling is that when connecting this entire structure, a small gap appears between the parts, which is the source of strong vibration.
To achieve a smaller gap, it is necessary to slightly grind off the metal bushing, which prevents these washers from being compressed more tightly. I would like to warn you that you need to grind very carefully and very little, literally 1 mm. If you overdo it, then the lever will move with very great effort.
As a result, after connecting the bushing with washers into a single structure, as was shown first, we get a picture when this gap has decreased:
I messed up a little and sanded a little more than necessary (which I warned about above). As a result, when the fastening nut is tightly tightened, the lever moves tightly when switching. But I loosened this nut a little, literally half a turn - it shouldn’t come off!
When everything was done, I started the car and gave good speed, and there were no sounds from the lever. But to be sure, I decided to take a ride. I accelerated to about 70 km/h in third gear and left the gas pedal. Previously, in this situation, the rattling was simply terrible, and the only salvation from this was a hand on the lever! Now there is not a single hint of extraneous sounds or vibration.
Anyone who has not yet eliminated a similar defect on their Kalina can use this advice, just grind the bushing minimally. It’s better to improve it a second time than to screw it up the first time!
Below is material from an old article that talks about a similar problem, but it is easily solvable and is a thing of the past!
Many owners of the Lada Kalina very often have the following problem: when accelerating, as well as when braking the engine, the gear lever begins to rattle. A similar problem arose with my Kalina after about 15,000 km of operation.
At first, these extraneous sounds did not irritate me much, but every day the rattling of the gearbox lever became stronger, and to be honest, it’s not very pleasant to listen to it every day. I decided to tackle this issue. So, eliminating the cause can occur in different ways, depending on the complexity of the problem.
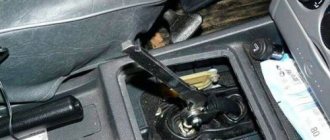
Fortunately, in my case it was enough to pry and remove the upper cover of the lever, on which the gearbox diagram is extruded. It is better to pry off this cover with a thin screwdriver so as not to damage the plastic parts. After we managed to remove it, we wrap its inner circle with a thin strip of electrical tape and insert it back. After this, this lid fits much tighter and does not rattle.
Of course, there are other sources of extraneous sounds, but for me everything worked out as simply and quickly as possible. The picture above shows exactly what needs to be wrapped with electrical tape.
In this article I will talk about possible causes and malfunctions due to which the reverse gear on the Lada Kalina does not engage. You will also learn how to find and fix a malfunction in the reverse gear locking mechanism with your own hands.
- Before you start drastic actions and disassemble “anything and everything”, check the gear shift lever itself, this may be the reason. The linkage and cardan are quite often the cause of this breakdown. The splines could also be worn out or the clamp loosened. In this case, you will need an inspection hole.
- A faulty release bearing is an option. Although it is unlikely, since in this case all gears without exception would be engaged with a characteristic crunch and with great effort.
- Reverse gear may stop engaging due to problems in the reverse gear locking mechanism; in order to confirm or refute this, remove the gear shift knob along with the dashboard between the seats and perform a visual inspection.
The gearshift lever twitches, rattles on the Kalina. Replacing the VAZ shifter. Cardan for the VAZ 2110 and Kalina gearbox shifter.
Diagnostics and repair
In order for the diagnosis to be as objective as possible, all parts of the gear shift mechanism must be perceived as a single unit. Only in this case can you quickly find the real cause of a particular problem.
Backstage cushion
However, the situation with repairs is different. It is much easier to repair only damaged parts, replacing them entirely or installing new components instead of worn ones. Therefore, replacing the entire gearbox on the Lada Kalina is almost never required.
There are 2 diagnostic methods suitable for rocker (1118, 2180) or cable (2181) boxes. The division into rocker and cable ones is due to the different way of transmitting signals from the SMVP to the MVT. On outdated gearboxes, this function was performed by a rod in the form of a bent steel pipe, and on new transmissions (2181) - 2 Bowden cables.
Diagnostic method for rocker boxes
To check or replace the Kalina gearbox rocker you will need:
- a hole or overpass, and if there are none, then you can get by with a jack with safety stands;
- a set of spanners and open-end wrenches;
- Screwdriver Set;
- flashlight (if the garage has poor lighting or you have to work outside in cloudy weather).
Here is the sequence in which diagnostics must be carried out:
- drive shaft;
- drive rod;
- drive and jet thrust;
- SMVP.
If you violate this order, you may miss some faults, which is why you will soon have to carry out diagnostics again. In addition, do not forget to remove the engine and gearbox protection from the vehicle, if installed.
Checking the drive shaft
Proceed like this:
- Loosen the clamp and remove the rubber boot from the cardan shaft.
- Turning it to the sides, as well as moving it back and forth, engage all gears one by one.
- After engaging the gear, rock the cardan by holding the part closest to the gearbox, easily turning it with your fingers in different directions and moving it slightly back and forth.
If the parts of the mechanism located in front of it are in good working order and correctly adjusted, then there will be no backlash. If you find play, check the clamp securing the cardan in the rod, as well as the gearbox rod. After making sure that there is no play, carry out the same check, but working on the part of this part that is as far away from the gearbox as possible. The absence of play indicates the serviceability of the part. If the cardan moves even a little, it needs to be replaced.
Checking the stem
This diagnostic stage is carried out only after play is detected when the part of the cardan shaft closest to the gearbox is exposed. Procedure:
- Turn on any gear.
- Unscrew the screw securing the cardan shaft to the rod shaft.
- Separate the parts.
- Wrap your fingers around the rod and check for play.
A positive result indicates that the gearbox needs to be removed and repaired.
Checking the drive and thrust
Perform this only if no play was found during previous checks.
To assess the condition of the drive and thrust, turn on any speed, then grab the thrust with your hand and check for play (move along and along the axis of rotation). If everything is fine, grab the jet rod with your hand and pull it strongly in different directions - it should not give in. The play indicates that it needs to be properly secured or replaced.
Replacing the backstage support
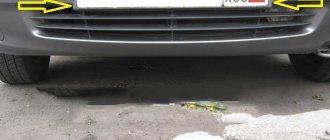
Also, make sure that none of the rods are closer than 5mm to the muffler. If one is closer, it needs to be adjusted and replaced. Sometimes the rod comes into contact with the muffler due to improper fastening of the latter, so do not forget to check its fixation.
Checking the AGN
It is carried out last, because a dangling lever with a stationary rod clearly indicates problems with the SMVP. To pinpoint the cause, do the following:
- Remove the gearshift lever cover.
- Unscrew the nut securing the knob to the gearshift lever.
- Remove the cover from the gearshift lever.
- Turn off the electrical reverse lock switch.
- Remove the gearshift lever tunnel. To do this, unscrew the handbrake lever mount and the side ventilation pads of the console.
- Unscrew the nut of the bolt connecting the lever and the rod.
- Move the rod to the side, do not lose the bolt and rubber or plastic gaskets.
- Remove the 4 bolts securing the support to the body. One of the bolts is located under the air duct, through which air flows to the feet of the rear passengers, so the air duct must be removed or drilled, and then sealed with electrical tape.
- Pull out the clip assembly with the lever.
- Pull out the locking ring that locks the lever in the support.
- Pull out the lever; Check the condition of all plastic parts.
The most common problems are damage to the rubber part of the race and severely compressed seals, including the spacer bushing.
Test method for cable boxes
This scheme is in many ways similar to the previous one, but much simpler. To check the entire mechanism, do the following:
- Remove the air filter and battery.
- Switch to any gear; swing the MVP levers.
- If they are loose, remove the MVP and check its play manually. If everything is fine, the problem is in the box; if not, then the part must be replaced.
- After making sure that there are no backlashes anywhere, engage any gear and swing the lever.
If it is loose, then the problem is either in the fastening of the cables or in a worn mechanism. Check all the cable fastenings, then unclip them from the plastic mechanism and move each one back and forth. Movements indicate that somewhere you missed the wrong fastening. If both cables are motionless, then the interior gear selection mechanism requires replacement.
Replacement or repair of the scenes
On rocker boxes (1118 or 2180), replacing any rocker blocks is extremely rare. Much more often it is necessary to change plastic or rubber gaskets, and also tighten the clamp. The most vulnerable blocks that fail most often are:
- rubber clip;
- rubber support;
- cardan
The service life of the remaining parts is calculated in decades. This has been known since the distant ancestors of the Kalina - the entire Lada Samara family, that is, VAZ 2108-21099.
Short-stroke rocker
Replacing the gearbox rocker on a Kalina is done in the same way as dismantling it during an inspection, only a new mechanism is installed instead of the old one.
Stories from our readers
“Fucking basin. "
Hi all! My name is Mikhail, now I’ll tell you a story about how I managed to exchange my two-wheeler for a 2010 Camry. It all started with the fact that I began to be wildly irritated by the breakdowns of the two-wheeler, it seemed like nothing serious was broken, but damn it, there were so many little things that really started to irritate me. This is where the idea arose that it was time to change the car to a foreign car. The choice fell on the melting Camry of the tenth years.
Yes, I had matured morally, but financially I just couldn’t handle it. I’ll say right away that I am against loans and taking a car, especially not a new one, on credit is unreasonable. My salary is 24k a month, so collecting 600-700 thousand is almost impossible for me. I started looking for different ways to make money on the Internet. You can’t imagine how many scams there are, what I haven’t tried: sports betting, network marketing, and even the volcano casino, where I successfully lost about 10 thousand ((The only direction in which it seemed to me that I could make money was currency trading on the stock exchange, they call it Forex. But when I started delving into it, I realized that it was very difficult for me. I continued to dig further and came across binary options. The essence is the same as in Forex, but it’s much easier to understand. I started reading forums, studying trading strategies. I tried it on a demo account, then opened a real account. To be honest, I didn’t manage to start earning money right away, until I understood all the mechanics of options, I lost about 3,000 rubles, but as it turned out, it was a precious experience. Now I earn 5-7 thousand rubles a day. I managed to get the car buy after half a year, but in my opinion this is a good result, and it’s not about the car, my life has changed, I naturally quit my job, I have more free time for myself and my family. You’ll laugh, but I work directly on the phone)) If If you want to change your life like me, then here’s what I advise you to do right now: 1. Register on the site 2. Practice on a Demo account (it’s free). 3. As soon as you get something on the Demo account, top up your REAL ACCOUNT and go to REAL MONEY! I also advise you to download the application to your phone, it’s much more convenient to work from your phone. Download here.
To replace the “ten” cardan you will need a pit, keys for 10 and 13:
- The gearbox control rod joint is hidden under the boot.
- We remove the boot and move it to the gearbox.
- Loosen the clamp bolt to 13, loosen it a little and pull the link off the hinge. Then unscrew the 10mm bolt that secures the hinge on the gear selector rod and remove the hinge.
- We install a new hinge without play on the gear selector rod and secure it with a 10-point bolt. To prevent it from turning away from vibrations, we lubricate it with a thread locker.
Replacing the VAZ 2108 gearbox driveshaft with a Kalinovsky driveshaft! Lada Kalina - the gearshift lever dangles a lot. Kalina gearbox lever rattling. Treatment
Installing a short-stroke rocker on a Lada Priora - step-by-step instructions
1. To access the bolts, you need to remove the decorative cover from the box lever along with the knob. The second one is not secured to the lever in any way, so to remove it you just need to pull it hard.
2. Then you need to remove the gearshift lever rod from the cardan; to do this, first loosen the clamp with a key set to “13”.
3. Before releasing the lever, you need to release the reverse gear locking ball, the one that springs when engaged. To do this, you need to remove the locking ring. Attention! Do not pull up on the lever to release it.
4. Remove the lock and lever along with the ball and spring, which are inserted into the plastic housing.
5. We take out the lever together with the rod through the interior; for convenience, you can disconnect the lever from the rod, although you don’t have to do this.
6. Remove the cardan. First of all, you need to pull off the rubber boot, then using a “10” wrench, unscrew the fastening bolt on the left side of the cardan.
7. As you can see in the photo, the cardan rods differ in length. The problem is solved by shortening the Kalinovsky rod; this must be done taking into account the type of short-stroke link. In some cases, the rod may not go in completely, as a result the gearbox lever will move towards the handbrake. If you also need to shorten, then know that you need to cut off about 1-2 cm.
8. So, we install the “Kalinovsky” cardan, having previously lubricated it with lithol from the inside. The bolt screws in easily because it has a cone shape, but do not overtighten.
9. Traction is also installed through the interior. It’s more convenient to do this in pairs with an assistant: one holds it by the elastic band in the cabin, and you carefully pull the traction.
Now assembly. It is produced in the following sequence
- Place the rod on the cardan shaft.
- Next, assemble the reverse gear locking mechanism. Lubricate the spring ball.
- We adjust the gearshift lever.
- Now tighten the clamp on the rod.
Note! If the reverse gear locking mechanism is assembled first, then due to the long rod you will not be able to put the rod on the cardan shaft. If you shorten the driveshaft, the problem may be solved. Don't forget to put the boot on the driveshaft.
5. Adjust the reverse gear locking mechanism as the adjustment of the rocker may cause the mechanism to not align with the plate it engages with. The solution to this problem is as follows: remove the plate and adjust the hook. There is a cutout in the plate mounting bracket with which the hook occurs; your task is to adjust or upgrade the plastic hook using sandpaper or a file.
Example of an adjusted toe.
That's all! All that remains is to put on the manual transmission cover with a knob and test the Lada Priora short-throw shifter in practice.
SWITCH MECHANISM
The new mechanism is a separate module. It can be installed last and removed if necessary without disassembling the box. This is technologically advanced not only in production, but also in repair. Already at the concept stage developed by the VAZ team, a selector grill appeared in it, clearly repeating the gear shift pattern and setting the lever stroke when selecting gears. The mechanism includes a lock against accidental reverse gear, which is only accessible from neutral.
The characteristics of the mechanism were selected on the original simulation stand. The tester sits down on the seat and begins to go through the gears, while the automatic system imitates the shift pattern, forces and lever strokes implemented on a specific production car. You can also upload your own settings. Don't like an overly tight lever? A couple of taps on the keyboard and the effort is reduced. So, step by step, we selected the optimal settings for the “eighty-one”. The computer processed the data and produced parameters for constructing an accurate mathematical model, according to which those very tricky central plates were made.
How to remove the old one and install a new gearshift pad with your own hands
After driving a VAZ-1118 for some time, many owners of this car noticed that the Kalina gearbox lever was rattling. Moreover, this rattling sound resembles the sound that was present in earlier cars of this plant (from VAZ-2108 to VAZ-2110). The fact is that the mechanical transmission is structurally controlled according to one type.
Driving a car when the interior is noisy is not very pleasant. Therefore, it is better to get rid of this problem, since the experience of many drivers shows that rattling does not go away on its own. On the contrary, as the mileage increases, it becomes increasingly louder. Ordinary driving turns into real torture for people sitting in Kalina, causing particular discomfort.
The main cause of this problem is an imperfectly executed system for attaching the gearbox lever to the linkage. The car owner can take two ways to correct the situation: fix the problem yourself or have the car repaired at a service station.
Advantages of a short-stroke rocker
The advantages of a short-throw shifter are that, in addition to the clarity of gear engagement, less time is spent on this, and accordingly, acceleration becomes faster. Moreover, the price of the issue is not so high. The dynamics of the car improves.
And one more thing that should be noted is that the rattling and shifting of the lever disappears. Why? Their number is really reduced because a backlash-free Kalinovsky cardan is installed.
To summarize this article, we can say with confidence that a short-stroke rocker significantly improves comfort for the driver of the car. And many people note that after installation the cabin becomes much quieter. And if you take into account the number of advantages and the not at all high price, then we can confidently recommend this product to you.