- To gain access to the bolts, the decorative cover must be removed from the knob box lever. The latter is not secured to the lever in any way; to remove it, it will be enough to pull strongly.
How to install a short-throw rocker on a Lada Priora
- We dismantle the gearbox lever rod from the cardan by loosening the clamp using a key set to “13”.
Installing a Lada Priora short-stroke rocker yourself
- To gain access to the lever, you must release the ball that blocks the engagement of reverse gear, which springs when engaged. Be careful! Do not pull the lever to get it released.
How to install a short-throw rocker on a Lada Priora
- The retaining ring is removed, then you need to remove the lever with the ball and spring inserted into the plastic case.
Do-it-yourself short-throw rocker on a Lada Priora
Do-it-yourself short-throw rocker on a Lada Priora
- Remove the lever with the rod through the interior. To make it more convenient, they can be separated.
How to make a short-throw rocker on a Priora
- Remove the cardan. To do this, tighten the rubber boot with a “10” key. Then you need to unscrew the bolt that secures the cardan on the left side.
How to make a short-throw rocker on a Priora
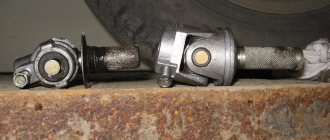
- It is noticeable in the photo that the cardan rods are different in length. This problem can be solved by shortening the Kalinovsky rod, taking into account the type of short-stroke link. Sometimes the rod does not go in completely, so the gearbox lever moves towards the handbrake. If you need to shorten it, cut off 1-2 centimeters.
Kardanchik Klin and Priora
“Fucking basin. "
Hi all!
My name is Mikhail, now I’ll tell you a story about how I managed to exchange my two-wheeler for a 2010 Camry. It all started with the fact that I began to be wildly irritated by the breakdowns of the two-wheeler, it seemed like nothing serious was broken, but damn it, there were so many little things that really started to irritate me. This is where the idea arose that it was time to change the car to a foreign car. The choice fell on the melting Camry of the tenth years. Yes, I had matured morally, but financially I just couldn’t handle it. I’ll say right away that I am against loans and taking a car, especially not a new one, on credit is unreasonable. My salary is 24k a month, so collecting 600-700 thousand is almost impossible for me. I started looking for different ways to make money on the Internet. You can’t imagine how many scams there are, what I haven’t tried: sports betting, network marketing, and even the Vulcan casino, where I successfully lost about 10 thousand ((The only direction in which it seemed to me that I could make money was currency trading on the stock exchange, they call it Forex. But when I started delving into it, I realized that it was very difficult for me. I continued to dig further and came across binary options. The essence is the same as in Forex, but it’s much easier to understand. I started reading forums, studying trading strategies. I tried it on a demo account, then opened a real account. To be honest, I didn’t manage to start earning money right away, until I understood all the mechanics of options, I lost about 3,000 rubles, but as it turned out, it was a precious experience. Now I earn 5-7 thousand rubles a day. I managed to get the car buy after half a year, but in my opinion this is a good result, and it’s not about the car, my life has changed, I naturally quit my job, I have more free time for myself and my family. You’ll laugh, but I work directly on the phone)) If If you want to change your life like me, then here’s what I advise you to do right now: 1. Register on the site 2. Practice on a Demo account (it’s free). 3. As soon as you get something on the Demo account, top up your REAL ACCOUNT and go to REAL MONEY! I also advise you to download the application to your phone, it’s much more convenient to work from your phone. Download here.
To replace the “ten” cardan you will need a pit, keys for 10 and 13:
- The gearbox control rod joint is hidden under the boot.
- We remove the boot and move it to the gearbox.
- Loosen the clamp bolt to 13, loosen it a little and pull the link off the hinge. Then unscrew the 10mm bolt that secures the hinge on the gear selector rod and remove the hinge.
- We install a new hinge without play on the gear selector rod and secure it with a 10-point bolt. To prevent it from turning away from vibrations, we lubricate it with a thread locker.
We put the boot and the drawstring in place and adjust it.
After that we do a test drive. If everything is good, then tighten the clamp. There is an opinion that before installing the glass you need to saw off its tip a little, in fact, everything installs perfectly without sawing. After adjustment, the gearshift lever is located exactly in the middle.
Impressions from the backlash-free driveshaft of the Lada Kalina on a VAZ 2110
It seems that the lateral travel of the lever has decreased. The difference is especially noticeable while driving than when parked. Gear changes have become clearer, there is no “yaw” movements of the lever.
However, do not forget about gearbox vibration . If previously these vibrations were transmitted to the rocker and were partially damped by the play of the standard cardan, now they are transferred in full force to the gearshift knob, which causes rattling, which has to be dealt with over time.
Adjusting the rocker on a Lada Kalina car
The backstage adjustment on the Lada Kalina must be done every time any work has been done on the gearbox. It also happens that the rocker clamp is not tightly clamped to the rod, or the nut becomes loose, which leads to displacement of the rocker and poor gear shifting. You can do all this yourself, armed with a wrench.
In order to get to the clamp on the rod, you need to drive onto an inspection hole or overpass. After this, fully open the clamp (it is located behind the cardan drive on the gearbox side) and place the gear shift lever in reverse or first gear until it stops. It is best if you have an assistant who will hold the lever in the cabin.
When the lever is fixed, tighten the clamp. If there are any issues with the tightening of the nut or the integrity of the clamp, it is better to replace them. When the clamp is tightened, you need to check how the gears shift.
If you still have issues with switching, you need to try to start from the opposite. That is, if you adjusted the rocker when reverse gear was engaged, try adjusting it in first gear and vice versa. If this does not help, you need to check the fastening of the link to the lever and the ball joint of the lever.
Perhaps the lever is simply “loose” - this will be felt by a slight play. When the lever is securely fixed, the appearance of play may mean that the ball joint is worn out or its fastening is displaced. In such cases, it is better to replace it.
Source
Tuning the VAZ 2109 transmission
The classic transmission of all VAZs is manual. It is quite reliable, cheap to maintain and well suited for use on domestic roads.
There are several popular types of tuning for manual transmissions. They appeared as a banal need to improve the performance of the car. The main work packages include:
- Replacing the backstage.
- Conversion from 4-speed to 5-speed.
- Installation of a sports row.
- Modernization of the pedal unit.
- Replacement of the main pair and differential.
Let's take a closer look at one of the tuning options. Replacing the rocker with a short-throw one is a useful tuning that will significantly simplify gear shifting. We all know that the lever of the “nine” and most other VAZ cars is absolutely inconvenient. It has a huge backlash, which simply has a terrible effect on the accuracy of gear shifting. If men with long hands can still cope with it without any critical effort, then women will have a very difficult time with it.
The easiest way out of the situation is to install a short-stroke cardan from the Lada Kalina on the 2109. Such tuning will cost you approximately 1,500 rubles. Along with the cardan, you will have to get a boot from the same model, because it won’t be original with it.
The necessary tools for work are a set of keys, a slotted screwdriver and a hammer. It will also be very good to have an assistant.
VAZ 2114 rocker repair - How to adjust the rocker on a VAZ 2114, varieties, repair
In order for the vibration of the VAZ 2114 gearbox handle to cease to exist, you need to have a couple of tools in reserve:
- Socket wrenches 13 and 10
- New drawstring cover
- Overpass or pit in the garage
- A smart friend who will help you tune the stick
- You can stock up on thread locker, but you can do without it (this thing is attached to the side of the box itself).
It will take a little time, about half an hour to eliminate troubles and the same amount to adjust.
First way
Progress of the adjustment process:
- Sketch, remember, remove or measure, but make sure that after installation everything is in its place: namely, at a certain distance from the passenger and the console.
- Now you can crawl under the car and begin to unscrew the fasteners for inserting the bushing into the lever tube (also called the rocker) using a 13-socket, and remove the lever.
- Then, remove the cover from the cross. Be prepared for oil to pour out. You can put the container in advance if you really feel sorry for him. Then pour it back. Well, unscrew its fasteners to remove it.
Drawstring without cover for VAZ 2114
- That's it, now we need to install a new clamp - this is the bolt that secures the cross. You can, of course, clean and tighten the old one, but it is not so expensive that you need to save on it. And new things always inspire greater confidence in the future.
We will put the actions in the opposite direction with some deviations:
- After putting the stick in place, inserting the bolt and tightening it, putting the cover in place, you need to engage 4th gear. This will drive the bushing into place - into the rocker (lever).
- Then, put it in neutral. This is where a friend comes in handy: he places it, and you tighten the fasteners. At this moment, you can adjust the position of the stick, move it in the desired direction under you.
- Well, then try the result. If you are not satisfied with how the gear knob is positioned on the VAZ 2114, you need to bring the adjustment to fruition.
Second way
The second reason for the rattling is the bushing, which is located on the lever itself. In order to get rid of this nasty sound you just need:
- Open-end or socket wrench 13
- New bushing
- And a little patience
The process itself will also take no more than half an hour. The work itself will have to be carried out in the interior of your car. The action plan is:
- To get to the bushing, you need to remove the skin from the gear knob.
- Using the wrench you have, unscrew the nut and pull out the bolt.
Unscrew the nut on the VAZ 2114 gearbox lever
We take out the gearshift lever of the VAZ 2114
Gearbox lever bushing components for VAZ 2114
- We assemble in reverse order.
In fact, as a result of this procedure (how to eliminate the rattling of the VAZ 2114 gearbox lever) you should get the following effect:
- The stick will stop vibrating at idle
- When revving up, the lever will not make those wild metallic sounds.
- May vibrate a little, but not enough to irritate the driver
- The gear selector itself will move through the gears more clearly (the result of a properly tightened bolt)
SYNCHRONIZER
The first samples were equipped with a three-cone synchronizer. But calculations have shown that double-cone, cheaper ones, can withstand the required torque with a margin (see pictures). Among other advantages, they made it possible to get rid of the problematic cone on the gears of the first and second gears, which is in contact with the synchronizer ring and requires high precision in manufacturing. The ring set now creates two friction surfaces for smooth and efficient synchronization. In addition, the German manufacturer (Ho¨rbiger) applies an additional coating to the intermediate ring, which reduces wear and ensures stable operating parameters, including the required coefficient of friction.
Structure of VAZ-2110 (A) and -2181 (B) gearbox synchronizers:
2 — intermediate rings;
4 — synchronizer clutch;
6 — clamp;
Gearbox slide: what it is, signs of wear, how to adjust it yourself
Not all motorists have any idea what the name of this or that part in their car is. In this case, we are talking not only about the mechanisms “hidden” in the engine, but also about the devices with which they interact literally every day. One of these parts is the gearbox linkage.
Please note: The name "slide" is not official for this mechanism, but it is generally accepted. In fact, this part is called the transmission control rod.
1. What is a gearbox rocker 2. Signs of gearbox rocker wear 3. Adjusting the gearbox rocker
What is a gearbox rocker?
Many drivers mistakenly believe that the rocker refers to the gear shift lever, but this is not entirely true. If we are talking about a gearbox rocker, we mean a composite mechanism whose task is to connect the gearshift lever and the rod. That is, the driver cannot see the backstage, much less touch it. This element is located between the lever and the gearbox itself, and it is located under the bottom of the car, near the driveshaft, and in some cases under the gearshift lever itself.
As can be understood from the description, the rocker regularly has to deal with serious loads, so this element must have good strength. Despite this, the slide is susceptible to damage. If it does not contain enough lubricating components, drops of water, dust or other “debris” have entered it, there is a high risk of part failure.
Please note: On some cars, the rocker can last 200-300 or even more than thousands of kilometers without replacement. But, if we take the average result, the gearbox usually fails after 100 thousand kilometers of operation.
Signs of gearbox wear
The driver must pay attention to possible failure of vehicle components, including knowing the characteristic signs of wear on the gearbox linkage in order to take timely action to replace it. Despite the fact that the mechanism is quite reliable, you should be aware of the following “symptoms” of its imminent breakdown:
- Increased play at the gearshift knob. This can be noticeable both when the handle is in neutral and in one of the gears;
- Difficulty shifting gears. For example, one or more gears are difficult to “stick”, or maybe a crunching noise occurs when the lever moves in their direction;
- It feels like changing gears has become more difficult, as if the lever has become much heavier;
- Gears are engaged incorrectly, for example, instead of fifth, third is engaged or vice versa.
Drivers often ignore the appearance of play in the gearbox, believing that this is a normal situation. In fact, if backlash occurs, it is imperative to diagnose the gearbox, and, if necessary, adjust or replace the linkage. The fact is that a slight play is already a fairly serious symptom of a faulty gearbox linkage.
If it “breaks” while the car is moving, this can lead to serious consequences for both the car and the driver, since in such a situation there is a high risk of getting into an accident.
That is why, if you notice problems with gear shifting, be sure to contact a service center for diagnosis and repair of the linkage, if necessary.
Adjusting the gearbox rocker
It is not always necessary to completely or partially replace the scenes. Quite often you can limit yourself to simple adjustments. At the same time, it is possible to adjust the link with your own hands, without contacting a service center. There are two ways to adjust:
- In reverse gear. In order to adjust the rocker for reverse gear, you need to loosen the clamp on it, and then move the gearshift lever to the position that corresponds to the ideal engagement of reverse gear. After this, the clamp is tightened, and the work is considered completed;
- On the first transfer. If it is not possible to engage reverse gear, you can adjust the gearbox rocker in first gear. To do this, engage first gear, and then loosen the rocker clamp. Next, rotate the rocker drive counterclockwise until the gearshift lever stops in the plastic reverse speed lock, and then tighten the clamp.
It is worth noting that the general processes for adjusting the gearbox linkage are described above. It is important to say that the process may differ depending on the car, so before starting work it is recommended that you read the instructions specifically for your car model.
Reasons for replacement
There are several situations when the owner of a VAZ 2109 has or wants to get into the design of the gearbox and specifically work with the rocker:
- Oil is leaking due to a damaged rocker seal. It must be replaced;
- The old drawstring was out of order;
- I would like to exchange the long-stroke for a short-stroke in view of its advantages.
Now to the question of when replacing or repairing the backstage is a necessary measure.
- The backlash of the gearbox selector has increased significantly.
- Gears change with difficulty, and when changing speed, extraneous sounds appear.
- It is possible to change gears, but with a lot of effort.
- Speeds change incorrectly. Instead of one, a completely different one turns on.
- It is impossible to turn on all or part of the gears at all.
Even if the resulting play is still insignificant, it is advisable to immediately begin repairs or completely change the drawstring.
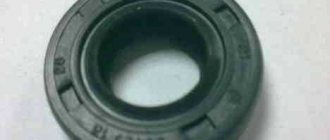
Replacing the oil seal
If you find that the oil in the gearbox is gradually disappearing, you can suspect the rocker seal. There is nothing else left to do but change the element.
- First, buy a new shift rod seal. It costs about 70-100 rubles.
- Drain the oil from the box, having prepared a clean container in advance. This is in case you refill the same oil. Although this is an excellent reason for you to change the transmission lubricant at the same time.
- To make sure the oil flows out better, first unscrew the filler plug or remove the speedometer gear. After draining the oil, screw the cap back on.
- We climb under the car and disconnect the fasteners of the gearbox lever driveshaft.
- Pull the boot off the cardan, unscrew the bolts securing it to the gearshift rod. Problematic fasteners that you will have to tinker with.
- After removing the cardan shaft, remove the rod boot.
- We remove the damaged oil seal using an awl or suitable available tools. The main thing here is the stock itself.
- We install a new one in place of the old oil seal and press it with a tube of the appropriate diameter.
- Put the boot back in place and rotate the driveshaft.
- Please note that the bolt securing the cardan to the rod is an adjustment bolt. Therefore, screw it in exactly the same way as before dismantling. Otherwise, some speeds may not turn on.
Adjusting the Kalina gearbox lever 1 and 2
Lada Kalina cars are equipped with two types of manual gearboxes, which have different types of drive - lever and cable.
Adjustment of the gearshift lever on Kalina is carried out only on models equipped with gearboxes 1118 and 2180 with a rocker drive, and is done on an inspection pit, overpass or lift. The tools you will need are a 13mm wrench and a slotted screwdriver.
Traditional first aid methods
If suddenly during a trip you discover that the pedal has treacherously failed and there is no longer any hope that the car will last until the planned trip to the car service center, you need to know 3 possible options for further action.
The first is to ask a friend to hold out the frozen car in tow, the second is to call a tow truck. But what to do if your friends are far away and there is no tow truck? In this case, there is a 3rd option: try to restore the clutch yourself so that it works until you get to the service station.
The driver is required to do the following:
- turn off the engine;
- use the lever to set first gear;
- simultaneously with turning the ignition key and starting the engine, press the pedal.
At which Kalina gearboxes can adjustments be made?
Lada Kalina cars are equipped with two types of manual gearboxes, which have different types of drive - lever and cable.
Adjusting the Lada Kalina gearbox lever
In the first case, the force of the lever, connected by a hinge to the transmission rod, is applied to the rod of the gearbox gear shift device. This design requires periodic adjustment of the Kalina gearbox linkage due to the gear selection lever moving beyond the range of movement provided by the design during operation. Most often, correction is required for the first generation Kalina gearbox with a mileage of more than 100 thousand km.
Unlike a traditional rocker, a cable shift drive effectively dampens the penetration of vibrations into the vehicle interior. The reduced lever travel in the longitudinal and transverse directions increases comfort when switching. Eliminating rigid traction eliminated the causes of incorrect operation when selecting gears, but problems can be caused by a malfunction and subsequent incorrect adjustment of the clutch on the cable box on the Lada Kalina-2. Insufficient oil level in the box can also be a reason for complaints about the quality of the device.
Adjustment of the gearbox on the Kalina with a cable drive is not required. Two cables with obvious signs of wear on the jackets or the appearance of effort when switching are removed and replaced. Avoiding sharp bends along the route is a necessary condition for trouble-free operation of flexible cables. After replacing the cables, additional adjustment of the clutch of the cable box on the VAZ Kalina-2 will be useful.
Disassembly and assembly of the gearbox
We remove the gearbox (see “Removing and installing the gearbox”).
We clean the outside of it from dirt (do not allow dirt to get inside the box). Remove the speed sensor (see “Removing the speed sensor”).
To make further disassembly of the gearbox easier, screw two nuts onto the clutch housing mounting stud.
. and unscrew the pin from the clutch housing. We install the gearbox on the workbench with the clutch housing facing down.
Using a 13mm spanner, unscrew the reverse gear fork lock plug.
Remove the retaining spring from the crankcase hole.
. and, using a magnet, a retainer ball. We unscrew the reverse gear lock solenoid from the holes in the gearbox housing (see “Replacing the reverse gear lock solenoid”) and the reverse light switch (see “Removing the reverse light switch”)
Using a 13mm spanner, unscrew the nut securing the rear cover of the gearbox housing, which simultaneously secures the clutch release cable bracket.
Using a 17mm spanner, unscrew the bolt securing the clutch release cable bracket.
. and remove the bracket.
Using a 13mm spanner, unscrew five more nuts securing the rear crankcase cover.
By tapping with a plastic-tipped hammer or regular hammer through a soft metal mandrel on the lid bosses.
. remove it from the studs. To loosen the shaft nuts, it is necessary to stop the shafts from turning by engaging two gears at once. To do this, pressing the gear selector rod all the way, engage third gear.
Using a 10mm spanner, unscrew the bolt securing the 5th gear fork.
Using a soft metal drift, we strike the fork, engaging 5th gear.
Using a beard, we straighten the places where the flanges of the nuts of the primary and secondary shafts are punched.
Head “32” with a powerful knob. . unscrew the shaft nuts.
Using a screwdriver, pry off the 5th gear driven gear and remove the 5th gear assembly.
Remove the 5th gear shift fork. Marking the position of the synchronizer locking ring relative to the clutch.
. remove the 5th gear gear with the synchronizer blocking ring.
Remove the synchronizer blocking ring.
We take out the synchronizer thrust plate.
Use a screwdriver to pry off the bushing of the 5th gear driven gear.
. and remove it from the secondary shaft.
Insert one or two screwdrivers into the gap between the thrust plate and the 5th gear drive gear. Using a screwdriver(s) to pry up the gear.
. press it off the input shaft.
Remove the thrust ring from the secondary shaft.
Using an impact screwdriver with a cross-shaped tip RNZ, unscrew the four screws securing the thrust plate of the bearings. Special lock washers are installed under the screw heads.
Using a 13mm spanner, unscrew the three plugs of the gear shift fork rod clamps.
Remove the springs from their sockets.
. and use a magnetic screwdriver to remove the retaining balls. Using two screwdrivers, we open the ends of the retaining ring of the rear bearing of the input shaft.
. and remove the ring from the crankcase groove. Similarly, remove the rear bearing retaining ring on the secondary shaft.
Using a 13mm spanner, unscrew one bolt and thirteen nuts securing the gearbox housing to the clutch housing.
By inserting a screwdriver into the groove at the junction of the flattened planes of the crankcases, carefully lift the gearbox housing.
Remove the magnet from the recess in the clutch housing.
Using a 10mm spanner, unscrew the bolt securing the 1st-2nd gear shift fork to the rod.
We lift the rod up and remove the fork from the groove of the synchronizer sliding clutch.
Using a 10mm spanner, unscrew the bolt securing the 3rd-4th gear shift fork to the rod.
. and use a screwdriver to remove the rod lever from engagement in the gear shift mechanism.
Raise the rod up and remove the fork from the groove of the synchronizer sliding clutch.
By turning the 5th gear shift fork rod, we remove the rod lever from engagement in the gear shift mechanism.
We take out the axis of the reverse gear intermediate gear.
Remove the reverse gear intermediate gear.
Using a 10mm socket, unscrew the three bolts securing the gear shift mechanism.
We simultaneously remove the primary and secondary shafts from the roller bearings of the clutch housing.
We take out the differential assembly. The cardan joint of the gear selector rod can be replaced on the vehicle (without dismantling the gearbox) by disconnecting the gearbox control rod from the joint shank (see “Removing and disassembling the gearbox control drive”). For clarity, we show the operation of removing the joint on a dismantled gearbox. Slide the protective rubber cover off the rod joint.
How to adjust the shift mechanism
The procedure for adjusting the Lada Kalina gearbox lever is carried out on an inspection hole, overpass or lift, best with an assistant monitoring the process in the cabin. Tools you will need:
- wrench 13 (convenient with a ratchet);
- slotted screwdriver.
Diagram of the Lada Kalina gearbox lever
Having blocked the wheels with rollbacks, the gear selection lever is fixed in the “rear” position. Next, work continues under the bottom of the car:
- use a 13mm wrench to unscrew the nut of the coupling clamp;
- make sure that it moves freely relative to the gearbox drive rod.
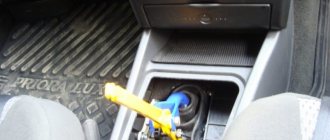
Lada Kalina sedan easy › Logbook › Installing a short-stroke rocker.
I rode for a very long time with the handle falling apart, it was swinging around the cabin quite a lot, the ride was hellish. The reverse gear had to be engaged with both hands, the lever rested against the tunnel. The fifth one was turned on, as in the classics - at the passenger’s feet.
I started thinking about repairs after I tried to turn on the reverse in a parking lot near a shopping center. Everything would be fine, but a whole column of cars was waiting for me until I pulled into a parking space and cleared the way for them. And then the other day I decided to get rid of this problem. I went to the store and bought some goodies. I immediately bought a short-stroke rocker, as it was highly praised in various BZs. I bought a gearbox hinge and a boot for it, so as not to bother with removing the old one (I just cut it off).
Tools: 1. 13x2 wrench 2. 10 wrench 3. Phillips screwdriver. 4. Round file. 5. Hammer. 6. Vadeha. 7. Litol.
Work algorithm:
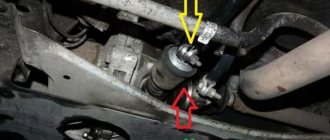
1. We climb under the car and first unscrew the torque rod from the ball joint race of the gear shift drive
5
(this is how I will mark the parts shown in the picture above)., 2 bolts from below.
2. Then loosen the iron clamp and pull the rod back. You can put it aside, or you can throw it away altogether. I'll tell you about this at the end.
3. Next, while we are under the car, you can loosen the clamp securing the rocker to the hinge 7
.
4. You can get out and go to the salon. Inside, you need to disassemble the tunnel and unscrew the 4 bolts securing this entire structure to the car body.
5. Pressure plate 3
unscrew it, take it out into the cabin along with the cover
4
and clip
5
.
6. After these steps, pull the drawstring into the interior if everything is unscrewed. You may need to crawl under the car again and help the driveshaft say goodbye to the rocker. 7.
Ball joint
22
is quite easy to remove; first you need to deal with the retaining ring
23.
Now a little about the pitfalls.
— We’ll have to modify the entrance to the slide with a hammer and the old cardan, in the place where it is attached to the cardan, so that the new one can easily fit in without effort.
— File the driveshaft in the place where it is attached to the gearbox, again so that it fits in without effort. — We assemble it like this: 1. Boot 9
on the gearbox 2. Cardan on the gearbox
7
, fix it with bolt
8
.
My problem with a loose lever was precisely this - the old cardan was poorly secured with a bolt, it simply hung on the gearbox rod. Pay attention to this, everything should be clear and nothing should fall out. 3. Pull the boot 9
onto the cardan
7
.
4. We insert a new link from the interior. 5. We fix it on the cardan 7
.
It must fit tightly onto the cardan, otherwise 2nd and 4th gears will not engage. Attention, do not tighten the clamp all the way, this is required for subsequent adjustment of the link.
6. Don’t forget to pull the cover
4
onto the new slide; a brake may be required.
7. Then insert lever 20
into the corresponding hole in the case.
8. We secure everything in the cabin. All 4 bolts 2
pressure plate
3
. There is no need to build a tunnel yet. 9. Put the rod in place. 10. Assemble the tunnel and the handbrake housing. 11. We set the lever in the center and go under the car to tighten the link. An assistant may be needed to hold the lever.
Thoughts on jet propulsion.
So, I installed the KHK, it’s very cool, I’m happy, the stroke has decreased, but I installed it with the old lever, more on that later. The problem is this: the rocker touches the jet thrust. You can remove this rod altogether, but then you need to install a brace with an additional engine support. Since without additional supports and without jet thrust, gears may fly out on bumps. It costs about 2k rubles. Nothing complicated to install, I’ll probably do just that, but for now I’ll touch the rod with the rocker. In principle, it’s okay, but the fifth one is difficult to turn on because of this. On the nines there was no jet thrust at all; everything was decided by a cardan with backlash.
Unsolved problems.
I bought a rocker without a lever damper
21
Due to the fact that it is missing, I can’t install the lever from the new rocker, I installed the old one.
I tried to knock the damper out of the old lever - nothing worked. We went shopping, and since May 8 is a pre-holiday day, some stores are closed. I don’t know what to do. Help me. Does anyone have this thing? Or do you know how to remove it from the gearshift lever? And is there any difference at all with the stock lever and the direct one from KHK?
Adjusting the gear selection mechanism
Adjusting the position of the gearshift lever on the Kalina, eliminating obstacles to its movement to the extreme points, is carried out from the passenger compartment. While in the driver's seat, you need to select a rear speed position in which there is no contact of the lever with the frame of the elastic casing and the driver's seat. It is necessary to ensure that the position of the control drive mate relative to the gearbox remains unchanged (an assistant can hold the cardan by the boot cover). Only the rocker moves relative to the rod.
replacing clutch VAZ 21099.
| Replacing the VAZ 2109 clutch |
| Click to view | – Spare parts without intermediary. Compare prices for auto parts from 2000 sellers, choose the best offer. |
| Tags: |
| Replacing the clutch on a VAZ 21099 |
| Click to view | A girl's clutch broke on her VAZ 21099. Instructions for replacing the clutch on a VAZ 21099…. |
| Tags: |
| VAZ 2108-15 clutch replacement without an assistant, with incomplete removal of the gearbox. |
| Click to view | VAZ 2108-15 clutch replacement. But a minute later I made a mistake... it’s very easy to break the sensor. |
| Tags: |
| Replacing the clutch on a VAZ 2114 without a pit |
| Click to view | In this video we will look at how to change the clutch on a VAZ 2108-15 without a pit, how to set it up, what... |
| Tags: |
| how to replace the clutch in ONE PERSON without a PIT and LIFT on a VAZ 2112 |
| Click to view | EYES ARE AFRAID HANDS DO My insta))) |
| Tags: |
| REPLACING THE FLYWHEEL AND CLUTCH VAZ 2108,2109,21099,2113,2114,2115 |
| Click to view | Also, by following this link, you can, for little money, purchase an excellent device for measuring pressure... |
| Tags: |
| Replacing the clutch of a VAZ 2109 |
| Click to view | A box began to buzz downhill, and as he rolled down the hill, he turned on the first one, the back one was buzzing. Pulled home...Rose br... |
| Tags: |
| How to remove the VAZ 09 gearbox? |
| Click to view | Start of repair 1:12 In this video I will show how, using minimal devices, practically in the field... |
| Tags: |
| Replacing a VAZ 2114-2115 clutch without a hole and draining the oil |
| Click to view | We change the clutch on front-wheel drive VAZs. Shift the gearbox on long bolts, we don’t get the axle shaft, no. .. |
| Tags: |
| Replacing the VAZ-2108, 2109, VAZ-2110 clutch without removing the gearbox and axle shafts. |
| Click to view | Quickly replacing the VAZ 21099 clutch with your own hands and without assistants is quite possible. Moreover, for… |
| Tags: |
| Replacing the clutch of a VAZ 21099 |
| Click to view | The video shows the process of replacing the clutch cable on a VAZ 2109 car. Comparison of the factory ... |
| Tags: |
| Replacing the clutch cable of a VAZ 2109 |
| Click to view | Have you ever thought about what happens inside the car when you press the clutch pedal? Or,… |
| Tags: |
| How does the clutch work? |
| Click to view | The video shows the process of replacing the timing belt on a VAZ 21099 car. Replacement on a VAZ 2109 is carried out… |
| Tags: |
| Replacing the timing belt VAZ 21099, 2109 |
| Click to view | How not to burn the clutch, in what cases the clutch burns, how not to burn the clutch disc. oh donat (Form... |
| Tags: |
| When the clutch burns |
| Click to view | – Spare parts without intermediary. Compare prices for auto parts from 2000 sellers, choose the best offer. |
| Tags: |
| Replacing the steering rack bushing for VAZ 1118 Kalina |
| Click to view | repair of the destroyed side member of the VAZ-2109. #VAZ-2109 #overcooking #body repair #recooking rock powder #… |
| Tags: |
| Simple repair of a damaged VAZ 2109 side member. |
| Click to view | Replacing the clutch on a VAZ 2110 2111 2112. Sign! |
| Tags: |
| Replacing the clutch on a VAZ 2110 |
| Click to view | Video from 2005. Replacing the clutch on front-wheel drive VAZs. Fair for families Samara, Samara-2, 2110,… |
| Tags: |
| HOW TO REMOVE THE TRANSMISSION OF VAZ 2110 2111 2112 |
| Click to view | In this video I will show you how to distinguish between an original and a fake release bearing on front-wheel drive VAZs... |
| Tags: |
| How to replace the clutch on a front-wheel drive VAZ |
| Click to view | our VK group our group in Odnoklassniki. |
| Tags: |
| Review of release bearings VAZ 2108 2110 1118 2170 |
| Click to view | How to change the clutch on a VAZ 2108, 2109, 21099. |
| Tags: |
| Removing and installing a gearbox, How to quickly change a VAZ 2109 gearbox |
| Click to view | repair. tuning |
| Tags: |
| How can you check the clutch? |
| Click to view | The video shows the process of replacing the clutch on a VAZ 2115 car. The AT 1601131-08 clutch assembly is used. |
| Tags: |
| Replacing the clutch on a VAZ 2108, 2109, 21099 |
| Click to view | How to check clutch wear? What condition is it in? Normal or in need of repair? Certainly,… |
| Tags: |
| How to remove a VAZ gearbox. without a hole. without overpass |
| Click to view | Subscribe to the #AvtoDrive channel – Clutch adjustment on a VAZ 21099 – For advertising and... |
| Tags: |
| Replacing the clutch disc VAZ 2115 |
| Click to view | All kinds of car repairs. |
| Tags: |
| The first and easiest way to check the clutch condition |
| Click to view | It’s a bit difficult to remove the gearbox for one person. But this way it’s very convenient. |
| Tags: |
| Clutch adjustment on VAZ 21099″ rel=”spf-prefetch |
| Click to view | Description missing |
| Tags: |
| VAZ. 2108 – 2115. Replacing the clutch.” rel=”spf-prefetch |
| Click to view | Description missing |
| Tags: |
| Replacing the VAZ 2108-15 clutch without completely removing the gearbox” rel=”spf-prefetch |
Backstage adjustment
Adjusting the gearbox linkage on the Kalina-1 comes down to finding and securing its optimal position on the drive shaft, which is ensured automatically, synchronously with the selection of the lever position in the car interior. Its longitudinal movement during adjustment can be only a few millimeters. When changing the location of the tension clamp, it is important not to go beyond the length of the gearbox drive shaft pin. Excessive force for fixing the nut is unacceptable. The knurling on the surface of the rod ensures reliable fastening at the junction of two parts of the mechanism.
Replacing the rear brake cylinder
If a red exclamation mark starts to light up on your car's dashboard and the brake fluid level is below the minimum mark, this indicates that the brake system may be leaking. The malfunction must be found and eliminated. The cause may be brake fluid leaking from the brake cylinder. In addition, the brake cylinder may jam, then, when checking the force of the braking system on the stand, the wheel will not brake, or will brake weakly - it will lag behind the second wheel of the same axle in terms of braking force. Replacing the rear brake cylinder on a VAZ will solve this problem. But how to replace the rear brake cylinder?
In order for the replacement of the rear brake cylinder on a viburnum to be successful, you need to jack up the side of the car that you are going to work on (it will be more convenient to work if you drive the car into a pit). The most convenient way, of course, is to use a lift. We remove the wheel. Then - the brake drum. Removing and replacing the brake drum is described in detail in the article “Replacing the rear brake pads and brake drum.”
We clamp the rubber brake fluid supply pipe so that it leaks out less and use a No. 8 wrench to unscrew the bleeder fitting on the brake cylinder. With a sharp movement we tear off the nut. There is a special wrench for VAZ cars that can easily unscrew these fasteners. If you don’t have such a key, use a regular one.
Using a special wrench for unscrewing brake pipes No. 10, unscrew the brake pipe fastening from the brake cylinder. If you don’t have such a key at hand, use a regular one.
But do this carefully so as not to damage the nut. When the tube is unscrewed, brake fluid will drip from it, so you should substitute a jar or a rag
Attention! Make sure that the nut on the brake pipe rotates. It can be pre-treated with WD 40, otherwise if the brake line breaks, it will also have to be replaced
Using a small #10 wrench, unscrew the 2 bolts securing the brake cylinder. We take it out, freeing it from the engagement of the brake pads and insert a new brake cylinder.
Thanks for subscribing!
Ready. We assemble the structure in reverse order:
- tighten the two bolts securing the brake cylinder;
- screw in the brake pipe;
- Replace the brake drum and install the wheel.
Attention! After replacing the brake cylinder, it is imperative to remove air from the brake system. While the brake fluid was leaking and you were driving, air could get from the rear circuit of the brake system to the front or opposite diagonal
Therefore, it is necessary to bleed air from all four brake cylinders. This operation is described in detail in the article “Bleeding the brake system”
While the brake fluid was leaking and you were driving, air could get from the rear circuit of the brake system to the front or the opposite diagonal circuit. Therefore, it is necessary to bleed air from all four brake cylinders. This operation is described in detail in the article “Bleeding the brake system.”
After bleeding the brakes, it is recommended to go to a brake tester to check the braking force reading.
You can learn how to extend the life of brake cylinders in the article “Prevention of rear brake cylinders.”
Traditional methods of adjusting the gearbox drive on a cable box
Repairs of gear selection devices are reduced to eliminating overtones that appear over time in the mechanics of the drive elements. Adjusting the gearshift lever on the Kalina on our own revealed ways to solve the problem that were used in practice by car enthusiasts:
- the noise from the box can be muffled by laying foam rubber between the walls of the tunnel and the jackets of the cables passing through it;
- rattling can be generated by a worn pair - the ball pin of the pendulum lever on the gearbox and the dome tip of the transmission cable; this can be eliminated by replacement.
Source
REQUIREMENTS AND SUGGESTIONS
Figuring out what and how we could improve, we agreed on one thing: not to touch the gear part, namely the shafts, gears, and synchronizers. Otherwise, huge financial costs will be required to launch a new gearbox into production - without high-precision equipment, it will not be possible to ensure the proper quality of engagement, operation and synchronization.
Main elements of the VAZ-2181 gearbox:
2 - secondary shaft;
4 — fifth gear fork;
6 — reversing light switch;
8 — gear shift mechanism;
Lada Granta with automatic and robot
After the appearance of the Granta version with an automatic transmission in 2012, which was installed on this model until 2022, many experts agreed that AvtoVAZ really brought to the market a high-quality budget model with an automatic transmission.
In fact, the experience of ordinary car enthusiasts confirms that this is indeed the case. The reason is quite obvious, since VAZ did not experiment and went along the proven path, equipping the Grant with a “classic” 4-speed hydromechanical Japanese automatic transmission.
If you follow all the rules and recommendations for maintenance and operation, such an automatic machine can easily cover 200 thousand km. and more without repair. The main thing is to change the transmission fluid every 40-50 thousand kilometers. As a last resort, replacement is allowed at 60 thousand km. It is also strongly recommended to fill with original ATF EJ-1 or Matic-S oil.
Putting aside the significant increase in price of the Lada Grant with an automatic transmission, the increased fuel consumption, the need for more expensive and frequent maintenance, as well as a slight decrease in acceleration dynamics, otherwise there are no complaints about the automatic transmission on the Grant.
It is important to understand that any torque converter boxes are sensitive to slipping (clutches burn), overheating and large “shock” loads (sharp starts, towing a trailer, etc.). Also, in some cases, leakage of oil seals and gaskets, damage to the automatic transmission pan due to its low location, as well as contamination of the oil in the machine as a result of active wear of the friction linings of the torque converter lock-up were noted
Also, in some cases, leakage of oil seals and gaskets, damage to the automatic transmission pan due to its low location, as well as contamination of the oil in the machine as a result of active wear of the torque converter locking friction linings were noted.
Taking into account the disadvantages of the automatic transmission and the high cost of the unit, which led to an increase in the price of the car as a whole, VAZ decided to replace the classic Jatco automatic transmission with the AMT 2182 robotic gearbox.
The specified manual transmission began to be installed on Grant at the beginning of 2022. It is based on a 2180 mechanical transmission, where instead of cables and a clutch pedal, an electromechanical gearbox drive developed by the Germans from the ZF company is used.
As a result, the Lada Granta with the AMT robot has become more economical compared to an automatic transmission, acceleration dynamics have improved, and transmission maintenance costs have decreased. However, such a robot is a cheap solution, which also has disadvantages.
For example, if you drive calmly at first speed and sharply press the gas pedal to accelerate, the transmission “thinks” for quite a long time, is in no hurry to engage second, immediately switching to third gear, etc. In other words, a robot in automatic mode can behave unpredictably, which excludes the possibility of actively using the car and practicing aggressive driving.
At the same time, during a quiet ride, jerks during switching, as well as delays and dips, are kept to a minimum. For lovers of active drive, it is recommended to use the manual shift mode (similar to the Tiptronic automatic transmission).
This mode is semi-automatic, that is, the driver does not fully control the box, as is the case with a manual transmission, but when independently controlled, the manual transmission behaves more predictably in manual mode.
Some owners in this situation are helped by changing the oil in the robotic box, while others still note the presence of extraneous noise to a greater or lesser extent even after this procedure.
Method number 1 - simple
This method is the fastest and easiest. To work you will need about 20 minutes of free time and the following tools:
- key for 13
- pliers
- sharpener
So, first we lift the casing and twist the securing nut. We take it out and carefully fold it, so as not to lose it, the bolt along with the washer and bushing. And we immediately find the cause of the rattling - this design was designed with a small gap between the connections, which is the cause of the vibration.
In order to get rid of the gap as much as possible, you will need to grind off the metal bushing, which will allow the washers to be compressed more tightly. There will be two bushings, and you need to grind off the one that is smaller in size. This must be done very carefully, and not get carried away; you need to grind down to 1 mm, no more. If you overdo it, it will be extremely difficult to move the lever.
Now we coat the parts with autoplasticine and put everything back together
The parts should also be connected carefully, since if you squeeze too hard, it will be difficult to change gears, and if you don’t squeeze too hard, the structure will wobble and also rattle. Then we get into the car and do a short test drive, the vibration and noise should disappear, if the result is not completely satisfactory, then you can do everything again, since the whole procedure will take a maximum of 20 minutes
Disadvantages, breakdowns and problems of the Lada Granta box
This transmission has low reliability, and it is also very noisy.
The clarity of manual transmission shifts leaves much to be desired and deteriorates over time.
Oil leaks often appear at low mileage and it is better not to ignore them
Wear on the plastic bushings will prevent you from locking the gear the first time.
Active use quickly affects the synchronizers and then the gears
You can contact the site administrator by email:
All texts were written by me, are authored by Google, included in the original Yandex texts and notarized. For any borrowing, we immediately write an official letter on company letterhead in support of search networks, your hosting and domain registrar.
Next we go to court. Don’t try your luck, we have more than thirty successful Internet projects and have already won a dozen lawsuits.
In 2013, AvtoVAZ decided to modify the manual transmission (manual transmission 2180). A cable replaced the gear shift drive with rods. The design of the box was modernized, and the following serial number was added to the name (manual transmission 2181). Let's look at the features of a cable gearbox.