Print this article Font size 16
Fog lights or simply PTF are an important element of the lighting system for a car. Alas, not all manufacturers equip their cars with these devices. AvtoVAZ with its model 2114 is no exception. PTFs for the fourteenth are available only for an additional fee and in the most expensive configuration.
Not everyone sees the point in buying the most complete version just to get PTF. An excellent solution is to install foglights yourself.
Beautiful and effective
What are fog lamps for?
The main task of the PTF is to illuminate the space in front of the car. Correctly adjusted “fog lights” can illuminate a section of road 10–15 meters long. This distance is quite enough for safe movement by car in poor visibility conditions. The switching on and off of such lighting devices must be fully controlled by the driver.
Adjustment of fog lights is carried out during their installation. The procedure does not take much time, but requires care and precision. You can install the rear and front PTFs yourself.
Why do you need PTF on VAZ 2113, 2114, 2115
The fog is located above the surface of the earth (road) at some distance and this gap remains transparent. Thanks to the fog lights (FTL), a beam of light is formed: wide in the horizontal plane and narrow in the vertical plane. It is directed parallel to the roadway. When the fog lights are on, the fog is illuminated from below, which improves road illumination. Thanks to the wide beam, side markings and the curb are clearly visible, thereby reducing the risk of leaving the roadway.
Installing PTF provides better illumination of the roadside and side markings, reducing the risk of leaving the road
Some motorists have the mistaken opinion that fog lights with high lighting efficiency can only be yellow. In fact, the road is illuminated quite well by devices with both white and yellow glasses. The designated colors, compared to green, red or any other, are characterized by maximum light energy in the spectrum. However, it should be taken into account that when installing even the highest quality PTFs, visibility will be no more than 10 m in heavy fog. But since in such weather conditions the speed of movement is low, these indicators are quite sufficient. Sometimes vehicles are equipped with rear fog lights, the purpose of which is to improve the vehicle's visibility when driving in fog.
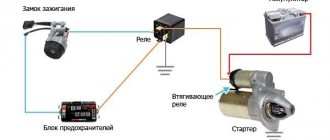
Installation diagram of fog lights
The connection of fog lights is carried out according to certain rules. They, first of all, relate to the placement of PTF on the car. The locations for installing headlights are strictly defined.
Layout of daytime running lights
Manufacturers of modern car models pre-mark the PTF installation locations on the bumpers. As a rule, such lighting elements are most often available in the luxury version of the car. If the headlights themselves are missing, then their installation sites are closed with special plugs.
Distance at which fog lights can be placed
How to install and connect PTF?
Installation and connection are carried out in 3 stages:
- We install the PTF in the bumper.
- We connect the wiring to the mounting block via a relay.
- Install a button in the panel.
Connection diagram
Well, I think everything is clear here! However, the diagram is not indicated in full: the mass of the PTFs themselves on the body, which must be done without fail, is not indicated. It needs to be secured in a safe place, on metal of course! Before fastening, be sure to clean the metal from dirt and tighten the mass well so that there is no loss of tension. Otherwise, the PTF will burn dimly and unevenly.
Bumper installation
As stated above, there are two options - either install a new bumper with ready-made cutouts for the PTF, or cut it yourself with a jigsaw. To do this, remove the element, mark the mounting holes, and cut it.
Next, we install the “glasses” - they cover the cutout on the outside of the bumper, they consist of two parts:
- Decorative - external.
- Internal - attaches glasses to the bumper using side latches and holds the PTF. (How to remove the bumper?)
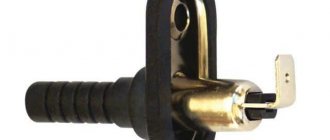
Connecting wiring to the unit via a relay
Relay with wire set
- First of all, open the hood, find the required block and unscrew its two fastenings to the body on the sides, remove the cover.
- From the bottom of the mounting block, unfasten the two outer wire blocks marked “7” and “8”.
- Take the installation kit: put the wires from the kit on the relay.
- We add their other ends to the block of wires “7” and “8” according to the diagram.
- We stick the pads back into the mounting block and fasten it back to its original place
- Next, we attach the relay to the car body in any place you like: for example, next to the same block.
- We run long wires from the mounting block blocks (which we have already installed) to the fog lights and connect them. We also attach the PTF mass to the car body.
Installation methods
There are several options to equip your car with a fog light system. The choice depends on your personal preferences and capabilities.
| Way | Peculiarities |
| Buying a bumper with built-in PTF | Such bumpers are bought at a tuning studio, where everything will be connected and connected for you. The disadvantage of this option is the high cost |
| Buying a bumper from a VAZ 2115 and installing it yourself | To do this, you will have to buy a bumper from an older model, which has holes for fog lights. All that remains is to find a suitable set of PTFs and install them |
| Purchase of PTF and facing elements - glasses | Today this method is in greatest demand because it allows you to do the installation yourself for little money. |
The standard PTF kit includes several elements:
- Headlights;
- Light bulbs;
- Switching relay;
- Set of wires;
- Connection diagram;
- Button to turn on/off PTF.
When choosing a set, pay attention to the fact that the headlights match the shape of the glasses, that is, the facing elements.
Standard kit
Today, for VAZ 2114 owners who want to install fog lights, it is recommended to choose rectangular kits from the Kirzhach company. It is used for factory installation of PTF on expensive versions of the model.
Xenon in PTF
Many car owners are thinking about installing xenon lamps in their fog lights. Is it good? Not really.
The thing is that when installing xenon in the PTF, focusing is disrupted. The operating principle of xenon is somewhat different compared to conventional Kirzhach type lamps.
Standard PTFs are designed for certain types of lamps, so they cannot cope with xenon. As a result, excessive reflection is observed in the reflector, rays are refracted, and the light is blurred. Where does this lead? To blind oncoming drivers.
The xenon option is not a practical or successful solution. Therefore, we recommend that you avoid it.
Another option is a combination of xenon and yellow fog lights. You will need H1 xenon bulbs, which are mounted in a bottle cap and only then placed in the headlight. This way the light beam has smoother boundaries, does not blind oncoming traffic, and better illuminates the roads in bad weather. Only after installing this combination lighting, be sure to make sure that your headlights really do not blind oncoming cars.
If oncoming cars stubbornly continue to shine their high beams on you, try adjusting the light beam. If this does not help, it is better to abandon xenon.
What requirements must PTFs meet?
Finally, we note what rules modern fog lights must meet:
- In order to illuminate the road surface well, this type of optics must have a clear beam boundary at the top. Thus, the light in the headlights is scattered slightly above the horizontal plane.
- If the car manufacturer has not provided space for PTF fasteners, do not install them above the headlights under any circumstances. Try to place them as close to the roadway as possible. The lower this optics is, the better it will “break” the foggy barrier in front of you. But don’t forget about the car’s ground clearance. If the headlight is located at a distance of 10 centimeters from the asphalt, then during rainy weather it will constantly get wet, and water that gets inside the reflector will linger there for several weeks. And throughout this period the glass will be cloudy, and the quality of lighting will deteriorate significantly. On cars like the VAZ “classic”, the optimal solution to the problem is to install the PTF under the steel bumper. This way you will “kill two birds with one stone.” Firstly, at such a distance from the road the headlight will never get wet, and secondly, it looks very attractive and does not disfigure the appearance of the car. But where there is no point in installing PTF at all is on the roof (owners of SUVs often do this). The benefit from such illumination is zero, but such a technique will be fully blinding.
- If this is not factory optics, it is advisable to purchase it with special plugs. This way you will significantly increase the service life of your headlights and ensure their high safety when driving on rough terrain. And the cap protects the fog lights all year round at any time of the day.
- During operation, it is important to prevent clouding or fogging of the optics glass. To prevent this, you should regularly treat their surface with special polishes (at least once every 2-3 months).
Difficulty adjusting
The VAZ 2114 does not provide for adjustment of fog lights, even in cars equipped with them. If on new cars no problems arise when passing a technical inspection, then after several years of operation (the front bumper touching foreign objects or bumps is inevitable on our roads), the direction of the light beam ceases to comply with GOST.
The only way is to install gaskets, overlays or other devices that change the angle of inclination of the light flux or its direction relative to the plane of the road. It is impossible to carry out this operation without a special stand. Having some knowledge, you can draw some semblance of such a stand on your garage door and independently adjust not only the fog lights, but also the low or high beam.
Wiring diagram VAZ-2114 new models
The updated engine has a new injection scheme, so it was necessary to use some new devices, as well as replace the ignition coil with a more efficient one and adapted to Euro 3 conditions. In order to comply with them, the engine had to minimize the amount of CO at start-up. And for this it was necessary to lean the mixture. Since a lean mixture ignites worse, it needed a more powerful spark to spark. This explains the use of a coil of increased power.
- block headlights;
- gearmotors for headlight cleaners*;
- fog lights*;
- ambient temperature sensor;
- sound signals;
- engine compartment light switch;
- engine cooling fan electric motor;
- generator VAZ-2114;
- low oil level indicator sensor;
- washer fluid level sensor;
- front brake pad wear sensor;
- wire ends connected to the common windshield washer pump**;
- windshield washer pump;
- headlight washer pump*;
- wire ends for connecting to the rear window washer pump on VAZ-2113 and VAZ-2114 cars;
- low oil pressure indicator sensor;
- engine compartment lamp;
- wire lug for connecting to the engine management system wiring harness;
- windshield wiper gear motor;
- starter VAZ-2114;
- block connected to the wiring harness of the ignition system on carburetor cars;
- coolant temperature indicator sensor;
- reverse light switch;
- low brake fluid level indicator sensor;
- accumulator battery;
- low coolant level indicator sensor;
- relay for turning on fog lights;
- mounting block;
- brake light switch;
- plug socket for a portable lamp;
- hydrocorrector scale illumination lamp;
- parking brake indicator lamp switch;
- block for connecting a backlight lamp;
- switch for instrument lighting lamps;
- Understeering's shifter;
- hazard switch;
- front seat heating element relay;
- ignition switch;
- rear fog lamp circuit fuse;
- front seat heating elements circuit fuse;
- door lock circuit fuse;
- front ashtray illumination lamp;
- ignition relay;
- cigarette lighter VAZ-2114;
- glove box lighting lamp;
- glove compartment light switch;
- heater fan motor;
- additional heater motor resistor;
- heater fan switch;
- heater switch illumination lamp;
- heater lever illumination lamp;
- gear motors for electric windows of the front doors;
- right front door ESP switch (located in the right door);
- gear motors for locking front door locks;
- wires for connecting to the right front speaker;
- gear motors for locking rear doors;
- wires for connecting to the right rear speaker;
- door lock control unit;
- wires for connecting to radio equipment;
- headlight wiper switch*;
- rear window heating element switch;
- rear fog light relay;
- block for connection to the heating element of the right front seat;
- rear fog light switch;
- right front seat heating element switch;
- fog light switch*;
- switch for external lighting lamps;
- left front seat heating element switch;
- block for connection to the heating element of the left front seat;
- wires for connecting to the left front speaker;
- left front door power window switch (located in the left door);
- right front door power window switch (located in the left door);
- wires for connecting to the left rear speaker;
- side direction indicators;
- dome light switches on the front door pillars;
- dome light switches on the rear door pillars;
- lampshade VAZ 2114;
- individual interior lighting lamp;
- block for connecting to the wiring harness of the electric fuel pump;
- trunk light switch;
- instrument cluster;
- trunk light;
- on-board control system display unit;
- trip computer*;
- block for connecting the wiring harness of the engine management system;
- rear exterior lights;
- rear interior lights;
- pads for connecting to the rear window heating element;
- license plate lights;
- additional brake signal located on the spoiler.
When do the hazard warning lights turn on?
Its use is mandatory in the following situations:
- if a traffic accident occurs;
- if you had to make a forced stop in a prohibited place, for example due to a technical malfunction of your car;
- when in the dark you are blinded by a vehicle moving towards you;
- the hazard warning lights are also turned on in the event of towing by a motor vehicle;
- when boarding and disembarking a group of children from a specialized vehicle, an information sign must be attached to it - “Transportation of children.”
Checking the functionality of the PTF
After the work has been carried out to connect the fog lights on the VAZ 2114, it is worth checking their functionality. If everything is done correctly, then when you turn on the side lights and press the button, voltage will begin to flow to the relay, after which the lights should light up. If you turn off the headlights, the fog lights should also go off, regardless of the position of the button. If everything is done correctly, then the next step is to adjust the light beam so as not to blind oncoming drivers. Having done this by eye, the light from the fog lights should be 10-15 meters ahead of the car, but no more. It is best to contact a service station with special equipment to adjust the headlights, or read the instructions in more detail on how to do it yourself. Useful: How to adjust the headlights and PTF on a VAZ 2114? Correct adjustment is the key to safety on the road, not only for you, but also for other road users. By installing fog lights, car enthusiasts want to get not only direct functionality, but also improve the appearance of the car. Since public roads require driving with the optics always on, fog lights can take over this function. Thus, you can install high-quality lamps in them and spend less on constantly replacing burnt-out light elements in the headlights. As described earlier, at the most unexpected moment, PTF can help you out when visibility deteriorates when driving along the highway during fog.
Video “Visual instructions for installing PTF”
How to install optics on a VAZ car - in the video below (the author of the video is Sergey Marunchenko).
Fog lights or simply PTF are an important element of the lighting system for a car. Alas, not all manufacturers equip their cars with these devices. AvtoVAZ with its model 2114 is no exception. PTFs for the fourteenth are available only for an additional fee and in the most expensive configuration.
Not everyone sees the point in buying the most complete version just to get PTF. An excellent solution is to install foglights yourself.
Beautiful and effective
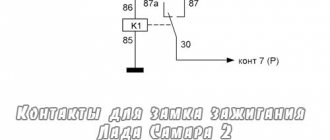
Relay location
So, the rear fog lamp relay is located on the driver’s side, under the steering wheel (just to the right of the fuse box, sometimes they are all covered with a plug or cover). There are only 3 pieces there. Sometimes they are covered with plugs. It should be noted that it is connected to a non-latching power button. This means that if you press it, it returns to its original state. But this is normal, since in it the contacts are paired through an electromagnet.
The PTF relay in old variations of VAZ cars was located under the hood, towards the fuse block. Now, more and more often, it is placed in the interior, under the steering wheel, in the area of the electronic unit. There is also a relay responsible for supplying power to the dashboard and a signaling device (if provided for by the design).
The rear fog light relay simultaneously combines 3 electrical circuits plus one spare line for 12 volts of static voltage. By the way, because of this, if it partially fails (meaning broken contacts due to vibration), you can fix the problem in a matter of minutes - simply transfer contacts from 1-2 to 6. The only caveat is that this procedure must be performed with the engine turned off and a disconnected battery terminal - some contacts are always energized, but without load. It can also cause a short circuit!
It is important to understand that initially the fog lamp relay does not connect this circuit, since the manufacturer by default installs conventional headlights without additional lighting. The circuit is closed after the fog lights are installed.