How to check the ignition coil (IKZ) with your own hands
The car jerks, there is no traction, vibration is felt, or the engine is rough; all these are symptoms of improper operation of the individual ignition coil (IIC).
Other signs of a faulty ignition coil are the presence of errors 0301, 0302, 0303 and 0304, indicating misfire in one of the cylinders. Let's look at a few simple ways to check the ignition coil with your own hands. It is worth noting that the process of checking IKZ on modern Lada cars (XRAY, Vesta, Largus, Granta, Kalina and Priora) does not have significant differences. All actions are performed in the same way.
Visual inspection of the IKZ
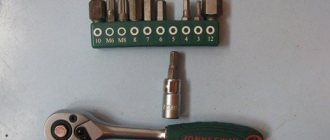
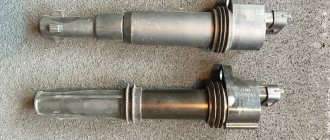
Remove the ignition coils from the engine using a 10mm or Torx E8 socket wrench (depending on the powertrain model). Carefully inspect the removed coils. There should be no cracks, damage to the rubber cap, melting or leakage of plastic. The spring located inside the coil must be in the correct position.
Checking the ignition coil with a multimeter
Checking the voltage at the terminal block of the wires
:
- Disconnect the block with wires from the ignition coil (on the H4M engine, to access the coils of cylinders 1 and 2, remove the intake pipe).
- Turn on the ignition and measure the voltage at terminal 3 of the wiring harness block (the numbering of the terminals is on the ignition coil).
- The voltage at the terminal must be at least 12 V. If it is less or absent, it means the battery is discharged, there is a fault in the power circuit, or the engine control unit (ECU) is faulty.
- Turn off the ignition.
How to check ignition coil resistance
:
- We set the switch on the multimeter to the 200 Ohm position and close the probes (the instrument error will be displayed on the screen, which will need to be subtracted from the readings during testing).
- We check the primary winding of the ignition coil by connecting the probes of the device to the contacts.
- The resistance between pins 1 and 3 should be close to zero (about 1 ohm).
- The resistance between pins 1-2 and 2-3 should be high (tend to infinity).
- Set the switch on the multimeter to the 2000 kOhm (or 2 MOhm) position.
- We check the secondary winding of the coil by connecting the red probe to the spring inside the rubber cap, and the black probe to pin 2.
- For good contact, it is best to remove the rubber cap from the coil and connect the probe directly to the coil contact, having first cleaned it of deposits.
- The resistance should be about 300-400 kOhm.
Attention! The resistance of the secondary winding of the ignition coil is highly dependent on its temperature. Carry out the test when the coil is completely cool. Compare the resistance of all four ignition coils to each other. A faulty ignition coil can be identified by very different values, provided that all coils are from the same manufacturer.
The process is also shown in the video:
Checking the ICP with a spark gap
- Disconnect the IKZ from the spark plug.
- Install a spark gap on the IKZ.
- Apply ground (from the battery terminal) to the spark gap using a wire.
- Turn the crankshaft with the starter.
- If there is a spark, then the IKZ is working.
Let us remind you that you can find a problem in engine operation by independently measuring the pressure in the fuel rail, or by checking the compression in the cylinders.
Share on social networks:
Found an error? Select it and press Ctrl+Enter..
Source
Chainsaw ignition systems
Not too many years ago, the ignition systems used in professional saws were cam driven. They were heavy, complex, expensive and prone to all sorts of problems - especially on rainy days. Even when the saw "had a spark," it was often difficult to start. Some saws barely produced enough power to produce a flash at rpm. And constant jerking of the starter handle was the norm.
Today's systems are small, lightweight, and rugged. Compared to earlier ignition systems, they are almost trouble-free. A modern reel is professional and almost always lasts the entire service life of the chainsaw. While changes to ignition systems have been major, operational problems can sometimes occur. Often these problems are easy to fix yourself and do not require a trip to the repair shop for expensive repairs.
Checking the ignition coil and its circuits on VAZ 11183, VAZ 21116 and VAZ 11186 Lada Granta engines
Parts and consumables:
- Probe with 1-2 W lamp
- Ignition switch contact group (if necessary)
- Ignition coil (if necessary)
- Bare wire
1. With the ignition switch OFF, disconnect the engine management wiring harness connector from the ignition coil as described here.
2. To check the coil power circuit, connect the tester probes to the middle terminal of the harness block and the engine ground. When the ignition is turned on, the device should record a voltage approximately equal to the battery voltage.
If there is no voltage at the middle terminal of the wiring harness block, then the wire connecting the block to the ignition switch is probably faulty or the lock contact group is faulty.
3. To test the coil control circuits, you can use a probe with a 1-2 W lamp. Relieve pressure in the engine supply system and do not replace the fuel pump fuse. Connect the probe probes to the middle and one of the outer terminals of the wiring harness block. If the control (and power) circuit is working properly, the probe light should blink frequently when cranking the crankshaft with the starter.
Otherwise, check for a break or short to ground in the wire connecting the outer terminal of the block to the controller terminal.
4. Similarly, by connecting the probe probes to the middle and other extreme terminals of the block, check the other ignition coil control circuit.
5. You can check the serviceability of the ignition coil itself on the engine by disconnecting the wiring harness block and high-voltage wires from it. For clarity, we show the test on a dismantled coil. It is necessary to connect the device wires to the module contacts, which are located at the edges. That is, to the extreme left and right. Using an ohmmeter, check the circuit for an open circuit.
If the multimeter readings do not change after connecting the wires, this indicates that there is an open circuit in the circuit.
6. To check for breakdown (short to ground) of the primary windings, connect the tester probes to the middle terminal of the coil and to the metal part of the coil body.
General diagram of electrical equipment 2190
1 — block headlight; 2 — windshield wiper gear motor; 3 - generator; 4 - battery; 5 - starter; 6 — sound signal; 7 — fuse box in the engine compartment; 8 — power window switch for the right front door; 9 — motor-reducer for window lifter of the right front door; 10 — right front door connector; 11 — connecting blocks of wires for connecting the right front speaker of the audio system; 12 — electric drive for locking the lock of the right front door; 13 — electric windshield washer pump; 14 — connecting block of the wiring harness for connection to the computer; 15 — electric fan of the engine cooling system; 16 — sensor of insufficient brake fluid level; 17 — left front door connector; 18 — central locking switch; 19 — interior lamp switch; 20 — connecting blocks of wires for connecting the left front speaker of the VAZ-2190 audio system; 21 — right front door power window switch (installed on the driver’s door); 22 — power window switch for the left front door; 23 — window lift motor of the right front door: 24 — airbag control unit; 25 — electrical equipment control unit; 26 — instrument panel; 27 — mounting block; 28 — right side turn signal; 29 — brake signal switch; 30 — seat belt unfastened sensor: 31 — ignition switch (lock); 32 — lighting control unit; 33 — steering column switches; 34 — left side direction indicator; 35 — connecting blocks of wires for connecting the left rear speaker of the audio system; 36 — electric drive for locking the left rear door; 37 — electric heater fan; 38 — additional heater resistor: 39 — heater switch: 40 — airbag module; 41 — hazard warning switch: 42 — trunk lock switch; 43 — rear window heating switch: 44 — connecting blocks of wires for connecting the right rear speaker of the audio system; 45 — electric drive for locking the right rear door; 46 — reverse light switch; 47 — parking brake warning lamp switch; 48 — cigarette lighter; 49 — connecting blocks of wires for connecting the head unit of the audio system: 50 — backlight lamps on the trim of the center console of the instrument panel: 51 — control unit for electric power steering; 52 — interior lamp; 53 — rear light; 54 — trunk lid lock; 55 — license plate lights; 56 — additional brake light; 57 — rear window heating element; 58 — luggage compartment lamp
How to check the 8 valve grant ignition module
On a Lada Granta car, 1 of 2 ignition systems can be installed, so one of them uses 4 individual ignition coils for each spark plug (for engine 21126 - Lada Priora). More detailed information about this system and operations for removing ignition coils from spark plug wells can be found in the article “Removing and installing ignition coils on a VAZ 2170 2171 2172 Lada Priora.” The second option is when all 4 coils are installed in one housing. This design is used for 8 valve engines of Lada Granta cars; further details about this option
To remove and check the ignition coil of 8 valve engines VAZ-11183, VAZ-11186 and VAZ-21116 installed on a Lada Granta car, do the following.
Symptoms of a problem
It happens quite often that the ignition coil fails for one reason or another. Most often, coil failure is caused by moisture, and due to the low location of the part itself, moisture quite often gets on it.
Malfunctions:
- Two cylinders (1-4; 2-3) do not work at once;
- The car jerks and accelerates poorly;
- Difficulty starting the internal combustion engine;
If your car has such malfunctions, then most likely the ignition coil is faulty.
Operations for removing and installing the ignition coil and checking it on a Lada Granta car
1. Disconnect the wire from the negative terminal of the battery.2. By pressing the plastic clip, disconnect the ignition coil power wiring harness block.
3. Disconnect the high-voltage wires from the ignition coil.
4. Remove the four screws securing the ignition coil to the bracket...
5. ...and remove it from the bracket.
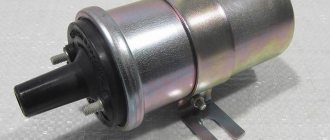
This is what the ignition coil looks like when removed from the car. Pay attention to its markings so that you can purchase a similar one for replacement.
6. Perform the following checks. Checking the short to ground of the ignition coil windings of a Lada Granta is performed as follows: connect one ohmmeter wire to terminal “15” of the ignition coil (middle terminal of the coil), and the other to the metal part of its body. If the ohmmeter shows infinity, then there is no short circuit and the circuit is working.
Checking for an open circuit in the primary circuits of the ignition coil is performed as follows: connect one ohmmeter wire to terminal “1a”, and the second wire to terminal “15”. If the ohmmeter shows infinity, then there is an open circuit in the circuit and the coil is faulty.
Checking for a break in the secondary windings of the ignition coil is as follows: connect one ohmmeter lead to the high-voltage terminal of the 1st cylinder, the second one to the high-voltage terminal of the 4th cylinder. If the ohmmeter shows infinity, it means there is an open circuit and the coil is faulty. Carry out a similar check for the chain of the 2nd and 3rd cylinders.
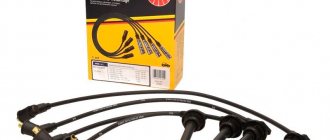
Checking high-voltage wires of Lada Granta
is performed as follows: connect the ohmmeter wires to the terminals of the high-voltage wire, the resistance of the wires should be less than 15,000 Ohms. If the resistance is greater, then the wire is faulty.
Connect high-voltage wires to the coil terminals in accordance with the cylinder numbers indicated on the coil body.7. Install the ignition coil in the reverse order of removal.
The ignition system (IS) is the most important unit of a modern car, which ensures the timely occurrence of a spark. The system consists of a large number of parts, on the serviceability of which the entire operation of the system depends. The article discusses the main components of the SZ Lada Largus and Granta: ignition lock (IZ), ignition coil (IC).
Repair
Finding a new ignition coil today is not particularly difficult. In order to repair a broken bobbin, it is not at all necessary to buy the entire reel. Auto parts stores sell quite a lot of repair kits, among which you can easily choose an option for your car.
Note. When selecting a bobbin repair kit, you should pay attention to the number of motor valves.
On the other hand, in remote areas of the Russian Federation, sellers are in no hurry to sell spare parts in the form of repair kits, preferring to sell assembled reels, which is beneficial for them in all respects.
One repair kit costs no more than 150 rubles. This also includes the spark plug well insulator and seal. If the car engine is 4-cylinder, then you need to take 4 repair kits at once.
Ignition switch and features of its replacement
The ZZ is secured with one screw and is located on the steering column on the right under the steering wheel. Its design includes a locking device and a contact group. They are interconnected, working synchronously, and are activated using the ignition key.
When diagnosing faults in the electrical circuit, it is necessary to check whether the contacts close correctly when the position of the key changes. If any irregularities in the operation of the ignition protection are detected, it should be replaced (the author of the video is Renault Repair).
The procedure for replacing the ZZ on the Lada Largus consists of the following steps:
- Before work, disconnect the negative terminal from the battery to turn off the power supply to the car.
- Next, remove the steering column casing.
- At the next stage, by releasing the latch, we disconnect the connector with the wires of the contact group.
- Then, inserting the key into the ignition switch and setting it to the first position, remove the 33 wires from the dashboard.
- Next, unscrew the bolt that secures the ZZ.
- Use a screwdriver to press out the latches and remove the 3Z from the housing.
- We dismantle the faulty unit.
- Having installed a new spare part, we assemble it in the reverse order.
After replacement, we check the operation of the locking device by changing the position of the key.
Replacing spark plugs Lada Kalina video instructions
Hi all. Today we will replace spark plugs on a second generation Lada Kalina with a sixteen valve engine.
I recommend buying Denso spark plugs. Inexpensive and go from replacement to replacement without problems. Order number: Q20PR-U11.
To replace spark plugs you will need:
- open-end wrench for ten
- seven-head wrench
- a long spark plug wrench because the wells are deep
Step by step replacement
1. First, disconnect the negative terminal of the battery. Ten key nut.
2. Remove the engine protective cover. We just pull it towards ourselves.
3. Using a socket head, unscrew the fastenings of the ignition coils. Each coil is secured with one bolt.
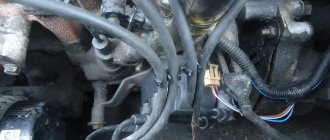
Ignition coil bolt locations.
4. Remove the power connectors from the coils. On the connector, press the latch with your thumb and pull it towards you.
5. Take out the coils. They fit tightly, so you need to apply some force.
We stack the coils so that we remember where each one was. During assembly you need to install it as it was.
6. Unscrew and change the spark plugs. I advise you to change one spark plug at a time. That is, they unscrewed one spark plug and screwed in a new one.
If you unscrew all the spark plugs at once, there is a chance that debris will get into the wells.
We tighten the candles without fanaticism.
7. Insert the coils all the way and tighten them with bolts.
8. Connect the connectors and battery terminal.
9. Put on the motor cover.
There are four grooves on the cover, and four matching holes on the motor. Just put the grooves into the holes and press.
10. Start the engine and enjoy the work done.
We also recommend:
Instructions for repairing and replacing the ignition coil
Removing and replacing short circuits is carried out according to the following algorithm:
- First you need to de-energize the car by disconnecting the negative terminal of the battery.
- Having released the latch, you need to disconnect the block with the wires coming from the controller.
- Then the high-voltage wires should be disconnected from the short circuit.
- Next, unscrew the screws securing the ignition module to the bracket and remove it from the bracket.
- The new module is installed in place of the old one. Next, perform the reverse steps of removal.
Photo gallery “Replacing the ignition coil”
Self-diagnosis of the module
You can check the module in the following ways:
- Checking for weight. To carry out the test you will need a multimeter. The tester should be set to resistance measurement mode. One probe of the tester must be connected to pin 15, and the second one must be shorted to the housing. If the unit is working properly, the resistance should tend to infinity.
- Checking the primary windings of the short circuit. The primary windings are checked for breaks using a tester. To check, you need to connect the probes of the meter to the outer contacts on the short circuit. If the resistance tends to infinity, this indicates the presence of a break in one of the windings.
- Checking secondary windings. Since there are two windings, the test is carried out in two stages. First you need to check the short-circuit winding of cylinders 1 and 4. To do this, the multimeter probes must be placed in the appropriate terminals. A resistance of about 5.4 kOhm is considered normal. If the resistance tends to infinity, then there is a break in the winding. The short-circuit winding of cylinders 2 and 3 is checked in the same way.
In case of malfunction, the ignition module is replaced with a new one.
List of online stores selling reels (Moscow, St. Petersburg, Kyiv regions)
| № | Name | Address |
| 1. | "AUTOKLAD" | https://www.autoklad.ua/ |
| 2. | "AUTOKLONDAYK" | https://autoklondayk.com.ua/ |
| 3. | "PITBIKECLUB" | https://pitbikeclub.ru/ |
| 4. | "ASTARTER" | https://www.astarter.ru/ |
| 5. | "AUTOPRIWOS" | https://www.autoprivos.ru/ |
| 6. | "DENSO" | https://www.denso-am.ru/ |
Ignition module Lada Granta
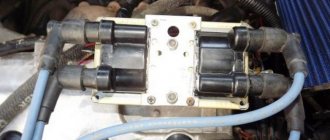
The engine ignition system uses one ignition coil. It consists of two two-terminal ignition coils, made in a single housing. Sparking occurs in two cylinders simultaneously (1–4 or 2–3).
The ignition coil is connected to the spark plugs by four high-voltage wires with permanent tips.
2. Having released the latch, disconnect the wiring harness block 1 from the terminals of the ignition module 2.
3. Turning on the ignition, use a voltmeter to measure the voltage between terminal 15 and the ground of the wiring harness block. After taking measurements, turn off the ignition.
4. Disconnect the high-voltage wires from the spark plugs.
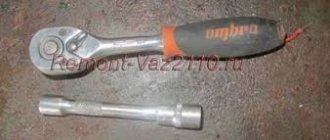
5. Using a 13 mm socket wrench, unscrew the two bolts of the upper fastening of the ignition coil bracket.
6. Using a 17 mm wrench, loosen the tightening of the lower bolt securing the ignition coil bracket and remove the bracket together with the coil.
7. Disconnect the high-voltage wires from the ignition coil.
8. Using an ohmmeter, we measure the electrical resistance between the central terminal 15 and the housing (bracket).
The device should show that there is no short circuit of the primary winding of the coil to ground. We sequentially measure the electrical resistance between the central terminal 15 and the outer terminals -1a and 1b. The resistance of each of the primary windings of the coil should be about 0.5 ohms.
When measuring small values of electrical resistance (about 1 ohm), it is necessary to take into account the internal resistance of the device, which can be determined by shorting the ohmmeter probes.
9. Using an ohmmeter, measure the resistance between the high-voltage terminals of the coil 1 and 4, and then 2 and 3. The resistance of the windings should be about 5.4 kOhm.
10. Using a 5mm hex wrench, unscrew the four screws securing the coil to the bracket and remove the coil
11. Install the ignition coil in the reverse order.
We connect high-voltage wires in accordance with the cylinder numbers marked on each wire and on the coil body next to the terminals.
This article will discuss replacing the ignition coil of one of the Lada Granta ignition systems. This ignition coil, as mentioned in the previous article, consists of two electrical coils that are controlled by the engine controller. It converts 12V pulses into high voltage voltage of several kV to produce a stable spark on the spark plugs.
One of the symptoms of a malfunction of the ignition coil of the 8 valve VAZ-11183, VAZ-11186 and VAZ-21116 engines installed on the Lada Granta is its unstable idle operation, decreased power, high fuel consumption and difficult starting at any temperature. If one of the ignition module coils partially fails, chaotic misfires in the cylinders are possible, usually in pairs.
So, let's start removing and checking the ignition coil on the Lada Granta step by step. Sequence of work
| 1. | When carrying out work on the electrical part of the car, do not forget to de-energize the on-board network by removing the terminal from the battery. |
| 2. | The control wiring harness from the controller is connected to the ignition coil. It must be removed by pressing the latch. |
| 3. | After this, disconnect all high-voltage wires from the ignition coil |
| 4. | The ignition coil module is mounted on a bracket and secured with four screws. Unscrew them. |
| 5. | We remove our reel from the bracket |
| 6. | There is a marking on the end of the ignition coil module. Remember it or write it down if you are going to buy a new one, so as not to make a mistake when choosing a similar one. |
Below are several procedures for checking the Lada Granta ignition coil for serviceability.
Reviews
| № | Positive |
| 1. | Victor: I’ve been driving Grant for the second year, no complaints, the ignition works properly. Even in winter the car starts with a half turn. |
| 2. | Vasily: I strictly adhere to the manufacturer’s recommendations, carry out scheduled technical inspections, and buy original consumables. |
| 3. | Gennady: at 50,000 km the spark plug of the second cylinder failed. I don’t consider this a defect, since the deadline for domestic parts is quite acceptable. |
| 4. | Ignat: I’m pleased with the build quality of the Lada Granta; for a budget car it’s very good. Minor flaws are always present, but they can be eliminated. |
| 5. | Vitaly: during the next maintenance, the mechanic pointed out the need to replace the spark plugs. Relatives traveled 65,000 km. The store advised me to buy BREMI 20466. I've been driving it for two months, no complaints. |
| 6. | Igor: in two years of driving the Lada Granta, I replaced several spark plugs once, and there were no more breakdowns. I believe that careful treatment of the car and original parts are the main factors that ensure long service life. |
| 7. | Vasily: I’m happy with my car, it hasn’t let me down once in two years, I haven’t made any investments other than scheduled maintenance. |
| Negative | |
| 1. | Victor: the first time the ignition module flew for 45,000 km, it was replaced under warranty. Second time at 75,000 km. I bought BREMI 20466 in the store. The cost is 300 rubles more, but the quality is good. |
| 2. | Gennady: I do not recommend purchasing a domestic Lada Granta. The car is crude, there are many flaws and defects. I am considering the option of Renault Logan. |
| 3. | Dmitry: I’m dissatisfied with the car, there are a lot of comments, shortcomings, there is a defect. |
Ignition coil malfunction factors
When the first signs of a breakdown appear, inexperienced owners first of all suspect the ignition switch or high-voltage wires as the culprit. Owners of Lada Kalina with experience recommend a balanced approach to resolving the issue. How to check the fault? If the coil fails, the dashboard will remind you of this by means of an indicator light.
A voltage surge or a short circuit inside the unit can cause damage to the spark plugs. In this case, the spark will not be able to generate correctly between the electrodes.
Device failure can also be caused by the following factors:
- the car getting into an accident, as a result of which you can observe the destruction of some components of the ignition unit;
- the car was struck by lightning;
- the previously completed repairs turned out to be of poor quality;
- use by the owner of non-original components in the designated system;
- ignoring maintenance intervals.
Regardless of the reasons, the owner of the Lada Kalina should diagnose the ignition system in detail. Sometimes a problem can be generated by the influence of several negative factors at the same time. This situation warns an inexperienced driver to tend to independently search for and eliminate breakdowns, because there is a likely risk of forced failure of other known-good components.
Operational Aspects
Frequent cases when owners call for service are when the coil fails or does not function correctly. You can also diagnose the ignition module yourself. To do this you will need to acquire the appropriate equipment. One such diagnostic tool is a multimeter. It is used to measure the actual resistance value at the coil terminals in the 8-valve versions of the Lada Kalina, as well as in the 16-valve version. In order for the results of measuring actions to have maximum correctness, the procedure should be followed at least twice.
Damage to the ignition system can occur in any part of the circuit. This circumstance requires maximum care and attention during diagnostic procedures. The check begins with making sure that the winding is connected correctly to ground. Now let's diagnose the central terminal of the coil. We apply the positive contact of the device to it, and connect the negative contact with the vehicle ground. We look at the screen. If there is a symbol of infinity resistance, then this indicates the absence of a short circuit on this section of the circuit. From this information, the owner must conclude that the ignition module is working.
Now we connect the device with the terminals of the module located at the edges. A specific parameter on the screen indicates the presence of a malfunction inside the LADA Kalina ignition switch. If a defect is not found here either, then the next step will be to diagnose the secondary winding of the coil. We place the ignition module in front of us so that both contacts are facing us. We connect the diagnostic device with the terminals for the 4th and 1st cylinders. Having made sure that there is no malfunction (short circuit), we proceed to checking the circuit for the 2nd and 3rd cylinders. There should also be no short circuit here.