VAZ 2121 or Lada 4x4 has been produced since 1977. During the entire production period, the body of the SUV changed slightly, and the interior was modified, for example, changes concerned the instrument panel. Let's look at the types of Lada 4×4 dashboards and their descriptions.
The most common instrument combinations (catalog numbers):
- 2121-5325120 - the very first model;
- 21213-3801010 - intermediate model;
- 21150-3801010 - modern model.
Despite the fact that the instrument panels are different, the indicators showing the status of the vehicle systems remain unchanged and are divided by color:
- Green and blue lamps are informational;
- Yellow lamps are informative (Attention!);
- Red lights are emergency lights, movement is prohibited!
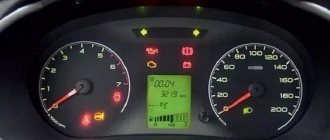
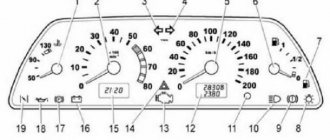
Let's look at the description of the instrument panel using the latest VAZ 21214 model as an example.
- coolant temperature indicator. Red zone - engine overheating. When the arrow reaches it, you must stop the car, turn off the engine and check the serviceability of the cooling system;
- tachometer. Shows crankshaft rotation speed. Do not allow the arrow to go into the red zone;
- left turn indicator. Lights up when the left turn signal is turned on;
- right turn indicator. Lights up when the right turn signal is turned on;
- speedometer. Shows the actual speed of the SUV;
- fuel level in the gas tank. 0 - the tank is empty; 1/2 - half of the fuel tank; 1 — full gas tank;
- Fuel reserve indicator lights up when there is less than 9.5 liters of gasoline left in the fuel tank. Do not let the fuel run out, this may damage the fuel pump;
- indicator for turning on external lighting. Lights up when the exterior lighting is turned on;
- low brake fluid level indicator. Lights up when the brake fluid level in the reservoir is below the minimum allowable level. Driving with this lamp on is prohibited;
- high beam headlight indicator. Lights up when switching the headlights from low to high;
- daily mileage reset button;
- odometer display. The upper numbers are the total mileage of the vehicle, and the lower numbers are the daily mileage;
- hazard warning indicator. Lights up when the emergency lights are turned on;
- engine management system malfunction indicator (CheckEngine). It is necessary to read error codes from the ECU using an on-board computer or diagnostic equipment;
- battery charge indicator. Lights up when electrical equipment starts running on battery power;
- handbrake indicator. Lights up if the handbrake is on;
- emergency oil pressure indicator. Lights up if the oil pressure in the engine lubrication system drops below normal. Operating the engine with the lamp on is prohibited. Check the engine oil level and the serviceability of the filter;
- reserve.
Niva instrument panel: description of indicator lamps
| Number | Description |
| 3/4 | The turn indicators turn on simultaneously when the hazard warning lights are activated. |
| 7 | Insufficient fuel level in the gas tank. |
| 8 | The vehicle's side lighting is on. |
| 9 | Emergency situation in the brake system. |
| 10 | The long-range illumination of the head optics is activated. |
| 12 | Vehicle mileage monitor. |
| 13 | Check engine light. If the indicator lights up, you need to carefully check the power plant. |
| 14 | Hazard warning light. |
| 15 | Clock display. |
| 16 | If the lamp lights up, you need to check the generator and battery charging. |
| 17 | Handbrake activated |
| 18 | The engine oil level has dropped critically. |
| 19 | Most configurations include a backup lamp. |
You should also highlight the colors of the car's indicators. They can be divided into three parts.
- Green/blue – indicators of these colors indicate normal operation of machine components.
- Orange/yellow - tells the driver that a certain unit requires attention or service.
- Red is the most dangerous color. If a lamp of this color lights up on the dashboard, the car must be urgently shown to a mechanic.
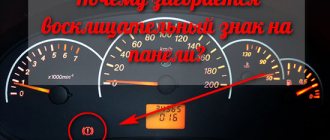
Exclamation mark on the Niva panel
Indicates that the fluid level in the brake system has decreased. You will need to open the expansion tank cap and add brake fluid to the required level. It is recommended to check the line for leaks and pad wear.
Lada Niva/VAZ-21214 operation, maintenance and repair manual
The VAZ-2121 Niva all-terrain vehicle, produced since 1977, after modernization in 1994, received the designation VAZ-21213, VAZ-21214 “Lada Niva 4X4”. In 2009, another modernization was carried out in Tolyatti, after which the car began to be called: VAZ-21214 “LADA 4X4”. During the modernization process, 250 new components and parts appeared in the car.
Externally updated: the car features new headlights with sections for side lights and turn indicators and larger exterior mirrors. The interior has a new instrument cluster and two warning lamps (differential locking and heated tailgate glass) on the instrument panel.
Major changes: the design of the main units was affected.
The model 21214 engine with a displacement of 1.7 liters received a distributed phased fuel injection system, as well as an exhaust gas emissions reduction system with a catalytic converter and a fuel vapor recovery system, ensuring compliance with Euro-3 environmental standards. The engine is designed to use gasoline with an octane rating of at least 95. The use of a clutch mechanism manufactured by Valeo from a Chevrolet Niva car made it possible to reduce the force on the clutch pedal. A clutch drive is also installed: from a Chevrolet Niva.
When assembling the transfer case, cardboard gaskets are excluded and silicone sealant is used instead.
In the transfer case crankcase ventilation system, the breather was replaced with an open tube, which eliminated the possibility of excess pressure in the box crankcase.
The requirements have increased: for imbalance and geometric manufacturing accuracy: cardan shafts, which has reduced noise and vibration and increased the service life of cardan shafts.
The brake system is equipped with a new vacuum booster and an aluminum brake master cylinder, unified with similar components of the Lada Kalina car, as a result it was possible to reduce the force on the brake pedal.
Power steering was installed on the car. The front suspension has new lower arms with larger silent blocks and steering knuckles: from the Chevrolet Niva.
We increased the diameter of the lower arm axis and installed new ball joints with a forged body.
In the rear suspension, the shock absorbers are installed closer to the vertical and the kinematics have changed due to the installation of the lower rods at an angle to the longitudinal axis of the car, this has made it possible to reduce the transverse and angular movements of the rear axle, reduce the yaw of the car when moving over bumps and reduce the steering effect of the rear axle. In addition, new shock absorbers were installed in the front and rear suspensions. As a result of all the changes, the car has become easier to handle and has better road holding both on asphalt and off-road. Isofix system fastenings have appeared in the rear seat, which allows you to install two child seats in the car at once.
| № | Specification/Specs | Data |
| Dimensions and Weight | ||
| 1 | Length | 3740 |
| 2 | Width (without/with mirrors) / Width | 1680/1814 |
| 3 | Height (loaded/empty) / Height | 1640 |
| 4 | Wheelbase | 2200 |
| 5 | Ground clearance | 221 |
| 6 | Curb weight / Total (curb) weight | 1210 |
| Gross (max.) weight | 1610 | |
| Engine | ||
| 7 | Type / Engine Type, Code | Gasoline, liquid cooling, four-stroke, 21214 |
| 8 | Number of cylinders / Cylinder arrangement: Total number of cylinders, of valves | 4-cylinder, in-line, 8V, SOHC overhead camshaft |
| 9 | Cylinder Diameter/Bore | 82.0 mm |
| 10 | Piston stroke/Stroke | 80.0 mm |
| 11 | Volume / Engine displacement | 1690 cm³ |
| 12 | Power supply system / Fuel supply, Aspiration | Multiport fuel injection |
| Atmospheric | ||
| 13 | Compression ratio | 9.3:1 |
| 14 | Maximum power / Max. output power kW (HP) at rpm | 59.5 kW (80.9 hp) at 5000 rpm |
| 15 | Maximum torque / Max. torque N m at rpm | 127.5 Nm at 4000 rpm |
| Transmission | ||
| 16 | Clutch type | Single-disc, dry, with diaphragm pressure spring and torsional vibration damper, permanently closed type |
| 17 | Gearbox / Transmission type | Manual transmission 5 five-speed manual, two-shaft, with synchronizers in all forward gears, with a two-stage transfer case and a center differential lock |
- Name: VAZ-21214 Niva device, maintenance, diagnostics, repair
- Gasoline engines: 21214 1.7 l (1690 cm³) 80.9 hp / 59.5 kW
- Release since 2009
- Series: “On my own”
- Year of publication: 2012
Source: https://vnx.su/content/avto/vaz/niva.html
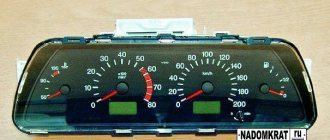
Shield Niva 21213
A transitional link between the classical and modern systems. The dial indicators and indicators are similar to the dashboard of the VAZ 2105, which many car enthusiasts do not like, and they want to change it.
Which panel is suitable for Niva 21213
Users often install panels from a VAZ 2114 or 2110 car. A minimum number of alterations and modifications will be required here. Contact groups and wiring terminals are reinstalled under the required pins. Refinement of plastic and seat will be required.
Removal and installation instructions
How to remove and install the dashboard on a Niva:
- First, you need to remove two plugs from the control panel lining and unscrew the screws. Next, unscrew the screws that secure the tidy visor.
- The right side of the panel facing is pulled out, the pads from the keys are removed, as well as the connector. Next, the control panel trim is removed from the left side; by doing this, you can dismantle the button for activating the side lights and optics. After this, the panel lining can be completely dismantled.
- The two screws of the tidy are unscrewed, the shield itself is removed, and all connectors and plugs are disconnected. If there are problems with the operation of the shield, they are resolved at this stage. The device is being repaired, it is soldered, and burnt-out light bulbs are replaced.
- Next, the shield is installed. When installing, keep in mind that the holes in the steel strip located under the tidy must line up correctly. Further installation is carried out in the reverse order of removal.
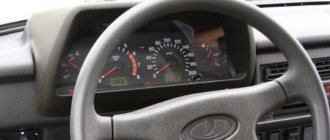
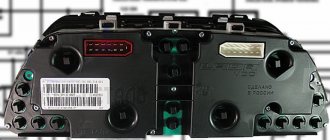
Shield Niva 21214
In the version where the injector is installed, the manufacturer installs a relatively modern device with a small display. The partially digitized version is easier to read and has a new indicator - a seat belt light.
Which panel is suitable for Niva 21214
On this version, users rarely change the device. The native panel is informative and only overexposure may be required here. If the driver decides to make a replacement, he needs to choose from a Lada tenth series car.
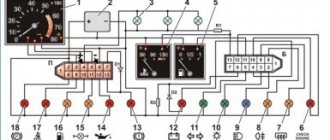
Appearance
1 – sound signal on/off switch;
2 – panel containing instrument clusters;
3 – steering wheel (steering wheel);
4 – screw intended for fastening the instrument panel;
5 – switch responsible for external lighting. When the key arm is pressed to the 1st fixed position, the side lights are turned on, and to the 2nd position, the additional headlights are turned on. For visualization, a light bulb is used that illuminates the keys;
6 – heater electric fan regulator. It has two fixed positions: 1st – low speed of the electric fan and 2nd – high speed. When the outside lighting is turned on, the key symbol lights up;
7 – windshield blower nozzles;
8 – central nozzles responsible for interior heating and ventilation;
9 – control panel for interior heating and ventilation;
10 – button to turn on/off the heated rear window. If the exterior lighting is switched on, the key symbol is illuminated;
11- indicator lamps (heated rear window and differential lock on);
12 – plug;
13 – glove compartment;
14 – blowing the windows of the front doors;
15 – area for magazines, first aid kits, newspapers...;
16 – plug;
17 – turn on/off rear fog lights. In case of limited visibility (snow, fog or rain), you must turn on the fog lights. To do this you need to press the shoulder of the key. If the exterior lighting is switched on, the button symbol is illuminated;
18 – space for radio equipment.
Something to remember! Independent installation of arbitrary electrical consumers can cause overloading of the electrical wiring, which in turn can lead to a fire.
19 – turn on/off the wiper and washer for the rear window. The switch has two positions: 1st – turn on the windshield wiper, 2nd – turn on the washer.
20 – instrument cluster.
The device on the Niva failed - the reason
For most classic versions, problems exist.
- The corresponding fuse has blown. This is usually insert F2.
- There are problems with the wiring. Such problems are not uncommon in classic car models. Here you should check the wires for damage to the insulation, loosening, oxidation of contact groups, breaks.
- Damage to the device. Here you should check the device circuit for breakdowns and burns.
If we are talking about modern modifications with an ECU, it is easier to find the problem using computer diagnostics. The BC standard errors will accurately indicate the location of the fault.
Niva instrument panel does not light up
The backlight of the shield is checked in the same way. If the panel periodically blinks or only some of the indicators go off, check the wiring. This is where the contact groups are usually oxidized. It is also possible that the integrity of the insulation may be compromised and individual light bulbs may burn out. If the backlight goes out completely, check the lighting fuse.
Possible faults
If the instrument panel of the VAZ 21214 has stopped working, this may be caused by various reasons.
What malfunctions are typical for the device:
- Light bulbs don't work. If all the backlight fails at once, most likely the problem lies in poor power supply. If only a few or one lamp does not work, then the indicator should be replaced with a new one.
- The speedometer does not work. An electronic problem can be solved by dismantling the device and looking for a bad contact or a failed board element. The problem of tachometer breakdown is solved in the same way.
- Mechanical damage to the device due to impacts and other impacts on it. If the device stops working because of this, it must be removed and tested to determine the failed element.
- Broken wires, this malfunction can also be attributed to mechanical failures.
- Once connected, the new device may not work due to incorrect connection.
- Oxidation of the contacts on the plugs, which may cause sensors and controllers to not work. The problem is solved by cleaning the contacts.
Also interesting: Where is the Chevrolet Niva fuel pump relay located?
Niva: tidy does not work
There are several ways to solve the problem.
- On the version with a carburetor, check the fuse and the device itself. Turn signals and other vehicle devices can work.
- If the car does not start, the malfunction probably occurred on the injection machine. Here you will need to perform computer diagnostics.
The Niva's tidy was constantly changing and updating. The board, regardless of modification, is informative and easy to perceive.
Specialization : Graduated from the State Automobile University, worked for 20 years at GAZ-56, now I drive a Zhiguli.
Source
Location.
On Niva DS is installed on the gearbox. This allows data to be read only while driving, turning off when the engine is in neutral.
The device itself consists of a plastic case, inside of which electronic components are located. For proper operation, it is placed in close proximity to the shaft. There is a built-in magnetic bar inside the shaft that creates electrical signals when rotated.
The product is quite fragile, so when dismantling or installing you must be extremely careful not to damage its body.
Description of the Lada 4×4 instrument panel (VAZ 2121, 2131)
VAZ 2121 or Lada 4x4 has been produced since 1977. During the entire production period, the body of the SUV changed slightly, and the interior was modified, for example, changes concerned the instrument panel. Let's look at the types of Lada 4×4 dashboards and their descriptions.
The most common instrument combinations (catalog numbers):
- 2121-5325120 - the very first model;
- 21213-3801010 - intermediate model;
- 21150-3801010 - modern model.
Despite the fact that the instrument panels are different, the indicators showing the status of the vehicle systems remain unchanged and are divided by color:
- Green and blue lamps are informational;
- Yellow lamps are informative (Attention!);
- Red lights are emergency lights, movement is prohibited!
Let's look at the description of the instrument panel using the latest VAZ 21214 model as an example.
- coolant temperature indicator. Red zone - engine overheating. When the arrow reaches it, you must stop the car, turn off the engine and check the serviceability of the cooling system;
- tachometer. Shows crankshaft rotation speed. Do not allow the arrow to go into the red zone;
- left turn indicator. Lights up when the left turn signal is turned on;
- right turn indicator. Lights up when the right turn signal is turned on;
- speedometer. Shows the actual speed of the SUV;
- fuel level in the gas tank. 0 - the tank is empty; 1/2 - half of the fuel tank; 1 — full gas tank;
- Fuel reserve indicator lights up when there is less than 9.5 liters of gasoline left in the fuel tank. Do not let the fuel run out, this may damage the fuel pump;
- indicator for turning on external lighting. Lights up when the exterior lighting is turned on;
- low brake fluid level indicator. Lights up when the brake fluid level in the reservoir is below the minimum allowable level. Driving with this lamp on is prohibited;
- high beam headlight indicator. Lights up when switching the headlights from low to high;
- daily mileage reset button;
- odometer display. The upper numbers are the total mileage of the vehicle, and the lower numbers are the daily mileage;
- hazard warning indicator. Lights up when the emergency lights are turned on;
- engine management system malfunction indicator (CheckEngine). It is necessary to read error codes from the ECU using an on-board computer or diagnostic equipment;
- battery charge indicator. Lights up when electrical equipment starts running on battery power;
- handbrake indicator. Lights up if the handbrake is on;
- emergency oil pressure indicator. Lights up if the oil pressure in the engine lubrication system drops below normal. Operating the engine with the lamp on is prohibited. Check the engine oil level and the serviceability of the filter;
- reserve.
Video “Replacing tidy at home”
The main nuances and features of replacing the control panel on the Niva are shown in the video below (author - Vladimir Kucher).
Loading …
Read news about the new Niva
- Instrument panel Niva Chevrolet designations. Improving the Chevrolet Niva dashboard
- Diagram and pinout of the Niva 4x4 instrument panel (VAZ 2121, 2131) » Lada.Online
- Instrument cluster Chevrolet Niva tuning
- The instrument panel and its replacement on a Chevrolet Niva
- FROST car air conditioners // Online store // Prices // Air conditioners for cars Lada VAZ, VolksWagen Polo, Daewoo Matiz
- Installing fog lights on a Chevrolet Niva
- Installation and repair of the VAZ 2121 Niva transfer case
- Tuning for VAZ Niva 4×4 (LADA Niva) buy with delivery throughout the Russian Federation
How to check the VAZ speed sensor
A failed speedometer sensor in a VAZ car is easily determined - in this case, the speedometer stops working, and it may also show some signs of life, but display incorrect information.
Using a tube, pliers or other available tools, rotate the sensor axis. In this case, you should see the voltmeter readings changing: the higher the speed, the higher the voltage (from 0.5 to 10 V). If this does not happen, the sensor requires replacement.
Checking the sensors.
In order to check the DC, you need to have a multimeter, then follow a certain procedure:
- Turn off the sensor.
- We connect the red (positive) probe to the DC contact.
- We connect the black (negative) probe to ground.
- We fix a tube of suitable diameter onto the shaft in order to be able to rotate it.
- We switch the multimeter switch to low voltage measurement mode.
- It is necessary to rotate the shaft and observe the readings: as the speed increases, the readings on the multimeter display will increase. If the readings do not change, the sensor is faulty.
Another method does not require removing the sensor. To do this, you need to jack up one wheel so that it is at a distance from the ground and can rotate freely. After this, you need to connect a multimeter to the DC connectors. You need to rotate the wheel and observe the readings of the device. A change in voltage will also indicate performance.
Panel Contents
On the VAZ 21214, on which the injector is installed, there are a lot of different instruments on the panel, among them you can find:
- Speedometer and tachometer (which report the vehicle speed and crankshaft speed).
- Engine temperature indicator.
- Fuel level indicator in the gas tank.
- Turning light indicator.
- There are a lot of indicator lamps that indicate breakdowns: battery charge, parking brake, oil pressure in the engine lubrication system, “check engine” lamp, emergency lamp of the entire brake system.
- Odometer (counts the kilometers that the car has traveled since it left the assembly line).