Heating of the interior of any car is provided by air, which is heated in the heater radiator. The VAZ 2109 heater radiator is connected in parallel to the main radiator, which is part of the cooling system of a car engine.
The heater itself is secured with four nuts in the passenger compartment under the instrument panel to bolts that are welded to the air supply box. The air heated in the heater is directed through an air duct system into the passenger compartment. The air ducts are attached to the instrument panel from below and sealed with gaskets.
Operating principle of the furnace system
As soon as the temperature outside the window drops below zero degrees, coolant in the car begins to flow directly through the furnace tap. After the engine warms up to the optimal temperature (about ninety degrees), antifreeze will begin to flow into the radiator.
Inside the car there is a special lever on the panel that is responsible for turning on the ventilation system. In the VAZ 21099 it is equipped with three power modes. You can also select the direction of the air flow. The air is directed using shock absorbers located at different points in the car.
Internal structure and principle of operation
The heating system installed on the VAZ-2109 has its own differences and features compared to other cars in the AvtoVAZ line.
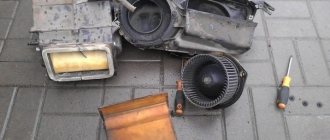
The heater consists of a pair of plastic casings (on the right and on the left), which are connected to each other along the entire perimeter with clamping brackets. A special flagellum is placed in the grooves of the casings to seal it well. The fan supplies air flow to the interior of the machine. The VAZ-2109 stove is designed so that the fan can be easily removed independently from the engine compartment.
An electric motor of type 45.37230 is attached to the casing, and a fan is located on its shaft. To obtain its desired rotation speed, additional resistance was provided. It was attached to the left side of the hole in the heater casing using a screw.
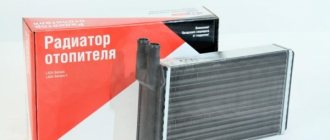
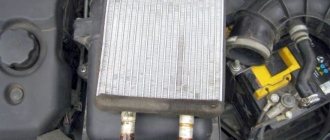
Heating system radiator
A radiator is built into the stove body to heat the air flows, which then blow into the cabin. Using three screws, this element of the system is screwed to the right casing and sealed with a polyurethane foam gasket.
The radiator design is a combination of:
- 2 rows of tubes.
- 2 rows of cooling plates.
- 2 plastic tanks.
It has two pairs of pipes, it is connected to the cooling system by rubber pipes, where coolant circulation is ensured using a pump. In the valve casing, on the axis of the supply line, there is a plate valve, which has a hole; it allows the coolant to pass through. The valve lever is connected by a rod to the handle lever, which also controls the process of heating the air flow. If you turn this lever, the hole in the valve will open the line for coolant to enter the radiator.
To ensure uniform heating of the car interior, the stove has two central nozzles, as well as left and right, to which air ducts are connected.
Exhaust ventilation
The car is equipped with exhaust ventilation, which circulates air from the interior to the street. It is located behind the body openings for the side windows.
Air also passes out through the deflectors when the car moves. The ventilation process is carried out due to the vacuum that occurs at the deflectors during movement. Air is sucked out from the rear of the cabin under the deflector trim; for this purpose, the rubber valves are pressed out and the air flow goes out through the deflector hole to the street.
Rubber valves are needed to prevent outside air from entering the car interior.
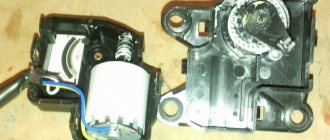
Stove design
Stove structure: 1 – elastic bushing; 2 – spring nut; 3 – left fan casing; 4 – electric motor; 5 – impeller; 6 – right fan casing; 7 – windshield heating flap; 8 – damper for the foot airflow channel; 9 – heater control damper; 10 – right heater casing; 11 – bracket for fastening the heater casings; 12 – gasket; 13 – radiator; 14 – clamp; 15 – supply hose; 16 – outlet hose; 17 – tap; 18 – left heater casing; 19 – sealing cover; 20 – resistor; 21 – support for the heater control damper axis.
Structurally, the VAZ 2109 stove consists of several parts:
- The outer casing is made of several complex configurations of plastic parts that fit tightly together and have seals.
- Air ducts are large-diameter corrugated tubes through which air is delivered to the nozzles in the cabin (at the windshield, on the driver and passenger sides). The amount of flow is regulated by valves.
- Control valves - they are located both inside the dashboard and on it. The former are adjusted through traction cables, and the latter directly manually.
- The radiator is made of aluminum and plastic. Tubes and plates are metal. Plastic - storage tank.
- Fan - runs on electricity and is powered from the on-board network (12 V)
- Rubber tubes - connect the expansion tank, radiator, pump. Coolant is supplied and discharged through them.
- The pump is also electric, pumps antifreeze and provides more intense heat exchange.
- Thermal sensor - installed inside the radiator and controls the operation of the pump and fan.
- The tap is controlled by a special lever and allows you to completely shut off the coolant flow in the system.
- Control levers and rod system - displayed on the dashboard and transmit influence to internal dampers and switches
- The vernier for turning on and adjusting the fan speed is also located on the front panel next to the levers.
- Electrical unit - power wiring and loading resistors.
Part of the system that provides interior heating includes an expansion tank with antifreeze. It is into this that the antifreeze that has released heat from the radiator enters.
Important! A VAZ 2109 may have a high or low panel, when the stove does not heat well, its repair is identical in both cases.
Design of the VAZ-21099 heater
And then everything is simple: the created flow passes through the radiator honeycombs, where heat exchange occurs, as a result, heat is transferred to the air, which then blows into the required zones through the air ducts.
The design of the VAZ-21099 stove includes several main components:
- stove body made of plastic;
- electric fan;
- air ducts;
- heater control mechanism.
heating system radiator (connected to the cooling system);
This car used heaters of two modifications (old and new), which were slightly different in design, but their components were completely identical.
Housing, radiator, dampers
Thanks to the housing, the required redirection of heating is ensured, since the movement created by the fan motor is immediately fed into it, rather than being dissipated. The body of the VAZ 2109 stove itself consists of two halves, connected to each other with special brackets. To reduce flow losses, a seal is placed between its halves. Partitions are made inside both halves, which provide the correct direction.
There is also a niche inside this case into which the radiator is installed. Initially, the radiator was made of brass, but now it is almost always made of aluminum. The design of the stove radiator 2109 is identical to the main one (consists of two tanks, tubes through which coolant circulates, and plates that form honeycombs), but is significantly smaller in size.
Video: The stove in the VAZ 2108, 2109, 21099, 2110, 2111, 2112, 2113, 2114, 2115 HEATS poorly
Air is blown through the stove dampers, also installed inside the housing. These elements are movable, and thanks to them it is possible to close some and open other air ducts. There are three of them in total - the main one (heater control), an air duct that redirects between the foot area and the supply to the cabin, and a damper for supplying flow to the windshield.
Additional flaps are installed on the side and central deflectors. It turns out that by default, air from the housing constantly blows onto the deflectors and this is done so that the flow always has an exit. Thanks to the existing dampers, it is possible to provide simultaneous supply of hot air to several zones at once (the interior and the windshield or the windshield and the footwell area).
The main heater damper provides air flow to the radiator or bypasses it. This is all done because the heater also plays the role of a forced ventilation system for the interior. This allows for a supply of cool air in the summer. And to do this, you just need to redirect the movement bypassing the heat exchanger, and the supply of heated coolant to the radiator itself will stop. To disconnect the heat exchanger from the cooling system, a heater tap is used, which is located on the supply pipe in front of the radiator.
Fan
The air flow is created by a squirrel wheel fan driven by an electric motor. These two elements are enclosed in their own separate housing, installed on top of the heater housing. Moreover, it is structurally designed to provide the easiest possible access to the electric motor, since it is considered one of the weakest components of the system.
The design provides three modes of fan operation. This allows you to select optimal air supply conditions (cold or hot).
Control mechanism
Video: Useful tips for cars. Why does the VAZ stove not work?
To control the stove and redirect air movement and open and close the coolant supply valve, a control mechanism located on the center console is used. It consists of a three slider mechanism and a fan operating mode switch.
The lower slider is the main one, since it changes the system mode (heating or ventilation). It controls two elements at once - the main damper and the tap. When this slider is switched to the “ventilation” mode, the tap and damper are simultaneously closed, which ensures air movement bypassing the heat exchanger. And everything is exactly the opposite - when you switch it to the “heating” mode.
The remaining two sliders control two other flaps - supply to the windshield and to the foot area. For example, when moving them to the center (the left slider goes all the way to the right, and the right slider goes all the way to the left), the air duct for the footwell area will be closed, and the one leading to the windshield will be open. When these sliders are moved to the edges, hot air blows into the legs (and the supply to the central deflectors is also cut off).
The connection between the slider and the valves and the tap is carried out using cables. Moreover, two cables connect to the main slider at once, since it simultaneously opens and closes the valve and tap.
Features of the heater on the VAZ-2109
The stove on a VAZ is an ordinary heat exchanger. The heating system is connected to the engine cooling system through a heater valve. When the stove starts, this unit opens and antifreeze enters the radiator of the heating system.
Coolant temperature under normal conditions ranges from 70 to 90 degrees.
As the antifreeze circulates through the radiator pipes, it cools, which leads to the release of heat.
An important component of the heating system on the “nine” is the fan, which operates in one of three modes. This element directs the heated air mass into the nozzles, and the driver regulates the flow distribution using deflectors. In exactly the same way, air enters the car windows.
Installation of deflectors
Having gained access to the space behind the bumper, we mark out future windows and cut them out with a jigsaw, grinder or other convenient tools. It should be noted that 1118 deflectors are designed for thicker seats than the thickness of the metal in the place we need. Therefore, when cutting out windows, it is advisable to provide tabs that need to be bent, thus forming thickenings of the metal, which will catch the latches of the deflectors. However, the latches are very fragile: on one of my deflectors the top pair broke. Having realized that this did not suit me, it was decided to use only the lower latches as hooks, and fix the deflector on top with self-tapping screws, which ensures complete reliability.
Main stove malfunctions
As we have already mentioned, the stove is connected to the internal combustion engine cooling system. Accordingly, heating problems may arise for the following reasons:
- Insufficient amount of coolant in the system.
- Clogging of radiator tubes.
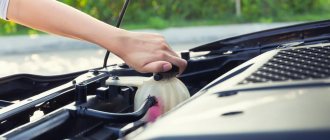
- There are air pockets in the system. To eliminate them, you will need to unscrew the cap of the radiator or expansion tank and let the engine idle for a while.
There are a number of cooling system malfunctions that can also affect the performance of the VAZ-2109 heating system. We look at the most common ones.
The weak point of the heating system is the valve through which antifreeze enters the heater radiator. This unit may leak. In this case, it must be replaced with a new one.
Poor quality coolant causes damage to rubber pipes due to its aggressive chemical composition.
Check the condition of the pump, which is responsible for pumping antifreeze and circulating it in the cooling system.
Poor operation of the stove can be caused by incorrect operation of the electric motor that drives the heating system fan.
If you notice extraneous sounds in the operation of this motor, this is a signal for a number of problems:
- Possible overheating due to fuse failure.
- When operating at low speeds, warm air does not flow - the electric motor has failed or there has been a break in the electrical circuit of the heating system.
Features of the stove operation and its modification
VAZ 2109 interior heating
Owners of a VAZ 2109 car are often concerned that over time the stove begins to heat poorly. Needless to say, driving in such a car will no longer be comfortable. In such cases, only upgrading the stove can solve the problem.
Refinement methods
There are many ways to modernize a stove. Below are a few of them.
Damper control lever
So:
- You can simply tighten the heater damper control cable to solve the problem. Make 1-2 turns of the cable located on the damper control lever (the lever itself is located on the stove body, near the gas pedal).
Note. The joints of the air ducts and the edges of the heater damper are covered with foam rubber, which does not compress completely. In this regard, a gap of several millimeters is formed, and the damper does not close completely. The above method will help you adjust the lever properly.
- There is another way to get to the control lever. There is a place on the driver's side and you need to try to reach with your hand and pull the lever, always with the heater fan on. During the adjustment process, the left ear will be in the area of the air duct nozzle and thus it will be possible to hear how the sound of the escaping air changes.
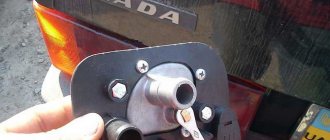
Heater valve
The reason for the ineffective operation of the heating system can also be incomplete opening of the stove faucet. This problem, by the way, occurs in almost all front-wheel drive cars of the VAZ family.
- The solution to the problem can be to tighten the valve control cable and then adjust the control lever to the maximum open position.
Note. In this case, it is possible that the valve will no longer close completely. But this is not the problem, but the fact that after adjusting the lever, the damper may lose its tightness and begin to leak (seen in the photo). In this case, we can recommend wrapping the leak area with a cloth that has been soaked in sealant and fixing it all with cold welding.
Heater valve leak location
Air ducts
Poor functioning of the heating system may be caused by leaky air ducts. The air that is pumped by the heater fan partially goes into the cracks, and the air flow thereby weakens and cools.
- The solution could be complete sealing and gluing of the connections that are located in the places where air flows from the stove to the outlet.
Air jams
VAZ 2109 interior heating system
In addition, the cause of poor operation of the stove can be air pockets formed in the heater radiator.
- The solution would be to stop the front of the car on some hill. Then you should open the heater tap completely and press the accelerator pedal several times.
Above were some ways to eliminate problems with the heating and ventilation system of the VAZ 2109. Instructions and advice given by experts are a chance to “cure” your car with your own hands, thereby saving a lot on repairs. As you know, the price of technical procedures at a service station is not low, and if they are carried out regularly, the family budget will become noticeably poorer. It is recommended to use photo and video materials in the process of independent work.
Possible breakdowns of the heating system
The main reasons why the VAZ 2109 stove does not heat well are interruptions or breakdowns of three components of the heating system:
| Radiator | Fan | Air ducts |
- Damage to the air duct assembly. The air ducts consist of plastic casings and large-diameter corrugated tubes. The flow of air through them is regulated by dampers. Seals protect against leakage of warm air or penetration of cold air. Problems in the operation of this unit most often arise when it becomes clogged with foreign particles of debris and dust. In this case, after inspection, the air ducts simply need to be cleaned of dirt. Another vulnerable part is the duct seals and dampers. The former can dry out and wear out - this leads to loss of tightness and leaks of warm air. The dampers often do not close completely. As a result, cold air penetrates the system and heating also does not occur.
- Fan assembly failure. The rotary-type blower fan on the VAZ 2109 is powered by electricity from the on-board electrical network through a ballast resistor. The switching itself and the rotation speed are regulated by the vernier on the control panel - it is located on the left side of the valve levers. Most often, the fan itself or the resistor burns out. If this is detected, they need to be replaced.
Advice! In a home garage, failure of these electrical parts can be detected by testing them with a multimeter.
- Radiator unit failure. This unit includes, first of all, the radiator itself, a temperature sensor (located between its plates), pipelines, and a motor pump (pumps antifreeze into the radiator and discharges it into the expansion tank).
- Failures related to this unit, and leading to the fact that the stove does not heat well on the VAZ 2109, come down to two groups:
- clogging of the internal volumes of pipelines with antifreeze deposits and other pollutants
- mechanical wear of rubber tubes, the radiator itself and the pump motor.
- Their determination is possible after disassembling the system and inspecting its individual parts:
- Are there any problems with fluid flow?
- are there any cracks or chips?
- Is the pump pumping liquid?
Repair
The procedure is performed after draining the antifreeze, in this order:
- from the interior side, disconnect 2 tubes leading to the faucet (you will need to loosen the fixing clamps);
- the remaining two are turned off in the engine compartment;
- unscrew the nuts on the faucet itself (from the bottom) and remove it (from the front);
- the rod is dismantled (you will need to disconnect the holder);
- the protective housing of the gearshift lever is removed;
- unscrew the screw in the gearbox tunnel and remove the floor covering;
- the ventilation hose is disconnected from the heater;
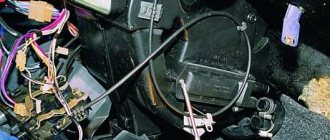
- the wires supplying them are removed from the resistor and the stove motor;
- To the right of the heater there are nuts securing it - they are unscrewed and the device itself is dismantled along with the control panel.
A faulty heater should be sent to a service center for repairs, since attempts to repair it on your own will most likely lead to undesirable consequences.
Why did the stove stop working on the VAZ 2109, 21099, 2114?
In harsh Russian winters, the stove saves the driver. But often in the most severe frosts it fails. What happened? Why doesn’t the stove work on the VAZ 2109, 21099, 2114? What to do? The age-old question.
Most likely, the stove failed due to a breakdown in the thermostat, which is why the antifreeze is not circulated along the usual route, large and small circles, but only in a large circle. To get the stove working properly, you will have to replace the thermostat, because repairing this part is very problematic and expensive.
The second, most common cause of failure is an air lock. This happens because, after active driving, while the engine is cooling, air accumulates in the radiator, which, under the influence of heat and steam, turns into a thermostat. And, if you start the engine a few hours after such transformations, this accumulated air is pumped into the radiator and, as a consequence of all this, an air lock occurs. You can solve the problem in the following way: you need to remove the pipe and slowly add antifreeze to the stove to the maximum level.
Another cause of stove failure may be the faucet. It is easy to determine the malfunction: if the faucet cannot be unscrewed to the limit, then the whole essence of the problem lies precisely in it. The problem is solved this way: we lift the crane cable, tightening it with pliers. If even pliers and your efforts are not able to move the faucet from its place, it means that oxidation has occurred in it. Then there is no point in repairing the part and you will have to replace it with a new one.
If the radiator is clogged, this can also lead to a breakdown. To diagnose, you just need to pull out the radiator and clean it thoroughly, using a vacuum cleaner. If after such a general cleaning the stove still does not work, then we are looking for the reason further.
Is all this necessary?
The video tag is not supported by your browser.
If the video does not play, try opening the page in a different browser.
In the video you can see the reaction of the deflectors to:
- closing the trunk door
- closing the driver's door
- turning on the 1st speed of the heater fan
- turning on 2nd speed heater fan
- turning on the 3rd speed heater fan
- turning off the heater fan
- restarting the heater fan
Ventilation and heating system VAZ 2109
As you know, on the VAZ 2109, interior heating is provided by air heated by a radiator. On the VAZ 2109, heating and ventilation of the interior are interconnected and represent a special system. In this article we will look at the general principles of operation of the heating and ventilation system of the VAZ 2109.
Checking the functionality of the heater elements
The first step is to test the fan. To do this, you need to turn on the ignition, and then start the fan by setting its switch to the first speed position. If it is working properly, the sound of its operation should be clearly heard. If the cabin is quiet, open the hood and listen to the sounds of the fan in the engine compartment. If the heater fan is “silent,” it means that you will have to remove it from the car and have it checked by an auto electrician, or, if you have the appropriate knowledge, check it yourself.
If during the inspection no faults were found with the fan, it is installed in place, and air still does not blow from the stove, the cause of the problem should be looked for in the wiring. It is necessary to determine why there is no voltage supplied to the terminals of the fan motor and to fix the problem. When the VAZ-21099 stove does not heat, even if the fan is working, the reason for this should be looked for in other elements of the heater.
The next step in troubleshooting is to check how well the heater air ducts are working. It is necessary to open them all, and, one by one, raise your hand to check the air flow on the windows, into the feet of the driver and passenger, and into the car interior. The air flow should be felt well. If all the heater air ducts are open and there is no airflow from them, you will need to disassemble the stove itself and look for the causes of the problems there.
Interior heater 2108
Greetings to all subscribers and those who just visited the page of my car. This post will talk about the interior heater of VAZ 2108,2109. About what factors influence the efficiency of the stove. And how to improve its efficiency.
In the distant times of the Soviet Union, when our cars were produced, many Samara car owners were pleased with its interior heating system. Every owner will say that a car with a low panel is very warm and heats up so much that your ears are burning. But gradually, as the car aged and after human intervention in the factory design, this efficiency decreased.
Let's look at the main factors that worsened its performance:
- Aging and wear of the foam rubber seals of the heater dampers and incorrect operation of the dampers (can be observed after replacing the radiator, when the foam rubber is damaged, the dampers and their drives may be damaged after some kind of repair requiring the removal of the torpedo.
- When the torpedo is installed slightly offset and its air ducts do not fall into place. (After removal/installation.
- Incorrect operation of the thermostat (sticks when opening). This is already affected by the quality of spare parts. And this is observed in almost every car. The engine must be able to quickly warm up to an operating temperature of 90 degrees. And its stable maintenance throughout the entire range of operation. If the temperature is, for example, not 90 but 84 degrees. This will affect the warmth in the cabin, especially in severe frost.
- Aging of the heater radiator, as well as if a Chinese analogue of the PRAMO KRONER LUZAR PEKAR type is installed, etc. (Full heating is provided by an aluminum DAAZ or a copper radiator) I do not consider an air lock and a water pump with a modified impeller to have a lesser effect on performance. Air is easily expelled from the system. And the pumps... This also doesn't work.
If the pump is more efficient, then it gives us more heat, thereby taking 2-3 degrees from the engine due to better circulation, lowering the main temperature. If the pump is less efficient, the coolant circulation is lower and the engine temperature is higher. And in the end it turns out + - the same thing. You need to choose the middle option.
So. We figured out the reasons. Now practice. We remove the heater from the car and carefully tear off the old foam rubber. We will use it to cut a new, thicker one.
heater removed from car
After that, we wash our stove. I washed the bathroom at home, with fairies. Because it was already dark and cold outside. Then we dry it and remember or photograph how the cables are attached to the damper control unit and how the cables are located on the body itself.
We disassemble the case, carefully unsnapping all the clips.
workplace
Now we see the following picture.
What kind of compaction and warmth in the cabin can we talk about?
Now our task is to replace the old foam rubber with new one.
To do this we need BITOPLAST 5MM, GLUE MOMENT, SCISSORS, DEGREASER. We clean the damper and degrease it, apply glue and stick BITOPLAST
Spread it well with glue, wait 3 minutes and stick it on.
Then we insert it into the body and check the tightness and clarity of operation. We trim off the excess bitoplast.
The recirculation control flap is ready. Now we do the same with the “face/legs” flap.
flap face/legs
And we check the accuracy of the work by installing it in the case. We trim off excess bitoplast if necessary.
face-closed/legs open
face-open/legs-closed
Great. Now let's move on to the glass shutter. I broke mine. I had to buy a new one.
Many will say that it is not necessary to smear it immediately because bitoplast already has an adhesive layer. Nothing will stick to this glue, after assembly it will all fall off due to the temperature difference inside the case, so we apply it and check the accuracy of the work.
The dampers are ready. Then I ran into a problem. A piece of the pin on which the cable is attached broke off. And for a long time I could not find such a curtain anywhere. I went to Voronezh to the car market and found it there. All spare parts are available and they are not expensive.
left new right old
We're done with the flaps, now let's assemble them. We lubricate all the scenes with grease. We assemble the body carefully. I personally suffered. It took me a long time to connect it. My valves were constantly shifting and getting knocked out. But soon I adjusted and won. I checked the operation of all the dampers by pulling the cables with my hands. We also coat the cables with oil.
damper
damper
Now we need to cut out a new one using the old foam rubber. to those places where the torpedo air ducts are adjacent. I found foam rubber in my attic, traced it over the old ones with a marker and cut it out. The foam is wider. It will fit tightly and there will be less loss.
I cut out two pairs. I left it in reserve.
The joint of the stove body does not need to be sealed with anything, but I sealed it with double-sided Chinese tape, for peace of mind, so to speak.
Now we connect the lever damper control unit. The cables are pressed against it specially. clamps. I bought a new unit because everything in the old one was broken. To do this, we take pictures or remember at the beginning how everything is attached. We set it so that the opening and closing of the dampers is clear and complete. so that there is no lack of income anywhere. So everything easily falls into place there. I got it right the first time.
Ready updated stove
The lower lever that simultaneously controls both the tap and the recirculation damper. After installing the stove, connect the cable to the tap. move the shell forward or backward and clamp it with a clamp. We achieve full opening of the tap and complete closing of the damper. Painstaking work. there's nothing to be done. The ends of the radiator must be wrapped in bitoplast.
That seems to be all. What else to say. With this operation, we achieved the condition of the stove as in the old days. The main problem when working with all these plastics is that this plastic dries out due to temperatures and becomes sooooo fragile and breaks when pressed with your hands. My block was all broken. Therefore, I bought a new one, and the upper damper, as well as some small things. the car market has it all. Well, the main thing is patience in work and calmness. I won’t say anything about the effect now. This is in subsequent entries. After all, important things also depend on the torpedo, the air ducts and the correct fit.
Repair and scheduled maintenance of the stove for VAZ 2109
Speaking about repairing the stove on a VAZ 2109, it should be noted first of all that most of the problems with this unit can be avoided by carrying out scheduled maintenance. It is its absence that causes sudden breakdowns at the most inconvenient moment (cold season).
The most important points are as follows:
- Regularly inspect air ducts and dampers - remove accumulated debris, clean the cabin filter, check the functionality of the dampers.
- If the seals on the dampers are worn out, they need to be replaced as soon as possible.
- When the dampers do not close tightly, you need to tighten the control traction cables.
- Antifreeze needs to be replaced regularly. The specific period depends on the brand and here you need to follow the manufacturers’ instructions.
- The tubes and the radiator itself need to be cleaned only with special branded liquids. Any amateur activity, for example using a sewer cleaner, will lead to failure of both the rubber tubes and the metal radiator (it will simply dissolve).
- The easiest way to remove a leaking faucet or not allowing antifreeze to pass through at all is to remove it from the system or replace it with a more wear-resistant tap. But in this case, it will become impossible to control it from the cabin through the rod and lever.
- The antifreeze level in the expansion tank must always be maintained at the proper level and when it drops, add what is missing.
Important! You only need to add additional antifreeze of the same brand that is used in the system. If you pour in another antifreeze, the system may become clogged with the resulting sediment.
Diagnosis of the reasons why the stove heats poorly on a VAZ 2109 should be carried out at medium engine speeds. The air temperature from the stove nozzles should reach 80-90 degrees Celsius in 5-10 minutes. Warming up the interior to +5 degrees from -10 degrees occurs in 10 minutes of operation of the stove.
Advice! If the stove does not heat well on a VAZ 2109 and it breaks down on the road, and there is no way to repair it, then the windshield will inevitably fog up. This can only be avoided by opening the side windows - this way, cold air from outside will prevent condensation from occurring.
Heating system elements
The stove diagram clearly shows the location of its main functional elements. It should be noted that the design of the stove on the VAZ-2108, 2109 and 21099 models is the same. Many car owners know that the heater in these models is not fully developed. As a result, the interior is not heated properly, so a decision is made to modify the stove with your own hands. Just in this case, it is important to know the design of the heater so as not to confuse anything.
The design of the stove of the VAZ-2109 car, whether it is a high panel or a low one, is absolutely identical. Therefore, the information presented will be useful to owners of this model with any instrument console.
Knowing the main points and what is located where, you can already try to independently deal with the problems that arise and fix the malfunctions that appear, while saving money and time on trips to the service station.
Basic malfunctions and methods for their elimination
There can be many reasons for the malfunction, here are the most common ones.
Warm air does not flow well into the cabin or does not flow at all
Malfunction of the fan or switch handle - one of the common reasons is a breakdown of the electric motor of the fan, wiring, or switch handle.
Test methods - to check this fault it is necessary; turn on the vehicle ignition, turn the control lever to the first position, listen.
The sound of the fan should be audible in the cabin, if not, then you need to open the hood and listen there. If the sound of the fan is not heard, the reason is in it or the switch.
Troubleshooting - remove the fan motor, check it, if it is fixed, check the serviceability of the wiring and the switch handle and fix the problem.
Malfunction of the air ducts - if the fan is working, but the air does not enter the cabin.
Prevention and care of the VAZ-2109 stove
To avoid problems with the stove in cold weather, it is recommended to periodically maintain the system. Use the following recommendations:
- Clean the radiator from internal contaminants that may accumulate during long-term use.
- Use only high quality coolant. You should not save on such consumables. Low quality products can clog the system or damage the rubber pipes. Accordingly, it is better to use a good antifreeze than to subsequently incur additional expenses on repairing the cooling or heating system.
- Check the thermostat's operation regularly. This device is designed to maintain a certain temperature in the system. If the unit jams, the liquid will not flow into the stove radiator, and the motor will begin to overheat.
- Pay attention to the condition of the fan bearing. From time to time it is recommended to lubricate this element.
What will be needed to replace the stove faucet?
Why is a leak dangerous? Antifreeze constantly leaks from the cooling system, thereby violating the established required volume of liquid. This circumstance prevents the normal operation of the entire power plant.
In most VAZ-2109 models, the heater tap is located opposite the front passenger seat under the panel.
Replacement requires the presence of repair equipment:
- New part (faucet).
- Gaskets included with the faucet.
- WD40 fluid or any other lubricant.
- Wire brush.
- Thirteen and ten socket and box spanners.
- Screwdrivers.
- A container into which antifreeze will drain.
- Coolant purchased in advance.