If you change the heater radiator on a VAZ 2108 (2109 or 21099) in compliance with all recommendations, then before this procedure you must drain the coolant and completely disassemble the dashboard. However, experienced car owners recommend doing the work easier: without disassembling the dashboard and even without first draining the antifreeze. Using the method described below, you can replace the heater radiator on VAZ 2108, 2109 and 21099 with both low and high panels. To carry out the work you will need an assistant.
Troubleshooting
To find the source of a leak in a stove radiator, pay attention to the following points:
- The primary sign of a leak in the interior heating system is an increased frequency of adding antifreeze to the expansion tank. At the same time, it is impossible to guarantee that the problem is in the radiator itself;
- Examine the condition of the heater valve and pipes;
- If the culprit is a faucet, it is not difficult to determine. If there are no unpleasant sweetish odors inside the cabin and the floor is not covered with traces of coolant, then this is definitely not it. The presence of such signs indicates that the stove tap needs to be replaced;
- The presence of deformations and cracks in the pipes can only be determined by visual inspection. Therefore, dismantling work will have to be carried out;
- Having discarded the options with pipes and tap, there is only one option left - damage to the heater radiator itself.
You should not delay repairing the radiator, as this will first lead to the need to spend extra money on antifreeze. A liter of coolant costs about 100 rubles. And over time, the problem will worsen, antifreeze will fill the interior, begin to corrode the floor covering, and cause a lot of other troubles.
Choice
When choosing a new radiator for the stove of your VAZ 2109, you should understand what exactly you want to achieve and what budget you have.
Today, consumers are offered two types of units to choose from.
| Radiator type | Peculiarities |
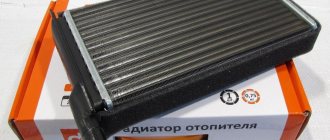
| Aluminum | A relatively inexpensive radiator option, which is characterized by high thermal conductivity. However, such a device cannot be repaired, which is its main drawback. But in practice, repairs are not carried out so often, so few people pay attention to this disadvantage |
| Copper | If necessary and a leak is detected, the copper radiator can be repaired - soldered. Thermal conductivity indicators are slightly higher when compared with aluminum analogues. But at the same time, the price is quite high - both for repairs and for the radiator itself |
Due to unprofitability and high cost, most VAZ 2109 owners choose aluminum radiators. But it all depends on your personal decisions and preferences. When actively using a car in harsh winter conditions, a copper radiator is fully justified.
Copper stove radiator
Part selection
Before replacing, the first thing you need to do is select a radiator and buy it. Aluminum and copper radiators are available on the market today.
Aluminum has the following features:
- low price;
- high thermal conductivity;
- In the event of a breakdown, repair is not possible.
Copper radiators are characterized as follows:
- unlike aluminum analogues, the thermal conductivity is higher;
- If there is a leak, you can always solder the part;
- the cost is slightly higher than that of aluminum analogues;
- The price of repairs is also not cheap.
The high price of copper radiators, as well as low demand, makes copper radiators a rare item that cannot always be found in stores (a small number of manufacturers produce them).
Which one to choose is up to you. In this article you will learn only food for thought, on the basis of which you can make an informed choice. The main thing worth noting is do not buy painted radiators.
High Panel Radiator Replacement with Dashboard Removal
Replacing the radiator on a VAZ-2109 with removing the dashboard will take a little longer than without, but the shelf for magazines will remain intact.
Progress
- Move the front passenger seat as far back as possible.
- Find the dashboard fasteners on the right and unscrew them.
- Pull the instrument console towards you and insert a spacer into the resulting gap; you can use a block of wood for these purposes.
- Close the heater valve and place rubber mats or old rags where coolant may leak.
- Open the hood and unscrew the expansion tank cap. To reduce pressure, close the lid.
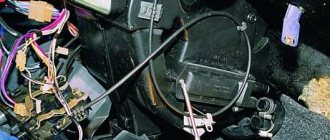
- The radiator is located between the glove compartment and the lower shelf. To avoid spilling the coolant, perform all actions very quickly. In addition, you will need 2 rubber plugs or champagne corks to plug the holes in the hoses.
- Place your hands through the gap in the retracted instrument panel towards the part that needs replacing.
- Remove the lower pipe and immediately plug its hole with the thumb of your left hand, then insert the plug into the hose with your right hand.
- Drain the coolant from the pipe into a prepared container.
- Disconnect the heater element and replace it with a new one. Remove the part carefully: first lift it up, then move it a little and pull it down. This will make it easier for you to remove it.
Radiator Maintenance
Clean the outside of the radiator of dirt, leaves and other debris. Inspect it carefully for any coolant leaks. If you find any leaks, it is advisable to replace it. If everything is fine, rinse it with a descaling agent (available at any hardware or auto store). If such a remedy is not available, use whey or a weak solution (3 - 5%) of sulfuric or hydrochloric acid. Pour the product into the radiator until it is completely filled. Perform this work wearing rubber gloves and safety glasses.
Remember that the chemical reaction will cause the product to bubble a lot, so work carefully. Cleaning time using whey 20 – 40 hours
Cleaning time using ready-made descaling agents or acid solutions is 5 – 10 minutes. After which the liquid must be poured out and the radiator thoroughly rinsed with clean water.
Replacing the radiator on the low panel
The progress of work on replacing the heating system of cars with a low dashboard is similar to models with a high one. However, replacing the radiator does not require moving or removing the front seats.
Also, before starting work, be sure to remove the cover from the steering wheel so as not to damage it when bending the instrument console. The most reliable replacement option is a copper stove radiator; it is the most expensive of all existing ones, but it is the most reliable and in case of damage or leakage, it can be repaired by soldering the resulting hole.
When removing the heater radiator on a VAZ-2109, do not forget about safety, the coolant is hazardous to health, try to protect your hands with at least gloves, and wash them thoroughly after work.
If you have doubts that you will not be able to cope, it is better to seek help from a car service center. But it’s much more pleasant to figure it out yourself and save a couple of thousand rubles.
Heating in the interior of a VAZ 2108 car
Replacing the heater on a VAZ 2108 car
Most often, a complete replacement of the VAZ 2108 heater is not required, and some of its units may not work, which can be repaired or replaced with new ones. If the consumption of antifreeze has increased, steam and a tasty smell characteristic of the coolant have appeared from the breathing holes of the windshield, then most likely the heater radiator on the VAZ 2108 needs to be replaced. The radiator must be replaced if liquid coolant comes out of it.
Advice: the device must be removed and installed when the engine has cooled down.
Checking the radiator for tightness is carried out after plugging the pipes. Then it is lowered into a container of water, and air is supplied to the radiator, the pressure of which is 0.2 MPa. If air bubbles appear from the device within 30 seconds, it is necessary to replace the VAZ 2108 heater radiator.
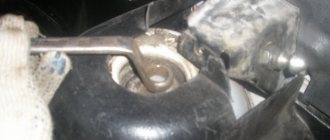
Removing the heater core
- The wires from the sensor that turns on the radiator fan are disconnected.
- The coolant has been drained from the vehicle.
- The battery is disconnected and removed.
Disconnect the wires from the fan sensor
- The same operation is repeated with the lower tube.
- The two upper pipes are disconnected from the radiator.
- The nuts and bolts securing the fan shroud are loose.
- The radiator is removed from the engine compartment, slightly tilting it to the side.
- The radiator cap is removed from the engine compartment. To do this, the cover with the electric fan must be folded to the side.
- The bracket is removed.
- The wire retainer is disconnected from the fan motor.
Radiator removed from car
- Pillows that have lost elasticity or are torn are replaced.
- If the lower mounting pads remain on the locating pins, they will need to be removed.
Tip: Engine overheating can occur due to a clogged radiator. In this case, there is no need to replace the heater radiator on the VAZ 2108. It is enough to rinse the device with water.
You can find out how to replace the heater radiator of a VAZ 21083 by watching the video. If the radiator is not leaking, the cause may be due to a broken faucet. In this case, there is no need to replace the VAZ 2108 stove, but only the heater valve is changed. The cost of repairs will be quite low. Sometimes replacing the VAZ 2108 heater radiator or other components of its components did not give noticeable improvements - the heater does not work well. In this case, it must be completely replaced. Replacing the heater on a VAZ 2108 is easy to do with your own hands. To complete the work, follow the instructions:
- The tap is removed from the front panel.
- The nuts securing the heater valve are unscrewed.
- From inside the cabin under the instrument panel, loosen the clamps and disconnect the two flexible hoses from the pipes located on the heater valve.
- Both hoses in the engine compartment are disconnected from the valve fittings.
Removing the heater tap
- The nuts installed to the right of the heating element are unscrewed.
- The wire is disconnected from the heater resistance.
- The boom is disconnected from the crane boom.
- The heater is removed along with the control panel.
- The nuts are unscrewed from the left side.
- The protective cover is removed from the gear lever from the trim installed on the floor tunnels.
- At the rear of the floor tunnel, a screw is removed to secure the cover.
- When pushed back, the tunnel lining is removed.
- The crane boom support is removed.
- The internal ventilation duct is disconnected from the heater body and pulled out.
- The overlap of the same coating is removed.
Removing the heating element with the control panel
Therefore, they replace the heater on the VAZ 2108. Timely repair of the heating system will create comfort for the driver and passengers of the VAZ 2108 while driving.
Replacing the stove VAZ 2109 high panel replacement
Heater device VAZ 2109
The VAZ 2109 heater is made according to the classical design, without additional recirculation hoses and electronics. It consists of a radiator, heater motor, air blower, intake air duct and cabin air ducts with deflectors. The operation of the engine is regulated by a handle on the panel, where it is also possible to adjust the amount of external air supplied and the ability to distribute the flow of warm air along the contours of the air ducts.
Most often, the heater radiator pipes and the radiator itself fail. A signal to replace it may be an antifreeze leak in the cabin, but this is not a definite verdict. It is quite possible that the pipes were to blame. they have the unpleasant property of leaking at the most inopportune moment, when it is 25 degrees below zero outside the window. But not only leaks can cause poor stove performance. Before removing the radiator of the VAZ 2109 heater, it is worth checking the intake air duct and making sure there is no debris and dust. The car does not have a cabin filter as such, so anything can get into the air duct. In this case, there will be insufficient air pressure and the heating will not work efficiently.
About the reasons for the malfunction of the VAZ 2109 heater
Air locks also became a fairly common occurrence during the first winter starts of the stove. Antifreeze simply does not circulate through the heating circuit, since it is blocked by an air lock. In this case, you need to take measures to remove the plug, and at the same time change the antifreeze and flush the cooling system for the company. It may happen that after 60-80 thousand, the amount of scale in the heater radiator simply does not allow coolant to circulate normally, in this case, if obvious symptoms of a malfunction are not visible, you need to make a decision depending on the mileage of the nine.
If the antifreeze still begins to leak, then first of all it is worth checking the heating system pipes. It's not as easy as it seems, but it's still better than removing the heater completely. In principle, even when replacing the stove radiator, it is recommended to change the hoses for preventive maintenance, so it’s worth buying them too. Since we are already in the store, then we will choose a suitable heater radiator.
How to choose a heater radiator 2109
All commercially available heater radiators are divided into three groups:
- Copper stove radiators. An excellent opportunity to tune the stove, because copper has good thermal conductivity, but the most valuable thing about copper radiators is that they can be restored. If you approach the process of repairing and cleaning a copper radiator correctly, it will last almost forever. I don’t dare call it expensive, because with a difference in price from the standard one of 500-800 rubles, the effect and subsequent operation will confirm its unconditional superiority over aluminum models. A copper radiator is a little heavier than an aluminum one, but compared to the junk that we constantly carry in the trunk, this is not weight.
- Aluminum heater radiators 2109. A good replacement for a copper-brass radiator if the replacement budget is no more than a thousand. This money will also include a lightweight aluminum radiator and pipes with clamps. The bad thing about aluminum models is that they are prone to corrosion, heat up quickly, but cool down just as quickly. Okay - price. For 800 rubles you can buy an average quality radiator, the only caveat is Luzar radiators. In terms of price, they are in the middle range, and the quality of the enterprise floats, as does the equipment. In addition, judging by the reviews, they tend to develop microcracks that are invisible to the eye, but the antifreeze, which will invariably evaporate from their surface all winter, will give the interior a unique aroma and the eternal mystery of “where does the antifreeze go.”
Replacing the heater radiator 2109 without removing the panel
The instructions say that it is necessary to remove the entire front panel, regardless of whether the panel is installed high or low. Of course, we won’t do anything like that. If the car has a high panel, it is enough to simply unscrew all the screws that secure it to the engine shield and the power elements of the body.
You can’t do it yourself, so you need either an assistant or a log of a suitable size. It (he) holds the panel at such a distance from the engine shield that the radiator, previously disconnected from the pipes, just passes.
The radiator passes between the glove compartment and the glove compartment, and the entire operation takes no more than an hour.
Therefore, just in case, keep a couple of logs of suitable size and a good stove radiator in the garage. Don't freeze in the cabin, have a successful and warm winter trip!
Replacement
Before you begin replacing the device, be sure to evaluate the condition of the new unit.
Replacing the heater core can be done using two methods:
- With removal of the instrument panel;
- Without removing the dashboard.
Removing the panel makes the job easy and quite convenient. But you will have to spend at least 6-8 hours on this, depending on your level of preparation.
The second method does not require removing the panel, which makes the procedure more complicated. But it literally takes 2 hours to work.
Most car owners want to do everything quickly, but efficiently. The process of dismantling the panel takes a lot of time and requires careful fiddling with each fastener. Therefore, the best option for most is without removing the dashboard.
That’s why we’ll tell you about it in detail.
To work you will need:
- Ratchet;
- Set of heads;
- Set of screwdrivers (flat and Phillips);
- Container for draining antifreeze with a volume of 8-10 liters;
- Rubber gloves for protection;
- Spanners;
- Garage with a pit.
When everything is ready and you are ready to work, you can begin.
- Get into the hole under the car, having previously turned on the handbrake, placing supports under the wheels and removing the negative terminal from the battery. All in the name of safety.
- Drain the coolant from the radiator by unscrewing the drain plug.
- Next, after draining the antifreeze from the radiator, you will fill the container with approximately 2 liters. Let's move on to the drain plug on the engine. Antifreeze is drained in the same way as from a radiator. A hose with a diameter of 1 cm and a length of about 1 meter can help. All work on draining the coolant must be performed with the engine cooled down and wearing gloves.
- The plug for draining coolant from the engine is unscrewed with a 17 key.
- Loosen the pipe clamps and drain the remaining antifreeze from the stove system. Here you will have to lie down in the cabin with your head towards the engine, since the pipes can only be reached from the passenger side.
How to remove heater radiator VAZ 2109
If for some reason you need to remove the heater radiator on a VAZ 2108-099 car, then the first thing you need to do is drain the coolant from the system; the interior heater valve must be completely open. Then we begin to remove the dashboard. You need to unscrew the bolt securing the damper rod clamp for the glass heating; it is located on the right side of the heater.
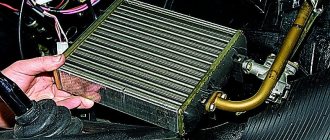
Now we begin to unscrew the three bolts securing the radiator heater, and then we can pull out the interior heater radiator from the housing.
Don't forget to loosen the hose clamps.
Then remove them from the heater radiator pipes. If the radiator is very dirty, it will need to be cleaned with any brush.
If the radiator leaks, it will have to be replaced.
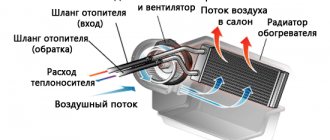
Design and purpose of the heating system
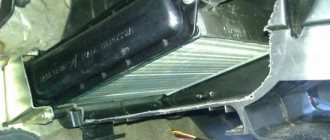
The design of the VAZ 2108 stove and the principle of its operation are quite simple. The heated coolant enters the heater radiator located under the dashboard. In order for the liquid to circulate between the heater radiator and the cooling system, rubber pipes are installed, secured with metal clamps for a tight connection.
In the interior of the VAZ 2108, there are several holes for the release of warm air. Since the radiator is located in the center of the dashboard, and the holes are also located at the edges, a special heater motor is used for uniform air circulation. It has a built-in fan that circulates warm air throughout the cabin, ensuring rapid heating.
The stove motor is considered one of the most important parts of the entire system. The scheme of its work includes:
- additional resistor;
- electric motor rotating the fan;
- switch for the current operating mode.
All these systems, when assembled, provide uniform heating of the interior of the VAZ 2108 car.
Determining faults
We identify a radiator malfunction. The first signal that there is a malfunction is the frequent pouring of antifreeze into the tank. In this situation, it is impossible to say for sure that the problem lies precisely in the radiator. The culprits may be the pipes or tap of the heating system. To isolate the option with a tap, it is enough to check the interior of the car for an unpleasant odor and drops of antifreeze on the floor covering. If there are none, the problem is definitely not in the faucet. To determine the condition of the pipes, gain access to them to visually inspect them. This way you will understand whether they are leaking or not.
If there are no problems as such, the problem lies in the radiator. The problem must be solved quickly enough, since antifreeze can get into the interior and ruin the carpeting.
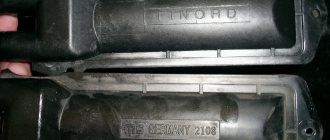
VAZ 2108: why is the heater replaced?
Heater - right view
Heater - left view
To ensure an average temperature inside the vehicle of plus 20°C, even at an outside temperature of minus 20°C, an internal heater is provided. General view of the device in the photo.
- 4 – heater control panel.
- 3 – damper rod for heating the windshield.
- 1 – fan.
- 2 – radiator.
- 5 – resistance of the heating system.
- 4 – heating tap.
- 1 – damper rod, used to control the heater.
- 3 – draft for opening and closing the heating tap.
- 2 – damping rod for warming up the legs.
- Air is supplied to the cabin and side windows through the right and left sides and two vents in the center. Fins with polyurethane foam seals are installed in the body of any nozzle. The ventilation intensity is changed by opening or closing the damper.
- The heating tap is connected to the cooling system with rubber hoses. A system of levers with handles controls the flow of hot air into the cabin.
- The heater is mounted in the passenger compartment under the instrument panel. To do this, four bolts are welded to the air intake box, and the heater body is secured to the car with nuts.
- Exhaust ventilation is used to draw air out of the body. On a VAZ 2108 car, air enters the cavity of the central pillars, then passes through rubber air ducts, then enters the holes located in the rear of the cabin and exits. This is due to the vacuum created at the rear edges of the B-pillar trim when the vehicle is moving.
- Forced air supply into the car interior is carried out by an electric fan, which is fixed in the upper part of the heater and can be removed from the engine niche for repair or replacement.
- The interior is heated by air, which is heated in the heater radiator. The latter in the engine cooling system is connected in parallel to the main radiator.
- Heated air is supplied to the cabin through a system of air ducts attached to the bottom of the dashboard. To prevent leakage of hot air, the heater with air ducts is sealed with gaskets.
- The heater consists of plastic covers - right and left, connected around the perimeter with brackets for fastening. To seal the sleeves, a special tourniquet is inserted into the grooves.
Step-by-step process for replacing a stove radiator
So, how to replace a radiator using the example of a VAZ-2109?
The work can be carried out using two methods – with removal of the dashboard and without dismantling the device. The first option involves an easier process that will take about 6 hours. In the second, everything will be somewhat more complicated, but the time spent will not exceed two hours. It's quick or easy - it's up to you. We will tell you how to replace it without disassembling the car dashboard.
To get started, prepare the following tools:
- two screwdrivers - cross and flat;
- ratchet with a set of heads;
- any container with a volume of up to 8 liters so that the coolant can be drained;
- rubber gloves to avoid chemical burns;
- spanners.
It is recommended to carry out work in a garage with an inspection pit.
After everything is prepared, you can begin replacing the heater radiator on a VAZ-2109 car. Following our recommendations, the process will not seem so difficult.
Let's start:
- Put on gloves and climb into the inspection hole. Unscrew the radiator cap and drain the liquid into a container. To simplify the process, take a hose 1 m long and 1 cm in diameter.
- After all the liquid has been drained, it should be about two liters by eye, it is necessary to drain the coolant from the engine cooling system. To do this, just find the appropriate plug on the engine and do everything in the same way as with the radiator. The button is unscrewed using a key with a diameter of 17 mm.
- At the next step, the pipes of the clamps are lowered and the remaining antifreeze is drained from the heating system. To do this, you need to get to these nodes from the salon and carry out this procedure. It's easier to do this from the front passenger seat.
- After draining all the antifreeze, proceed to dismantling the radiator. First, remove the screws that hold the front panel in place.
- The next step is to remove the screw on the back wall of the glove compartment and the screw located next to the passenger side rear view mirror.
- Once all the screws are removed, the front panel should move up/down freely. To simplify the work, lift it up to the maximum and place a 7 cm block under it.
- Place your back on the passenger seat mat and unscrew the 3 screws that hold the heater in place and remove it.
- At this stage, cover the new radiator with rubber band and put it in place. Be sure to clean this area before installation.
- Final step: Reassemble the entire system in reverse order. This should no longer cause additional difficulties.
Once all work is completed, fill the system with antifreeze (coolant). It is advisable to fill in fresh liquid, but you can also use the one that has been drained. Fill to the “max” level on the expansion tank. After this, start the engine for about 15 minutes, then add more fluid.
This completes the process of replacing the heater radiator in the VAZ-2109 car.
Dismantling process
- After draining the antifreeze, you can begin replacing the radiator itself.
- Remove the screws that hold the front panel in place.
- Unscrew the fasteners located on the rear wall of the glove compartment.
- You also need to remove the screw, which you will find near the side mirror on the passenger side.
- Once these fasteners are removed, the front panel will move freely up and down on the passenger side.
- To make your work easier, lift the panel as high as possible and insert something like a wooden block into the resulting gap. Usually you need a stopper about 7 centimeters thick.
- Lie on your back on the floor on the passenger side, unscrew the three fasteners that hold the heater in place. Get her out. The radiator has been removed.
- Apply a rubber seal to the new unit and insert the device in place of the old radiator. Don’t forget to clean the unit’s landing site first.
- Reassemble the unit.
- Fill the system with old or new coolant. This is an excellent reason to change the antifreeze if the old one has been in use for a long time.
Antifreeze should be added sequentially. First add fluid to the reservoir up to the MAX mark. After this, you need to start the engine so that it runs for about 15 minutes. The antifreeze level will drop, and you can add the missing amount.
The work is completed. The old radiator is recycled, the interior is tidied up and you can enjoy the result.
Didn't find the information you are looking for? on our forum.
We recommend reading:
The dimensions of the VAZ 2114 have disappeared
How to increase the charging of a VAZ 2110 generator, increase the voltage by soldering a diode
How to remove the fuel rail on a VAZ 2112 16 valves
How to connect the stove to a VAZ 2106, do-it-yourself replacement, step-by-step description
DIY podiums at VAZ
Replacing the CV joint on a VAZ 2114
Why does the low beam not work on the VAZ 2106?
VAZ 2114 how to change a headlight on a car, choosing optics, replacing a rear headlight, replacing glass on the front...
How to change the heater radiator on a VAZ 2109 which has a high panel
The stove on any car, including the VAZ 2109, is designed to heat the car's interior during the cold season. Malfunctions of this unit will lead to less comfortable driving, so the driver in any case needs to be aware of possible breakdowns and how to eliminate them. We will tell you more about this below.
Where is the heating system on the domestic nine? How to disassemble and remove hoses for repair, for what reasons may the device stop working? If the VAZ 2109 stove does not heat up, first of all you need to understand the reasons why this is happening.
Radiator device for heating system
Causes
If the VAZ 2109 stove stops working, there may be several reasons for this:
- The stove fan does not work. According to the connection diagram, the problem may be an inoperative fan of the heating device. Sometimes the cause is a failure of the fan switch itself or broken and oxidized wiring.
- Another reason why the VAZ stove does not work may be clogged air ducts. They can become clogged with leaves and other debris that falls on the car while parked. Sometimes the VAZ stove does not heat up due to closed air duct dampers.
- On a VAZ 2109, the heater may not heat up due to the radiator; this problem is one of the most common. The heater radiator of a VAZ 2109 or VAZ 21099 may be clogged with dirt, which is why antifreeze cannot circulate through the system. In some cases, the problem is a heater faucet that does not open, or this may also be due to the refrigerant level in the cooling system being too low. If there is an air lock in the system, this will also lead to insufficient heating of the vehicle interior. If the radiator of the VAZ 2109 stove is working normally, it is possible that the power unit simply cannot warm up to operating temperature. Much less often, the reason for the inability to heat the interior is a broken pump.
Heater valve for nine
Remedies
How to disassemble the heater on a VAZ 2109 and how to fix the problem?
Basic recommendations:
- First of all, you need to check whether the ventilation device of the circuit is functioning; to do this, turn on the ignition and the interior heater, first at the lowest power. If the device is working normally, this will be audible. Before removing the stove for repairs and changing or blowing out the pipes, you need to make sure that the fan is out of order. Try cleaning the contacts connecting the power wires - sometimes their oxidation makes the element impossible to operate. If, through diagnostics, you have discovered that the ventilation device is working, but it still does not turn on, the problem should be looked for in the wiring.
- The next stage of diagnosing the VAZ heating system will be checking the air flow. Turn the heater on to maximum and check how well it blows from different air ducts - onto the windshield, side windows, and into the feet. If the fan is functioning and there is no good air flow from the air ducts, it is necessary to diagnose the blowers themselves - perhaps they are simply closed.
- The radiator may not work only because antifreeze does not pass through it. As a rule, this is due to the fact that the system is simply clogged due to the use of old consumables in it, in which sediment has formed, collecting in the stove pipes. So first you need to drain the consumables from the system and flush it, in particular the pipes, from sediment. Fluid for flushing pipes can be found at any auto store. The purchased product is poured into the cooling system, then the engine is started, which must run for a certain time in accordance with the instructions. If, after draining the flushing agent from the pipes, you notice dirt and sediment, this indicates the need to fill in new antifreeze. Replacement of pipes occurs in cases where the flushing agent cannot remove all the sediment from the system, which is firmly lodged in the lines. If the radiator device is clogged, there is no other way out other than replacing the radiator of the VAZ 2109 stove.
- The valve of the VAZ stove, as practice shows, is one of the weak points of the circuit. The heater valve is opened and closed by installing a regulator on the panel. This regulator is connected to the tap through a rod. If the thrust is very weak, you can try to adjust it. The VAZ stove valve is replaced if the element does not respond to adjustment.
- If the problem of unit inoperability is due to a low level of antifreeze in the system, it simply needs to be replenished. But at the same time, you should determine the reason why the leak occurred so that this problem will no longer bother you in the future.
- As stated above, the problem may be that the engine does not warm up to the desired temperature, usually due to a failure of the thermostat.
- The unit's electric motor has failed. A breakdown of the VAZ heater motor will make it impossible to heat the car's interior. If the mechanism fails, the issue can be resolved by replacing the heater motor (the author of the video is Pro Remont).
Principle of operation
Air from outside the car is forced into the cabin using a fan preheated by the radiator. In turn, the radiator must be warm enough, otherwise cold air will enter the cabin. The principle is this: the longer the car engine runs, heating the coolant, the warmer the air entering the cabin will be.
The air distribution inside the car is as follows. The initial flow goes directly to the passenger and driver footwell windows and also goes to the panel. Some of the flow is delayed due to the location of the shock absorbers, and the air is slightly cooled. Consequently, cooler air is supplied to the windshield than to the passenger compartment.
The efficiency of the stove is 20 degrees below zero, while it is operating at maximum, the interior will heat up to 20 degrees with a “+” sign, and the temperature in the foot area will be 5 degrees higher.
Furnace modernization
Heater (external)
If you are not satisfied with the operation of the stove in the VAZ 2108, you can try to modernize it. To do this, it is not necessary to change the radiator, pipes or anything else, but simply buy sealant and fiberglass, literally a square meter.
The slab must be completely disassembled at the base. Thoroughly rinse all its parts and proceed to sequential assembly. Pay special attention to the case lug as it breaks quite often and may need to be replaced. After inserting and gluing all the flaps, fill the seams with sealant. Glue both halves of the film and wait for the sealant to set. Next, assemble the internal parts of the oven. After assembling the stove, we cover it with fiberglass. This will increase the temperature in the cabin by about 5-10 degrees.
This modification was taken from a VAZ 2108 car, on which a low panel was installed. So with the regular figure eight type this method works great.